After not having AC for the past 10 years, this summer has gotten to me and I wanted to get everything working again. This was somewhat of a project for me having never touched an AC system before, so I figured I should write up my notes to keep people from the same mistakes I made.
Supplies
Steps
Supplies
- R12 to R134a conversion fittings (I had big issues with these):
- R134a systems use quick connect valves that don’t connect directly to R12 systems. These conversion fittings screw onto the R12 valve stems so that R134a quick connectors can be used with the existing system. On the FJ62, the high side is closer to the passenger wall and the low side is closest to the motor. Inside each valve stem is a schrader valve, the little bit that depresses to let refrigerant in or out.
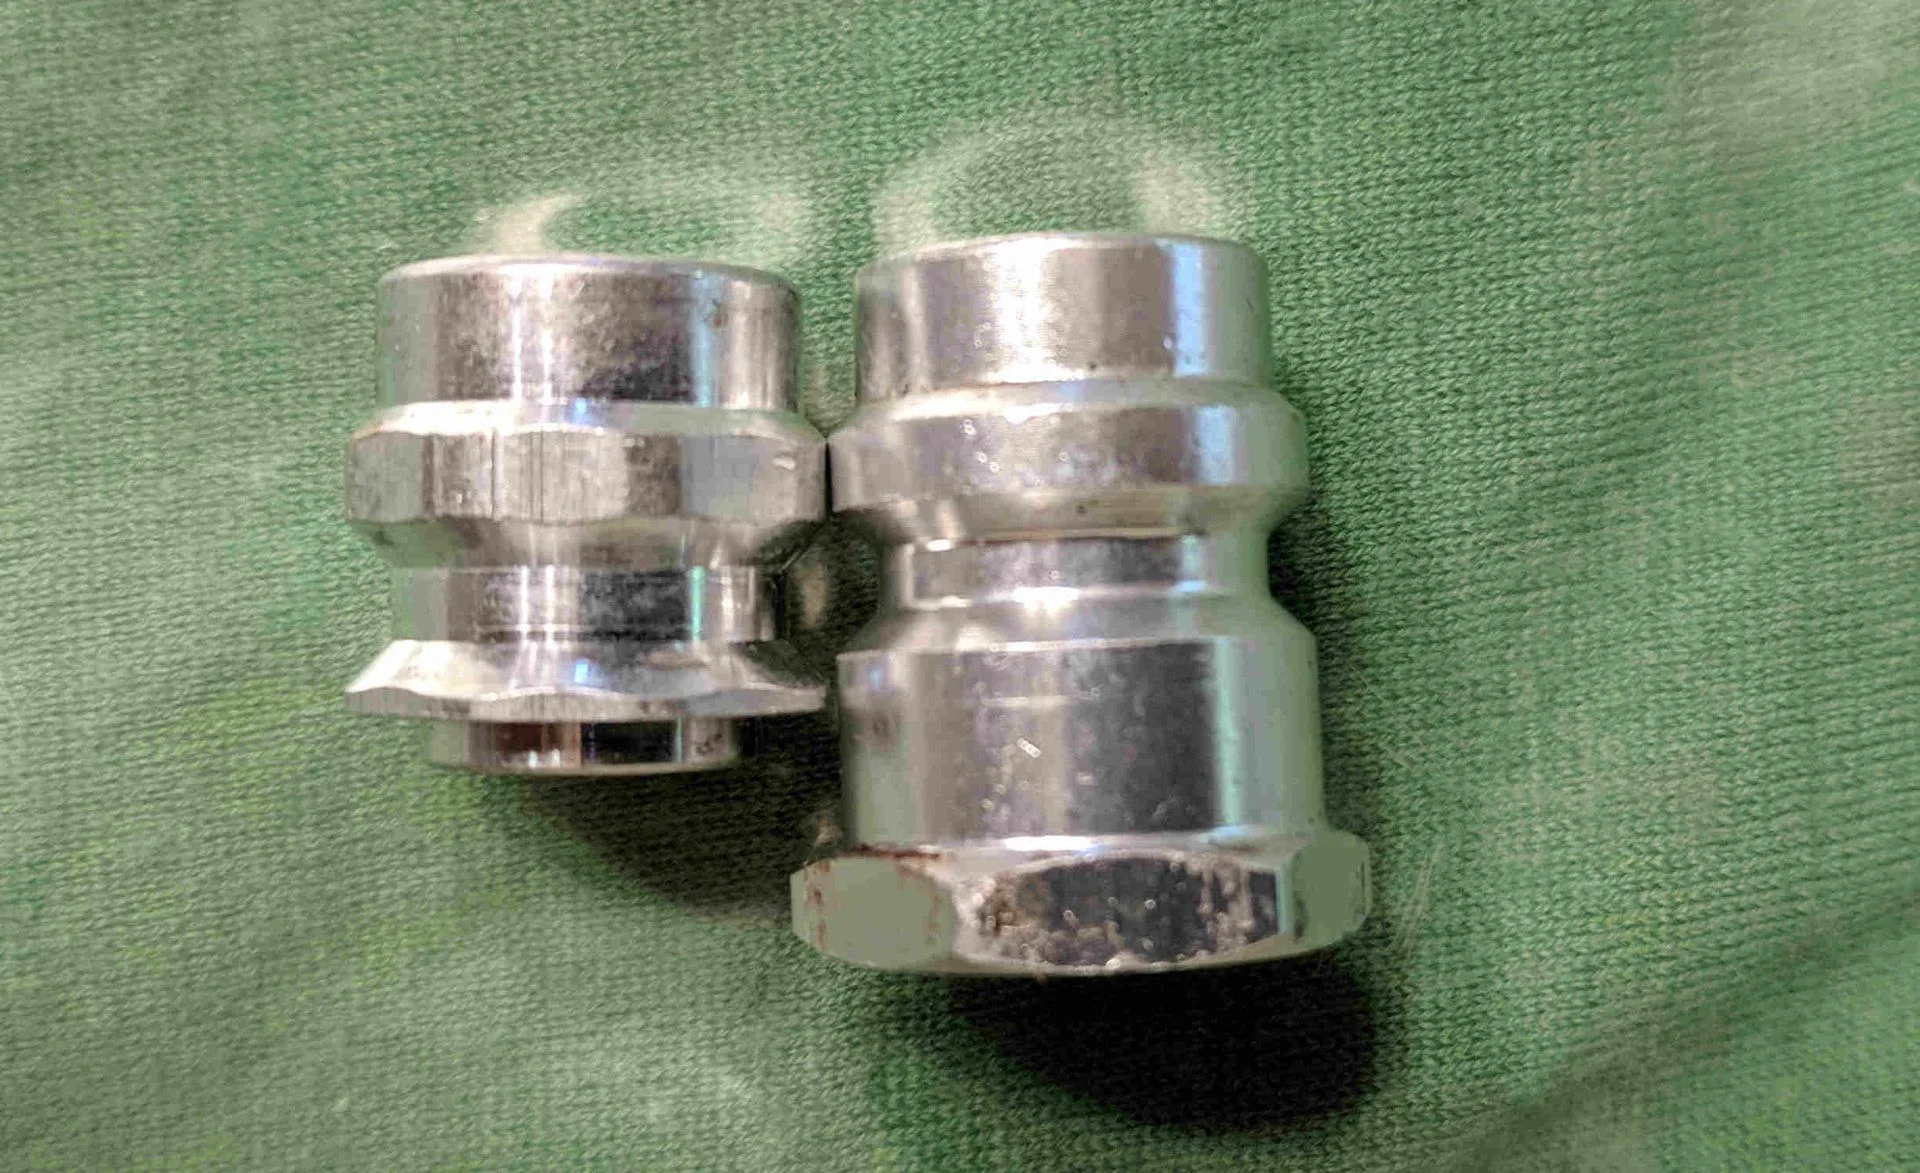
- Look at the conversion fittings you buy carefully. First, many adapters come with their own schrader valves in them, requiring you to use a valve removal tool to take the schrader valves out of your original valve stems before you screw the new adapter down. This prevents you from running into a situation where one valve is pressing into another. Mine came with a schrader in only the low side, so I removed the schrader core from the valve stem on my compressor. Second, the most common adapter sets sold at auto part stores have a high side adapter that is too long and will not screw down as far as it needs to. When this happens, the quick connect will not depress the schrader valve all the way, leaving the valve closed and preventing you from vacuuming or recharging. You need to find a shorter one or one with its own valve. I found a short one on Amazon without a valve. Take a look at the image below, the adapter that is too long is on the right, the short version which fits is on the left.
Two sizes of AC high side adapters
Get the smaller size for an FJ62. The larger side will hit the manifold and the new quick...
- O-rings
- Kits are cheap everywhere and come with a bunch of different sizes
- Put oil, or even better Nylog Blue (blue is for 134a systems), on them before putting them in.
- 3 for the condenser, 1 driver side, 2 passenger side
- 2 for the receiver drier
- 4 for the 2 hoses from the firewall to the compressor and drier
- 1 for the hose from the compressor to condenser (I already counted the other side of the hose in the condenser count above)
- 2 for the expansion valve
- Sorry if I forgot any
- Expansion Valve
- I grabbed TEM 207306 from NAPA
- I believe the Denso part is 475-0101.
- The Denso 475-2087 listed on RockAuto is not the correct part. It has an extra port that doesn't connect to anything.
- Receiver drier
- You need a new one. Driers can't be flushed and will have old oil in them. The desiccant is probably used up anyway.
- Compressor
- Stock is a 10P15C. I grabbed a Four Seasons model 68302, Denso makes the OE. Mine required that I pull the upper manifold off the old compressor - make sure you mark down the direction when you replace it (valve cores should be pointing away from the flywheel). Depending on what oil comes in the compressor (four seasons comes with a shipping oil, not sure about the Denso) you probably want to drain the oil in the new compressor by flipping it upside down with the manifold off and spinning the flywheel a few times. Then replace with PAG 46 oil.
- Evaporator
- If you need it, I kept mine.
- Condenser
- Again if you need it. Mine stayed.
- Belt
- I grabbed an ACDELCO 17470
- System flush
- I rented a flush kit from Autozone that hooked up to a small compressor I bought at Harbor Freight. You can also get stuff that comes in a can at any auto parts store. I flushed the evaporator, condenser, and the two lines from the firewall to the compressor and drier. Make sure you vacuum the system for at least 30 min after using this stuff to get it all out of the system.
- Manifold guages
- I rented a set that was gummed up with oil. It took me 2 days to figure out that was the problem. Buying a new set at Harbor Freight was $50 and probably worth it considering the money your saving doing this yourself.
- Vacuum pump
- Available for rent at auto stores or for sale at Harbor Freight
- PAG 46 oil
- The system uses 5.5 oz. I added 3.5oz to the new compressor and 2oz to the receiver drier.
- Note that if you're looking at the Technical Service Bulletin, it says to use 100cc (3.3oz) - this assumes you kept your old compressor and already have oil in the system.
- R134a refrigerant
- The Toyota Technical Service Bulletin calls for 800g (28.2 fl oz) of r134a refrigerant.
Steps
- Remove the cooling box and disassemble. Just getting this thing out is a bunch of work it helps to loosen the lower vent to get it out of the way.
- Remove and flush the evaporator core with flush solution, then with dry air (fancy people seem to use nitrogen) to get the flush out.
- Replace the expansion valve.
- Reassemble the cooling box. I found some 3/4in wide by 1/4in thick polyfoam at ACE hardware which seemed to be a drop in replacement for the foam on one side of the cooling box if you tear it up too much.
- Remove the compressor and receiver drier. I didn’t have to deal with getting the belt loosened as my AC belt had been cut off. You’ll have to pull the battery and battery tray to get the compressor out.
- Flush the lines from the firewall to the compressor and drier with flush then dry air
- Flush the condenser with flush then dry air
- Install the new compressor and receiver drier (add oil to the drier if you didn’t put all 5.5ccs into the compressor), and reinstall the cooling box. Put nylog blue on the screw threads and o-rings during reassembly.
- Vacuum the system for at least 30 min. I went overboard and did it for 2 hours. Let the system sit overnight to confirm you don’t have a leak.
- Tighten the AC idler pulley. I admittedly had to take it into a shop for this. The tightening bolt is accessed from underneath the car. You need a really long extension and socket. Turn counterclockwise to tighten. Remember to loosen the nut on the front of the pulley before adjusting.
- Charge the system and enjoy your AC.
Last edited:
