fj60 deformed heater pipe...how many banannas?

This site may earn a commission from merchant affiliate
links, including eBay, Amazon, Skimlinks, and others.

Joined
May 6, 2011
Threads
76
Messages
1,375
Location
Box Elder County, UT
Gentlemen,

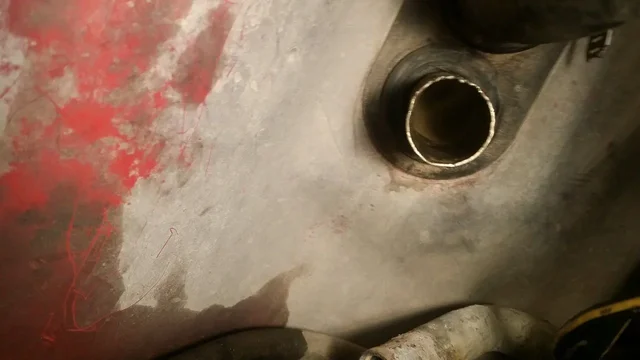
after rebuilding the radiator I developed a leak in one of my heater hoses going into the firewall. I pull off the hose to see this :eek: So I guess I'm wondering two things:
What am I gonna see on the other end of this pipe, and what is it gonna take to get to it? I assume this isn't part of the heater core, it just leads to it?
Can any of you backyard mechanics think of a solution that doesn't involve ripping my dash apart and spending who knows how much $$? 84 FJ60
20151218_124709.webp 20151218_124759.webp 20151218_124823.webp
As always, thank you MUD
Drew
 
Last edited:
not looking good. apparently the pipes are NLA and to get to them from the inside would be about as much work as doing the whole 2FE.

from this thread: Pics for replacing heater core?
Drew, are you saying that Toyota doesn't make the tubes anymore?! [Rigger puts head in hands] Yeesh, if the tubes need to be replaced, you'd about have to buy another Cruiser to get 'em. No one parting out a Cruiser would be willing to go thru all this just to sell you the tubes for $10 plus shipping!

Ducks, the pics are great. Thanks for educating me. How do the tubes connect to the core? Give us some close-ups of that.

Thinking aloud, what if I put some JB weld on the outside of the pipe and shaped it round by spinning a hose over the pipe or something? any other thoughts? anybody wanna come and swap it out for a large ice cream shake?
 
Yes, the other end is the heater core pipes. But taking the heater core is an awful job, but not difficult. Just a lot of stuff to remove before you get to the heater core itself.

I would take a punch and see how round you can get that end I see. The copper is pretty malleable, and I'll bet you can get it plenty good.

What screwed it up that bad? Did you do that while pulling the hose off, or was it like that before?

Dan
 
I know it's kind of redneck but I guess if you absolutely don't want to tear into your dash, you could find a slightly larger I.D pipe section and cut it and like you said JB weld it over the two pipes to connect them, just like PVC for landscaping...I know that insults perfectionists but...just a thought
 
I remember it being deformed, but it seems worse than before. If you look close you can see that it's not just the end of the pipe that mis-shaped either, most the whole stub is out of round.

HOWEVER.

Y'all are about to see some at-home engineering at its finest. Stay tuned...:idea:
 
It's soft thin brass pipe. I'd try shaving a wooden dowel to a snug fit and gently tapping in to 're-form' the end of the pipe.

That deformation happens, usually, when someone uses a screwdriver to pry off a stuck heater hose. Much better: a single-edge razor blade and two slices and it's off.

Good luck.
 
start hunting for used parts online and in any local salvage yards to see if you can acquire a good used heater pipe replacement. Or...you'll have to rig up something....like braided hose or whatever it takes to make the connection with the heater core.
 
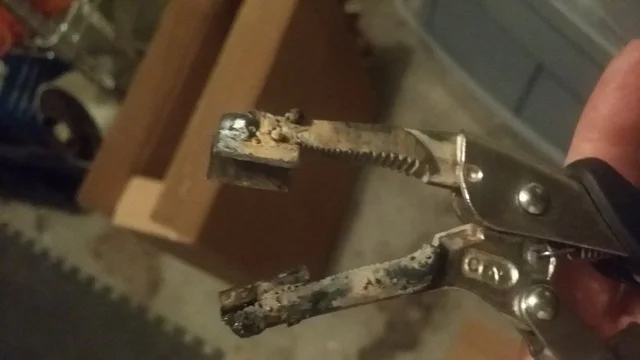
Depending on what's laying in your garage, this tool is free. 15 bucks if you buy everything. 20151218_190137.webp 20151218_190129.webp
work your way in on the edge of the deformation, alternating sides, towards the middle then front to back. once it's reasonably in shape gently squeeze the handles and spin it around the pipe, feeling for small divots and working them out as you find them. Then (and this is why you use vice grips instead of pliers), back out the set screw so that you can lock the handles with a very loose grip. with them locked into place, continue to rotate the grips around the pipe, gradually setting the "squeeze" tighter. the tool will smooth out on a fine level the smaller imperfections and...
20151218_214732.webp 20151218_214701.webp
Voila! End result not perfect but a HUGE improvement. Nearly perfect. I was sure to warm, stretch, and pre-soap the new hose so as to ensure minimal stress on the poor thing, and I slid it on all the way to the firewall. then I used two hose clamps on that end just in case one didn't seal perfectly. Again, not too tight, don't want that copper to break or anything. passed the running in driveway test, will take it out tomorrow and see how it does. Thanks for your help and ideas, always appreciated.
 
Last edited:

Users who are viewing this thread

Back
Top Bottom