
Look at postings 1 and 2 on the previous page.
You're on the wrong side.
Rudi
You're on the wrong side.
Rudi
Follow along with the video below to see how to install our site as a web app on your home screen.
Note: This feature may not be available in some browsers.
This site may earn a commission from merchant affiliate
links, including eBay, Amazon, Skimlinks, and others.
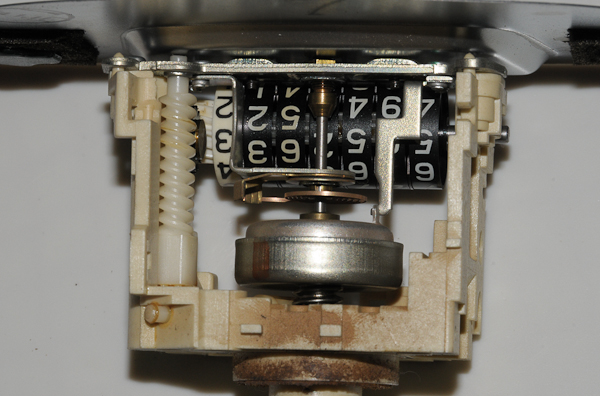
Could you email me this procedure with photos. I have tried to copy it and no luck.Many here have seen or experienced the symptoms of the odometer not turning over properly. Usually the minor (tenths) wheel still turns over correctly but it does not increment the next digit. The most common cause for this is the lube on the odometer becoming old and sticky. My 84 BJ42 had this problem and over the past few days I have stripped, cleaned, lubed and reassembled my odometer. I'm not saying what I have done is the best way or that it is even perfectly correct, but my odometer now works great. I took a lot of pics during the process and will post them in case it helps someone else. If you go through this and see any errors or want to add something please feel free, actually it would be appreciated!
How it works:
The speedo cable drives a shaft which powers the speedometer through a rotating magnet and calibrated spring (look on wikipedia for "eddy current speedometer) to give the correct speed reading. Also attached to this shaft is a worm-gear which drives a series of gears which turn the odometer "tenths" wheel. This wheel has a notch so that for each revolution it will trip the next wheel to increment by one. And so on. There are pictures further down which illustrates how this works for the odometer on my truck.
These moving parts are lubricated for obvious reasons. After 25+ years this lube has dried up on my odometer and has become a sticky gunk - I was really very surprised at how sticky - it was almost like glue. The bugger was that it was not just on the shaft but in-between the wheels as well. Safe to say, my truck has probably done a few more kilometres than is reflected on the odometer - no way those wheels were going to move!
What you will need:
1. Good light
2. Clean workspace to spread the bits around, and preferably a soft cloth to avoid damaging the speedo face plate
3. Electronic cleaning solvent - that won't attack plastics
4. Good quality grease - no melt type
5. Small philips screwdriver to remove black faceplate retaining screws - plastic-type would be good to avoid scratching the black screws
6. Small flat screwdriver and needle-nose pliers - to remove the cir-clip and the odometer shaft retaining pin
7. Soft and clean cloth to wipe off old gunk and excess lube
8. Earbud - to help with getting lube into the hard-to-reach places (I'd prefer a foam type to avoid having to remove the fluff that the cotton buds leave behind)
9. A rod/screwdriver/wire to put the cogs on when you are not working on them - just reduces the risk of losing the bits
10. A pencil and paper to note the odometer reading so that you can put it back (unless you are going to reset it to 000000.0)
11. Some time and patience

If you want it really bright.....
Remove the bulb covers and the gauge covers.
Paint the inside cluster and the back of the front panel white.
Upgrade your light bulbs to 5 Watts.
View attachment 763663
NOTE: clean the little square behind the FUEL gauge from the paint.
This is the GROUND for the FUEL gauge. (RED square in the pic).
View attachment 763664
Rudi
View attachment 763663View attachment 763664
Assembly and lubrication
I applied grease to the shaft, the small cogs, the sides of the wheels, and a very light coating on the metal discs (just rubbed it with greasy fingers) Not sure about the wisdom of that - time will tell if I over did it. You can always wipe the surface of the wheels after it is assembled so don't be too worried about greasy numbers yet.
Reassembling the odometer wheels and shaft is just a reverse of dismantling. There are a few things that you want to keep in mind though. The small cogs on the metal discs have sixth teeth each, with every second tooth being shorter. This mates to a raised ring inside the adjoining wheel - it is subtle but be sure that it all fits nice and flush. It is easier to set your odometer numbers correctly before re-fitting the cir-clip. (You can, but it involves a bit of turning and fiddling!) The numbers displayed between the two rows of lugs on the discs is what will show through the speedo window.

Before fitting the odometer assembly, lube the worms, gears, and cogs inside the housing. The earbud helps to spread it into the grooves. I used a cordless drill (in reverse) with a square torx bit to give the gears a run, then adding/spreading more lube as necessary. Wipe excess lube off the numbers before continuing.
Fit the odometer assembly by putting the right side of the shaft into the hole, aligning the shaft groove with the housing gap (on the left side in the pic below), ensure that the lugs line up with the metal bar on the housing, snap it in, and slide the shaft to the right. Re-fit the retaining pin and fasten the faceplate screws.
Note that the odometer assembly can physically fit on the other side of the housing - but it should fit on the side with the black gear otherwise your numbers will be upside-down and your odometer won't work (ask me how I know!)

Last steps for me were to clean up any extra lube, double-check that everything was installed correctly, and run it on the cordless drill again to check that the odometer would tick over properly. Now just to give it a quick wipe, replace the foam around the indicator lenses, and refit into the cluster.

")
The black thing is the socket that holds the bulb.Rudi, where would I find 5 watt bulbs? These originals look to be one piece bulbs and I'm not even sure what to call the whole thing (bulb plus seating that inserts into the cluster holes).
The black thing is the socket that holds the bulb.
Turn it 1/4 counter clockwise and pull it out. Pull the bulb out of the black socket.
Go to any auto parts shop, show the bulb and ask for a 5Watt type or order from CCOT (expensive!).
Rudi
There's a lot of resistance. I feel like I'm going to bust the bulb inside it if I hold it any tighter to turn. That's why I thought maybe it was one complete set-up. I'll try some lubricant and see if that helps.
Nice! (but as you say--expensive) Hopefully, I'll be able to pull those bulbs out of mine.
hi guys , these lamps are the w5w 5w 24v socket w2.1 x 9.5d t10 I THINK THEY ARE very cheap purchased in every car/truck store
Just tried unsticking mine today and it is like yours with seems like non removal bushings on both ends. Tried to remove either with no success. Spayed pb blaster on all wheels as they were stuck on shaft but could not really clean the gears between the wheels. Seems like it might work a while. Have you found an alternative fix for this? ThanksI have the brass bushing on both sides, and I cannot budge either side. I took odometer out a second time last night to try and clean, but it is still stuck on the 1/10ths. I put in an ultrasonic jewelry cleaner with simple green concentrate since I cannot disassemble. If anyone knows how to remove the brass bushings that appear to be crimped on, please share. I know I will end up breaking something from taking everything apart over and over. Are the numbers/odometer unobtanium? Thanks.
Thanks for this very clear guide. Now to put it back in the truck and see if it works!Disassembly and cleaning
(assuming that the speedometer has already been removed from the cluster housing)
The odometer shaft is held in place with a retaining pin - see vertical silver pin on right side of the white worm gear in the picture below. Once this pin is removed (lift it straight up) the odometer shaft slides to the left and pops out of it's base. However, to remove this retaining pin you will need to loosen the speedometer face plate (it will be easier if you can take this plate off completely, but I was afraid to remove the speedo needle, so I only loosened the screws and moved the plate)

Now that the odometer shaft is loose you will need to remove the little cir-clip before taking the wheels off. For the first time in my life the cir-clip did not go flying across the workshop.

I used a spare piece of steel as a temporary "shaft" to keep all the bits together and in correct order. You will notice that there is a thin metal disc with a tiny cog between each wheel. These tiny cogs are not fastened to the disc, they simply sit on a small pin - and they are tiny so be careful not to lose them.

I used the electronic part cleaner to clean each disc, cog, wheel and shaft of all gunk and dust. Actually I did this twice, wiping each item with the cleaning cloth and leaving to dry for a few hours before doing it again. I cleaned the holes and also cleaned the sides of the wheels and cogs, as mentioned earlier they were sticky. The speedo plastic housing was a bit harder because I left the face plate on - so it was a bit time consuming, but cleaned as much old lube as I could from the worm gears (If you've left the face plate on be careful not to get old/new lube or parts cleaner on it)

")