Extended cab 45 SWB from a 40 (1 Viewer)

This site may earn a commission from merchant affiliate
links, including eBay, Amazon, Skimlinks, and others.

Bed mounts and bumpers wanted to occupy the same space, but I'm mostly happy with how this turned out. Those big holes are for the combo LED tail lights and I'll have backup and rock lights in the open space next to the rear cross member.


I welded 3/4" square tubing on to the door frame I cut from hard top side panels. I need to widen the channel, but this is how the soft top will connect to the door frame, close to FST style.


I REALLY wanted a snorkel on the left side of the truck and since I'm running a Vintage Air heater I don't need the heater intake vent. So I cut some 14ga and took 3.5" exhaust tube and went to town. Turned out pretty slick.


I need to get one of the inside pipes bent at the exhaust shop and make a mount for the filter but the intake for the motor is pretty much done.


I'm still working on how the radiator and coolers are all going to mount. I think everything will fit as it is now, but it's VERY tight up front and I still need to stick a power steering cooler somewhere. I used some 3/8" allthread and cage tabs to brace the radiator on each side. Passenger side is easy but the PS gearbox and pump are making the driver side tight.

I need to finish up the driver side 3/4" square tubes, weld caps on the half doors and then finish weld all of the cage tubes. I cut a 14ga piece to cover up the giant hole in the dash and I'll cut holes in that for the HVAC controls and the radio head. Once this is done I'll be cleaning everything up and getting ready to paint it. I planned it out and should be able to get it painted and wired by the time kid two shows up in October....should be able to.

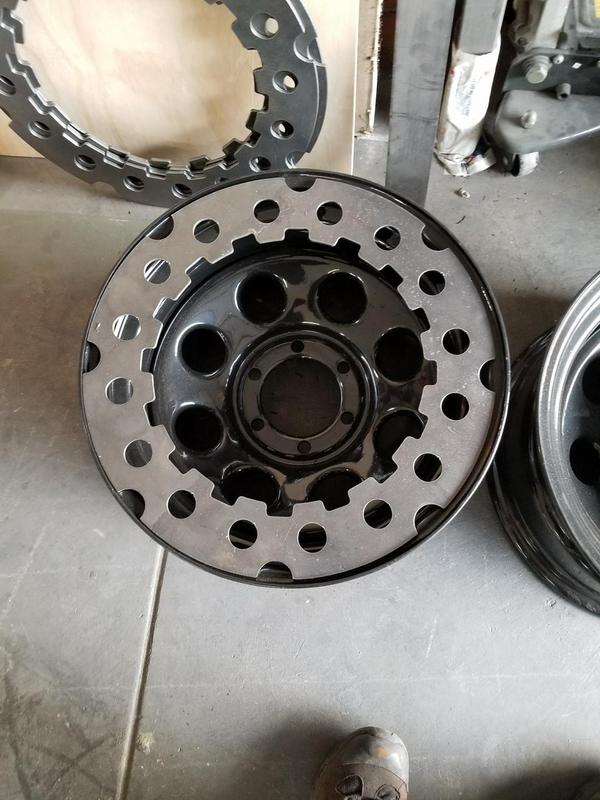
The wheels and tires on the front are what I plan on running to start, 315/70/17 on FJ cruiser steel wheels. I have 4.10 gears in the axles now, but would like to go 4.56 or 4.88 and 37" tires in the future which will probably require a spring over in the rear at least....will see.
 
Got the first coat of primer on it this weekend. Went with Summit low VOC 2k epoxy. When the epoxy dries I'll do a little bondo and then shoot some urethane primer/sealer over that. I did find that painting an integrated cage/body sucks! I think for the final color I'll paint from the bottom up and cover the cowl and hood so I don't get overspray texture. When I painted top down I got lots of overspray from trying to get all the different angles of the cage...I could always paint each part separately but I don't have the space.


Goal is to get the bondo done on Friday and then spray the sealer on Saturday morning. Followed by the first couple coats of OD Green on Sunday. Then Monsta Liner the bed and inside the cab and roll it outside to dry while I paint the windshield frame, bib and doors in the garage. I'd like to start assembling it in a week or so. The electrical system is a universal harness with mostly original Toyota switches. I'll be running dual batteries under the back seat and a second bus for lights and such.
 
Amazon. It's a Specter 4" cartridge filter. 4" to 3.5" 90-degree elbow is from Silicone Intakes. Can get part numbers if you need.
 
I'll look it up, but #'s are always good, trying to hook up my snorkel to get cold air intake and that can is exactly where my air filter sits. My snorkel is on driver side so I have to run a pipe across firewall but its doable. I think it will bring engine temps down a bit.
 
I'll look it up, but #'s are always good, trying to hook up my snorkel to get cold air intake and that can is exactly where my air filter sits. My snorkel is on driver side so I have to run a pipe across firewall but its doable. I think it will bring engine temps down a bit.

Spectre Performance 9831 4" Inline Air Box with 6.4" Body
 
Painting is done...well at least for a while.


Did some bondo at the rear corners of the bed but left most of the patina scars and dents intact. Then came the green.


It looks washed out in the inside photos, but looks much better outside. After the paint dried a little i attempted to spray on Monsta Liner with a shutz gun. I wanted to spray it because of all the little areas it would be difficult to get a roller into and I had really good luck spraying Raptor liner....well they are very different products! Monsta Liner does not like to be sprayed and if you thin it down it will run like slime before it sets up. I had to roll over everything I sprayed to get it to completely cover the surface and to have decent texture. You might get away with spraying several coats, but it didn't seem like it was working for me so I rolled it on. I will say that the final "feel" of Monsta Liner is much softer than Raptor Liner, so pick your coating based on your final desired results. I also went with Monsta Liner to use their "Jeep Spice" tint to match my seats from Corbeau. It ended up being a much bolder color than the seats so I may end up changing it down the road.

Then I rolled the truck outside and Frank saw the sun for the first time in over a year!


I got so excited seeing it outside in the sun I couldn't stop bolting parts on it. By Saturday evening it looked like this:


Really happy with how it turned out. Now I have to do all the wiring. I'm using a universal wiring harness and trying to use as many FJ40 switches as possible.


Then I added the PSI wire harness for the engine. I'm hoping to mount the body fuse block, the engine fuse block and the PCM all in the driver footwell where the clutch pedal was, it will be tight!

Kid Approved.
 
Its coming along great! Very nice work. The sun does make her shine nicely. Now you just have to dot the i's and cross the t's.
 
I've been chipping away at the wiring. One of the things that bugged me was that the PSI engine wiring harness and the universal wiring harness had two fuse blocks and they used different kinds of fuses. So I decided to cut ALL the wires and make one fuse box for all the fuses. I used a LittleFuse 45989, which was $15 at Waytek.com.


I ran the ignition from the ignition switch to a relay that powers most of the engine circuits and the gauges. Combining the blocks let me get rid of some of the universal circuits I wasn't using and remove some stand alone relay wiring. Now I only have the flasher power relay living out of the fusebox inside the cab. Under the hood I have a small fuse box that has a fuse and relay each for the fan and the horns. All the wiring is in now, a main battery line to a lug/firewall passthrough, a starter relay and even a breaker that powers the ignition switch and the fuse block battery circuits.


Now I'm working on fitting the giant spaghetti monster in what little space I have left behind the dash. The Hurricane 2100 has a removable manifold so the bottom is easy to get in place.

I ran 1/4-20 rod from the 3 holes in the back of the 2100 with some spacers and through the firewall. The template that comes with the kit is very helpful here. Now I need to get the manifold tucked in there and figure out where the vents will go.
 
Cute
I've been chipping away at the wiring. One of the things that bugged me was that the PSI engine wiring harness and the universal wiring harness had two fuse blocks and they used different kinds of fuses. So I decided to cut ALL the wires and make one fuse box for all the fuses. I used a LittleFuse 45989, which was $15 at Waytek.com.


I ran the ignition from the ignition switch to a relay that powers most of the engine circuits and the gauges. Combining the blocks let me get rid of some of the universal circuits I wasn't using and remove some stand alone relay wiring. Now I only have the flasher power relay living out of the fusebox inside the cab. Under the hood I have a small fuse box that has a fuse and relay each for the fan and the horns. All the wiring is in now, a main battery line to a lug/firewall passthrough, a starter relay and even a breaker that powers the ignition switch and the fuse block battery circuits.


Now I'm working on fitting the giant spaghetti monster in what little space I have left behind the dash. The Hurricane 2100 has a removable manifold so the bottom is easy to get in place.

I ran 1/4-20 rod from the 3 holes in the back of the 2100 with some spacers and through the firewall. The template that comes with the kit is very helpful here. Now I need to get the manifold tucked in there and figure out where the vents will go.
Cute shifters
 
Well it runs...and drives.

Got all the wiring cleaned up and the new fuse block worked great. The power steering hose I bought ended up not working, the fitting at the gear box side wouldn't thread in far enough to seat the flare. I thought about getting two power steering hoses at NAPA to use one and cut the fitting off another but I decided to go with fittings and AN6 hose from Summit.

So for an LS pump to FZJ80 gearbox:

Russell 648060 at the pump
Russell 670531 at the gearbox
372024 24" -6 AN hose, 2 female fittings, one 90 fitting for the pump side

With the power steering sorted I put some gas in it and worked on the motor. It took about 3 cycles for the fuel pump to prime the line and then the motor fired up. After about 30 seconds I started smelling gas so I shut it down. I was a bit confused to see fuel leaking out of the exhaust! After tightening up all my T-bolts and collectors I did some investigating and found one cold header tube. I replaced that injector and it's running good now. I have a code for the crank learn procedure, so I'll need to take the truck to a Chevy dealer or a tuner to get it "learned". I think I'll need to tune it regardless with the headers, lack of cats and the snorkel. Drove it around the block and it felt pretty good. The front suspension is a little bit firmer than the rear and the brakes feel over-boosted, but at least it's drive-able! Now I need to get it weighed because California now considers it an FJ40 "Pickup". Then I can get the FRNKN45 plates swapped over from my 80.

Hoping to get it up to Petaluma for the soft top in the beginning of October. I'd like to get some nice thick material that matches the Jeep bikini top I have on it now.


I put a 10.5" Tuffy console in. At least the console and the top match the Monsta-Liner color. The seat color is washed out compared to the rest though.
 
We ended up having our second baby a little early, but she has been a sleeper so I had some time to work on Frank. I dropped it off in Petaluma to get the soft top done and then finished welding the half doors.


It's 2"x.120 steel strap for the caps.
Then I welded some rock rings onto a set of steel wheels. They are heavy, but should look killer with the 37's and take tons of abuse.

 
Today I picked Frank up from the upholstery shop. The soft top is made from convertible fabric and designed with a top bucket and modular sides. The sides and rear can be unzipped and rolled up like an FJ40 top, or they are completely removable at the high snaps for a bimini top. It has internal fabric wraps over the cage to keep in in place and internal tension buckles to tighten it down. First drive on the highway it was very quiet at 70...at least until a computer glitch put the motor in limp mode. Reset a fuse and made it home fine but nothing like diagnosing a broken truck on the side of 101.


I should have kept the other set of early doors I had and made another set of half doors. No time now though, have to go back to work next week!
 

Users who are viewing this thread

Back
Top Bottom