Diesel FJ40, 1974FJ

This site may earn a commission from merchant affiliate
links, including eBay, Amazon, Skimlinks, and others.

I can get you all the measurements you want of my 4BTA/4L80e/Split Case in my 1964 FJ45. :D

I can also get you the measurements of the 700R4/Split case combo sitting here in the FJ55.


yeah,
What i would want to know is the total distance between the engine mounting surface to the transfercase mounting surface on the 4l80e. Also, whats the width of the bottom oil pan on the 4l80e, and how that relates to the distance between the frame rails in that location.

I was just talking to Jason earlier today and he says he met a guy that had a LS1 with a 4L80e in a short bed FJ45. I don't know how long the driveshaft was, but I know that the stock wheelbase of a short bed FJ45 is 10" longer than a FJ40.

How far back did you move your rear axle?
 
TH400 Heavy Duty Length 25 1/8 from front of Bell housing to the tailshaft section where the adaptor would bolt up. Pan/housing width is 12 5/8"

4L80e Length 25 3/4" from front of Bell housing to the tailshaft section where the adaptor would bolt up. Pan/housing width is 12 5/8". You will need a transmission computer controller ($1k) and the correct torque converter.

700R4 Length 22 1/2" from front of Bell housing to the tailshaft section where the adaptor would bolt up. Pan/housing width is 13". (The adaptor on the back of the transmission to the split case is an additional 6 5/8". I know you are using a Dana 300 but I do not know the length of the adaptor for that application.)

Let me know if you want pictures in relationship to the frame. I can also get some close guestimates of driveshaft lengths for the front driveshaft.

Hope this helps you.

Dan
 
4L80e Length 25 3/4" from front of Bell housing to the tailshaft section where the adaptor would bolt up. Pan/housing width is 12 5/8". You will need a transmission computer controller ($1k) and the correct torque converter.

More like $500 for a pretty good controller.

http://www.usshift.com/

A 4l80e is bulletproof if you can find a low-mileage used one. The others need a rebuild and some parts to be as good. It is a bit bigger. The one in my tow rig has 190k miles and seems like new to me.
 
image-2750872712.webp
 
Or you could run the Chevy low mount manifold to get that turbo closer to the motor for clearance, then lower to make firewall clearance easier.
 
Last edited:
Boom! Got my new fj60 housing bolted up in the front. I used a 2.5" axle sleeve tube on the passenger short side, allowing me to keep the springs inboard and move the WMS to WMS to 61". I also scored a set of 6shooters with trunnion bearing eliminator from a fellow mud'r that I'm adding fj80 TREs too. It came with ARP studs too. If you've been wheeling with me you know I go through knuckle arm studs like a Pez dispenser on my old small pattern knuckles. I shouldn't have to worry now.

image-1239188254.webp


image-3148978381.webp
 
i just realized i havent posted a lot of whats been going on since i pulled the 5 speed...
i got excited about the 6shooters and fj60 front axle i forgot to add other/older items first.

While i had the motor out, it makes it much easier for me to get to the top of the injection pump. Ive had a 3200 RPM (366k spring rate) spring i wanted to add finally...i didnt make any pump modifications (fueling modifications) at this point, im going to mess with that once its back in the bay and running again. i didnt want to put the 4bt back in and get everything plumbed back and not be able to get it started, and not know what the cause is......right Johnny :bang:?

IMG_0155.webp


IMG_0160.webp


IMG_0161.webp
 
i completed the dana300 4:1 lowmax and 32 spline rear output upgrade (im upset with myself for not getting the front 32 spline kit too). it was relatively simple to complete but not having a press in my shop i had to make numerous trips to another shop. the most difficult part was deciding what to do with the detent plugs that come factory. Ive never seen those before and didnt know how to replace. The instructions tell you to remove the factory detent plugs but nothing on how to replace them (you have to destroy them to remove them). so i drilled and tapped the holes and ran large set screws with plumbers dope.

IMG_0340.webp


IMG_0371.webp


IMG_0372.webp
 
i have since mounted it to the tranny.
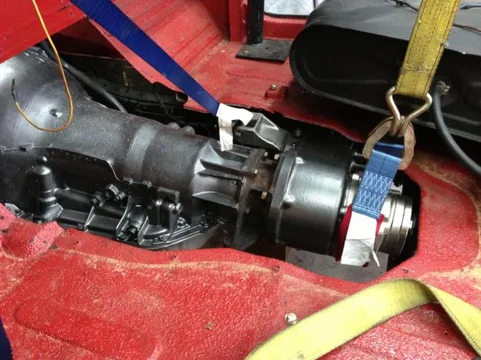
i thought about the mounting of the two for a few weeks and discovered it trim ~.75" off the tailshaft of the th400 i can mount the dana300 to the factory th400 adapter(3rd pic down). This allowed me to keep the th400/dana300 shorter than if i used a bought adapter. I still had to get a 32 spline input gear to mate the two. youll see i stuff it up into the floorboard as much as possible without cutting floorboard under the diesel tank, i did clearance the tip of the trannyhump opening for an output flange.

328.webp


340.webp


336.webp
 
when i mounted the motor with its 14* tilt due to the chevy engine adapter i ran into an issue with the passengerside of the engine, especially the turbo. Youll see in the first picture that the turbo is now into the inner fender (touching) so i knew i was going to have heat issue. I didnt really want to cut into my fenders so while i worked on the motor mounts my fiance removed the turbo and manifold....thats right :bounce:
if you recall i made my manifold so i could have a centered turbo mount with minor tilt. Flipping this placed the turbo in an ideal location for running similar intake tubing and turbo oiling lines.

212.webp


334.webp


331.webp
 
with the motor tilt i had an issue with the starter. With my first setup i welded .25" plates to the inner frame rails to weld my motor mounts. this added material was the main problem i had with starter clearance. I got it clearanced and its got enough room for the motor to shake like it likes too.

i also got rid of my 35" MTRs and picked up a steal on decent tread 37" MTRs. I still need a 5th one for a spare.....anyone?

437.webp


323.webp
 
the dana300 are extremely compact compared to most tcases. since my front output on the dana300 isnt far enough away from the input shaft, it makes it hard to get front driveshafts past the th400 case and oil pan. To solve this most build two piece shafts, or run a non-cv joint with a ~1" tubing for the shaft to clear. i went two piece...

i cant justify paying alot of money for driveshafts since ive made all my driveshafts on this cruiser since my first SOA and the recent diesel/5speed conversion. So im building this one. I hope this works out like it does on my napkin....

Im using a 1.5" carrier bearing (similiar to Isotels 700r4 build) and im using a pinion shaft inside of it. I turned down the pinion shaft to fit the 1.5" bearing. after cutting off the pinion gear off the end i welded this end to the CV side of a toyota truck slip shaft. the other end of the slip shaft will bolt to a flange on the dana300. using this modified pinion i was able to bolt a pinion flange at this location for a true two piece removable shaft. From this carrier bearing to my front axle i will use the same year model CV front toyota driveshaft. My intentions were to use one model driveshaft (87-95 front CV i think) so i can carry a trail spare that would either fix the 1st section between the carrier bearing and dana300 (ie the non cv section of a CV driveshaft) or replace the entire 2nd section between the carrier bearing and front diff. so far all measurements works out perfect....
and did i mention that with my pinion flange on the dana300 rear output and on the rear diff, i can use this same toyota truck driveshaft for the rear driveshaft....:hillbilly: biggest bonus being how cheap these driveshafts can be had $30-45 off ebay with free shipping...

335.webp


638.webp


649.webp
 
if your wondering or didnt understand that description above as to why i have two slip sections in my front DS, its simple. I know i will not have movement from the dana300 to carrier bearing so the slip shaft is for the sole purpose of being able to unbolt a broke/wore out ujoint from the tcase and replace it with the same section of a spare. i didnt make a spare machined pinion and i doubt that will be a section thats gonna break anyway. Im counting on either joints to break before my machined and welded pinion/upper DS Section.

left to right in the picture above:

26 spline dana300 to toyota pattern flange
non-CV section of a 87-95 toyota V6 front CV DS (Male splined shaft)
female slipshaft section (from below the CV) welded to the machined pinion.
toyota fine spline pinion flange
complete 87-95 toyota V6 front DS
front diff fine spline pinion flange
 
Last edited:

Users who are viewing this thread

Back
Top Bottom