
I guess my question is - if the horns aren't leaking and it's not leaking where the intake and exhaust are mated, wouldn't it make sense just to leave together?
Navigation
Install the app
How to install the app on iOS
Follow along with the video below to see how to install our site as a web app on your home screen.
Note: This feature may not be available in some browsers.
More options
Style variation
You are using an out of date browser. It may not display this or other websites correctly.
You should upgrade or use an alternative browser.
You should upgrade or use an alternative browser.
Can we make a exhaust/intake manifold sticky?
- Thread starter Zack1978
- Start date
This site may earn a commission from merchant affiliate
links, including eBay, Amazon, Skimlinks, and others.
Yes just leave it together....but if you're getting it machined you might as well replace the gasket between them so you know it's good.
I didn't have mine machined and left them together, replaced the main manifold gasket and it's fine.
I didn't have mine machined and left them together, replaced the main manifold gasket and it's fine.
Finally getting around to doing this job. Talking about it here - Not Needed (hopefully): Over-priced Machine Shop with experience resurfacing 2F intake/exhaust manifolds - if you're curious for more info.
But I thought I'd at least post the torque specs here for the intake/exhaust manifold, riser plate gaskets, and egr downpipe gasket. At least when you use Remflex gaskets. It's always surprising to me how low the torque specs are, really. Which is an even better reason to have a good torque wrench or three laying around.


But I thought I'd at least post the torque specs here for the intake/exhaust manifold, riser plate gaskets, and egr downpipe gasket. At least when you use Remflex gaskets. It's always surprising to me how low the torque specs are, really. Which is an even better reason to have a good torque wrench or three laying around.
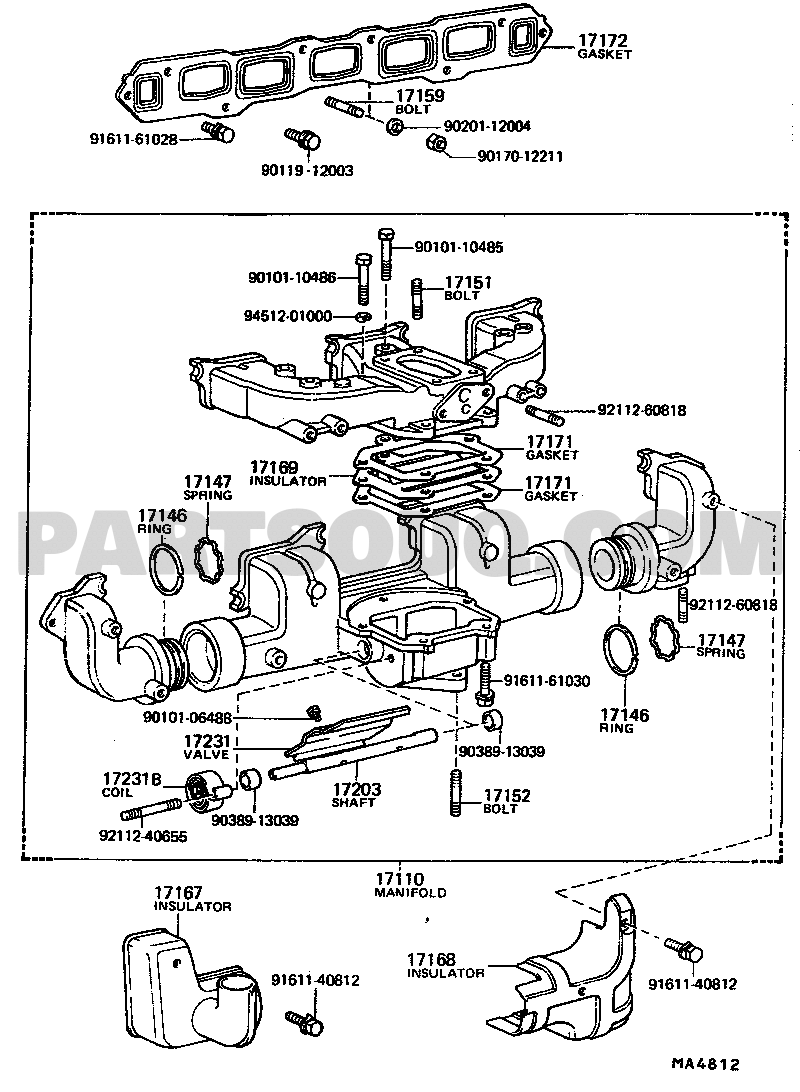
I am rebuilding my exhaust/intake ...I see there are three bolts that come down from the top and two that come up from the bottom to hold the exhaust manifold to intake manifold/heat riser joint together. So I need (2) 90101-10486? and (1) 90101-10485? and ...85 doesn't get a cut washer? Looks like ...85 is NLA, can I use 3 of the ....86 bolts? I'm guessing that center bolt is a few mm longer than the other 2. Can someone give me the length of that bolt if they have a loose one. Also guessing it is 10mmx1.25
Last edited:
micruz60
Unleaded Regular
I am rebuilding my exhaust/intake ...I see there are three bolts that come down from the top and two that come up from the bottom to hold the exhaust manifold to intake manifold/heat riser joint together. So I need (2) 90101-10486? and (1) 90101-10485? and ...85 doesn't get a cut washer? Looks like ...85 is NLA, can I use 3 of the ....86 bolts? I'm guessing that center bolt is a few mm longer than the other 2. Can someone give me the length of that bolt if they have a loose one. Also guessing it is 10mmx1.25
The longer one is 97 mm. 10 mm shaft, I do not know thread pitch. The two shorter bolts have split/lock washers, the longer one does not have any washer.
HTH
I'm thinking about how to tack the horn joints so they don't move. Maybe a dab of pc11 or tacky 2 part epoxy on the joint...like a peas sized dab right on the joint.
Last edited:
Super glue. I'm dead serious. It works a treat. Be generous. It burns off.I'm thinking about how to tack the horn joints so they don't move. Maybe a dab of pc11 or tacky 2 part epoxy on the joint...like a peas sized thick bead?
Gets down in the 20s at night here in VA, how much longer am I looking at warm up time with a block off plate?
looks like I need to flip the butterfly plate manually then while holding it in this position (I guess thru the exhaust pipe hole) I bolt the intake and exhaust manifolds ...gaskets and block off plate together.... so that the valve flap is flipped past the block off plate and the spring will close it the rest of the way when it heats up.
looks like I need to flip the butterfly plate manually then while holding it in this position (I guess thru the exhaust pipe hole) I bolt the intake and exhaust manifolds ...gaskets and block off plate together.... so that the valve flap is flipped past the block off plate and the spring will close it the rest of the way when it heats up.
That internal Heat Control Valve in the manifold is not pure evil. It does good. Even when I was driving all day long in the summer in the desert (over 105°F) for years, it never caused any problems in regards to overheating.
The A/F mixture benefits from being heated up at the hot intake bottom before getting sucked into the combustion chambers.
If the flapper valve works fine, I’d leave it, especially if the cruiser lives in a place with freezing winters.
The A/F mixture benefits from being heated up at the hot intake bottom before getting sucked into the combustion chambers.
If the flapper valve works fine, I’d leave it, especially if the cruiser lives in a place with freezing winters.
Yeah, I imagine a lot of the intake cracks and gasket leaks are caused by the heater control valve not working properly...either the spring breaks or the valve gets stuck open. Still even with the block off plate, the valve is partially open at cold start up and some exhaust heat is gonna get up there and warm things up. Just a layer of protection for the aluminum intake until the spring turns the valve shut.
hmmm...after looking at this with the block off plate in position and the valve flipped. There is not going to be any movement of the valve by the spring. It is basically pinned in the hot and exhausing downward position by the block off plate. There is a 1/4 inch space between the manifold and the valve though so some air may move up here.so that the valve flap is flipped past the block off plate and the spring will close it the rest of the way when it heats up.
If a block off plate is used to completely separate the ex manifold from the intake, the flapper valve inside is just causing a restriction. It’s not doing anything good, only bad at this point.
When my flapper got removed, the exhaust sounded much different.
When my flapper got removed, the exhaust sounded much different.
The flapper valve will be in the same "hot" position that it normally is in when the spring warms up and turns it. It will angle downward to deflect hot air coming out of the exhaust valves and upper part of the manifold to keep it moving downward. Removing it seems like it would make a pocket for the air to eddy around in and probably caused a change in the sound. Cruiser Outfitters block off plate is barely thicker than the isolator plate. And much thinner than the thickness of the valve.the flapper valve inside is just causing a restriction
the only negative I can see to keeping the flappper valve would be another point of leak where the shaft comes through the manifold that could be welded shut.
In my opinion there are two good solutions here
1.) A functional flapper. This is the best option.
2.) A well constructed block off plate. Maybe (this is a strong caveat) as good as #1, but you also have to deal with the holes in the exhaust manifold. Welding shut is a pain; mechanically plugging is superior.
1.) A functional flapper. This is the best option.
2.) A well constructed block off plate. Maybe (this is a strong caveat) as good as #1, but you also have to deal with the holes in the exhaust manifold. Welding shut is a pain; mechanically plugging is superior.
Wondering if I should change the intake/exhaust gasket myself or take to a shop (Toyota dealer, with a tech who has worked on Cruisers). I have the tools, space, and I think the skill to do it, but this looks daunting and I don't want to break a bolt and be stuck with that headache. I have the Remflex gasket in hand, a backup intake manifold, the FSM and have read every thread about it here. Truck is an '83 with 84,000 miles and is parked until spring so there's no urgency. If I could get @OSS over to my garage, I could ply him with beers and go for it. Shop wants $750, which I don't mind paying if it gets done right, but that's always a bit of a gamble.
For the long gasket at the head I sprayed all bolts and the two studs/nuts with liquid wrench for several days and they all came out without a problem. The last bolt closest to the firewall I turned with a 3/8 inch short socket plus swivel and stacked about 3 or 4 extensions to bring the ratchet out and over the brake booster. Couldn't get enough torque to break it loose. So went to short socket on the ratchet and tapped the end of the ratchet handle with a hammer to break it loose. Not sure how a torque wrench will work on this set up when putting it back though. For the forward most bolt I used a 3/8 inch drive socket because it was narrow and slipped past my saginaw ps pump. The rest I used 1/2 drive sockets and wrench. for the two at the bottom I stacked (2) three inch short extensions on a normal sized 17mm socket (not deep well) and it got the ratchet out past the manifolds.Wondering if I should change the intake/exhaust gasket myself
If that's all your replacing you can unbolt the first exhaust hanger in front of the cat and you should be able to wiggle the manifold out far enough to slip a new gasket in there. You may have to move some vacuum lines, and obviously the air cleaner and hoses. I did this when replacing my cylinder head. Credit to @OSS for the info about unbolting the hanger to loosen the exhaust pipe.
Last edited:
The countour of the manifold doesn't allow the piece to sit flat on a machine. I used a ball peen hammer and torch to heat and flattened the sticking piece of metal gasket. Just a lot of tapping to gently expand the metal gasket. The torch gets it red hot and it starts to flake off. A nice trick I learned from an old timer who helped me with my cylinder head. Now I find there are low spots in the inside corners probably due to some warpage. Although I'm not sure that the low spot goes all the way to the outside edge of where the gasket will go. How did any of you re-surface the exhaust manifold at the riser?
I have the Remflex gasket in hand, a backup intake manifold, the FSM and have read every thread about it here
You’re more prepared and educated on this topic than many of us were the first time we dId it. Back in the day, there wasn’t an internet. All we had was the FSM and faith/hope we could do it. On rare moments, it might sound like I know what I’m talking about, but that’s only because I owned the same cruiser for 30 years and always worked on it myself. When I bought it, the most wrenching I had ever done (on my ‘78 Toyota pickup) was change the oil filter. That’s it.
When I purchased my used cruiser in 1988, it seemed perfect on the test drive - so I bought it. I found out later that it had a burned exhaust valve and zero compression in one cylinder - holy crap!
I talked to the parts guy at Toyota and told him my story and he said “You can fix it. Land cruisers are easy to work on”.
So I took his advice and bought a bunch of metric wrenches over at Sears and bought the Toyota manual— and unscrewed one bolt, then another and another - going really slow and being really careful, labeling everything.
Needless to to say, I got everything fixed and all bolted back up correctly- AND … it was one of the most rewarding and satisfying experiences working on something in my life. I felt so much more confident in my abilities around the cruiser and that project gave me tons of confidence that I could fix anything on the cruiser in the future if needed.
In retrospect, I think THE BEST part about owning a FJ60 is working on it and learning all about it and becoming a good mechanic while doing so. The vehicle is rewarding to drive off road for sure, but it’s the eventual repairs done on your own that really make this vehicle rewarding.
The FJ60 is the easiest vehicle to work on. Everything is big and burley and for the most part accessible. Yeah the smog equipment is annoying, but you can learn about that too.
If you have a 2nd car, I’d recommend you replace the manifold gasket yourself. It’s a great project and not too hard. It’s a weekend job. 2 days. I’ve done it several times, a few on my cruiser and on a couple others.
I say you should do it yourself because — you’ll likely need to do it again maybe 10 years from now. The gasket doesn’t last forever.
There are a few ways to skin this cat. Most important is going about it in the right order. The manifold assembly is four parts as you know. First, the mating surface between the intake and exhaust has to be verified co-planar. Usually you can leave this alone because leaks here are not common. Second, the horns should be removed and the mounting surfaces where the horns slip into the exhaust manifold body cleaned, grooves cleaned, and the wavy springs and rings replaced. Third, the mating surfaces that interface with the head need to be verified co-planar. This is easiest to verify if you have access to a blanchard ground surface plate. Lay the assembled intake/exhaust manifold on the plate with this mating surface in contact. Using a flashlight from the opposite side look for gaps between the plate and the manifold. If you can see light creeping under the manifold check these points with feeler gauges to ensure they are within spec according to the FSM. This verification can be done with a good machinist straight edge in the absence of a surface plate but it is somewhat less reliable. In fact, that's what the FSM recommends.How did any of you re-surface the exhaust manifold at the riser?
Assuming you've cleaned the mounting surface on the cylinder head, verify that this surface is good. Here a good straight edge is crucial. Also, inspect the points on the manifold itself where a single fastener applies a shared load to the intake and exhaust. These "half circles" must have the same thickness where the washer contacts both parts. If they're not the same thickness, you'll have a difference in clamping pressure and leaks will likely develop in short order. If all of the above verifies within spec, time to reinstall.
If you're out of spec, you need to find a machinist that is comfortable with these manifolds. This may prove challenging so be patient and ask questions. The manifold should be machined as a complete assembly and because it is four distinct pieces (two of which are bolted together; two that "float") workholding is difficult. Also, because the intake is cast aluminum and the exhaust side is ferrous, very light cuts are required to avoid deflection in the softer material.
Alternately, these surfaces can be trued with a file. I don't recommend this for someone that has never manually flattened something before. It requires a surface plate, transfer dye, good files, and LOTS of patience.
I think I may not have actually answered your question. The riser at the front end of the exhaust pipe?How did any of you re-surface the exhaust manifold at the riser?