Biscuit's Keeping The FJ40 - Customization/Improvement Thread

This site may earn a commission from merchant affiliate
links, including eBay, Amazon, Skimlinks, and others.

Found the vacuum leak that was making the nice whistling noise. It's in the brake booster somewhere. With the booster connected the engine was pulling 17inHg and with the booster disconnected and line plugged it pulled 18inHg.
 
Started the prep work for the transmission swap: pulled the seats and the gas tank cover. I would have gotten further (hoped to at least get the hump removed) had I not had to take the :princess: car for an oil change and then clean out the :princess:'s split Starbucks drink from behind the passenger airbag on my Jetta. :bang:

With Christmas travel and work, this was most likely the last day I had in 2013 to work on the 40. I may have a few hours on the 29th. So much for getting the swap done this year. :bang:
 
There are now TWO off road adventures planned for the last weekend of January.


Motivation!
 
There are now TWO off road adventures planned for the last weekend of January. Motivation!

If it wasn't for trip deadlines nothing would get done.

New target is to have the tranny/t-case out and separated New Years Day.
 
Took advantage of the federal holiday today to get some work done on the transmission swap. I had intended to get the transmission pulled, but didn't quite get there.

image-812144001.jpg

Driveshafts are disconnected. On Saturday I'll finish pulling the transmission.
image-812144001.jpg
 
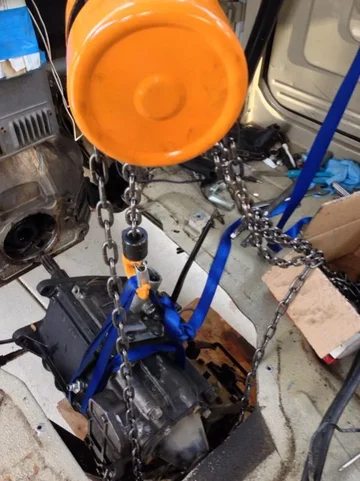
Taking a quick lunch break before unbolting a lowering the transmission and t-case.

The roll cage is doing double duty today as the framework for the lowering system.

image-619372832.jpg
image-619372832.jpg
 
Lowering the transmission

image-1524447638.jpg


And the three speed is out

image-3090460306.jpg

I had to take apart the t-case linkage to clear the frame rail, but aside from the it rolled out easily with the furniture dolly.

Tomorrow I'll split the t-case off for inspection since I'm going to use my 3 speed t-case in place of the 4 speed t-case.
image-1524447638.jpg
image-3090460306.jpg
 
Pulled the clutch this afternoon.

image-3431492549.jpg

Nice view looking up into the truck.

image-96101149.jpg
image-3431492549.jpg
image-96101149.jpg
 
Ran into some problems this morning while attempting to remove the flywheel. I was able to keep the flywheel from turning, but even with the electric impact gun (200 ft-lb) I wasn't able to get any of the bolts to turn. I didn't spend too much to win each bolt as I saw no rotation of the socket.

image-441321437.jpg

Any thoughts aside from a more powerful impact wrench?
image-441321437.jpg
 
They're prolly red-loctite-d .... Flame is your friend.
 
That's what I'm thinking.

Also the lock plates weren't folded up to lock the bolt heads. I'm now wondering what else may have been overlooked by the shop that did the rebuild.
 
Biscuit said:
Ran into some problems this morning while attempting to remove the flywheel. I was able to keep the flywheel from turning, but even with the electric impact gun (200 ft-lb) I wasn't able to get any of the bolts to turn. I didn't spend too much to win each bolt as I saw no rotation of the socket.

Any thoughts aside from a more powerful impact wrench?

I use a pry bar in the teeth of the flywheel to 'lock' it to the bellhousing, and a half inch breaker bar on the bolts. I had the same problem with the motor my customer bought from saryon7.
 
I use a pry bar in the teeth of the flywheel to 'lock' it to the bellhousing, and a half inch breaker bar on the bolts. I had the same problem with the motor my customer bought from saryon7.


X2 I just pulled mine the other day With a breaker bar. If needed you could use a cheater pipe over the breaker bar for some more leverage.
 
Got the flywheel off, but not out. The half inch breaker bar worked, no heat required (though I had a torch on standby).

The collectors for the headers runs just enough under the bellhousing to prevent the flywheel from dropping free. :bang:

Also found that the shop that installed my engine used an necessarily long bolt on the left rear engine mounts. I had to back that off to see if I could find a way to slide the flywheel out. :bang:

image-715372214.jpg


I think there may be project creep because of this. The old rusty exhaust may come out in favor of a stainless one run correctly. The two piece headers would be replaced with Tri-Y headers to move the collector farther forward. Then custom stainless exhaust the rest of the way back.
image-715372214.jpg
 
Last edited:
Flywheel is out, finally.

image-2824711906.jpg

For those that are wondering: here are the four bellhousing bolts the flywheel prevents access to.

image-4002572610.jpg

Bellhousing removal is on deck for this afternoon.
image-2824711906.jpg
image-4002572610.jpg
 
Bellhousing is out

image-2192918535.jpg

I'm going to preventatively replace the rear main seal while I'm in here.

image-3526331969.jpg
image-2192918535.jpg
image-3526331969.jpg
 
Always wise to do.
 
Love the progress pics. Following your progress... Keep up the good work!!!
 
Last edited:
Are you supporting the engine while you have the rear motor mounts out?
 

Users who are viewing this thread

Back
Top Bottom