8274 modification and overhaul (for the 105) (1 Viewer)

This site may earn a commission from merchant affiliate
links, including eBay, Amazon, Skimlinks, and others.

First I'd like to express my jealousy over the 105.
Second, great work and attention to detail!

Your thread, in addition to the video you posted will really come in handy when I eventually find a better 8274 to overhaul.
 
Outstanding work.

I must have missed it, but what work did you do to the end support plate aside from welding the tabs for the brace bars? Zerk fitting.. quality bushing...maybe a seal? I was hoping to see the steps involved in that.
 
...what work did you do to the end support plate aside from welding the tabs for the brace bars? Zerk fitting.. quality bushing...maybe a seal? I was hoping to see the steps involved in that.

Actually I didn't do anything else myself because Gigglepin supply a LEGRIS swivel fitting + an upgraded aluminium bushing with the air free-spool drum so it was really very easy.

You can buy the swivel fitting here if you need one: Pneumatic Push-In Air Fitting Male Stud Elbow Legris

I couldn't find a pic of the upgraded gigglepin bushing on it's own, but here it is trial fitted before overhaul.


The welding is complete and the last little niggly bits all sorted so today we finally got to trial fit the 8274 on the bar whilst bolted to the 105. Everything sits quite well and nothing clashes. The spotties are a little off-centre due to the high-mount gear-housing sitting where it does, but for me it's a small compromise and hopefully not going to look too awkward when all is said and done. We did weld a set of tabs on the roof rack for the spotties if it looks too queer but I think it will be ok.

Next it's off with the bar and sliders (to the same shop that painted the winch) for blasting and powder coating / satin black finish.

I'm hoping to have everything back and fitted in around two weeks, let's see how it goes....


Blasted and ready for powder coating, going with Satin Black.


Everything came back from the powder coaters last week looking very good. Here are a couple pics of the winch fitted in the bar.


From here I still need to a few things before we're ready for some winching adventures:-
1) Hook up the air-solenoid for the air free-spool drum
2) Shim the end plate for smooth free-spool operation
3) Mount and wire up the Allbright solenoid
4) Wire up in-cab controls and switches
5) Mount external remote plug
6) Trim grill to fit around the Warn motor
7) Splice the safety thimble onto the synthetic rope
8) Fit the synthetic rope onto the drum
9) Test everything
 
Last edited:
This is very helpful! How did you get the knob off of the shaft that engages the motor vs. neutral? In other words how did you remove part # 2 from part # 5? Mine is not going anywhere!
 
Put the shaft of item#2 in the vice using aluminium soft-jaws, then grab the plastic knob with a large set of multi-grips. If you get good purchase with both the vice and the multi-grips, then use an open palm (or soft hammer) to "shock" the knob loose. Once you "break the seal", it will still offer resistance but come off no problem. Not sure if the Aussie terminology for tools makes sense, but hope it helps.
 
It's taken a little longer than expected but the winch is now wired up and installed, with the old style grill trimmed and fitted around the new 6HP motor. I don't know a lot about the electrical side of things so I had a lot of help from a sparky mate.

Unfortunately there wasn't much room for the solenoid anywhere in the front of the engine bay, so after deciding not to mount it in the winch bar, it ended up next to the airbox on the drivers side. We're still working on the air free-spool solenoid and in cab switches.

I made a small bracket that sits between the spotlight tabs to fit the socket for the old 4-pin Warn cable remote.

 
Last edited:
How did you get the knob off of the shaft that engages the motor vs. neutral? In other words how did you remove part # 2 from part # 5? Mine is not going anywhere!


Small torch. A bit of heat and it came right off. It wasn't budging until I but the flame to it....

BTW: I happen to have a few replacement knobs if anyone is interested.
 
I've had the winch on for a couple of months now and everything seems fine though I've only pulled a few stumps at home and haven't really had the opportunity to give this thing a good work out. I'd like to see what sort of heat is generated in the winch motor and if there are any issues at higher loads but that will have to wait for the moment. Anyway, here's what it looks like fitted up.


The winch sits in nicely though there wasn't enough room to have the spotties and the winch mounted centrally. Options were to 1) space the winch further back into the grill to allow spotties to sit in front of the winch and be central 2) offset the winch and fairlead slightly to the drivers side or 3) offset the spotties slightly to the passenger side. I took option 3) and moved the spotties a little to the passenger side, just off-centre. In hindsight I think perhaps it might've been better to offset the winch a little to the drivers side instead, there's only about an inch or so in it, and having the fairlead off-centre compared with two big spotties probably wouldn't be quite so obvious.


The grill neatly cut and trimmed to fit the larger XP motor. As you can see it only just breaks the profile of the grill.


I wanted to re-use the old 8274 cable remote but didn't know where to mount the socket. In the end I made a bracket between the spotties and I found that that works quite well. And doesn't look too bad either.


I have the in-cab switches located just under the ignition. I got the idea from having seen a few other 100's with switches in the same place, so being short of space for switches I thought this would be a good spot. Unfortunately I've come to realise that the location is not so good for me because I find it really hard to see which switch is which, being on an angle and down so low. And being bit of a tall bloke it's very easy to accidentally knock the switches with my knees. I've only had this for a couple of months and already it's annoying me!


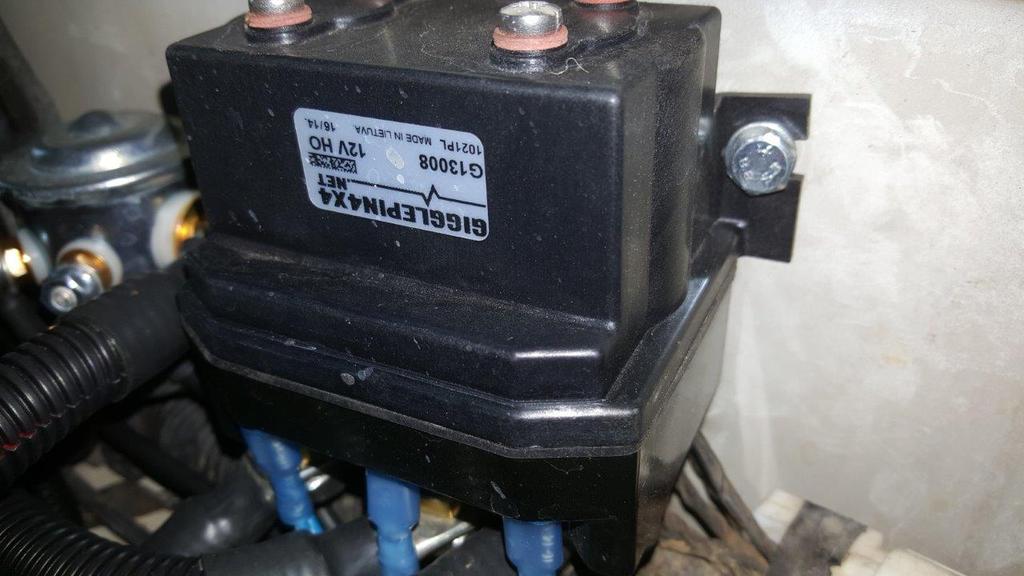
This is the Allbright solenoid pack that I mounted in the engine bay (sits between the airbox and the master cylinder). I know it's a lot easier to mount the solenoids on the winch or on the front winch bar somewhere but I really think in the engine bay will give you much better longevity regardless of which brand you prefer. I got this one from Smithi Engineering (Australian Gigglepin distributor).


At the moment Winch Power is isolated by a 200A Cole Hersee solenoid via the in-cab switch. It's good for 200A continuous load but I'm not sure it's up to the ~480A peak load that Warn says the 8274 will draw at full power. Blue Sea have some good products and I'm looking to find something that might be more suitable....


I fitted a M2K 390XP alternator to the LS3 and according to the specs it will push 220A of charging current at idle. I'm a little concerned about the high amperage going through the hookup. I measured a 1.7V voltage drop when spooling the cable onto the drum so at higher loads I suspect there are going to be some problems. So I'm looking at simplifying and strengthening the electrical system. As I mentioned before I'm no electrical guru so luckily my father has excellent marine electrical knowledge and he's offered to help out here. I probably should've got him involved from the beginning :)


Specifications from for the OEM 4.6HP motor on Warn 8274-50.
 
Last edited:
1st page "5) Drill and pin free spool" to prevent accidental free spool. Can someone explain how this mod is done so I can better understand it?

Another question: What weld rod are people using to weld on aluminum plugs for drain and fill? 4043?

Thank you.
 
Last edited:
Drill and pin free spool / to prevent accidental free spool.
Can someone explain how this mod is done so I can better understand it? Another question: What weld rod are people using to weld on aluminum plugs for drain and fill? 4043? Thank you.

Welding Aluminium is pretty difficult (let alone getting it looking good) so I had someone else do it for me, sorry mate, I have no idea what filler or welder he used.

The drill & pin mod on the free-spool clutch is done by drilling through both the free-spool clutch shaft and the housing-boss from which it slides in/out so that you can put a Hitch pin through the hole to lock the shaft in place. It happens (apparently) that sometimes this shaft can accidentally move out and so this modification prevents any unintended release of the free-spool clutch.

USXl8Cb.png
 
Hi Hendrik,
Thank you for the explanation and the picture. Do people perform this mod on the OEM warn free spool assembly or only on the modified gigglepin model?

Thanks.
 
in reading though this thread i don't see anywhere about the concave washers being used in the brake assembly. mine didnt have any in it when i took it apart but the rebuild kit has three concave washers in the kit? do they get used on the older winches or are they for something different?
 
I just did this on my rebuild this past weekend. There are two different sized circlips that install on the end of the pinion cam brake assembly. Mine required the larger of the two.

The spring washers (belleville washers?) had an ID matching the smaller circlip.

So I installed my brake assembly without the three washers. I was not concerned about this since I have the modified shaft with the cap over it.

Maybe someone knows more about the two different sized pinion cam brake shafts?
 
in reading though this thread i don't see anywhere about the concave washers being used in the brake assembly. mine didnt have any in it when i took it apart but the rebuild kit has three concave washers in the kit? do they get used on the older winches or are they for something different?

I don't know for sure but seems you're right, the bellevue washers appear in the Warn drawing for newer winches (item#50 in the first drawing of the first post in the thread) but doesn't appear in the second drawing for the older winches, which this winch was, and so they were not installed.
 
that’s what i though too based on those parts break downs. i didn’t use the either but realize i didn’t check my circlip as the directions said for the flat edge. ill have to double check that but otherwise i think i’m good to go leaving it as is
 

Users who are viewing this thread

Back
Top Bottom