81 BJ42 - I have to bring it home and pass inspection

This site may earn a commission from merchant affiliate
links, including eBay, Amazon, Skimlinks, and others.

Applying lessons learned I started on the passenger door.

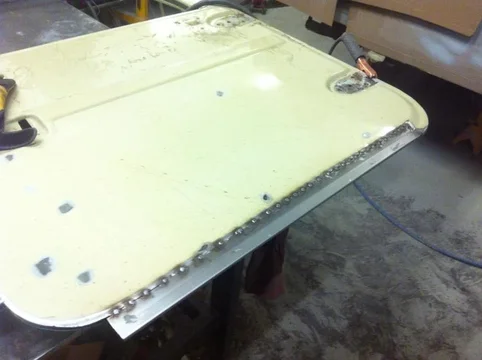
I started by cutting away all of the rust on both sides. Then I tacked in the outer skin patch.
IMG_2218.webp

IMG_2219.webp

Having already botched the other door repair I went to the extreme to keep this weld flat, straight and not oil-canning the door. I did: one set of tacks from end to end. Then hammer each tack to flatten it a bit and stretch it a bit. Then grind of the excess metal down to the surface. Then repeat. Repeat until the seam is welded solid.

IMG_2220.webp
IMG_2218.webp
IMG_2219.webp
IMG_2220.webp
 
And that's where I am now. I have the inner patch on and just have to close the corners up to finish this door. The second time was the charm and the skin is flat and true. I will still skim it with bondo but only to make the paint smooth, not to flatten the door. If that makes sense.
 
I had the exact same thing happen to me with patching my front doors - the dreaded oil canning problem from shrinkage. I ended up filling the door with more filler than appropriate, and 2 years later it cracked and now looks like total s***.

My question to you is this: how do you tell that the hammer/dolly work is stretching the weld back out?

And another: How does one gauge stretching/flattening? Do you sight the surface against flat light? Do you work the weld beads down one by one, or outside-in, every other one, or in what pattern exactly?

Sorry for all the questions- this is one of those areas of body repair magic that i have been trying to understand for a while.
 
I go through that "telling myself to walk away" thing all the time and usually always end up hanging around, screwing stuff up anyway. Funny how practice still makes perfect. It warms my heart to know that someone with your incredible skill still hits a bump in the road once in a while. :) As always - great work!
 
I had the exact same thing happen to me with patching my front doors - the dreaded oil canning problem from shrinkage. I ended up filling the door with more filler than appropriate, and 2 years later it cracked and now looks like total s***.

My question to you is this: how do you tell that the hammer/dolly work is stretching the weld back out?

And another: How does one gauge stretching/flattening? Do you sight the surface against flat light? Do you work the weld beads down one by one, or outside-in, every other one, or in what pattern exactly?

Sorry for all the questions- this is one of those areas of body repair magic that i have been trying to understand for a while.


When yer hitting it there is no real way to tell. But once you're done the end result is noticeably better. You want to make sure you support the backside with a solid chunk of steel and get that nice "ting" when the hammer hits. otherwise yer just denting the panel.

I usually finish all the tacks to form a full weld before getting out the hammer. But on this second side door I was paranoid and did about ten tacks evenly spaced, hammered them and then ground them flush before doing another set of tacks.

As far as inspecting as you go, on this panel I could see my garage lights reflecting in the paint. As long as my fluorescent bulbs looked straight I was golden. I also used a straight edge but most importantly I made sure it wasn't "popping" in and out (aka "oilcanning")

Gauging the stretching. I have never stretched it too much no matter how much hammering I've done. Its more like "minimizing the shrinking"

The door still had shrinkage but it was kept to a zone within an inch or so of the weld. It didn't translate into the main skin. It will still get filled and sanded but the fill will be like 0.02" rather than 0.25".


One last thing I thought I'd mention before someone asked.... You might wonder what happened when I went to weld the inner skin patch in place. Wouldn't I just have the same issues on the inner panel? Well, no, for a coupla reasons. Firstly, the inner door skin is full of ribs and bends that prevent the weld from warping it. Secondly, when I cut the rust away I left the bend intact to further maintain that stiffness. That might be visible in one of the pics.
 
Then I flipped it over and cut away the outer panel rust. I trimmed a patch and welded it in.

So whats wrong you ask? You can't see it well here and I stopped taking pictures cuz I was dealing with the issue. You can see a bit of it in the third pic here. The weld along the bottom of the outer skin shrank. That put a hugh oilcan effect into the door skin. It bulged up and down and up again. It was horrible.

For those that don't weld I'll attempt to explain. Welding is melting metal. Molten metal is hot. Hot things expand. The $Hitty part comes when hot things cool. They shrink when they cool. They don't shrink much but when you weld a line, even tack,tack,tack a little at a time it will shrink enough to notice. Normally I would deal with it by hitting it with a body hammer and dolly. The impact of the hammer mushrooms the weld bead and effectively stretches it back.

But I can't put a dolly behind this weld because_I_already_welded_the_inner_panel_in_place. :bang:
View attachment 690190

View attachment 690191

View attachment 690192


Hey Kevin, looking so darn good...

Could you not shrink that and pull it tight, then bet a spoon inside the panel and so some dolly work?

Rob:beer::beer:
 
I had the exact same thing happen to me with patching my front doors - the dreaded oil canning problem from shrinkage. I ended up filling the door with more filler than appropriate, and 2 years later it cracked and now looks like total s***.
I never totally got rid of the oilcanning. I made relief cuts, welded them, hammered the panel and lastly I actually welded in a couple of stiffeners to the inside to hold the oilcan effect in the place it did not want to be. The bondo is still thicker than I like but the door is salvaged. If I come accross a clean door I'll prolly snap it up for the frame off in a few years.

Murphy's law - it had to be the drivers door. The one that gets slammed the most :rolleyes:

Again, what I should have done was just stop the moment I realized the problem. I could have just cut out my patches and started again. I had more patch material just sitting there. That's what burns me the most.
 
Hey Kevin, looking so darn good...

Could you not shrink that and pull it tight, then bet a spoon inside the panel and so some dolly work?

Rob:beer::beer:

Thanks Rob.

If I had a better selection of dollys perhaps. Its pretty tight in there, way down in the bottom. But its all done now. The second door is 100% better and good to go.
 
If I come accross a clean door I'll prolly snap it up for the frame off in a few years.

I have a very nice 1983 driver's door which has been stripped down to bare metal. It has a 1.5" x 3" rust hole on the lower inside corner, and is not dead flat, but in excellent condition. I bought this to replace my current door, and then found a brand new OEM door, so now i have a spare. Well, two spares actually, though the existing door on my truck is a 1978~79 door.

The later type doors have the bump out for the light switch and accept the rubber exterior glass wiper weatherstrip. PM me if you want pics.

~C
 
Inspirational work. :clap:
 
Great work ! Are you going to galvanize the inside with a spray can ?
I know they sell galvanizing spray cans for finishing work, not sure where though.

Cheers
JMac


I had to buy a coupla rubber factory floor plugs for the two holes in the rear floor. The ones just behind the seats. Same plug as in the front floors. Anyway, I bought a few extra and the plan is to drill a couple of holes in the sides of the rear doors near the door seals. I have a schutz gun and a "inner panel corrosion inhibiting" spray product that I can't recall the name of right now. I plan to periodically spray some of it into all four doors and perhaps the rockers and rear sill to kill the metal termites. Its not a wax but it's thin and runny to wick into the tight spots. With the rear doors I am going to seal them up as much as possible with seam sealer before paint and weather strip. The right door can be made basically air tight, save for the handle, but the left has the latches top and bottom so there is always going to be access for water. One must accept the fact that the front doors will be wet all the time given the water access through the window which requires the four drain holes in the bottom. Maintaining these doors will be a priority by removing the door panel and keeping them protected with anti-rust agents.

For reference I'd like to mention that other than the rusty bottoms of the doors which is obvious the doors were remarkably clean and corrosion free throughout. Well, there was a little around the rear door twist handle. Everywhere else factory primer and paint was clean and shinny. I take from this the following; if you protect the lower portions the rest will take care of itself and last indefinitely. Keep the front door drains clear and functioning to let it dry out. Rain, snow, muddy water splashes and even the morning dew will get inside the front doors. I takes two minutes to pop off the crank, pull, latch bezel and panel. Get in there with a vacuum/ blowgun and spray some gunk in once and a while.

That's my plan. We'll see if it happens.
 
The major thing is the front floors. I've been putting them off for a while but once I dig into it I'm sure it can't be any scarier than the rear sill was (I still look at the rear sill pics of all the bad material cut away and cringe).

I am not worried about the actual mechanical stuff. I gotta do a pinion seal, hubs inspect/clean, brake inspect/clean, tighten steering play and possibly a windshield. I might let the inspector make the call on the windshield. I plan to borrow Costal Kevin's tires for a day so I have a matching set without cracks. Now that the snow is here the rad and fan hub should be fine at least for the inspection.

That should all be one day plus wait on any parts for a day or two at most. Brake and axle parts are easy to find.
 
Last edited:
Right arm. I wont be using my stock fan for the hilux (wont fit) so if the fan clutch is of use to you your welcome to it, though I suspect it could be different on a BJ42.

Curtis (RocDoc on mud) has some experience and insight regarding rebuilding the fan clutches FYI.

Coastal Kev now refers to those tires as " the rmlca inspection tires"
 
I watched a guy do lead fill on a 1930's sedan roof. You know the type, the big compound curve around the back of the roof line. The roof and back window area were two separate parts but when he was done you couldn't tell. Apparently that was the way the factory did them back then. He basically had a torch and a bar of lead. Maybe some flux of some kind and a couple of spreaders. Essentially just like bondo. He layed it in there and after it cooled he shaved and sanded it smooth.


Cody,
I have the following in the garage:

NIB BJ60 fan clutch
NIB BJ42 fan
Used and corroded BJ42 clutch - unknown functionality
Used BJ42 fan
Plus the original fan and clutch (not working) on the 42
And possibly a BJ60 clutch and fan from that motor I got off you and Ian (pretty sure it's still on the pump)

I will try the old BJ42 clutch and see if it is functioning and go from there. I am not above trying to lock up the clutch with RTV or even taking a stab at using the correct silicone stuff. I'd like to use a 42 part over a 60 part as this unit is 99% original.

The rad is ok but weeping from the bottom. I might do a re-core on it but the last one I did was near $500 at citywide and they did not impress.:banana::wrench::banana:
 
Sooo...

You figure it might be ready for River Shiver 2014 then.:D
 
It'll be close!
 

Users who are viewing this thread

Back
Top Bottom