40/45 Mutt

This site may earn a commission from merchant affiliate
links, including eBay, Amazon, Skimlinks, and others.

I finished up all of the gussets and checked it for fit with the frame. Looks not bad. Still need to drill some holes to connect the trailer chains
frame12.webp
frame13.webp
 
Next step, weld in the shackle hangers. This part stressed me out cause I have no load on the truck to test the true angle of the shackles. Also, with brand new springs, they are sure to be a little shorter than they will be when they break in.

So the pic shows the shackle angle if I placed the hanger in the stock location (remember, these springs are about 3.5" longer). I figure this angle is too much. Once the springs break in and I put all of the weight back on the truck, they will be approaching flat.

So with 3.5" of extra spring length, I moved the hangers back 2.5" to slightly increase the angle from vertical.

The other pic shows aligning the hangers with a broom handle and tacking them in place. I wanted to put the hangers on before I welded in the subframe so that I didn't have to weld them on above my head (ouch!)
frame14.webp
frame15.webp
 
After welding in the hangers, I mounted the subframe to the frame and welded it all together. I decided to use the 45 degree weld at the joint. It turned out quite well.

The last pic shows the new shackle angle. It's about 10 degrees from vertical. Once I break the springs in, add about 250lbs of steel for the box and 200lbs of gear, I bet it will sit nice (maybe around 45 degrees)
frame16.webp
frame17.webp
frame18.webp
 
Because of the length of the 45 tub, the third mounts (from the front) of the 40 are about 4" to far forward to use for the back mounts of the 45 cab. Also, because the 45 frame is horizontal and does not ramp up like the 40, there are some clearance issues with the tub and frame. I think I have that figured out but I'll show it on this thread later

So I cut a hole in each rail and slid a 2x2 tube through for extra strength and for mounting the back of the 45 cab
frame19.webp
frame20.webp
 
Here are the next few mods I made to the frame.

I boxed in the rear x-member, installed some angled braces for the rear crossmember, and some mounting plates to weld on some rock sliders
frame21.webp
frame22.webp
frame23.webp
 
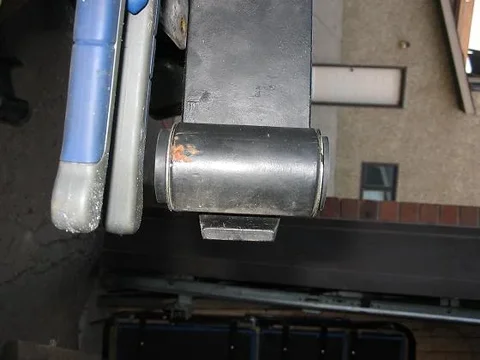
I'm no expert at welding, but if it were me I'd probably beef up the spring hanger welds a bit. There is a LOT of stress going through those points, and I would want to be dang sure that there was good penetration and a good sized fillet on those corners. Just my two cents, I know you already have it upside down so it's a lot harder to weld. But is it easier to weld at home or on the trail?
 
I'm no expert at welding, but if it were me I'd probably beef up the spring hanger welds a bit. There is a LOT of stress going through those points, and I would want to be dang sure that there was good penetration and a good sized fillet on those corners. Just my two cents, I know you already have it upside down so it's a lot harder to weld. But is it easier to weld at home or on the trail?

Those are burned in quite well. I figure the amount of weld I have on there (all the way around the hanger) is WAY stronger than the factory bit of welding and 2 rivets.

I have thought of putting small gussets on the sides and/or ends to help with the side forces, but it seems too overkill

Thanks for the input!
 
I skipped over the bit of work it took to put on the suspension during this process. The biggest problem I had with the fj55 springs was getting perfect sized bushings

You can see in the pic where I had to reduce the size of the flange on the bushings (used a flap wheel on a grinder - it took 10 seconds)
susp3.webp

Also, those silly u-bolt plates under the spring always get bent and of course mine were bent into the nuts, which caused a problem when putting the new u-bolts in.

So I cut along the bent parts and bent them straight. Then welded everything back to normal. I also added some plates on the side to close them in (like the rears) to prevent the corners from bending in again
susp2.webp
susp1.webp
susp2.webp
susp3.webp
susp1.webp
 
Some other challenges;

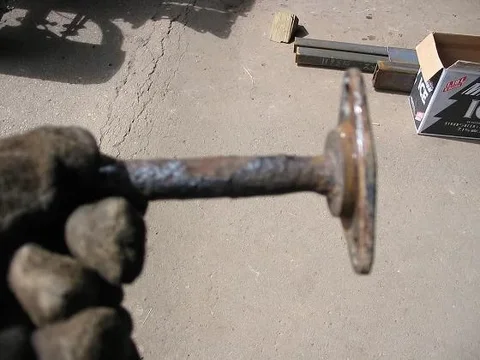
Of course, removing the spring/frame pins was a chore. Ended up burning the bushings out with a torch. Check out the wear/neck on the shaft of the pin.
susp4.webp

Other problem was the military wrap of the front springs was hitting the underside of the spring hangers. So I used the plasma and gouged a bit of material out in the place they were hitting. (thanks AGAIN Mike for the plasma)
susp5.webp

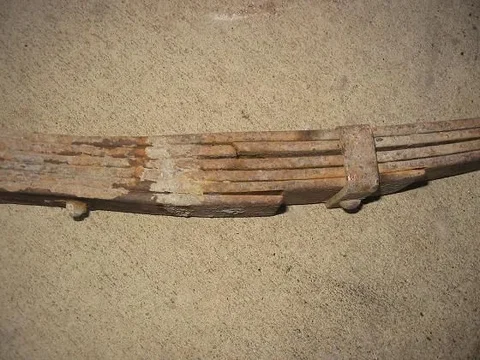
And just for fun, here's a pic of one of my old front springs. See anything wrong with this pic?? There were 2 like this
susp6.webp
susp4.webp
susp5.webp
susp6.webp
 
So back to the frame

The last 2 things I did were to clean up the boxed ends of the rear x-member
frame24.webp

and to rotate the shock mount x-member 180 deg. so that the mounting locations for the top and bottom of the shock lined up (because the axle is sitting 4.75" further back then before)
frame25.webp
frame26.webp
frame24.webp
frame25.webp
frame26.webp
 
So I cleaned up all of the loose stuff on the frame and as much of the dirt as I could (cleaning out those boxed sections is such a *****!)
frame27.webp

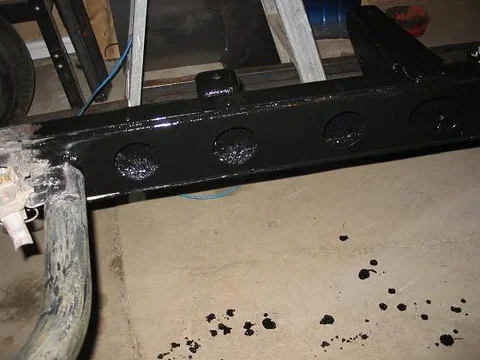
I used POR-15 for the frame (used it before with mixed success).

Marine cleaned it. Rinsed it off. Metal Readied it. Rinsed it off. Let it completely dry.

Then applied the paint using foam brushes (they work pretty good cause you can soak up a lot of paint and bloch the really rough areas to leave lots of paint in the cracks/bumps. They just fall apart after a while so you go through a lot of them (but a $4 for 24 or something stupid like that, who cares)
frame28.webp
frame29.webp
frame27.webp
frame28.webp
frame29.webp
 
After the first coat of paint, it sat for about 6-7 hours. When I started the second coat, the first coat had just a bit of softness/stickiness. I'd say that the POR guys would likely say to paint it a bit sooner.
frame30.webp

An hour after the 2nd coat, I put a real light dusting of primer on the sticky paint.
frame31.webp

After that dried (I waited 24hours), I put a gloss black coat on of cheap old rustoleum. Remember, this is not a full resto. If my buddy hadn't started cleaning the frame off, I would have never painted it!
frame32.webp
frame30.webp
frame31.webp
frame32.webp
 
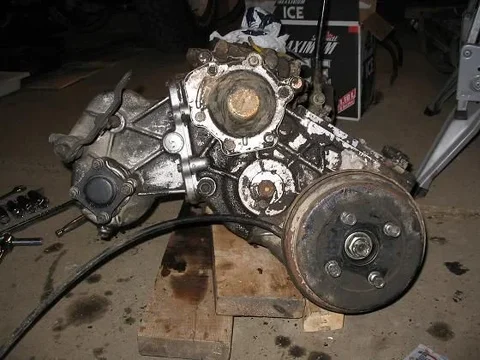
To end off my week, I put the tranny/transfer/PTO back in the truck.

I don't know how guys get these parts sparkling clean, but I had a hell of a time just getting them to look like this. There was a thick coating of dirt/gearoil on the whole assembly
assembly1.webp
 
Looks good so far. Getting parts clean and refinished takes a lot of patience and time, most people I know don't bother but I can't stand the thought of redoing something and not refinishing it but to each his own. I like how you lengthed the back of the frame and redid the supports at the very back, gave me some ideas to keep in mind when I get back to working on my frame. That boxed section is an enormous pain to clean out, first part I did when I wire brushed and cleaned mine up.
 
What is Marine Cleaned?

Pressure washed it or a chemical type cleaner.


Looks Great and you are making great progress!
Check out the POR-15 website. They have a cleaner called "marine clean" and an etching fluid called "metal ready".

The marine clean is a concentrated degreaser and the metal ready is a slightly acidic wash.

Apparently, the marine clean works great for all sorts of things but I haven't used it for anything but frame
 
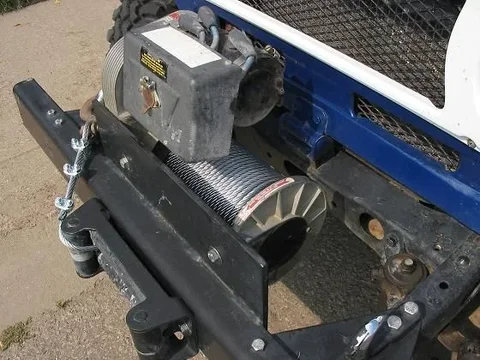
Along side all of the work I have been doing on the frame, I've also been cleaning up the PTO winch and building a bumper for the front.

Before I tore the truck apart, I had a 8274 mounted on a bumper I had built. The bumper was made with 3/8" thick plate that I had a local company bend into a c-channel. I then welded another piece of 3/8 plate to that for the mounting of the winch.
bumper1.webp
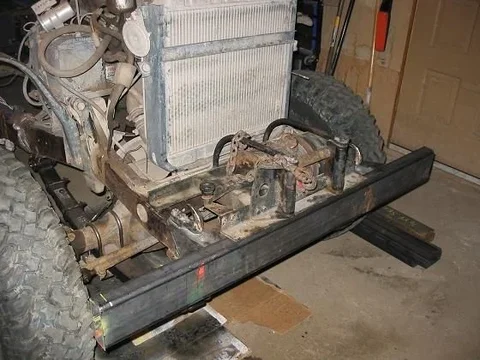
For the new bumper, I used a 2x5 steel tube (3/16" wall). Cut it to 4.5' and cut out openings on one side for the end of the frame to go into. The front of the winch sits on top of the bumper (just like a factory set up)
bumper2.webp
You can see that it still needs all of the holes drilled. And I'm planning to mount a receiver as well for a portable winch
bumper3.webp
bumper1.webp
bumper2.webp
bumper3.webp
 
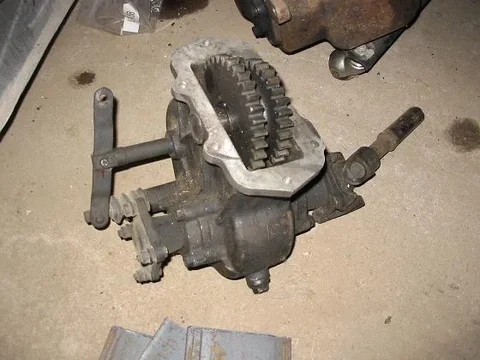
Here is a pic of the PTO box before I put it on. It's from an 81 BJ41 and bolts right up to my T-case. To my surprise, there was already a PTO drive gear in the T-case (I had another one but this saved me splitting the cases)
PTO3.webp

The box shifts real nice and I cleaned it up a bit before I bolted it on. It doesn't seem to leak (yet)
PTO1.webp

Now for the real challenging bit. For some reason, disassembling the winch was very difficult. I had to pull out the FSM to figure it out. It still didn't make sense. But then.... Seized. The gear box on the winch is in great shape, but I assume that is because the winch was NEVER used. The shaft was seized into the passenger side mount. Even worse, the lever to disengage the clutch was seized. It took a good deal of heat, hammering, and hoil to loosen it up.

Finally got it all cleaned up and I added a zerk for the main shaft and for the clutch lever (cannot see it in the pic, it is on the front)
PTO2.webp
PTO1.webp
PTO2.webp
PTO3.webp
 

Users who are viewing this thread

Back
Top Bottom