40/45 Mutt

This site may earn a commission from merchant affiliate
links, including eBay, Amazon, Skimlinks, and others.

Just asking, does it have fluid in it?

Funny. I guess I asked for that. What I should have said was it didn't seem to have been leaking. It was relatively clean on the outside where if the seals had been leaking, there would be oil all over it.
 
So we had a garage sale the other day, so while my wife and in-laws made the sales, I worked in the yard and finished up a few things on the chassis

1st was to tighten up all of the suspension - u-bolts, shackles and pins, and frame pins. The rear shocks are from the belton kit, but the front ones are the post style (I didn't realize the 55 series had a different front shock from the 40), so I used a pair of my buddies old rears. They're ugly, but they'll do for now.
susp7.webp
susp8.webp
 
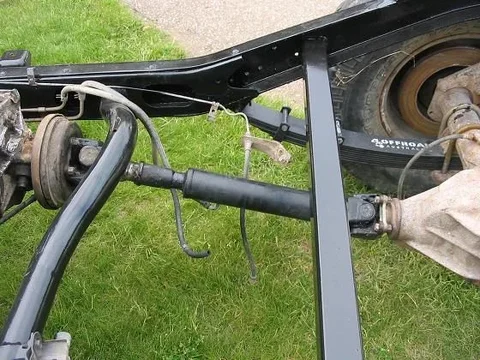
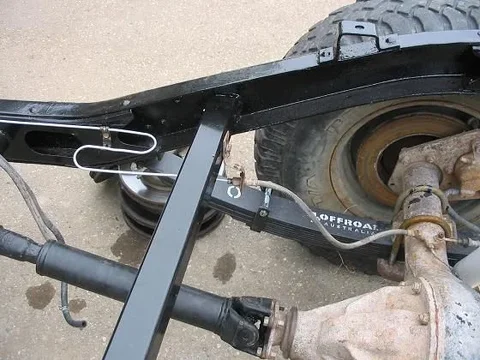
2nd - I replaced the old rear brake line (hard line) with a new one that was longer (and mounted to a different location). I used the factory soft line on the end of it.

Here's the original (dangling)
assembly2.webp

Here's the new line
assembly3.webp
assembly4.webp
assembly2.webp
assembly3.webp
assembly4.webp
 
3rd (and final for the weekend), was I bolted together, all of the freshly painted parts of the front bib AND I finished painting my old wheels

It's an alluminum bib, so it's a little different than the original in that the headlight openings are not inset. Because of this you have to mount the light "pods" on the back of the bib to get the headlights set into the bib (otherwise the headlights and bezel stick out forward about an inch from the original position)
body1.webp

The wheels were sandblasted, then coated with 2 coats of POR-15, a light coat of primer, then 2 top coats of black tremclad (same as the frame). Wanted to get them done because my new tires will be in this Friday!! WooHoo!! (you'll see them soon). The wheels are 15x7
assembly5.webp
assembly5.webp
body1.webp
 
Nice read Byron. You're progressing well.

I've put zerks on my winch exactly where you have.

Interesting that your POR15 primer was still tacky after 6-7 hours. (Maybe it's warmer here because I've always found mine dries in less than half that time.)

Like you, I like to paint over it before it has set hard.

:cheers:
 
Picked up my tires today.

Nice!!!!:steer:

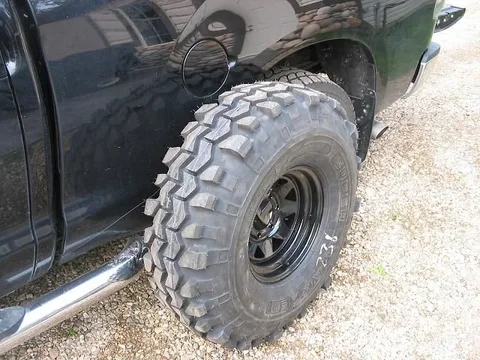
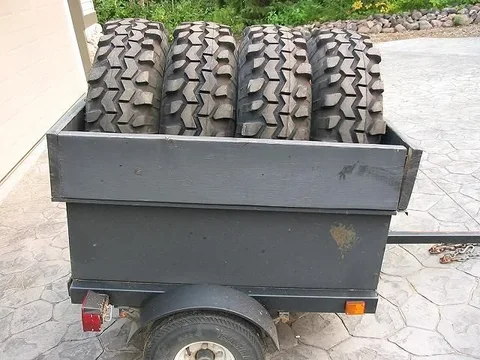
Q78-15. These were hard to find
IMG_9603.webp

Here they are in my trailer. Tight fit. There is about 46.5" on the inside of the trailer giving each tire a width just over 11.5"
IMG_9606.webp
IMG_9603.webp
IMG_9606.webp
 
I believe the rear right side motor mount is buggered. Should be one on top and one on bottom of the frame saddle.
 
Nice ! how far from FT.McMurray did you have to go to find those tires . Nice build ,

i have a couple of cousins working up there right now .

:cheers:

Apparently, Kal-Tire bought a bunch of tires from Interco in 2007, early 2008 before the recession and now have a bunch in storage that Interco isn't even making right now. It does depend on the Kal-Tire though, as the one in McMurray didn't have access to them, and the one in Sherwood park (where I bought them) were able to get them in 3 days from Toronto!!
 
Of course I had to bolt the tires on the chassis as soon as I got home

Clearance is a little tight on the driver side front when fully turned to the left (tire rubs on pitman arm and spring clip simultaneously) and at full turn to the right the tire barely hits the center arm and spring. A little adjustment to the stops and that will be fixed.

The rears are going to be a challenge with the clearance on the back of the 45 cab. I may unbolt the rear axle and extend the perches a little bit so that I can drill a new alignment hole on the perch for the spring center pin. This way I could move back another inch. And because my shaft is almost too short (my driveshaft that is:p), another inch will not hurt it.
parts1.webp
parts2.webp
 
Well finally got around to working on the front bumper again. I cleaned up the ends nice and smooth
bumper4.webp

I also welded in all of the inside "plugs", one of which I cut through to install the receiver. You can see this from the back..
bumper5.webp

And last is a pic of the receiver from the front
bumper6.webp
bumper4.webp
bumper5.webp
bumper6.webp
 
I then welded in the receiver. The back side was a little challenging as there was little room to work
bumper7.webp

Here's the front side. I left it sticking out just enough that it would be easy to get the pin in and out
bumper8.webp

Here you can see the bumper mounted and the receiver location. It's placed there to clear the winch and the bolts for the bumper. It's also a lot stronger near the frame ends (as opposed to putting it right in the middle where the bumper might bend inward when pulling)
bumper9.webp

I'm planning to mount something on the other side to balance off the receiver (can't mount another receiver because of the worm gear of the winch)
bumper7.webp
bumper8.webp
bumper9.webp
 
:bounce:So I decided to move the rear axle back another 1.25", so I took it off, extended:bounce2: the perches and drilled a new allignment hole. You can see the 2 perches extended with the original allignment holes on top, the next ones down are the first holes I drilled to move the axle back (1.25"), then the bottom holes are the newest ones (2.5" from original)
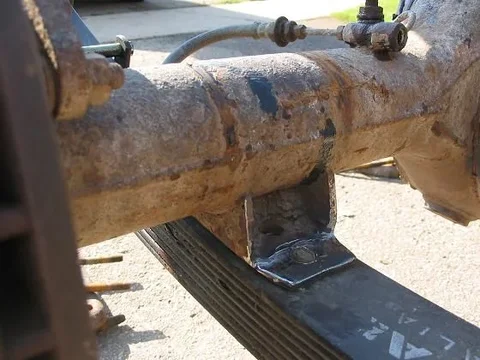
susp9.webp

Here you can see the axle sitting in place in the new center pin hole. This stretched the driveshaft some, but not too much
susp10.webp

Of course, I had to put a new hole in the u-bolt plate (forgot about that one). The hole was right on the edge, but it still worked
susp11.webp
susp9.webp
susp10.webp
susp11.webp
 
Any pics with the tub on it yet?

Finally I have sit the tub/firewall on the frame, but I am a little behind on this thread. Sorry.

Here we are with my boys out for a little offroading without the cruiser. My older boy is used to the cruiser, my little guy doesn't know what he is missing. But he loves the rhino.
myboys1.webp
myboys2.webp
 
Here I was finallizing te allignment for the PTO shaft. You can see where the pulley block will mount (have the bracket complete, just haven't taken a pic). The mount attaches to the rad bracket on the driver side
pto4.webp
pto5.webp
 
Finally I got some of the firewall done. Cut out the rusted peices (the bottom of the door frame, the floor under it, and the lip of the rocker on both sides)
body2.webp
body3.webp
Here is my buddy Shane helping me out. He did the sheet metal work so he now owns part of my cruiser.
body4.webp
body2.webp
body3.webp
body4.webp
 
So we finished up the new steel welding for the firewall and set the cowl/firewall and the 45 tub on the frame. In the pic, the tub is sitting 1/2" too high. But it's pretty close. Still need to do some bodywork before they are bolted together.
body5.webp
body6.webp
You can see how close the body is to the tires, so it will need to be trimmed (part of the plan)
body7.webp
body5.webp
body6.webp
body7.webp
 

Users who are viewing this thread

Back
Top Bottom