1978 LPB Teardown and Rebuild

This site may earn a commission from merchant affiliate
links, including eBay, Amazon, Skimlinks, and others.

Wow, now that is some creative thinking, I like the cruiser air box and had never thought to recreate and reuse it before.

Was your exhasut manifold exhaust tubing?,

Rob:popcorn:
 
I installed the right side. It looks a bit swiss cheesy here but its not too bad in person.
View attachment 356160
The left side has some conflicts with the existing 2F mount rivet holes. The larger holes shown here are from the 2F mounting brackets that I removed. The smaller ones are pilot holes for the nutserts that need to be drilled out to a touch over 1/2". With them so close together drilling would be a PITA and the nutsert won't anchor properly. So I will weld the offending holes shut.
View attachment 356161
I want a smooth inner surface after I am done so I clamped a bit of 1/2" thick aluminum to the inside of the frame. When I MIG the hole shut the filler material will not adhere to the aluminum and it is much easier to fill the holes. In this shot I have already done the lower hole and am prepared to do the upper one.
View attachment 356162


Yep, it takes some practise and even then if the hole is slightly bigger than the nutsert, you will struggle to get it to stop spinning in the hole.

I wish I had purchased the bigger set of nutserts myself.

Looking good,.

Rob:beer:
 
Great work on the turbo setup and exhaust manifold. Soon Nascar is going to be calling you to build theirs!!

THAT would be cool - they've got all the cool tools

You are amazing. Awesome fab work. You must be a very patient person bc you clearly take the time to get it right. Great reading and motivation. Keep it coming.

My wife has another name for it...

Anal


Yep - I've realized over the years that I am definitely a details guy

WOW! I am stunned. Incredible fab work and attention to detail. Thanks again for sharing. I'm loving the results and can't wait until you get to fire it up and drive. :)

You and me both!

Wow, now that is some creative thinking, I like the cruiser air box and had never thought to recreate and reuse it before.

Was your exhasut manifold exhaust tubing?,

Rob:popcorn:

Two points there related - thin material. That filter housing is REALLY thin, like 26 or 30 gauge so careful welding is required. The brackets are much thicker so that helps but welding the original inlet hole required TIG welding with silicon-bronze which is basically brazing.

The manifold is 16 gauge exhaust tube which I have used before but not with the weight of a turbo hanging from it. Its very strong now but with a few hundred heating cycles on it combined with road or off road vibration I dunno. Its the same stuff guys make performance headers out of, but again, that turbo is like 20-25#. I told myself when I started that I could always brace it somehow from below but I haven't decided yet. I doubled up the material where I thought the most stress would be and decided not to pay for ceramic coating so that if it cracks I can weld and gusset the next weakest part.

Your work never fails to make me smile... Beautiful...

Thanks Coolerman, Peter, others - those types of comments are my motivation. Well that and my wanting to eventually park in the garage again :D.
 
Coolerman

I have seen some of your electrical brilliance in a few other threads. I have to eventually go through my harness to make my 12V 3B diesel run in my 2F chassis. My basic plan is to take the full harness and peg it up on a board to go through it adding and removing bits. I want to fix any defective wiring or connectors but there is more to it. I will be adding stuff. Stuff like 6 new gauges, large screen GPS, two way radio, dual battery system, house battery glow plug relays, EDIC relays, alarm system(s), fuel transfer pump, etc,etc... I want to incorporate all mods directly into a custom harness where appropriate for a squeaky clean finished product.

I guess I don't really have a direct question for you other than to ask if I might pick your brain occasionally for technical advice on components and "how to".:D What kind of wrap, connectors, wire gauge etc. stuff like that.
 
You kidding? Teach me to fab metal like that and I'll come up there and wire it for you! :lol:

Seriously, when you get to that stage all you have to do is ask. PM me for my phone#. I'll help as much as I can.


Coolerman

I have seen some of your electrical brilliance in a few other threads. I have to eventually go through my harness to make my 12V 3B diesel run in my 2F chassis. My basic plan is to take the full harness and peg it up on a board to go through it adding and removing bits. I want to fix any defective wiring or connectors but there is more to it. I will be adding stuff. Stuff like 6 new gauges, large screen GPS, two way radio, dual battery system, house battery glow plug relays, EDIC relays, alarm system(s), fuel transfer pump, etc,etc... I want to incorporate all mods directly into a custom harness where appropriate for a squeaky clean finished product.

I guess I don't really have a direct question for you other than to ask if I might pick your brain occasionally for technical advice on components and "how to".:D What kind of wrap, connectors, wire gauge etc. stuff like that.
 
Very, very, well done. definitely the way that fab should be done. Looks as good as, or better than, factory. Congrats!
 
Coolerman - I checked out your website and I know where to get my wire now ;).

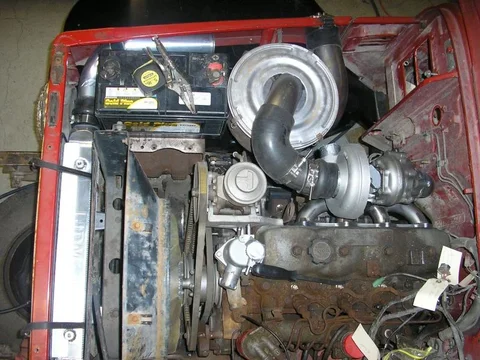
A shot of the right side engine bay. I need to finalize the rad and intercooler mounts so I can fab the piping.
P1010003_50.webp
Finished up the welds on the housing - just need to thread the center post for the wing nut.
P1010013_29.webp
The inside
P1010017_22.webp
P1010003_50.webp
P1010013_29.webp
P1010017_22.webp
 
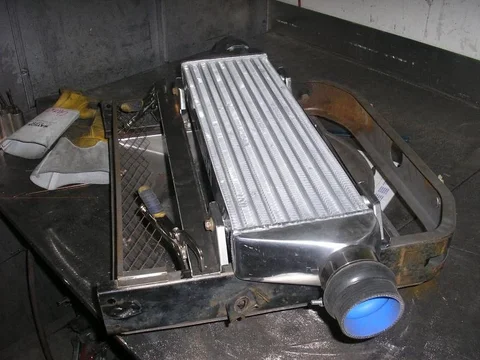
So the intercooler is big enough to fill the main opening in the bib and I decided to mount it to the rad support at the proper height to do so. The IC actually sits a little off center. I used the headlights to center the IC left and right rather than the rad support and I have the IC inlet/outlet below the plug to the headlights.

I made up a couple of brackets. The upper one replaces the original stiffening channel and the lower one is all new.
P1010005_43.webp

P1010007_37.webp

P1010008_35.webp
P1010005_43.webp
P1010007_37.webp
P1010008_35.webp
 
All welded and bead blasted - showing the original stiffener that I replaced with mine.
P1010009_33.webp
Bottom view
P1010010_31.webp
I told him I'd make him immortal - Shawn, the man with the stead welding hand. The holes are obround so I can fine tune sliding left and right.
P1010012_29.webp
P1010009_33.webp
P1010010_31.webp
P1010012_29.webp
 
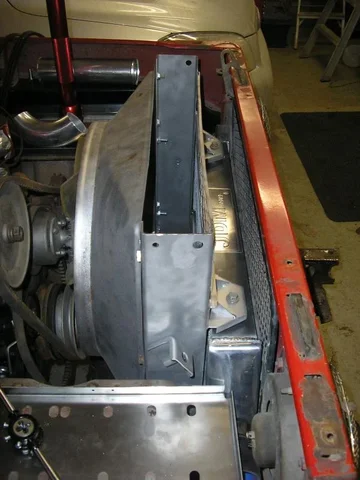
Side view with shroud. I cut the shroud down about as far as the rad moved back. I trimmed a little more around the bottom to allow the shroud to be pulled up without removing the fan. The bracket for the rad support bar visible here was rotated about 20 degrees CW to better fit after moving back. It mounts to the battery bracket.
P1010015_25.webp
I also removed the horn mounting brackets from the rad support. They were poorly located for the new rad position. I will weld them back on once I find out where they will fit better.
P1010014_27.webp
I had to add two M8 nuts welded to the inside of the rad support channel. The 2F shroud had a different hole pattern on one side and required the new nuts. I used the 3B shroud as a template, drilled and added nuts. I don't have a 40 series 3B rad but I imagine it will use these same new captured nuts.
P1010016_23.webp
P1010015_25.webp
P1010014_27.webp
P1010016_23.webp
 
Kevin,

Have I told you lately that I love you?

Josh
 
Awl_TEQ just out of curiosity what made you choose to go with an air/air intercooler vs a water/air intercooler? You must have a very understanding wife to let you play out in the garage so much. Keep up the great photos.
 
Kevin,

Have I told you lately that I love you?

Josh


Awwww :o

Awl_TEQ just out of curiosity what made you choose to go with an air/air intercooler vs a water/air intercooler? You must have a very understanding wife to let you play out in the garage so much. Keep up the great photos.


Nothing other than when I think of an intercooler it's "supposed" to be air to air. Nostalgia/ oldschool perhaps but a friend had done a couple before on 40 series and they worked ok. I also like to fabricate and making up one piece multi-bend aluminum tubing is fun :D.

As for the wife: A) I make sure she never sees any reciepts and B) she gets to fly to Dallas, New York and Las Vegas to shop with her sister so....

I offered to let her work on the truck while I traveled with her sister but that didn't go over well :meh:
 
Last edited:
Awwww :o


Nothing other than when I think of an intercooler it's "supposed" to be air to air. Nostalgia/ oldschool perhaps but a friend had done a couple before on 40 series and they worked ok. I also like to fabricate and making up one piece multi-bend aluminum tubing is fun :D.

As for the wife: A) I make sure she never sees any reciepts and B) she gets to fly to Dallas, New York and Las Vegas to shop with her sister so....

I offered to let her work on the truck while I traveled with her sister but that didn't go over well :meh:

You must have a nicer sister-in-law than I do. My Wife would threaten ME with making me go shopping in New York with my Sister-in-law.

Josh
 
;)...


there are three of them :grinpimp:
 
Threaded the rod to hold the lid on the air cleaner
P1010001.webp
Here is the intercooler in the truck
P1010002.webp
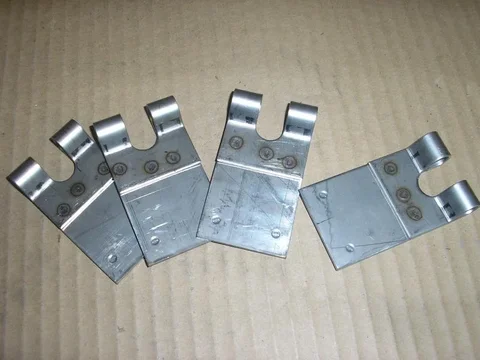
Guess what these are...
P1010003.webp
P1010001.webp
P1010002.webp
P1010003.webp
 
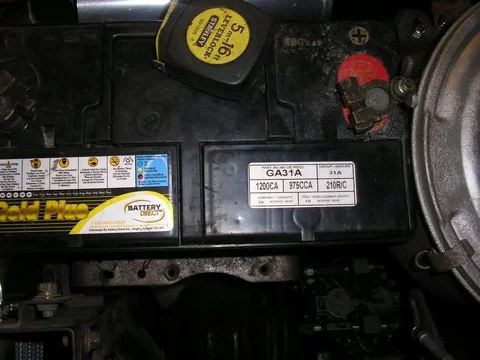
I want to use two of these group 31A batteries in this build but the stock trays are too small in length.
P1010004_43.webp
So I made up two stainless steel battery trays roughly similar to the stock ones. Because I couldn't stamp them out like Toyota I made short hat channels to lift the battery above the bolt heads. Short is the operative word because these 31A batteries are taller and get close to the hood. These two are custom in that the hole locations are side specific (left and right battery) for my particular needs. Obviously I would be willing to fund my habit by making trays for others if anyone would like that.
P1010004.webp
T-bolt straps installed
P1010005.webp
P1010004.webp
P1010005.webp
P1010004_43.webp
 

Users who are viewing this thread

Back
Top Bottom