100 Series Button Repair How-To - A/C, Defrost, Recirc etc (5 Viewers)

This site may earn a commission from merchant affiliate
links, including eBay, Amazon, Skimlinks, and others.

Bringing topic back up.. Does anyone have link to buttons with rubber cups which I can use? One link above points to UK eBay and they wouldn't ship to US, another link points to Overstock which doesn't seem to work either..

I can resolder, but I'd rather keep it stock

Is this what your looking for?
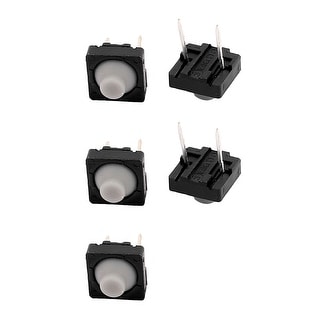
 
I think he wanted the rubber cups off the switch in which case the switch body doesn’t matter.
 
Yes, I did! Sorry, link seem to work, I just looked at a top banner like and didn't scroll. It felt like link was broken or something.
I had just one button not working well, so I swapped rubber from unused (capped) rear heat button and all seem to be good now, so unless something else goes bad I am good for now
 
As I drove to work with frosted mirrors, and some other buttons take some extra punches to work, I am looking forward to trying the new booth method! Just ordered, and will update after I install!
 
I have three more buttons that aren't working right and I have to boots left. Ugh. But the ones that don't work are super annoying. I think they worked better in the warm weather which is why I didn't think to replace them at the time.

I also picked up some nylon picks to hopefully do less damage to the boots this time around.
 
Guys, there’s no need to buy new boots or solder new contacts. The problem lies in the conductive carbon paint that is inside the boot that presses against the contacts upon pressing the button.

I just bought some circuit board conductive paint like this:

Amazon product ASIN B01MQ4F1T5
I repainted the black contact point inside the boot, let it dry for 24 hours, reinstalled and the buttons perform like new. No need to solder or any of that nonsense.
Not familiar with electronic repairs or conductive paint but just noticed a conductive paint pen online. Wondering if there’s any issue trying one of those.
 
Not familiar with electronic repairs or conductive paint but just noticed a conductive paint pen online. Wondering if there’s any issue trying one of those.
Might work? Not sure. But you're going to have to take the boots off anyway, which means you will need to put them back. If you are going through that trouble think about getting new switches and harvesting the boots.

I had four more that were going bad on me and finally just said F**K it and rebooted them all (except the fan speed/clock/antenna) and they work great. The fan speed are kinda iffy but I only had one switch left over and and it's kind of tight working against the display and I usually leave it on AUTO so the fan speed isn't really needed much.

The first one is a b**ch to do but once you get it, they become easier. I did this in two rounds. First one was three switches using metal picks. Second round I used plastic picks from Harbor Freight and I did the remaining six in the same amount of time (or less) Second round would have taken maybe 90 minutes if I didn't have a 4yo wanting to help.

1698945943071.png


IMG_8023.JPG
 
Can't find the pick set I used on Harbor Freight so maybe I bought it on Amazon? This one looks identical to the one I used and it make it a ton easier.

Amazon product ASIN B00G8W8FDI
 
I had previously disassembled and cleaned the contacts with isopropyl, but the buttons were as stingy as ever. Then I replaced the domes with ones from these buttons from Adafruit and it worked great. I only did the AC and recirc buttons, but I'm astonished with how easy they toggle now. Picture shows how the OEM blue domes compare to the Adafruit ones.

Thanks to everyone who contributed to the thread.

Fwiw, I applied some dielectric grease and used toothpicks and needle nose pliers to get the domes back in place.

IMG_9675.jpg
 
Just curious whether anyone has done this on a later model 100? I'm hoping that beneath the facia the switches are similar across years, but wanted to ask before ordering anything.

Thanks
 
I am now in a situation to get the rear ac bottom fixed. I will follow the boot replacement. The swith works about 50% of the time and today I realized one of the illumination bulb is blown, so ordered 10 of those switches (on ebay: use the same name shown in post 81 and do an ebay search). Also ordering OEM light bulbs for the illumination.

The same contact is also used inside the TV remote controllers.
 
Project accomplished:
2000 Landcruiser

I bought these switches off of ebay 10 pieces $7.57.
10Pcs 8mmx8mm Panel PCB Momentary Tactile Tact Push Button Switch 2 Pin DIP
Also did all light bulbs on HVAC panel: seller PATRSOUQ.com

1) Eight bulbs of 84999-70007
2) Two bulbs of 90010-05104

Replaced only the "REAR" "AC" and "RECIRC" buttons

Removed 3 boots and installed using a twizer and a pic (2nd picture)

REAR switch swap took less than 30 seconds! Seems like with this thread, each one is getting smarter :)
Due to the location of the AC and RECERC, each took about a minute

NOTE: When installing the Hazard and diff lock buttons, have the switches on the circuit board at the extended state 3rd pic (not pressed-in, 5th pic) and hold the two buttons on the dash panel pressed in. Make sure you carefully slide the circuit board/switches to latch into the buttons on the panel. There is a cutout on the circuit board (4th pic) allowing room to slide.

Also it is good time to clean the illumination panel with lightly damped q-tips (cotton buds)

Enjoy!

DSCN2198[1].JPG


DSCN2199[1].JPG


DSCN2203[1].JPG


DSCN2201[1].JPG


DSCN2202[1].JPG
 
Last edited:
I successfully replaced the caps on three buttons today and now the Rear Defrost and Side Mirrors are working again on my 2005 Land Cruiser with Nav.

I want to thank everyone for sharing all their knowledge and experiences in this thread.

When I first pulled the blue OEM caps off I thought it would be impossible to get the replacement grey ones inserted, but turns out not to be that difficult. I uploaded a video here:


I also noticed the replacement grey buttons are slightly taller than the OEM ones which is probably better to make contact longer. See photo.

Also the contact inside the new boot is slightly thicker than the OEM. Probably the source of the problem.

Again thanks everyone for your help with this. I desperately needed these to work again...

IMG_20231217_143837.jpg


IMG_20231217_190733.jpg


IMG_20231217_155424.jpg


IMG_20231217_191640.jpg
 
Wondering if anyone happens to know the spec on the little green backlighting bulbs?

I was reading thinking that was a subset of this thread.

There is a definitely a thread on those bulbs - followed it to replace some myself a couple of years ago and could stand to do a few more and refurb some of these buttons.
 
im going to try these "conductive ink pens" for recoating the inside of the boot.....may work great and a lot less $$ that the other conductive paint i have seen posted.
Amazon product ASIN B08DVD14FP
 
Just wanted to add to this as I hadn't seen where anyone had just replaced the whole button. Having done a previous and short lived repair (in which I found fighting the little boots on and off to be ridiculous) I was back to reading the updates from this thread. I see everyone is still replacing the boots from new buttons. I decided the hell with that. I bought the new buttons and soldered them in. I picked up these uxcell 20Pcs 8mmx8mm Panel PCB Silica Gel Momentary Tactile Tact Push Button Switch 2 Pin DIP. First tests they work perfectly and no ****ing around with the stupid little boots. On the lower row that has the little plastic guides around the button I had to round off the corners of the square buttons, which took a few minutes. All in all, de-soldering and re-soldering probably took me an hour to an hour and a half.
61A4Epzzc7L._SX522_.jpg
 

Users who are viewing this thread

Back
Top Bottom