What have you done to your 200 Series this week? (46 Viewers)

This site may earn a commission from merchant affiliate
links, including eBay, Amazon, Skimlinks, and others.

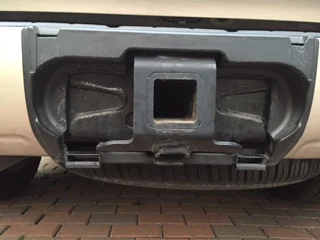
I can't recall if I posted how I did this. I'll try to dig it up. In reality all I did was use a dremel to cut the extra plastic away. You could also probably do this with a sharp Exacto knife or a good set of scissors or tin snips and maybe some sand paper just to file down the edge.

Here's a photo of the result.


Thank you sir
 
@linuxgod I need to do this. I can barely fit a normal pin. Do you have a post on this somewhere?

I also have a 2013 LC200, and honestly I am at a loss to understand why all this plastic cutting is necessary.

Here are some pics of my unadulterated hitch area with an easily accessible locking pin:

IMG_2611.JPG

IMG_2612.JPG

IMG_2615.JPG


What am I missing?

BTW, here's a link to that locking hitch pin: Master Lock Receiver Lock, Stainless Steel Barbell Receiver Lock, Fits 5/8 in. Receivers, 1469DAT

HTH
 
I also have a 2013 LC200, and honestly I am at a loss to understand why all this plastic cutting is necessary.
What am I missing?

I used a threaded hitch pin for the anti-rattle on my bike rack and there wasn't enough clearance for my socket and ratchet to fit on the bolt head with the plastic in place, I needed a few more mm of clearance on the backside. I had to use an open-ended wrench before trimming the plastic. I don't have pictures to show because I now have an aftermarket steel bumper
1597796389868.png


The extra clearance with the plastic removed also makes cotter pin insertion and removal easier. I sure there are also larger hitch pin locks the wouldn't even fit with the stock plastic in place.
 
I also have a 2013 LC200, and honestly I am at a loss to understand why all this plastic cutting is necessary.

Here are some pics of my unadulterated hitch area with an easily accessible locking pin:

View attachment 2408428
View attachment 2408429
View attachment 2408430

What am I missing?

BTW, here's a link to that locking hitch pin: Master Lock Receiver Lock, Stainless Steel Barbell Receiver Lock, Fits 5/8 in. Receivers, 1469DAT

HTH
I have the same pin and could not get it to lock. Maybe I need to do more finger pushups? Anyway it’s like 0.3oz of Tupperware I did not need..
 
Haven’t technically done anything to the cruiser yet this week, but I was super stoked to find these on the front step when I got home from work. Icon rebound 17” in bronze. I think I’ve decided to wrap them in 285/70/17 ko2s. Still debating on a mild lift. Currently looking at ome 2700/2721. Or Bilstein’s recently released 6112/5160 set-up for our rigs. Also, for those of you running these Icons, what lug nuts are you guys running?
8A8AEF5C-0B0F-471A-BEF1-3B0323315385.jpeg
 
Haven’t technically done anything to the cruiser yet this week, but I was super stoked to find these on the front step when I got home from work. Icon rebound 17” in bronze. I think I’ve decided to wrap them in 285/70/17 ko2s. Still debating on a mild lift. Currently looking at ome 2700/2721. Or Bilstein’s recently released 6112/5160 set-up for our rigs. Also, for those of you running these Icons, what lug nuts are you guys running?View attachment 2409829
Nice! I have same wheels. Used ProComp black lug nuts.
 
Also, for those of you running these Icons, what lug nuts are you guys running?

6x McGard Black Cone Seat SplineDrive Lug Nut Set - M14 x 1.5 # 65315BK = $29.00 each


2x MCGARD # 65302 Install key= $16.00 each

I recommend purchasing 2 of the socket adapters. If you crack one it will flex under torque load and simply spin around the lug nut making it to impossible to remove the wheel/tire. The lugs are sold in 4 packs and it never hurts to carry a few spares.

Mcgard is who manufactures the TRD set with locks. I don’t care for locks and wanted black lugs. Wheel, Trd Wheel Installation Kit - Toyota (PTR27-60110) | Toyota Parts
 
Haven’t technically done anything to the cruiser yet this week, but I was super stoked to find these on the front step when I got home from work. Icon rebound 17” in bronze. I think I’ve decided to wrap them in 285/70/17 ko2s. Still debating on a mild lift. Currently looking at ome 2700/2721. Or Bilstein’s recently released 6112/5160 set-up for our rigs. Also, for those of you running these Icons, what lug nuts are you guys running?View attachment 2409829
Those are some sexy ass wheels. Should look great on the black LC. Can’t go wrong with 285/70r17’s especially on a stock suspension. Post pics when you pick out tires and get them mounted!
 
6x McGard Black Cone Seat SplineDrive Lug Nut Set - M14 x 1.5 # 65315BK = $29.00 each


2x MCGARD # 65302 Install key= $16.00 each

I recommend purchasing 2 of the socket adapters. If you crack one it will flex under torque load and simply spin around the lug nut making it to impossible to remove the wheel/tire. The lugs are sold in 4 packs and it never hurts to carry a few spares.

Mcgard is who manufactures the TRD set with locks. I don’t care for locks and wanted black lugs. Wheel, Trd Wheel Installation Kit - Toyota (PTR27-60110) | Toyota Parts
Thanks for the info, much appreciated.
 
Replaced the 5+ year old weathertechs w/ Husky's all around. Love how deep they are! Also, the cutouts have proven useful for me and the seatbelt retainer is the perfect height to hold a water bag upright for wetsuits or dog towels.

20200820_095649.jpg


20200820_095702.jpg


And ordered up a full set of the Escape Gear "tough canvas" covers... my dogs arent overly trunk friendly (would pay for opening rear windows!)
 
Last edited:
No pics because I'm lame, but I covered both rear doors and partial rear quarter panels in 3M scotchgard pro , and the headlights with xpel ultimate. I have found that getting the surfaces as immaculate as possible before applying the film works best. I clay barred twice, then polished in 3 passes with menzerna polishes. Then I did a final wipe with isopropyl alcohol / distilled water mixture. It's also important to get the ratios right the tack and slip solutions when applying PPF. I purchased the headlight kit from Xpel direct, and I purchased the roll of 3M scotchgard pro on ebay. 18x96" roll for 100 bucks.

Currently measuring out the rest of the body panels as I plan to cover the whole truck in this stuff!!

Edit : I ordered an 8x72" roll of scotchgard pro for the top of the roof. The area between the windshield and sunroof.
 
Last edited:
No pics because I'm lame, but I covered both rear doors and partial rear quarter panels in 3M scotchgard pro , and the headlights with xpel ultimate. I have found that getting the surfaces as immaculate as possible before applying the film works best. I clay barred twice, then polished in 3 passes with menzerna polishes. Then I did a final wipe with isopropyl alcohol / distilled water mixture. It's also important to get the ratios right the tack and slip solutions when applying PPF. I purchased the headlight kit from Xpel direct, and I purchased the roll of 3M scotchgard pro on ebay. 18x96" roll for 100 bucks.

Currently measuring out the rest of the body panels as I plan to cover the whole truck in this stuff!!

Any tips for DIY? What sort of equipment do you have?
 
Any tips for DIY? What sort of equipment do you have?


Sure.

20 oz of distilled water to a tablespoon of J&J baby shampoo for the slip solution. You spray this on the film and surface of the vehicle initially to "slip" the film in place.

70% distilled water, 30% isopropyl alcohol for the tack solution. You spray this under the film and on the vehicles paint to "tack" the film to the vehicle in a faster manner than the slip solution. Tacking the edges seems to work well

Xacto knife to cut the film (NOT on the car's paint) I cut the film 1-2 mm away from the panels to roll over the edges once the film was in a dry state

Silicone squeegees

Patience. There will be times that the film will "lift". Just be patient and wait for the film to dry a bit more, it'll stick!

No heat gun at all? Impressive! Thank you.
 
Ill add I had a LR4...the last of the non russian doll trend that LR moved to in their less than imaginative design ideology. Never had a problem, drove like it was on rails and would climb right out of soupy mud and hunting areas. Its only downfall was my 18 yo daughter. After 3 wrecks she finally put it on the scrap heap by T-boning someone and ripping off portions of the front end. No one was hurt thank goodness but insurance said the cost of parts far exceeded the payoff. Lol.

On a side note...LCDC damage assessment found a bent trailing arm. Looks like ill be playing driveway mechanic when i get the replacement one (SPC version found on Slee).

funny you mention the LR4, we still have one and have had a similar experience , never has seen a flat bed (knock on wood). we tend to be meticulous on maintenance above and beyond (pun intended if you have ever watched a LR ad) what LR recommends. BUt even on the land rover forums, the LR4 generally tends to be considered the more reliable as compared to its range rover brethern!! Which is surprising given that RR is their flagship SUV. But the way my family uses the LR4 - as it is intended to be - we won't dare to ever venture into the RR territory... the thought of fixing that $$$$$$$ leather and other gremlins freaks me out.

Glad you had a good experience with the LR4. I am hoping the 200 2021s start making their way over here this fall for me to get wifey to drive one!!! I know she'll love it ;-)
 

Users who are viewing this thread

Back
Top Bottom