
Navigation
Install the app
How to install the app on iOS
Follow along with the video below to see how to install our site as a web app on your home screen.
Note: This feature may not be available in some browsers.
More options
Style variation
You are using an out of date browser. It may not display this or other websites correctly.
You should upgrade or use an alternative browser.
You should upgrade or use an alternative browser.
What have you done to your 200 Series this week?
- Thread starter MScruiser
- Start date
-
- Tags
- 200 series
This site may earn a commission from merchant affiliate
links, including eBay, Amazon, Skimlinks, and others.
finally got the Rooftop Tent more properly mounted although the wind noise on these round yakima bars is pretty awful at anything over 50. Would need to add the wind screen for sure if this wasn't a temp solution until i get my Gamiviti rack installed on the 19th!
Something like a rope or bungee cord wrapped around the front bar will help. 6-10 wraps is about all you need.
It’s spacers Friday! Just finished installing the OEM front coil spacers and 1.25” Spidertrax wheel spacers and I am beat. Took me about 4 hrs due to the tie rod ends being stuck.
Did you use a specific write-up for the coil spacers? I’m about to do the same job.
Did you use a specific write-up for the coil spacers? I’m about to do the same job.
I followed this: LandCruiser 200 - Suspension kit - Project 200 but I also end up removing the abs sensor wire (held by 10mm bolts) to prevent it from getting damaged/stretched. I have a 2019 which have the updated KDSS valves so I didn’t have the issues others had with rusted hex bolts but I did fought the tie rod ends.
I followed this: LandCruiser 200 - Suspension kit - Project 200 but I also end up removing the abs sensor wire (held by 10mm bolts) to prevent it from getting damaged/stretched. I have a 2019 which have the updated KDSS valves so I didn’t have the issues others had with rusted hex bolts but I did fought the tie rod ends.
Awesome. Thanks for the tip. Even though I have the hex bolts on my ‘13, I made sure to pick up a California vehicle so they are in near perfect condition (and recently treated with antiseize and LPS). So that’s one trouble spot averted.
Last edited:
Awesome. Thanks for the tip. Even though I have the hex bolts on my ‘13, I made sure to pick up a California vehicle so there in near perfect condition (and recently treated with antiseize and LPS). So that’s one trouble spot averted.
Just in case you don’t have the torque specs. Found this here and values are the same for Tundra/200.

Just bought this Land Cruiser and installed the Fender mirror and bumper kit (Ordered from another Country). More to come in near future
View attachment 2406099
The purpose of that JDM mirror is to get a better view of oncoming traffic when stopped at an intersection with an obstructed view. In Japan, traffic drives in the left lane as opposed to the right lane here in the U.S. This means that when stopped at an intersection in Japan, oncoming traffic in the closer lane to where you are stopped is coming from the right. In the U.S., however, oncoming traffic in the closer lane is coming from the left.
In Japan, the steering wheel is on the right. When looking at that JDM mirror, the driver is afforded an unobstructed view of oncoming traffic in the closer lane coming from the right. It's a great feature - I used it all the time when driving in Japan.
In the U.S., the steering wheel is on the left. When looking in that JDM mirror, the driver is afforded an unobstructed view of traffic in the closer lane after it passed the intersection. This is of little or no use. For the U.S., the mirror should be on the right (passenger) side fender, not the left (driver) side fender.
I've often thought of sourcing one of those JDM mirrors just to see if I could adapt it for mounting on the right side instead of the left side. Do you think this might be possible?
HTH
Last edited:
The purpose of that JDM mirror is to get a better view of oncoming traffic when stopped at an intersection with an obstructed view. In Japan, traffic drives in the left lane as opposed to the right lane here in the U.S. This means that when stopped at an intersection in Japan, oncoming traffic in the closer lane to where you are stopped is coming from the right. In the U.S., however, oncoming traffic in the closer lane is coming from the left.
In Japan, the steering wheel is on the right. When looking at that JDM mirror, the driver is afforded an unobstructed view of oncoming traffic in the closer lane coming from the right. It's a great feature - I used it all the time when driving in Japan.
In the U.S., the steering wheel is on the left. When looking in that JDM mirror, the driver is afforded an unobstructed view of traffic in the closer lane after it passed the intersection. This is of little or no use. For the U.S., the mirror should be on the right (passenger) side fender, not the left (driver) side fender.
I've often thought of sourcing one of those JDM mirrors just to see if I could adapt it for mounting on the right side instead of the left side. Do you think this might be possible?
HTH
I inquired and I believe that is not possible. As for your information in your earlier paragraphs about the purpose of the mirror, I’m very well aware of that because I was born overseas and go back pretty much every year so I grew up watching Land Cruisers with a RH steering wheel. Now I once stumbled upon a mirror that mounts on right side for LH steering wheel (like the US market) but I’ve lost the website and that mirror was not the one you see in my picture. It was smaller, older one for older LC (if I remember correctly). If I happen to come across it again, I will let you know. If you do find a mirror for right fender, you can shoot me a PM as well
")
Working on front camera relo. Got distracted by my hazy sombrero so I cleaned it. My wife calls these “Squirrel” projects as in someone says “squirrel” and I go case it....
before:

During:

After:

used a Turtle Wax head light Restore kit. Not perfect, a little haze remains, but much better. Squirrel dead. Back to camera relo.
before:
During:
After:
used a Turtle Wax head light Restore kit. Not perfect, a little haze remains, but much better. Squirrel dead. Back to camera relo.
Went to hidden falls after installation of doug thorley headers and dirty deeds exhaust.
The list continues:
List of items:
1. Tough Dog suspension install
2. Long Ranger fuel tank install
3. Safari Snorkel install
4. Install ARB Twin Compressor
5. Install Front Runner Roof Rack and tables
6. Fabricate front skid plate
7. Fabricate winch mount
8. Install warn 12S Zeon
9. Install Switch-pros 9100 and wire up
10. swap out LC steelies for EvoCorse DakarZeros
11. Install Blue sea Systems switch panel and charging panel
12. Install Rago Fab rear window panel (powdercoat and paint to match)
13. Install Lazer Lamps front driving lights
14. Install Superior Engineering upper control arms
15. replaced rear drive shaft
16. replaced front diff mounts
17. installed Auburn gear rear LSD
18. Installed intercooler bracket with SPAL fans and wired up to SP9100
- Joined
- Mar 24, 2010
- Threads
- 23
- Messages
- 452
- Location
- Sydney, Australia
- Website
- www.gorillaindustries.com.au
Nice to see some Aussie parts abroad! What flares are on the later model?
It’s officially a resto-mod now... cut some plastic to allow for a locking receiver pin, busted some rust that was starting to annoy, and put two coats of rattle can black on her! PS thanks to @linuxgod for the original idea.

This little project is on my semi “short” list.It’s officially a resto-mod now... cut some plastic to allow for a locking receiver pin, busted some rust that was starting to annoy, and put two coats of rattle can black on her! PS thanks to @linuxgod for the original idea.
View attachment 2407985

Nice to see some Aussie parts abroad! What flares are on the later model?
That's the Land Cruiser Extreme version done by Arctic Trucks Middle East. The flares are locally made and Toyota fits them
reddog90
SILVER Star
It’s officially a resto-mod now... cut some plastic to allow for a locking receiver pin, busted some rust that was starting to annoy, and put two coats of rattle can black on her! PS thanks to @linuxgod for the original idea.
View attachment 2407985
@linuxgod I need to do this. I can barely fit a normal pin. Do you have a post on this somewhere?
Even the upper control arm that says .AU on it?That's the Land Cruiser Extreme version done by Arctic Trucks Middle East. The flares are locally made and Toyota fits them
@linuxgod I need to do this. I can barely fit a normal pin. Do you have a post on this somewhere?
I can't recall if I posted how I did this. I'll try to dig it up. In reality all I did was use a dremel to cut the extra plastic away. You could also probably do this with a sharp Exacto knife or a good set of scissors or tin snips and maybe some sand paper just to file down the edge.
Here's a photo of the result.
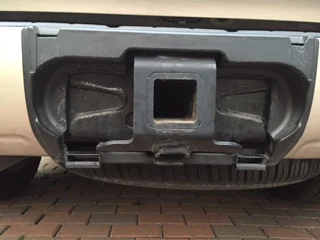
Trimming bumper plastic around hitch
Trimming the plastic required to allow my master lock locking hitch pin to fit-
Edit: This is the original link, but it's not much more helpful than what I just described above
Overall it's a very easy modification.