The Road to a 100 and 2001 build thread

This site may earn a commission from merchant affiliate
links, including eBay, Amazon, Skimlinks, and others.

Hey Paul awesome thread. Your 100 looks great and is an inspiration to what I want mine to eventually be like. I am in a similar boat to you; long time Jeep owner, future hundy owner.

Need to clean up some body damage on my Grand Cherokee over the winter and am going to sell it in the Spring. After that hopefully I will have a build thread as well.
 
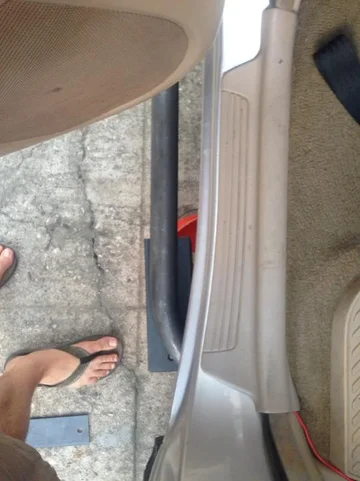
I still have to add intermediate supports between the box rail and tubing. I'll also waterjet a plate for the top for the step.

image-667213867.webp


image-3250057036.webp


image-3346272265.webp


image-1142735779.webp


image-719095505.webp


image-510798515.webp


image-259075264.webp

image-667213867.webp


image-3346272265.webp


image-3250057036.webp


image-1142735779.webp


image-719095505.webp


image-510798515.webp


image-259075264.webp
 
Very nice work ! Remember to leave a little gap to account for body flex.
 
There is .5"+ on all clearances
 
It has been over a year since I have posted or logged on to MUD. Time for a few updates I suppose.

I last left off with my home-made sliders. I have made no progress towards finishing those. Buying is starting to look a lot better.

Last summer I bought and installed a TrekBoxx Cargo System. I wrote a long writeup on a separate thread. Here is that thread for all the details.

https://forum.ih8mud.com/threads/trekking-with-trekboxx.815349/

Almost a year later I still LOVE this system. Even better yet my wife loves it and uses it everyday for stuff. There is a lot less room for things like kids bikes and what not but we make it work.

At the HIH 2014 Event I was lucky enough to win a rear bumper from BIOR. Due to financial constraints it too me 9 months from the time I won the bumper to actually order the bumper. The free bumper was just the basic bumper with no swing outs or accessories. I added dual swing outs, adjustable tire carrier and closed wings. I will post up a series of photos.

Pictures!
 
Lets see this thing!!!


It has been over a year since I have posted or logged on to MUD. Time for a few updates I suppose.

I last left off with my home-made sliders. I have made no progress towards finishing those. Buying is starting to look a lot better.

Last summer I bought and installed a TrekBoxx Cargo System. I wrote a long writeup on a separate thread. Here is that thread for all the details.

https://forum.ih8mud.com/threads/trekking-with-trekboxx.815349/

Almost a year later I still LOVE this system. Even better yet my wife loves it and uses it everyday for stuff. There is a lot less room for things like kids bikes and what not but we make it work.

At the HIH 2014 Event I was lucky enough to win a rear bumper from BIOR. Due to financial constraints it too me 9 months from the time I won the bumper to actually order the bumper. The free bumper was just the basic bumper with no swing outs or accessories. I added dual swing outs, adjustable tire carrier and closed wings. I will post up a series of photos.
 
Ok. Here are a few photos of the drawers in use at HIH.
IMG_1758.jpg

DSCF6634.jpg

DSCF6641.jpg


This is on one of the trails at HIH. Great trip. Sad I can't go this year.
PG3_2004.jpg
 
Those are extremely nice looking drawers. Good job.
 
At HIH4 I won a BIOR bumper in the raffle. Pretty awesome to have a prize like that there. After buying drawers and tires for the HIH trip it took a while to get the free funds to upgrade from the free basic bumper to one with swingouts and other features. 9 months after HIH I ordered the bumper and received it a month or two later. Installation was pretty straight forward with no real big surprises; just a few hard to reach spots.
My kids got involved with the install too.
IMG_7566-2.jpg

IMG_7579-2.jpg

IMG_7662-2.jpg


This is the one thing that really pissed me off. The inserts were misaligned and I could only get 3/4 of the frame bolts on. I just made sure the three were extra tight.
IMG_7583-2.jpg


Notching the rear cross member was a good excuse to get a new sawz-all and grinder
IMG_7585-2.jpg


I cut twice and it was still too short
IMG_7587-2.jpg

IMG_7588-2.jpg

IMG_7590-2.jpg

IMG_7591-2.jpg


It's not pretty but it works. Thought about going in and welding in some extra material to clean this up but I didn't. Not sure extraly what happened in the back. Probably a little too eager with the new tools combined with a poor angle to cut and just had to deal with it. I don't remember.
IMG_7607-2.jpg


Bumper on but not attached
IMG_7603-2.jpg


I kept the original recovery points on there for no real good reason
IMG_7604-2.jpg

IMG_7605-2.jpg
 
All the random hardware installed
IMG_7612-2.jpg


Had to run a tap through all the tapped holes on the bumper to clean out powder coating
IMG_7613-2.jpg


Swingout Spindle components without the arm
IMG_7622-2.jpg


Swingout assembly
IMG_7627-2.jpg

IMG_7629-2.jpg

IMG_7633-2.jpg

IMG_7634-2.jpg

IMG_7635-2.jpg


The gas struts are such a nice touch. My wife loves having them. It makes opening much easier.
IMG_7637-2.jpg


Piece of wood and a dead blow hammer make seating the bearing seals easy and keeps them from being destroyed.
IMG_7641-2.jpg


Same goes for the spindle covers
IMG_7642-2.jpg


Tuning things up
IMG_7646.jpg


The biggest pain in the rear was putting the wing support brackets on. Space was so tight that I could barely get my hands or a tool in place to tighten the bolts. It took one click of the ratchet at a time to get everything tight. Because I was cursing so much I didn't take any photos of that part of the install.

Finished product
IMG_7649-2.jpg

IMG_7703-3.jpg

IMG_7785-2.jpg


Mainden voyage to the Sierras
IMG_8073-3.jpg
 
My next project was my dual battery system. I have had the Tmax system for over a year now and have not had the time to install it. I have also been designing my system based around how we use the truck and exactly what was needed. Without going into tons and tons of philosophical detail on why I did it the way I did it I will sum it up with the following:

1) I wanted everything to be modular
2) I wanted everything to be professional
3) I wanted everything to be clean and hidden

That said, I probably went way overboard on the professionalism when making my wiring harnesses. I used nothing but the best tools and components. It was a really fun project that took me over a month of tinkering in my garage. Quite therapeutic. It came at a great time while I was taking time off between jobs. It also gave me an excuse to stock up my workbench with fun toys. For a super detailed instructional on a dual battery install you should read klausvanwinkles sticky thread. That is what I referenced for most of what I did.

https://forum.ih8mud.com/threads/t-max-dual-battery-install.607791/#post7820405

The big take away is just keep things clean and take care to make really solid connections with good strain relief. All my wires were grouped together with wire loom and shrink tubing at all the ends.

Here are some schematics of what I intended to do. I stuck to these plans pretty well for the most part. There were a few deviations along the way to simplify where I could. My original intent was to have everything on a switch, even if the device had its own switch. After a lot of internal and external debate with friends I decided that most of the things in the rear of the truck (fridge, lighting, 12V pwr and USB) did not need relay switching and could be hard wired to the fuse block.

INSERT SCHEMATICS

Clean slate
IMG_8928-2.jpg


Slee Battery tray
IMG_8931-2.jpg


Pulled the Tmax wires through the firewall just to the right of the battery tray
IMG_8939-2.jpg


And into the glove compartment. You have take pretty much everything apart to get to the feedthrough.
IMG_8944-2.jpg


I drilled a hole in the back of the glove compartment to run the wires through
IMG_8951-2.jpg


Put heavy duty velcro on the back of the control box
IMG_8952-2.jpg


Attached inside the glove compartment
IMG_8956-2.jpg


IMG_8957-2.jpg


Battery
IMG_9220-2.jpg


The bolts used for the battery tie down bar were too short. They came just up to the bar but not enough to get a nut on there. I had to hack and bend the slee part to a shape that would work. I used a common battery size too. You would think Slee would test with the most common batteries. Maybe I just missed something. Gave me an excuse for a bench vise.
IMG_9217-2.jpg

IMG_9221-2.jpg


I used a sawz all to cut the verticall walls off and then bent it to shape in my bench vise. I eventually used a grinder to round off the edges that turned out to be razor sharp and hungry for eating 1/0 cables.
IMG_9293-3.jpg


Then I tore out every single piece of wiring that I had hastily installed over the years connecting all my devices. That was kind of a do or die moment. It was a total rat's nest of wires all over the place. No order.
IMG_9176-2.jpg


There were all kinds of examples of unacceptable electrical work done minutes before leaving for a trip and then never returned to to fix. It is painful to look at.
IMG_9179.jpg
 
Looks like you and your little leprechauns have been very busy.
 
Paul, just a note on this

The bolts used for the battery tie down bar were too short. They came just up to the bar but not enough to get a nut on there. I had to hack and bend the slee part to a shape that would work. I used a common battery size too. You would think Slee would test with the most common batteries. Maybe I just missed something. Gave me an excuse for a bench vise.

The tray was designed around an Optima Red battery or similar size, hence the length of the J bolts. Any taller than Optima you have to be careful that the terminals does not come into contact with the hood. That is why it is so short. Yes, others can fit, but from a liability stand point, we chose to make it fit a smaller battery.
 
Christo,

Thanks for the clarification on this. When I called the shop to order I asked what size battery fit and they just told me a group size, not a brand type. I put a Group 34 Diehard Platinum deep cycle marine in. I can see your concern because the terminals do get close.
 

Users who are viewing this thread

Back
Top Bottom