Builds The Mule: My OM617 swap and other improvements (1 Viewer)

This site may earn a commission from merchant affiliate
links, including eBay, Amazon, Skimlinks, and others.

It's an Advance Adapters 712577 NV4500 bellhousing. Do you think 1" is enough clearance? I may go with a little more since I don't want the fan to eat the radiator.
Should be fine with 1", really depends how soft of mounts you go with. You want some dampening so you don't rattle to death ;) Your rear DS length is going to be short, so I'd put it as far forward as you can ...

Looking good!

Tucker
 
Should be fine with 1", really depends how soft of mounts you go with. You want some dampening so you don't rattle to death ;) Your rear DS length is going to be short, so I'd put it as far forward as you can ...

Looking good!

Tucker
I'm using the AA engine mount bushings so they should be firm, but still let it rattle around a little. I'll probably try to find a way to anchor the drivetrain somehow for fore/aft movement.

Last night I thought I was going to luck out and be able to use my front DS on the rear, but I'm about 2" off.

Should I use a double cardan on the rear?
 
A couple of questions for the "experts":

Taking into account this engines characteristics, how critical is it that the drive train be completely level?

I'm trying to get it as level as possible, but the top of my transfercase is going to bottom out on the bottom of the tub if I get anywhere within 2* of level. It also doesn't leave me much room for the twin stick hi/lo selector rod.

Second question:

What is the maximum misalignment for my transfercase output shaft yoke (front) to my front axle? I know for a single cardan setup they should be parallel with the same alternate interior angles. My front yoke is 90* and my transfercase output (front) is 3 degrees "aft" of perpendicular or 87* (tilted to the rear). Am I going to run into binding problems? I know if I went to a DC setup it halves the angle, but in that case the front pinion should be pointing at the tcase, which would require a cut and turn.
 
Moderators, can I get this moved over to the diesel section???
 
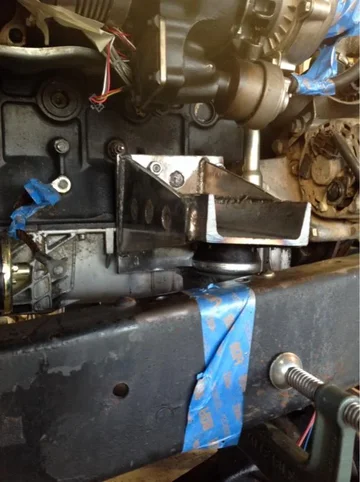
Continued working on motor mounts. I'm not sure if the driver side is going to work, as it warped upward when I welded it. All the metal is .25". Don't laugh at my welding skills. image-137673366.jpg image-3424333481.jpg Made some fish plates for the frame image-3555570604.jpg image-1767293680.jpg I think the passenger side will work, but I didn't get around to trimming it down...
image-3424333481.jpg
image-137673366.jpg
image-3555570604.jpg
image-1767293680.jpg
 
So,

I think I'm getting to the point of frustration with this build right about now. Between work, looming deployments, and family I'm starting to get overwhelmed.

I'm sure everyone who's done a build has felt this way at one point or another. Suggestions? Words of wisdom?

I think I just need to prioritize, keep the garage clean, and focus on incremental successes.
 
This is looking great. Keep your head up and look at the small victories. You dont win a war with 1 battle. Keep up the good work.
 
Been there done that a couple of times. You can click on my build thread and I am 5 years into my OM617 rebuild darn near so just take your time and relax. I have done very little of my build though since I am no where near it which makes it even WORSE. All I want to do is get out and get my hands in it. Can't wait to get it back and at least work on all of the small things.

Just clean up the garage, make a mental note of what you want to do next and forget it until deployment. That stage will come when you are bored (we don't do S%^T there anyway anymore) and then start dreaming of how you would like to move forward when you get back. Gives you a goal and something to look forward to outside of the family time. Looking up car parts and builds is a lot more fun than studying CH 5&9 (your Limits/EP for us Army fliers) so trust me you will find many good reasons to study up on how you want to build your truck.
 
We'll, I've decided to rebuild my block plates. I just didn't know what I was doing the first time around (probably still don't, haha).

Basically, I was building the wrong direction last time.

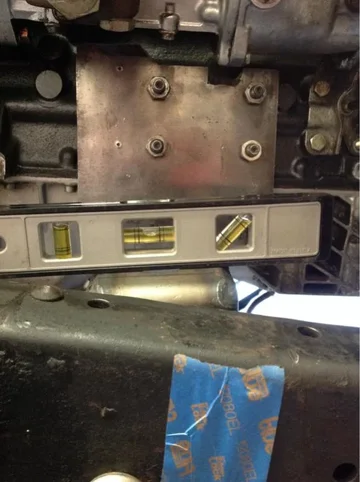
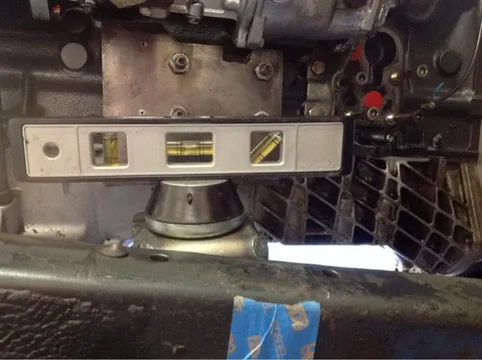
This time around, and once I got the engine level, I started building from the block out, checking for level in both planes.

New block plate

image-674969714.jpg


Checking level

image-1634125507.jpg

Checking c-channel. Had to cope the end to match. Bevels ground prior to tack welds.
image-742806338.jpg


Tacking gussets in place. Notice rosette welds. I extended the gussets past level with the bottom of the c-channel. Got the idea from the vertical stabilizer on the plane I fly...
image-1242115647.jpg

image-2227892196.jpg


New mount in foreground...
image-4269800404.jpg

I used a 1/4" plate as a spacer to get it out in order to clear the oil pan lip.
image-2918264465.jpg
image-674969714.jpg
image-1634125507.jpg
image-742806338.jpg
image-1242115647.jpg
image-2227892196.jpg
image-4269800404.jpg
image-2918264465.jpg
 
I still need to round out the edges and smooth some welds. Overall I'm a lot more happy with this mount mainly due to it being level... I'm almost done with the new passenger side mount. I'll post up pics when I'm done...
 
Your welds are looking good.


:D
 
Made some progress today! Something other than a cherry picker is supporting the engine!!!! Finished the passenger mount. Nothing cleaned up yet as far as smoothing edges goes, but overall I'm pleased. image-4291525526.jpg image-1005820196.jpg image-3272890352.jpg I was pretty surprised how firm the AA engine bushings are. I rocked it side to side and it seems like it will let the eng rattle around just a bit. I'll probably build some kind of restraint system as a backup. Also, I've got to get longer block studs on the passenger side, but the parts guy at mercedes was a real prick when I told him the engine was going in a Toyota. :flipoff: The cherry picker is back to supporting, c clamps were just temporary...
image-4291525526.jpg
image-1005820196.jpg
image-3272890352.jpg
 
Last edited:
If anyone is following this, I have a question:

When welding scab/fish plates to the frame should I be worried about too much heat? Small sections at a time in alternating places? Avoid 90* / vertical welds? I searched for specifics, but everyone seemed to have a different opinion.

Is this going to become a point of maximum stress since the boxed portions can't move a bit like they could when riveted? Guess I need to keep an eye on it for fatigue and stress fractures.
 
Switched gears this Saturday.

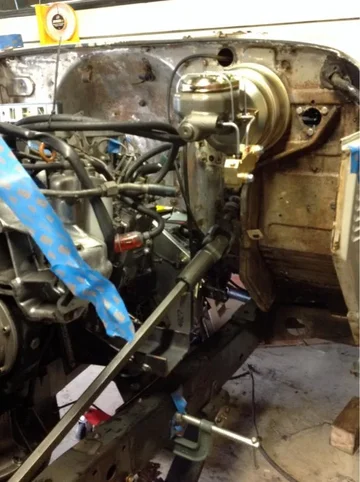
New brake booster / master. Slapped some cast iron colored engine enamel on it since one of my pet peeves is letting MCs rust...

image-449694268.jpg


image-637877461.jpg


image-4275381241.jpg

Started looking at how the Ford shock towers will fit and/or interfere. Will either have to straighten them or clearance the inner fenders. Don't laugh at my redneck plumb bob.

image-1641553741.jpg
image-449694268.jpg
image-637877461.jpg
image-4275381241.jpg
image-1641553741.jpg
 
If you are talking about boxing the frame, you won't hurt it. I would make sure everything is tacked together good before burning it in but that is all you really need to watch out for.
 
Switched gears this Saturday.


Started looking at how the Ford shock towers will fit and/or interfere. Will either have to straighten them or clearance the inner fenders. Don't laugh at my redneck plumb bob.

Don't cut the inner fenders unless you really want to! I pie cut the Ford towers and bent them in a little bit. They fit with about an 1/8" clearance under the inner fender. Much better than cutting my inner fender.

20140116_145432.jpg


20140223_101117.jpg


:cheers:
 
Well, no progress this weekend as I've been studying for the Weapons and Tactics Instructor course I'll be going to in a few weeks; but, I did pull the trigger on a plasma cutter! I went with the Hypertherm Powermax 45. My tax free combat pay has been officially used up, haha. I'm sure it will come in handy for years to come...
 

Users who are viewing this thread

Back
Top Bottom