Slider prep this afternoon. I was liberal with my cuts and left more than enough plastic on the ends so that I could trim the rocker panels to the exact length I need once I hang the sliders which will hopefully be this weekend. I used a box blade to make the cuts, it requires more pressure and a steady hand but it leaves a much cleaner cut. Now I need to figure out where to mount my LED puddle lights.
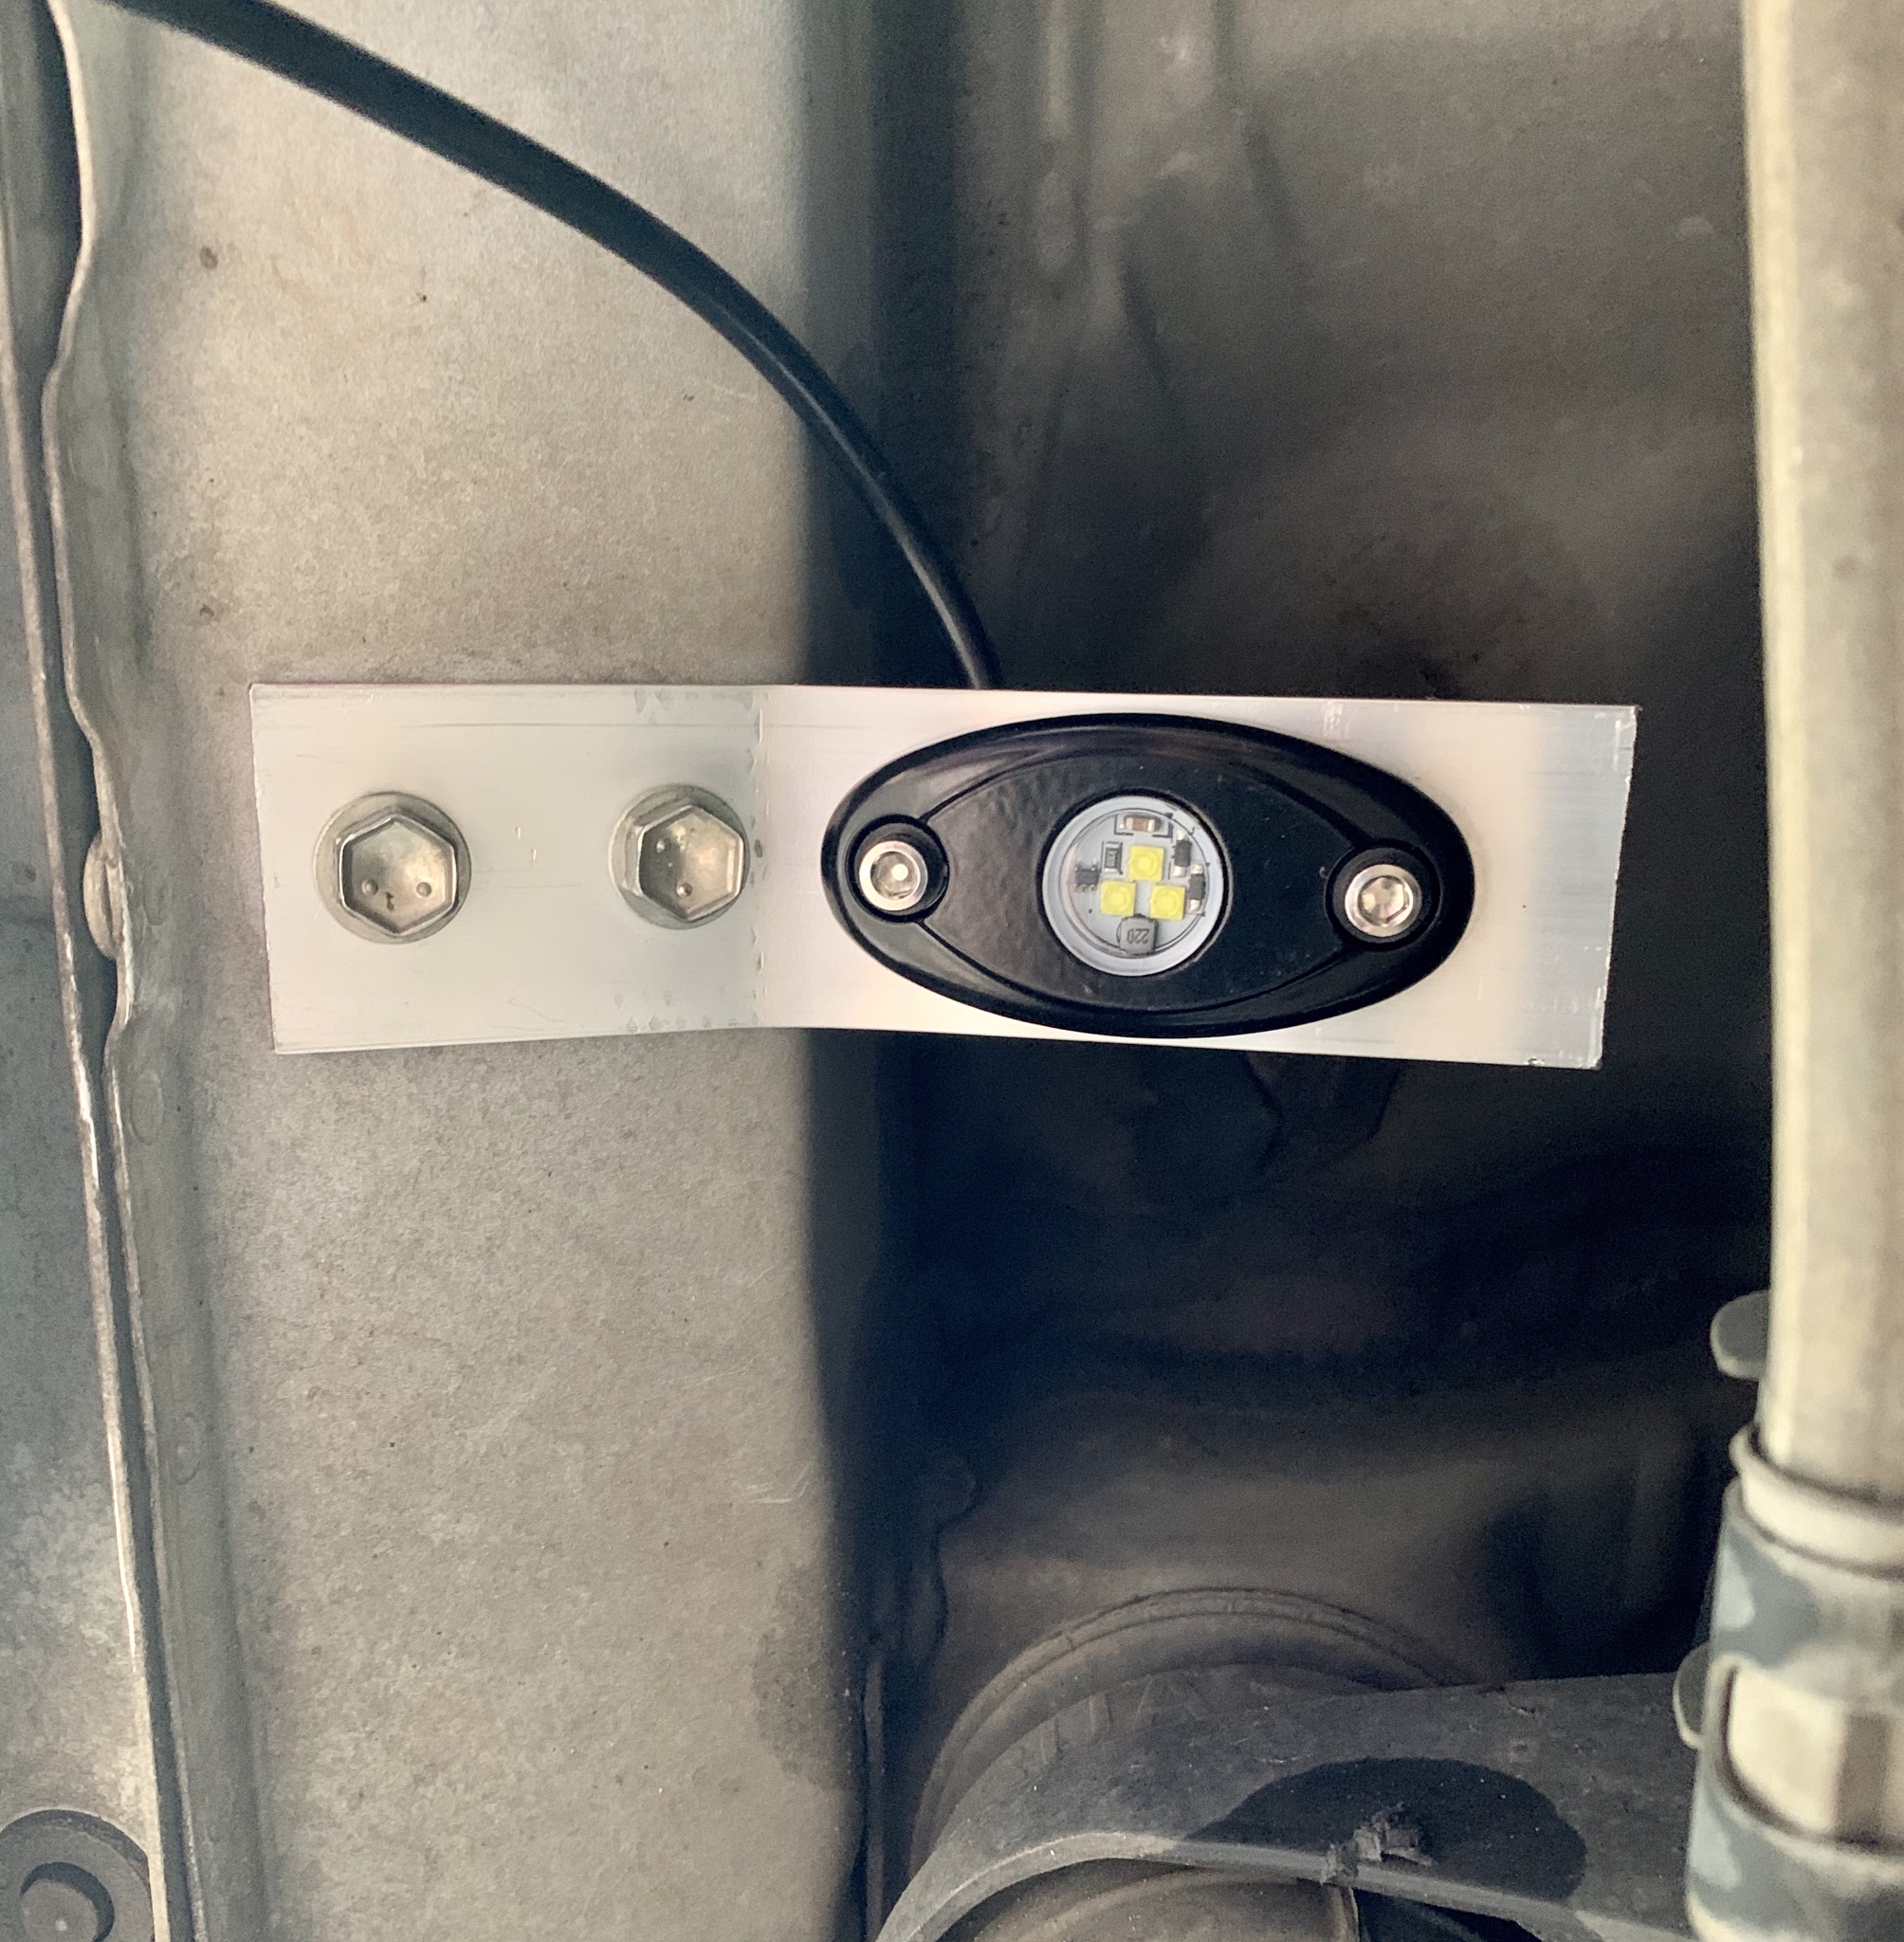
For the LED puddle light mounts, I used the brackets that the stock puddle lights were in - trimmed them so they're smaller, and used the threaded bolt holes that the stock step brackets were mounted to.
For the LED puddle light mounts, I used the brackets that the stock puddle lights were in - trimmed them so they're smaller, and used the threaded bolt holes that the stock step brackets were mounted to.
I haven't even looked at that yet, I am pretty happy with how clean the initial cuts I made came out. If I can replicate that once I trim the ends after installing the sliders then I might forgo the edge trim altogether.
Rock Light Mounts will bolt directly to the frame of your vehicle, keeping your lights secure. Made from Aluminum Rust Free Guarantee Lifetime Warranty. Made in USA.
Rock Light Mounts will bolt directly to the frame of your vehicle, keeping your lights secure. Made from Aluminum Rust Free Guarantee Lifetime Warranty. Made in USA.
So where exactly would you bolt those to? I like the idea of reusing the threaded holes that the factory step supports were mounted to but I doubt those Rago brackets would line up. I am considering making my own out of aluminum but that'll require a trip to the hardware store for some aluminum scrap.
So where exactly would you bolt those to? I like the idea of reusing the threaded holes that the factory step supports were mounted to but I doubt those Rago brackets would line up. I am considering making my own out of aluminum but that'll require a trip to the hardware store for some aluminum scrap.
I haven’t put that much thought into it. Wasn’t to worried about it till the sliders go on. I have all the factory hardware from the bumper and side steps so I’ll figure out how to attach the someway.
Here are photos of mine. The stock puddle light brackets are soft, so you can easily bend them to point the new lights how you want, and they are shaped so that the lights are tucked way up out of harms way.
I bought some marine style waterproof connectors and soldered them to the stock harness so I can change the puddle lights easily if one burns out.
Admittedly, I don't have my sliders in yet so not 100% sure that I won't have to modify the puddle lights once I get those on.
I haven't even looked at that yet, I am pretty happy with how clean the initial cuts I made came out. If I can replicate that once I trim the ends after installing the sliders then I might forgo the edge trim altogether.
SOMEBODY's working from home! And finding some time to tinker on their rig!! (BTY, I hope you are still working and not lost your job....)
To your comment above, if you can get away with not adding the trim, good on ya!
I had to glue the ends on because they kept peeling down. No worries if you don't have any!
Slider prep this afternoon. I was liberal with my cuts and left more than enough plastic on the ends so that I could trim the rocker panels to the exact length I need once I hang the sliders which will hopefully be this weekend. I used a box blade to make the cuts, it requires more pressure and a steady hand but it leaves a much cleaner cut. Now I need to figure out where to mount my LED puddle lights.
I liked all of the above for different reasons and equally disliked them for others. In the end I thought I had settled on the RCI's, but they are made to order and weren't readily available to ship and they are currently shut down due to the shelter in place order in Colorado. It was likely going to be the middle to end of May at best before I could get a set. I lack patience these days so they were out lol.
Main Line Overland needed to move the front leg forward for GX use and they would still need powder coat as well and on top of all of that I never heard back from them in regards to my inquiry on whether or not they were still conducting daily business. Marked off the list.
Metal Tech were in stock and they offered me a small discount but freight/shipping was $200 and combined with the high price it made them north of $1100 to get them here. I've run their sliders in the past on my FJC's and I like the look, but I wanted to go with a set that used a backing plate at the frame they did not have that. Strike them for cost and design.
RSG were very similar to the RCI and MLO in design and they were in stock and ready to ship next day. Jason answered all of my one million questions some even via text well past regular business hours. He gave me suggestions and even worked with me on the price beyond the sale price in order to insure that I was happy with the overall experience. I can't recommend these guys enough, they went over and beyond what is to be expected of a company in order to close the deal. In the end I got what I wanted quickly and for a great price. It felt good knowing I was supporting a small business in times like these.
I ordered the angled, dimpled top plate, powder coated (emblem too) with kick outs. I usually run flat sliders in order to provide a step for the lady friend and to assist in loading things on the roof. This time I was set on trying something with at least a slight angle. I wanted to get away from the kick out but in the end I settled for a kick out once again because they have saved my rear fender in the past and they do provide a better step into the rear seats. Hopefully I can get them bolted up this weekend.
My wife is only 5'1" so she really appreciates a step up. Having said that, even though my sliders angle up, I have the grip tape and they work great for her stepping up and into my rig. This has been a non-issue for us.
The kick-out I find is great as it gives a little more foot support when standing on the back end. Albeit, I wish the entire rail stuck out that far PLUS a kick out.
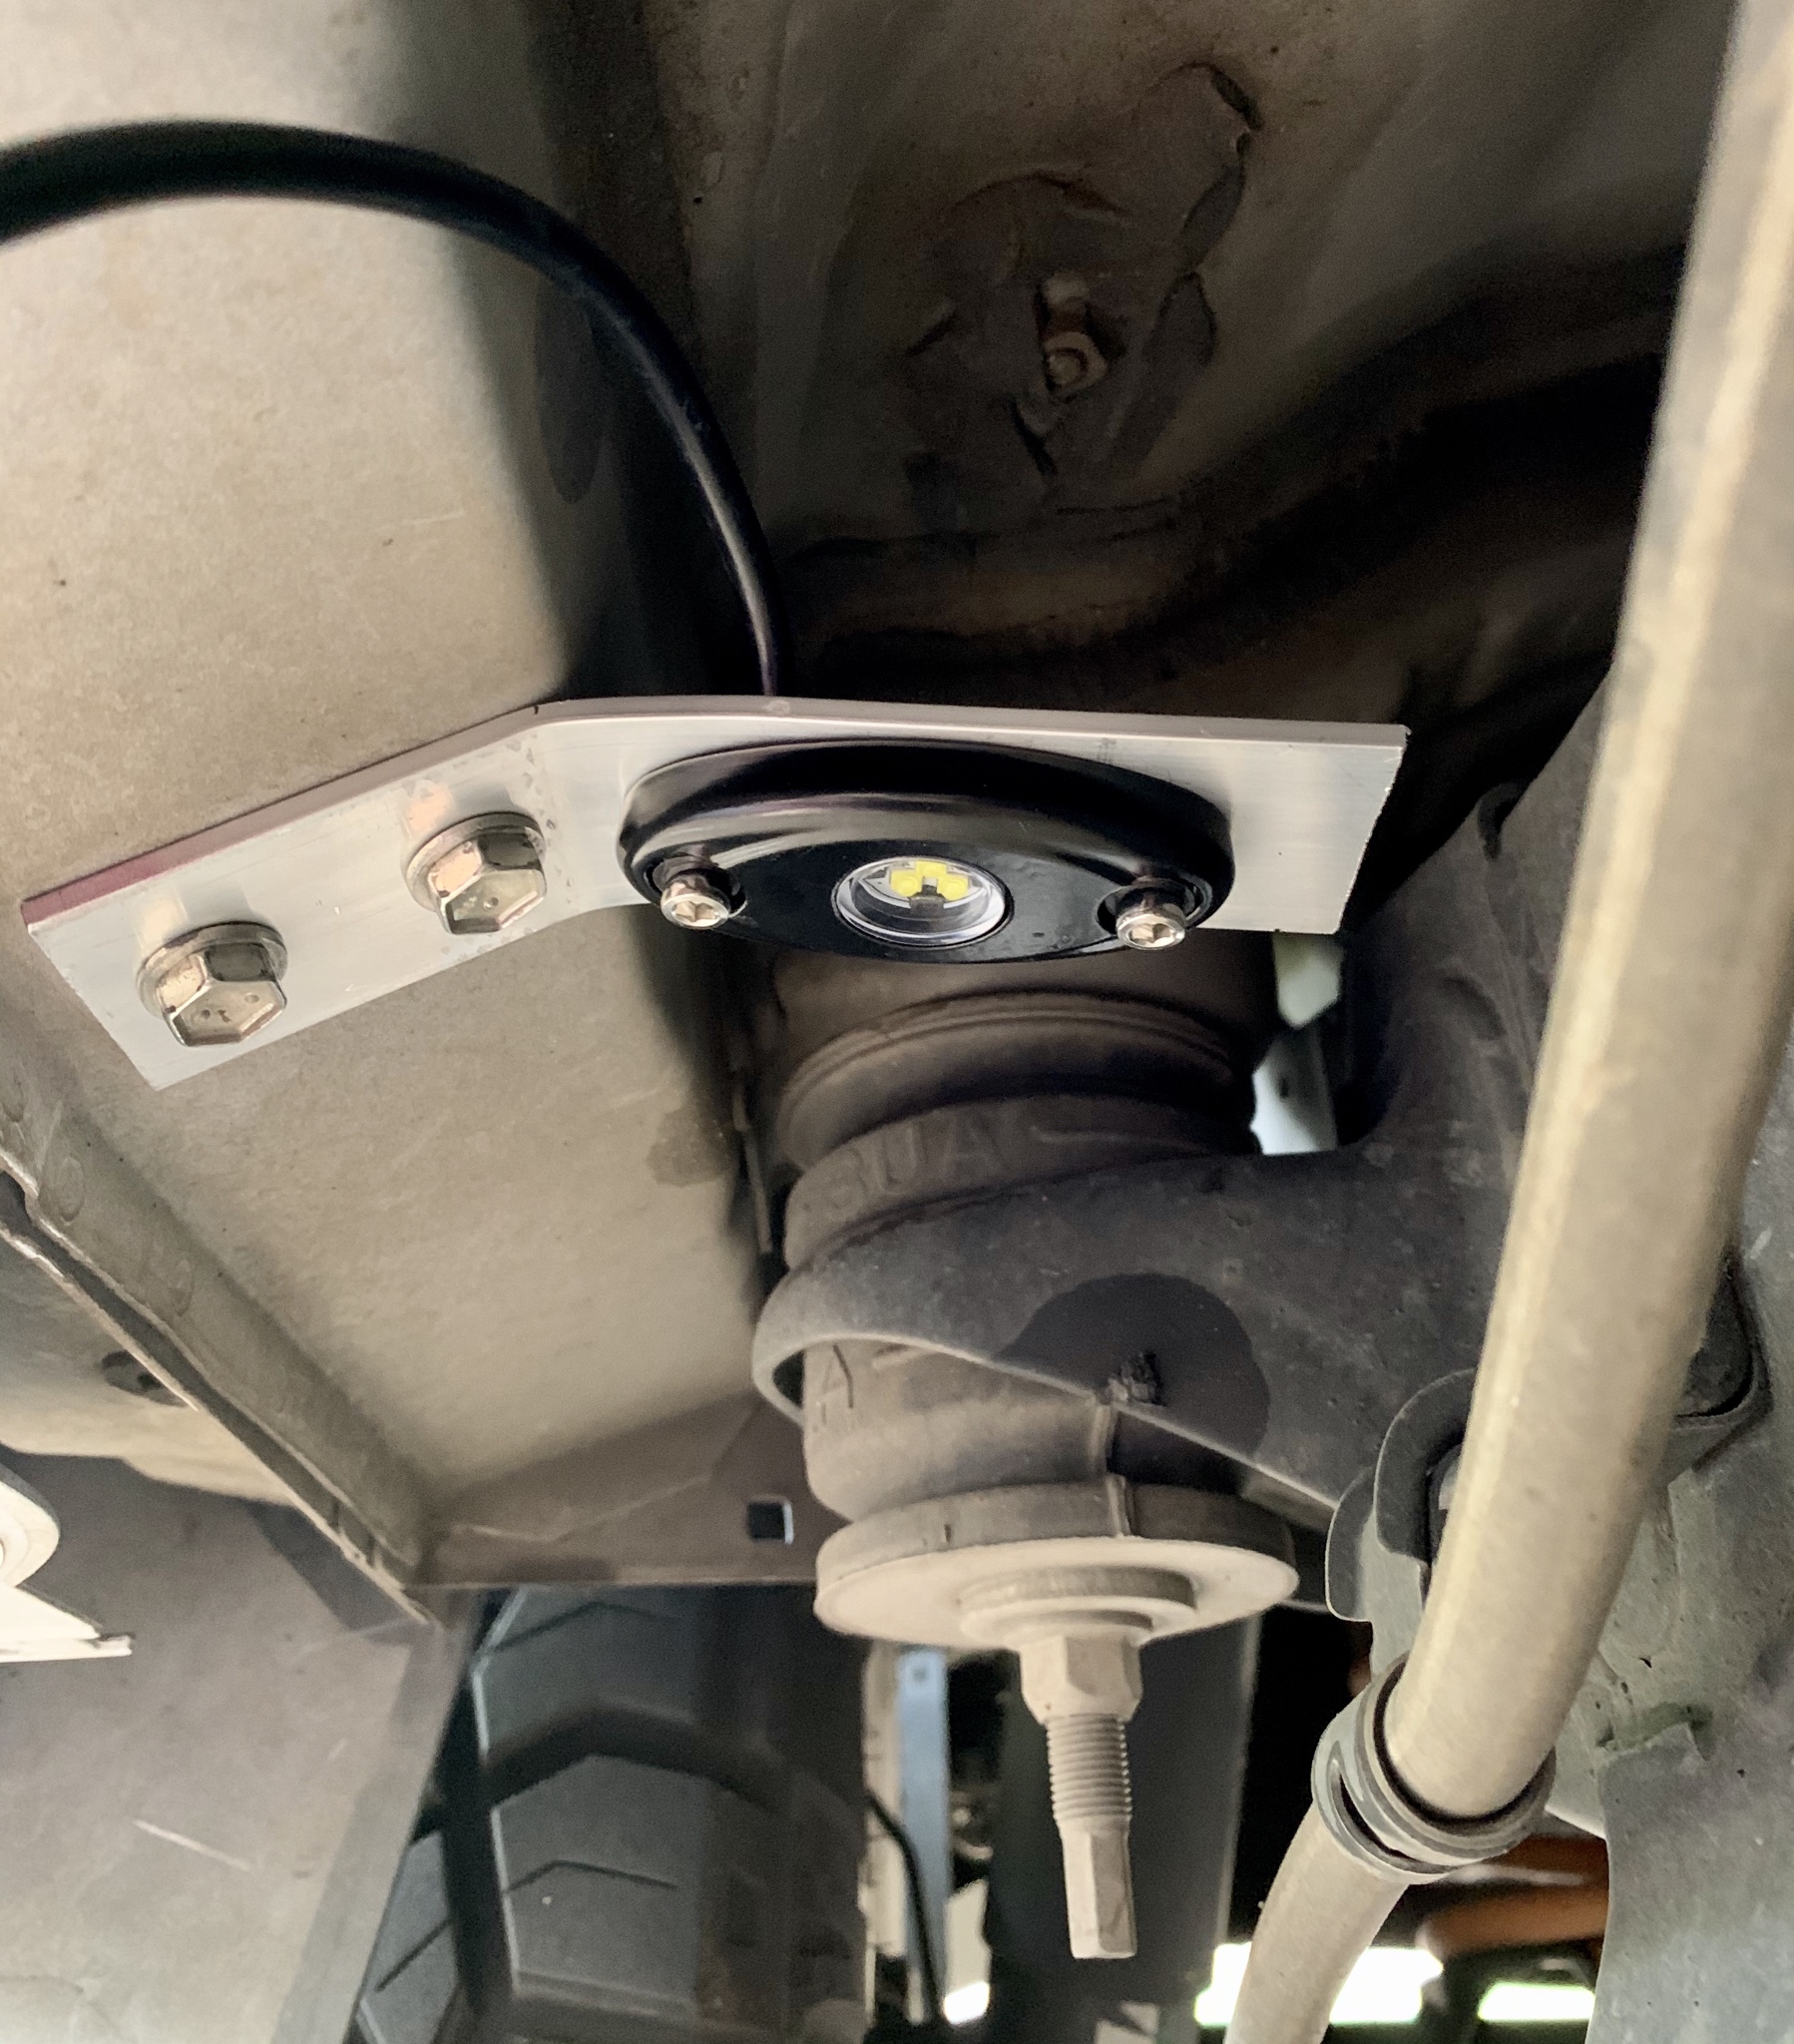
I fabbed these up earlier this evening. Not the prettiest brackets out there but they keep the lights flush and up and out of the way. Simply put, they get the job done and once mounted they are pretty robust. The jury is still out on whether or not I'll have trim them or possibly adjust the bend once the sliders go on, but I think just from eye balling it that they will be fine.
I used a piece of 1/8" by 1.5" flat aluminum stock.
I then marked all of the necessary holes for the bolts and for the wire to run through the mounting bracket when mounted flush.
I used a set of Amazon "Rigid" knock-off rock lights. The location of the wire at the back of the light tended to vary from one to the other. This required a little enlarging of the holes in order to get the wire to sit flush at times.
I reused the existing threaded holes from the factory step supports in order to mount the brackets. I pre-bent the brackets in the vice before mounting the lights and then the brackets to the truck. Once fully supported against the truck you can adjust the bend in the bracket by hand.
I still need to finish wiring them back into the factory puddle light harnesses, hopefully I can get that done this weekend along with the slider install. The aluminum was $11.99 for a 4ft stick and the puddle lights were $20 on Amazon. So for a little more than one pair of Rago Rock Light Brackets I have four LED puddle lights with brackets, I can't complain. I'll post up pics with the finished product once I get them wired in.
Slider prep this afternoon. I was liberal with my cuts and left more than enough plastic on the ends so that I could trim the rocker panels to the exact length I need once I hang the sliders which will hopefully be this weekend. I used a box blade to make the cuts, it requires more pressure and a steady hand but it leaves a much cleaner cut. Now I need to figure out where to mount my LED puddle lights.
RSG were very similar to the RCI and MLO in design and they were in stock and ready to ship next day. Jason answered all of my one million questions some even via text well past regular business hours. He gave me suggestions and even worked with me on the price beyond the sale price in order to insure that I was happy with the overall experience. I can't recommend these guys enough, they went over and beyond what is to be expected of a company in order to close the deal. In the end I got what I wanted quickly and for a great price. It felt good knowing I was supporting a small business in times like these.
RSG sliders are on! I am extremely happy with how these turned out, I had my doubts before they showed up but I couldn't be more impressed with this product. The welds are clean and the powder coat is excellent. I'll clean up the wiring tomorrow and then I can focus on the next mods.
Kaon rear door table ordered and delivered all the way from Australia to Texas in just six days. It's a simple design, but executed quite nicely. I can see this being used for food prep, eating meals, repairing small items, field surgery on small animals and children, etc. I hope to possibly use it to setup my CPAP for when I camp and sleep inside the truck, which I do often when out camping without the misses. I can't see paying three times as much for the Orangeboxx version, money well spent!
*Edit- I drilled through for the mounting plates and used a bolt with a wide fender washer and a nylon lock nut to secure them to the plastic panel. I got this idea from another member here, the self tapping sheet metal screws just didn't give me the warm and fuzzies for long term use.
RSG sliders are on! I am extremely happy with how these turned out, I had my doubts before they showed up but I couldn't be more impressed with this product. The welds are clean and the powder coat is excellent. I'll clean up the wiring tomorrow and then I can focus on the next mods.
Don't forget some type of grip/traction tape on those slider! They will be slick in rain, snow or mud if you and/or your significant other ever use them!


 (BTY, I hope you are still working and not lost your job....)