
Part numbers:
Spring: 90501-20095
Plunger: 44152-30020
Plunger guide (not the nut): 44153-30020
Spring: 90501-20095
Plunger: 44152-30020
Plunger guide (not the nut): 44153-30020
Follow along with the video below to see how to install our site as a web app on your home screen.
Note: This feature may not be available in some browsers.
This site may earn a commission from merchant affiliate
links, including eBay, Amazon, Skimlinks, and others.
I just finished this rebuild but the preload guide in the fsm must be joking. With all the new o-rings and teflon rings, the input shaft wasnt easy to turn at all. I guess i wont know until installation but come on.

Curious what the cost difference was?So i just did this rebuild and also did the 105 sector shaft upgrade kit from @Akella at the same time. Thanks @96r50 for your step-by-step guide on the rebuild, phenomenal job. I also watched this youtube video by Samuel Bishop - wasn't done exactly the same way that Adam did it but it was very helpful to watch.
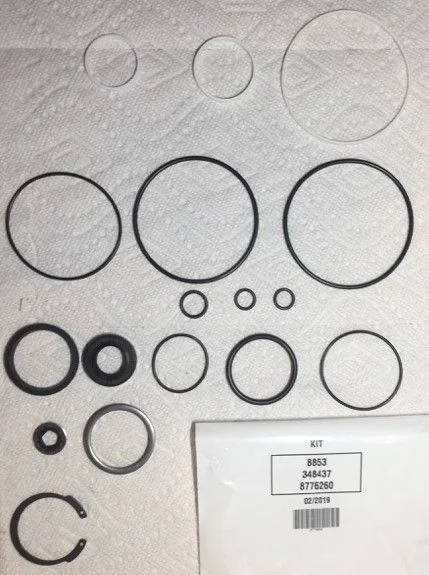
I think in some earlier posts there was a question if the Toyota kit came with the input shaft seal - it does. I ordered a Gates kit just in case...they are identical in terms of what comes in the kit. See pics below.
Toyota Kit:
Gates Kit:
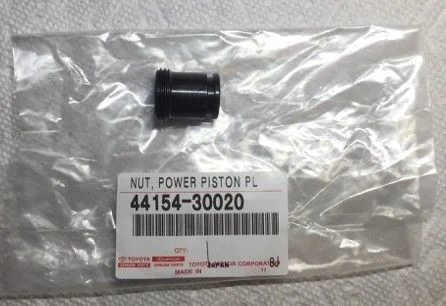
When I did this rebuild I also bought a new power piston plunger nut. I would say It is a must for the rebuild.
Curious what the cost difference was?
So i just did this rebuild and also did the 105 sector shaft upgrade kit from @Akella at the same time. Thanks @96r50 for your step-by-step guide on the rebuild, phenomenal job. I also watched this youtube video by Samuel Bishop - wasn't done exactly the same way that Adam did it but it was very helpful to watch.
I think in some earlier posts there was a question if the Toyota kit came with the input shaft seal - it does. I ordered a Gates kit just in case...they are identical in terms of what comes in the kit. See pics below.
Toyota Kit:
Gates Kit:
When I did this rebuild I also bought a new power piston plunger nut. I would say It is a must for the rebuild.

After 2 weeks I got my order, did unpack and found the 4 teflon seals inside and they fit, YAHOO!!
Most of the other rings and seals where from another type of gearbox I think. Don't know what I did wrong but for me it's ok, I have what I need and started to fix the gearbox.
For those who didn't put a teflon seal on this kind of device, this is what my mecanic (old guy) did.
1, Throw the seals in a plastic cup within a layer of steering oil, drowning them, after a couple of minutes stretch them a little with the hands and throw them back and wait a day.
2, Put them around he shaft and work/stretch them SLOWLY and GENTLY with a thin pick on the first spot for the seal (don't know the name of the pick but a dentist have the same thing but luckaly they're pick is smaller, lol)
3, Keep moving the seal to the last spot on the shaft and pick the next seal till you have all 4 sitting where they belong. Than leave the shaft for a cup of coffee or a beer, let the seals shrink a little for a couple of minutes.
Now they are still stretched and your officially need a tool to shrink them again, DO NOT JUST PUSH THE SHAFT IN! you'll break them for sure.
If you look close to the inside where the shaft needs to go, you'll see that in the beginning it first slopes a bit, it's not a sharp edge.
4, Put some steering oil where the shaft needs to go and also on the edge.
5, Put the shaft in up untill the first teflon seal and GENTLY press and turn a bit, it'll slide in.
6, Gently turn a bit and try the next seal.
7, Gently turn again and,.. slowly take the shaft out again, you'll see that they shrunk a bit compared to the other 2
8, Put more oil (see point 4) as you'll notice it's getting a bit dry
9, Try the rest and keep in mind, GENTLE and SLOWLY and keep the steering oil coming, it'll be fine
This is how we did it. Car drives good again and no more troubles!! (exept that I had to change the oil seal for the driving shaft.. yes the one behind the pully for the timing belt... AGAIN... but it's good now lol)
04445-60050, it's in the picAnybody knows?
its a different part number, the kit from toyota 04445-60050 doesnt have the 4 Teflon rings04445-60050, it's in the pic
Any update on this?Real time help need..
Need some help with my gearbox rebuild. I managed to get the bearings and tube back in but noticed it unwinds but its hard to close the piston back up closer to the input shaft housing, seems to be binding somewhere in the bearings. I figured it might be binding since its not in the piston sleeve. But when I put it in the thing still binds and only wants to expand. Has anyone else had a similar issue? Do I need to pull apart and re-install the bearings? I didn't lose any bearings...
Any update on this?
Great post.So i just did this rebuild and also did the 105 sector shaft upgrade kit from @Akella at the same time. Thanks @96r50 for your step-by-step guide on the rebuild, phenomenal job. I also watched this youtube video by Samuel Bishop - wasn't done exactly the same way that Adam did it but it was very helpful to watch.
I think in some earlier posts there was a question if the Toyota kit came with the input shaft seal - it does. I ordered a Gates kit just in case...they are identical in terms of what comes in the kit. See pics below.
Toyota Kit:
Gates Kit:
When I did this rebuild I also bought a new power piston plunger nut. I would say It is a must for the rebuild.
