Okay boys,
I've recently worked through changing out my power steering box and I wanted to post the process here. I can say that this swap made an incredible difference in eliminating slop in the steering wheel for my rig. It went from being genuinely terrifying at highway speeds to feeling like a brand new car.
[Now with Pics!]
First, below are the tools you'll need to make this happen:
Step 1 - Prep the truck
(may not be necessary but I did to minimize the mess)
If you need to remove the pitman arm, you should be able to do so with a tie rod end puller. If you need more instructions, there are several posts here on the forum that provide guidance on that portion and the manual seems to indicate that there are alignment marks for centering the arm to the box on re-installation. You can also use your old box as a guide for how the arm needs to be aligned.
The arm should be tightened to 130 ft lb.
**I'm open to any additional information here to flesh out this section.
Step 4 - Install new box
Step 5 - Install new fluid and bleed the system
At this point, hopefully you have a fully-functional, new steering box. For me, it made a huge difference in the steering responsiveness.
Again, let me know if I've missed anything or if anyone has any suggestions for improvement.
Good luck!
I've recently worked through changing out my power steering box and I wanted to post the process here. I can say that this swap made an incredible difference in eliminating slop in the steering wheel for my rig. It went from being genuinely terrifying at highway speeds to feeling like a brand new car.
[Now with Pics!]
First, below are the tools you'll need to make this happen:
- Five feet or more of clear >=3/8" inner diameter (ID) plastic tubing (to help draining without a terrible mess) - I used 1/2" ID hose as that is what I had lying around
- Plastic tubing coupler 3/8" (ID of PS drain hose) to X" (ID of your hose - 1/2" in my case)
- Assorted sockets and socket wrench
- Long socket extension
- 17mm crow foot adapter (for getting PS hoses off and on the steering box)
- Breaker bar (for getting steering box bolts loosened)
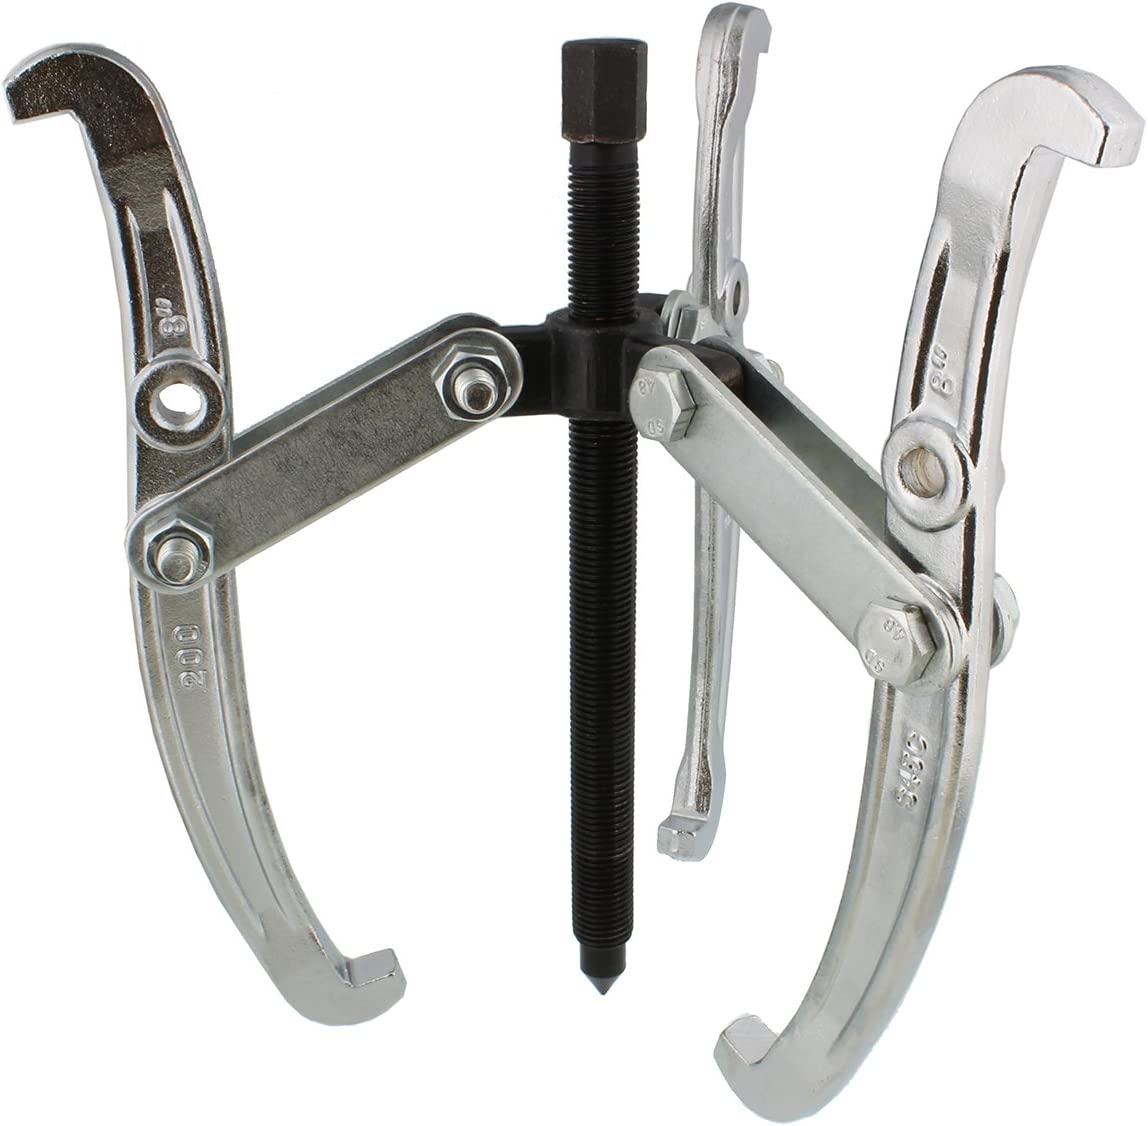
- Tie rod end puller (for disconnecting drag link from pitman arm)
- 1 Gallon Automatic Transmission Fluid (I didn't need a full gallon but I got it just in case)
- 1 German aircraft mechanic's jump suit - best $25 I've spent on keeping me and my clothes clean on these projects!
Step 1 - Prep the truck
- Jack up front end on Jack stands (don't trust your life to an O-ring by just using a jack!) and chock the rear tires.
- Center the front wheels with the steering wheel
- Lock steering wheel by turning off ignition and removing key
- Remove the left wheel to gain access to the box and pitman arm
(may not be necessary but I did to minimize the mess)
- From within the engine bay remove the hose clamp and disconnect the return line (it's the smaller line on the side that attaches to the downward facing bent, metal tube - not the large one on the bottom of the reservoir) from the power steering reservoir and allow reservoir to drain into cup. I also set some towels down underneath the catch the inevitable overflow.
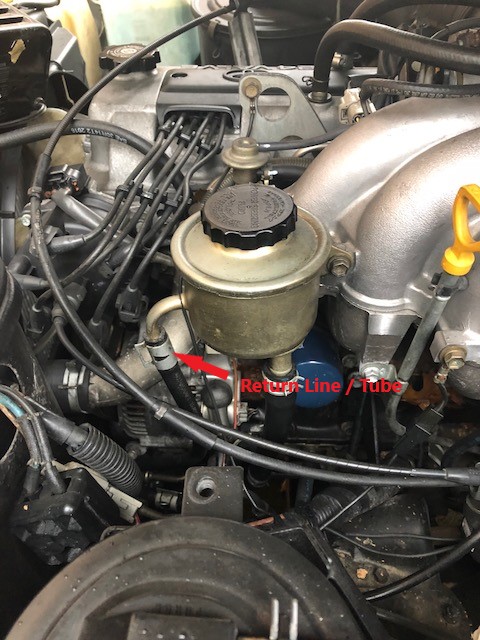
- Attach your drain line hose (1/2" ID in my case) to the plastic coupler and then to the return line (3/8" ID). Place other end of drain hose in bucket or whatever you want to catch fluid in.
- With the key turned to the on position but the truck not running begin turning the wheel fully left and right. This will force the PS fluid out of the system, down your drain line and into the bucket
- Once system is drained, you can move on to removing the gear box
- From the top of the engine looking down at the gear box (just beneath and behind battery on right side of bay), you'll see a small black cover held in place by (2) 12mm bolts. Remove these and the metal cover. This will expose the universal joint that connects the steering shaft to the gear box.
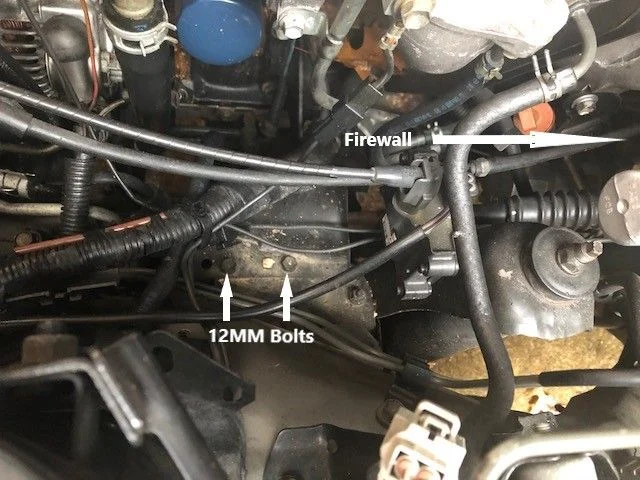
- There are (2) 12mm bolts on the universal joint that need to be loosened and removed (just loosening is not enough). Note that you will need a rather long socket extension to get to these bolts.
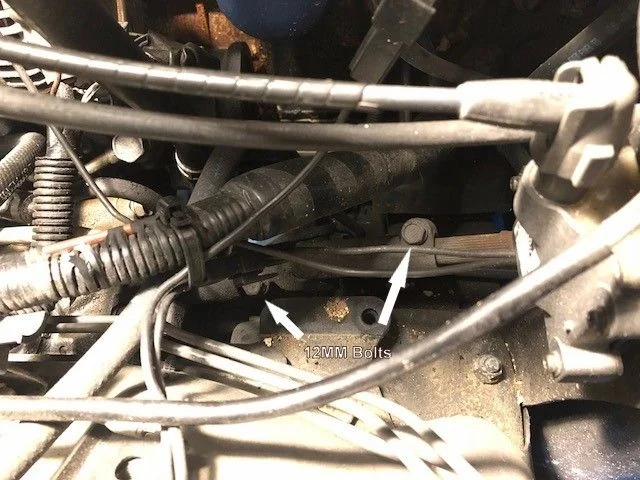
- After removing the two bolts, work the universal joint up the steering shaft toward the firewall, disconnecting it from the gear box. You may want to hit it with a little penetrating oil to help this process go a bit more smoothly.
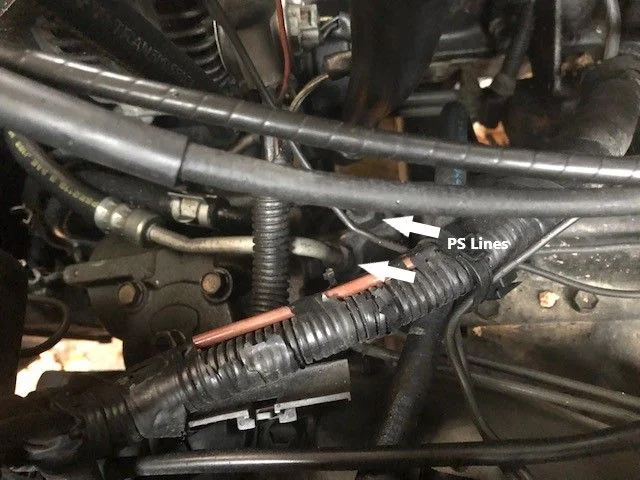
- Next, using the socket extension and crow foot adapter, loosen and remove the two PS lines running into the top of the gear box. Make sure to fully remove the lines as they set fairly deeply into the box.
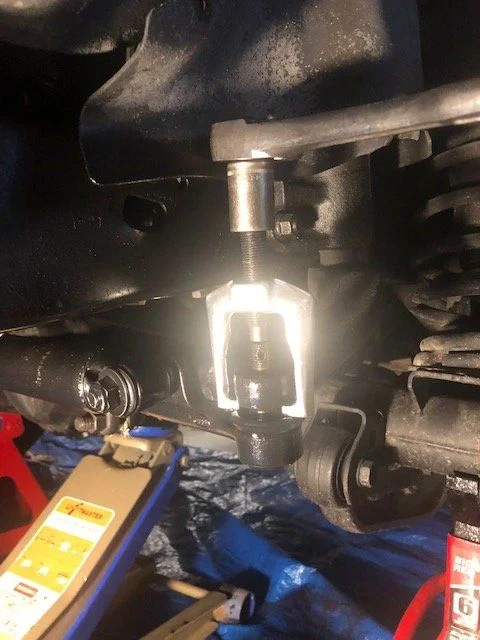
- From the underside of the gearbox, remove the cotter pin and castle nut that hold the drag link to the pitman arm.
- Using the tie rod end puller, disconnect the drag link from the pitman arm
- At this point, it you need to remove the pitman arm from the box, you will want to loosen the retaining nut prior to removing the box from the frame. This will likely require a breaker bar.
- Next, using a socket wrench or breaker bar, loosen all 4 nuts attaching steering box to the frame - note that there are bolt heads on the opposite side of the frame member that you will need to hold with an open faced wrench in order to fully loosen the bolts
- At this point, CAREFULLY remove the VERY HEAVY steering box from the frame. I don't recommend doing this while lying down under the truck. The box would do some serious f'ing rearranging of your face if it falls on you. Also, as mentioned above, make sure that the PS lines are fully removed at the top before pulling the box. They set down into the box fairly deep and will catch if not fully removed.
If you need to remove the pitman arm, you should be able to do so with a tie rod end puller. If you need more instructions, there are several posts here on the forum that provide guidance on that portion and the manual seems to indicate that there are alignment marks for centering the arm to the box on re-installation. You can also use your old box as a guide for how the arm needs to be aligned.
The arm should be tightened to 130 ft lb.
**I'm open to any additional information here to flesh out this section.
Step 4 - Install new box
- Carefully install the new box onto the 4 bolts on the frame.
- Using an open face wrench and a torque wrench, tighten the 4 bolts down to 105 ft-lb
- Attach the drag link to the pitman arm with the castle nut and torque wrench. The book says 67 ft-lb but I just got as close as possible while making sure that the hole lined up with the nut in order to get the cotter pin inserted. At exactly 67 ft-lb the hole wasn't quite aligned. Use your best judgement here.
- Insert and secure cotter pin
- Install PS lines with crow foot adapter, making sure to get correct line in correct hole (it's fairly obvious but double check to be safe). Tighten to 33 ft-lb.
- With your steering wheel centered (which it should be from beginning of this process), slide the universal joint down onto the steering box linkage.
- Insert and finger-tighten universal joint bolts and tighten with torque wrench to 25 ft-lb. Note here that the universal joint may need to be wiggled a bit up and down the shaft to get the bolts to align. I didn't do this and tore the threads up on the bolts and had to order new ones.
- Reinstall the universal joint cover with the (2) 12mm bolts. Not entirely sure on ft-lb here. It maybe 9 ft-lb if I'm reading manual correctly but I'm not sure on this. I just got it "tight" by hand with socket wrench.
Step 5 - Install new fluid and bleed the system
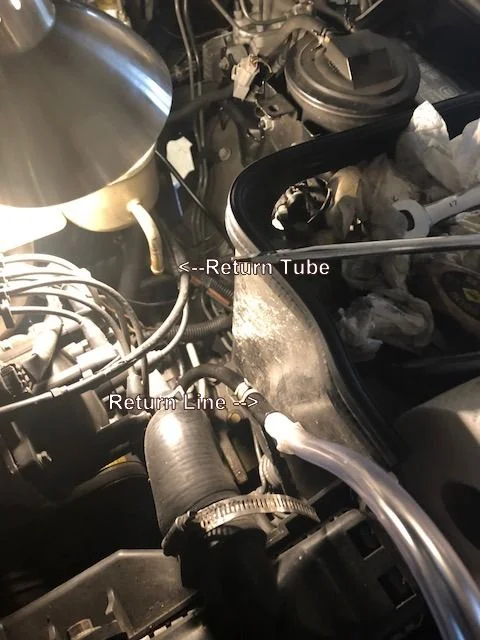
- With the return line still connected to the drain hose via the coupler, make sure that the return tube (the downward facing tube coming from reservoir) is sealed up. I used a little rubber stopper but you could probably use a variety of things (tape, etc) - open to other suggestions here.
- Fill the PS reservoir to the top with automatic transmission fluid (not PS fluid!)
- With the truck in the on position but the engine NOT RUNNING, have someone turn the wheel from stop to stop as you add fluid to the reservoir. This can be done alone - but just f'ing ask someone to turn the wheel. It makes life so much easier!
- This will pull fluid from the reservoir and ultimately out the return line. Note that I used a little suction at first on the drain line to get the fluid going (using vacuum pump) but I'm not sure that is really necessary. Turning the wheel should create enough suction to make it all happen.
- Once you have clear (clear-red that is) ATF running into drain line you can disconnect the return line from your coupler and drain line and reconnect the return line to the return tube. This takes a little jostling as you remove the plug from the tube and reconnect the line. Some fluid is bound to spill but do your best. Make sure to reattach the hose clamp.
- Continue bleeding the system by turning the wheel from stop to stop with the engine OFF, adding ATF as necessary.
- Once you have things looking good, start the engine and see how it goes. The first time I started then engine, the pump made a lot of cavitation noises (squealing). I let it run for a second and then turned it off and went back to bleeding for another few minutes. The next time I started it, it ran perfectly.
- Continue to check your PS levels and inspect system for leaks.
At this point, hopefully you have a fully-functional, new steering box. For me, it made a huge difference in the steering responsiveness.
Again, let me know if I've missed anything or if anyone has any suggestions for improvement.
Good luck!
Last edited:
 ) and want to make sure I don't disable my truck and ruin the trip before it even starts.
 ? Seems like there are really pretty few steps to this process, but I tend to screw things up and run into roadblocks whenever I get into anything.