Builds SAS 89 Mini--Triple cased Mashed Potato (1 Viewer)

This site may earn a commission from merchant affiliate
links, including eBay, Amazon, Skimlinks, and others.

The controller is sitting on my work bench for another day. I was tempted to buy another one and may still but for now it's just gonna have to wait.

Mine is also a bolt, 5/8 fine thread grade 8 if I remember correctly. I welded it in though so it aint goin' anywhere soon.
 
5th stud installed. One thing I did learn is that if you do not get the stud in very close alignment both horizontally and vertically with the other 4 studs you will not get the arm on or off. Obvious I know but the tolerances are very tight so take your time if you're doing this mod.
Mine is also a bolt, 5/8 fine thread grade 8 if I remember correctly. I welded it in though so it aint goin' anywhere soon.
So if it's a bolt and not a stud, I don't understand why there were issues getting it aligned correctly. If it's a bolt then you unscrew the bolt and the 4 top nuts off the studs and everything pulls apart just like normal. Shouldn't be any different than disassembling a stock knuckle. :meh:
 
Keep in mind the order of assembly. Mount the steering arm onto the knuckle with at least 2 factory studs including cone washers. Then take your pre-cut 3/8 steel re-enforcing plates that are to be welded to the steering arm and set them in place. Now, tack weld those onto the steering arm and then measure for the drilled hole. This is where it gets a little tricky because the hole must be drilled at the proper orientation in order to get the stud at the correct angle. Now I suppose if you like sloppy holes it wouldn't matter but I prefer them tight. :eek:

Once drilled (remember the steering arm is still there now with 2 pieces of 3/8 steel welded) now insert the the 5th stud up and through the hole. Once you're happy with the location then weld the stud in place from the inside of the knuckle.

Here's where you know if you screwed up or not, try to pull the steering arm off. If you forked up and got the angle wrong you can't remove the steering arm because as you pull up it will bind with the misaligned 5th stud. Get it?
 
Last edited:
Okay, I kinda thought that might've been what you did when you said you welded it in. But when you said it wasn't a stud but a bolt, that pulled me the other way picturing it as removable. You shoulda just called it a stud - that's what it is now that you put it in the way you did. And yes, doing it that way would be a pain.

Here's how I woulda done it:
Get the hole drilled and tapped where you want it and reinstall the steering arm. Cut the metal "tab" that you need and put the hole in it for whatever size bolt you tapped for. Then, through trial and error, keep adding some bend to it (in a vice, off the truck) until, when bolted in place, it's lined up with the steering arm enough to tack them together. Pull it and the steering arm off with tab tacked on, weld it up while its off and you're done. There may be a tiny bit of adjusting afterwards if the welding moved the bracket some, but I can't imagine it'd be anything major. At that point, installation and removal of the arm from the knuckle wouldn't be any different than it ever was once you've removed the one extra bolt from that tab. Walla!!, 5th stud mod without all the hassle later due to alignment problems.
 
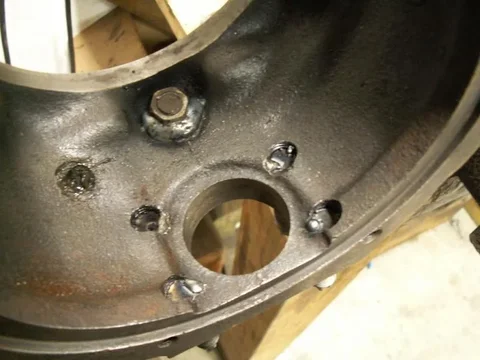
The target for the hole is very small and very specific, if you miss it you get into the ball of the axle housing. Notice the little nook in the pic where the bolt head is. (not my pic but same)
5th stud.webp
5th stud 2.webp

The drilled hole is not tapped, it's not straight up and down and nor does the tab lay perfectly flat on the knuckle so there are many variables to consider, thus the dry fit

The knuckle hole has to line up perfectly with the hole in the welded tab and be at the exact same angle so the bolt will fit through. The only way to do this is to drill the hole through both the welded tab (while in place) and then through the knuckle to accomplish this. Short of drilling out the hole bigger there is no adjustment after it's done.

5th stud.webp


5th stud 2.webp
 
Last edited:
The target for the hole is very small and very specific, if you miss it you get into the ball of the axle housing. Notice the little nook in the pic where the bolt head is. (not my pic but same)
View attachment 756267
View attachment 756271

The drilled hole is not tapped, it's not straight up and down and nor does the tab lay perfectly flat on the knuckle so there are many variables to consider, thus the dry fit

The knuckle hole has to line up perfectly with the hole in the welded tab and be at the exact same angle so the bolt will fit through. The only way to do this is to drill the hole through both the welded tab (while in place) and then through the knuckle to accomplish this. Short of drilling out the hole bigger there is no adjustment after it's done.

Did you weld the knuckle studs at the inside of the knuckle like the picture you posted?
 
Ted Ted Ted Ted.... I feel like I'm talking to a 4yr old.... :flipoff2:

Maybe I should just wait til I see you next week so I can point it out at just how easy I believe it to be. I think you went way overboard on your design, fab, and install.

Don't get me wrong, the way you have it is probably stronger than the way mine is. But for the headaches you went through in setting it up, only to have it still be aggravating later too, just isn't worth it IMO.


PS: Bring your bolted/spiked tires if you have any; looks like it might be a wet GSMTR. :doh:
 
Not only did we not talk about Moab, but we didn't discuss this either.

We also need to see some pics of your recent trail mods. AKA: carnage.
 
Yup, time flew by and it just never really came up. Not that it wasnt a priority there just never seemed time.

anyway, the "mods" list is a little longer than usual. My poor truck took a beating this go around but as I was the small tire guy in the group it seems to reason.

Tuesday
Rattle Rock-- this mod you guys have already seen. I'd taken the bypass but somehow ended up back on the trail... well, that was the end of drive shaft #4. As it turns out even the repaired DS has been further modified since Tuesday and has a few new dents in it. :bang:
IMG_3678.webp

Wednesday
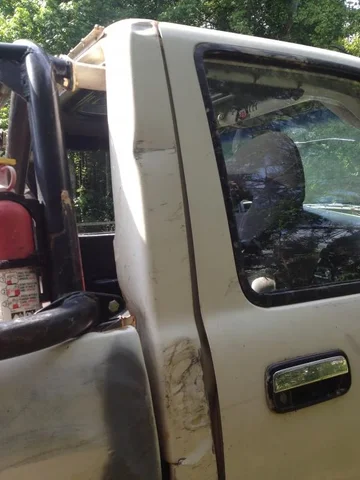
Trail 10-12-13 and out. As best I can figure I crunched the B Pillar near the bottom of trail 12 cause I really don't remember anything major happening but it's consistent with hitting a tree. The door wasn't touched b/c I wasn't running doors at the time. :hhmm:
IMG_3846.webp

Thursday
We ran 15 to Little School Bus and then upper 3, except for the right front running light at the very top of Little School Bus I came out unscathed. :clap:


Friday
Rail Trail--- We all knew at least one part was going to be a winch fest, and it was. But just short of the creek bottom there was a little spot with a rock on the right and to be honest I knew this was going to happen but couldn't be bothered with trying to prevent it. So, since it was too much trouble to throw it in R I said screw it and just pushed through.

edit: forgot about the rr tail light leaving the creek bottom on Rail Trail:meh:
IMG_3771.webp

IMG_3678.webp


IMG_3846.webp


IMG_3771.webp
 
Last edited:
Starting to pick up parts for dual cases, bout damned time! R150F adapter and 23 Spline input shaft will be in hands in the next week or two and 37s bolting on in a about month. :clap:
 
Starting to pick up parts for dual cases, bout damned time! R150F adapter and 23 Spline input shaft will be in hands in the next week or two and 37s bolting on in a about month. :clap:

You must be getting fast on breaking down those bead licks by now.
 
Starting to pick up parts for dual cases, bout damned time! R150F adapter and 23 Spline input shaft will be in hands in the next week or two and 37s bolting on in a about month. :clap:

Man... at this rate Steve is going to have like 5 cases before you get duals. :flipoff2:
 
You must be getting fast on breaking down those bead licks by now.

takes a full day if you decide to clean up the rings and repaint them. Just the price I pay for awesomeness. :lol:

Man... at this rate Steve is going to have like 5 cases before you get duals. :flipoff2:

I prefer learn how to drive my junk before I just climb in and let it take me for a ride.:steer:
 
:grinpimp:Ted Post up Before and After Split Screen Pictures! I told you what a slipperry slope you were headed down!!!!:grinpimp:
 
:grinpimp:Ted Post up Before and After Split Screen Pictures! I told you what a slipperry slope you were headed down!!!!:grinpimp:

take a nice clean white piece of paper with straight lines and no marks on it, now crumple it all up into a nice tight ball and then flatten back out and you got it. :bang:
 
Last edited:
Starting to pick up parts for dual cases, bout damned time! R150F adapter and 23 Spline input shaft will be in hands in the next week or two. :clap:

Yup!!

IMG_4003.webp


IMG_3999.webp
 
I'll pull a tape measure on it tomorrow. :bang::bang: I hear your transfer case and tranny don't like each other any more.

IMG_3969.webp
 
Last edited:

Users who are viewing this thread

Back
Top Bottom