Rods 65 FJ 40 thread (1 Viewer)

This site may earn a commission from merchant affiliate
links, including eBay, Amazon, Skimlinks, and others.

Rust removal

Well I've been working hard at rust removal. I built a poor mans blast cabinet and it works really well. It would be better if I had a higher performance compressor and blasting gun.
HPIM2490.JPG
Anyway its been doing a good job until I got to the running boards. Man are they rusted. I wire wheeled them, blasted them, wire wheeled them again then once more through the blaster and I still had heavily pitted areas full of rust. So I got out my Phos. acid and started brushing it on. Don't have a plastic container it will fit in or else i would have just let it soak. The Acid is the only thing that is touching it.
HPIM2485.JPG
As you can see in the photo I still have a little more soaking to do but it is working and it is a lot less labor intensive.
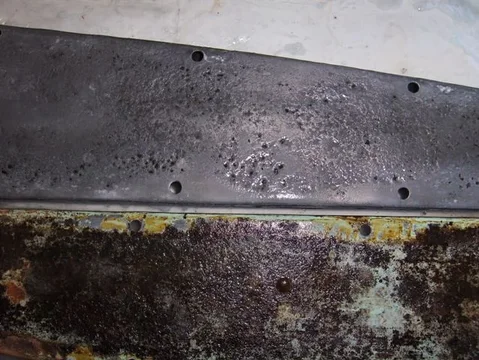
HPIM2491.JPG
Slow but sure I'm getting there!
HPIM2490.JPG
HPIM2485.JPG
HPIM2491.JPG
 
FOUND!

The elusive carb! One great thing about Christmas time is being able to justify a purchase.
HPIM2493.JPG

HPIM2496.JPG

The guy was even nice enough to throw in a glass bowl fuel filter. Now I have a backup.

HPIM2500.JPG
HPIM2493.JPG
HPIM2496.JPG
HPIM2500.JPG
 
nice :clap:...looks like its ready for a good cleaning :)

Yes it is! but for now I'll let it sit until I'm closer to putting my rig back together, unless that's a bad thing? Letting it sit in the present condition that is.
 
I am sure we are one day going to get some rain in our neck of the woods. Will make a good rainy day project.
 
rain

I am sure we are one day going to get some rain in our neck of the woods. Will make a good rainy day project.

The problem is if we went through 40 days and 40 nights of solid rain I would still need more time for all my rainy day projects. And then I would need a boat not a cruiser :)
 
Motor Mounts (insulator)

While separating my parts the other day looking for things that need replacement I came upon a question. During my research I found 3 answers so I need the experts to steer me in the right direction. How are the hocky puck looking rear motor mounts stacked on a 65. I need to know both right and left sides. My research indicated it may be different. This is what I found. At the dealer (poor guy couldn't find his butt with both hands) finally handed me a couple of print outs and said "IF you could use these to identify which insulators you need then I can check availability. but there are to many part numbers for the same thing"
HPIM2534.JPG

So I have the part number figured out but what I need is the mounting method. $pector has this diagram that shows it slightly different. Their site shows the same mounting method from 58 up to 80.
040A-r2[1].gif
My Mounts look like they were used in the method shown on the $pector site for the left side and I have one photo that verifies that. I also included a pic of my mounts and the bolts. Notice one of the bolts is bent which makes me think it may have been mounted incorrectly.
HPIM2535.JPG

So anyway the right side looks like the mounts are stacked top to bottom on the right side, both between the frame mount and the bracket. But on the left side are they stacked like the photo from the dealer, stacked bottom to bottom both together between the frame mount and the brackert or like $pectors site, one on each side of the bracket?
Also as a side note the bolts for the right and left sides are different part numbers and only the left side is available from the dealer. He was able to find that part!
040A-r2[1].gif
HPIM2534.JPG
HPIM2535.JPG
 
Go back to your cabinet for a minute...

What are you using as a gun, and how big of a compressor?

Been thinking of doing the exact same thing this summer, but using soda...

I think I rather take it apart when I'm done, or build another one if this one get's too beat up, than have a permanent blast cabinet taking up space.
 
I have a very loud craftsman oil free electric. It says 6hp on the side and 150 psi. I took the gun out of my bench top blast cabinet. I purchased it from Tractor supply. It's small, maybe that's why it works with my compressor. It takes all day to completely blast a few parts but when I'm done I know all the rust is completely gone. I would recommend building your own cabinet I'm very happy with mine for what it is. There are a few changes I would make if I did it again but as it is I really like it. I built it big enough to do my seat frames and I'll tackle them soon. Contact me when you're ready to build.
 
Rod,

Any chance you can send me a message with your plans for your blast box. I just bought a 40lb blaster and was planning on setting up a clear storage container as a small parts blast case so i can see what i'm doing and also easy to store and break down. just not big enough for larger projects. Matt
 
Blast cabinet

Rod,

Any chance you can send me a message with your plans for your blast box. I just bought a 40lb blaster and was planning on setting up a clear storage container as a small parts blast case so i can see what i'm doing and also easy to store and break down. just not big enough for larger projects. Matt

I don't have plans I just built it as i went but I did learn a few things.

Plywood is a cheep way to go. I used 1/2". It's light enough I can move it by myself and it didn't cost very much.

I think the one biggest issue is making sure you have good air exchange inside. I cut a hole in the top to fit a 12" household type furnace filter. Then I cut a round hole in the side to fit the hose on my shop vac. As I'm blasting I run the vac to suck up all the airborn dust. The 12" filter allows for enough air exchange to keep the inside of the cabinet clear. I put a 6" square piece of plywood 1" infront of the shop vac inlet to prevent the vac from picking up the sand as it bounces around inside.

I used cheap silicone sealent on all the inside edges. But with the right air exchange I don't think that is necessary now.

I use food grade stretch wrap to cover the plastic window. 2 layers on the inside and one on the out side. I replace it often.

I ended up spending the extra $$ for a HEPA filter for my vac (about $35) and it works very well and it's reusable.

I even made my gloves, $8 dollars at ACE and I added the long arms to them from some scrap material.

If your viewing window is big enough you can hang a coulpe of shop lights on the outside.

You might consider painting the inside with white paint for better lighting.

I used 2 sheets of plywoob and had some left over. I made it the full 4' wide and deep enough to hold my seat frame.

One side is also the door.

Hope this helps
 
Have you tried using soda? I have read that it does a great job, and won't hurt the glass...
 
Soda

Have you tried using soda? I have read that it does a great job, and won't hurt the glass...

Not yet, If I can source some soda maybe i'll give it a try. No damage to the glass would be very nice. I can see OK through the plastic window with 3 layers of stretch wrap but a simple plate of glass would be real nice.
 
Not yet, If I can source some soda maybe i'll give it a try. No damage to the glass would be very nice. I can see OK through the plastic window with 3 layers of stretch wrap but a simple plate of glass would be real nice.

I've seen guys on youtube make cheap soda blasting thingamajigs, like these two; $15 DIY Soda Blaster - YouTube and Soda Blaster final build. - YouTube

I have spare plywood laying around, so I think I'll give it a go later this spring.

Let us know if you try the soda...I hear that it won't hurt the glass, and rubber seals...and leaves a film on that prevents flash rusting after being stripped. The film is supposed to be very easy to remove...or so I hear. :beer:
 
Soda

I've seen guys on youtube make cheap soda blasting thingamajigs, like these two; $15 DIY Soda Blaster - YouTube and Soda Blaster final build. - YouTube

I have spare plywood laying around, so I think I'll give it a go later this spring.

Let us know if you try the soda...I hear that it won't hurt the glass, and rubber seals...and leaves a film on that prevents flash rusting after being stripped. The film is supposed to be very easy to remove...or so I hear. :beer:

Thanks for the links. I'll look at them soon. Right now I'm enjoying the birth of Grandson number 3!

After blasting I use Prep & etch a product from Home Depot. I mix it 3 parts water to 1 part P&E. I spray it on with a simple plastic bottle sprayer like fantastic or 409 comes in. I keep it wet for 5 or so minutes then wipe it off with a dry rag. Any areas that aren't perfect will show up and then I re-blast. When i get a even finish after the P&E I cover it with Masterseries silver. On stubborn rust that I can't get with the blaster or I don't want to take the time (seat springs) I soak it overnight, hose it off then spray and wipe. So far I love the Prep and Etch it will completely remove rust from the poors in the steel. Sometimes I use a scotch brite pad to work it in then let it set for a few minutes. My goal is RUST free but we all know that is near impossible. I will get as close as I can with elbow grease and time.
 
The mounts are different on each side. One side, they are stacked on top of each other under the mount, the other one over and one under. It has to do with the way the engine rocks on acceleration.
 
The mounts are different on each side. One side, they are stacked on top of each other under the mount, the other one over and one under. It has to do with the way the engine rocks on acceleration.

Thanks so much for the information:). Now for the million dollar question. How were they stacked? Like the first diagram or like the diagram from the spector catalog. MY guess would be the way from the spector diagram, but then again that is just a guess.
 
Front hubs

So in keeping with doing a " close as possible" restoration of my 65 I would like to remove the locking hubs and go back to OE. So what will I need? I know I'll need the correct hubs but what about bearings, castle nuts, seals... etc. Got a couple of swap meets coming up this year and I need something to look for.
 

Users who are viewing this thread

Back
Top Bottom