
Navigation
Install the app
How to install the app on iOS
Follow along with the video below to see how to install our site as a web app on your home screen.
Note: This feature may not be available in some browsers.
More options
Style variation
You are using an out of date browser. It may not display this or other websites correctly.
You should upgrade or use an alternative browser.
You should upgrade or use an alternative browser.
Build Project Bluebird and the tale of an engine rebuild
- Thread starter maxbob002
- Start date
Member Builds and Stories
This site may earn a commission from merchant affiliate
links, including eBay, Amazon, Skimlinks, and others.
- Thread starter
- #62
Man. Got a good look at @maxbob002 ’s install last night at the CottonLand meeting.
A++ install.
Thanks man. Your build thread was a big help along the way.
- Thread starter
- #63
Well it made the 90mile round trip to the club meeting without a hiccup. I ran at 68-71mph by gps the whole way. Had to hit close to 80 a few times for passing. Power wasn’t an issue at all. However vibrations encouraged me to keep it at a slower speed. I picked up the old air intake hose and had it installed for the trip back. The temp gauge showed it ran a touch cooler and it seems to idle smoother with it in place. It averaged 11.67mpg on the trip by the stock odometer which is 6-8mph off. I haven’t cared to do the math to calculate the actual mpg.

However it looks a bit worse for wear. I had read about using these spectre ones from oreilly’s and figure I would give it a chance.

It fit great and looks nicer. I used the stock clamp on the breather and the rubber end just flaired from being inserted into the hole behind the headlight.


And a parting shot of bluebird hanging out in the driveway.

However it looks a bit worse for wear. I had read about using these spectre ones from oreilly’s and figure I would give it a chance.
It fit great and looks nicer. I used the stock clamp on the breather and the rubber end just flaired from being inserted into the hole behind the headlight.
And a parting shot of bluebird hanging out in the driveway.
- Thread starter
- #65
Tough to say. It rattled the whole truck quite a bit but almost a loud hum with the vibratio. I think that would be driveshaft. Tires I think are more felt vibrations. I can always get the driveshaft balanced I suppose. It’s easy to drop.Bob, nice.
Do you think the vibrations are tires or driveshaft?
- Thread starter
- #67
Me and my girls have been driving bluebird quite a bit and it’s been going great. I get between 11 and 12 mpg consistently. I took a highway trip this week and got 12.5 mpg. This is not corrected for tire size either. Thanks to @Dustin Messina I now have an ARB bumper and quadratic winch. Install was a breeze and it looks great.

Also I finally flind some time to fix the check engine light. I was just using the led that came with the kit and stuck it in the chicken cable hole. Today I finally pulled the cluster and wired it to the choke light. For those searching in the future I attached a couple pics. Use the grounding wire from the ecu and tap it into the red black wire with blue dashes.


If you ground the other wire it blows the fuse, just an FYI.
Also I finally flind some time to fix the check engine light. I was just using the led that came with the kit and stuck it in the chicken cable hole. Today I finally pulled the cluster and wired it to the choke light. For those searching in the future I attached a couple pics. Use the grounding wire from the ecu and tap it into the red black wire with blue dashes.
If you ground the other wire it blows the fuse, just an FYI.
Dustin Messina
SILVER Star
Looks awesome!!!! Super clean.
- Thread starter
- #70
After a few thousand miles Bluebird has done great including a trip to Arkansas for the Cottonland Crawl and lots of daily kid hauling. That was until I found the rear diff leaking and driveshaft bolts loose. Ones that were definitely torqued and locktited in place. Closer inspection showed the pinion had play. Time for a rebuild. I was torn between a locker and lsd but got in on the sale from four wheel parts and got a free air compressor. After much reading and watching videos it was time to begin.


Pretty uneventful disassembly honestly. I did pattern the gears and bl was from 0.15-0.17.


Pretty uneventful disassembly honestly. I did pattern the gears and bl was from 0.15-0.17.
- Thread starter
- #71
I found out that mine was the earlier shim style rather than a crush sleeve pinion set. The Toyota pinion shims are not available so hoping that using the old ones works well.

I cut the cage off the larger pinion bearing and used a collar to press it off.


Drill and tapped the housing before a good scrub in the parts washer bin. A little suntan and some black paint and it’s lookong great.

Used the old race to press the new bearing on without much fuss.

I cut the cage off the larger pinion bearing and used a collar to press it off.
Drill and tapped the housing before a good scrub in the parts washer bin. A little suntan and some black paint and it’s lookong great.
Used the old race to press the new bearing on without much fuss.
- Thread starter
- #72
The bearing races came out using a punch and dead blow hammer. There was a 0.40 shim under the larger pinion race which will was reused.

I used the old smaller race and my old tcase shaft to seat the race.

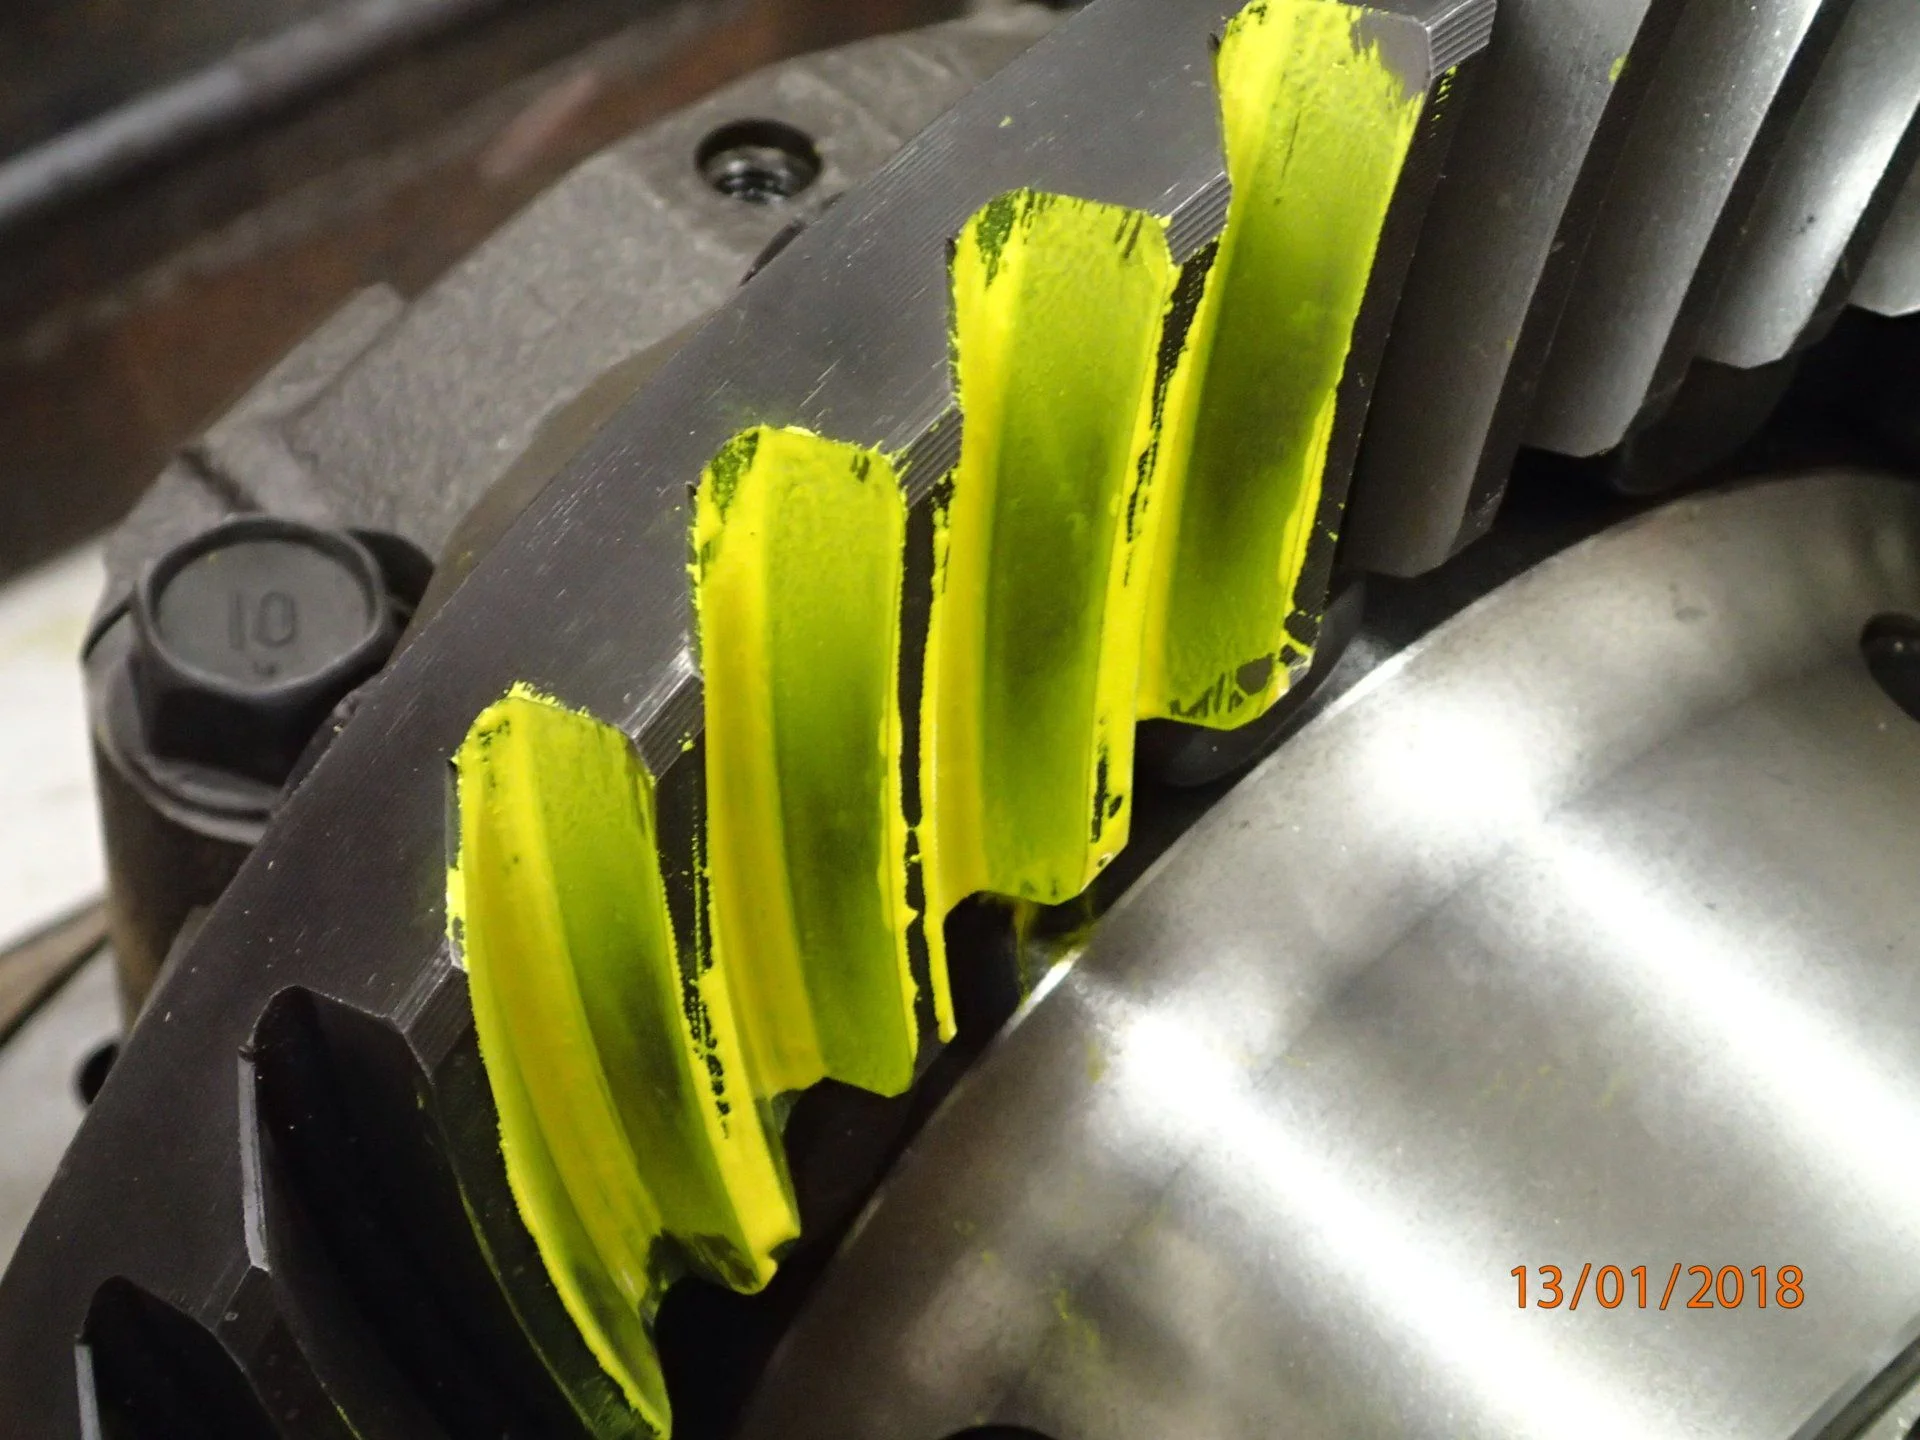
Here it is all together. Backlash is 0.17 give or take a few all around.


Here is the final pattern. Of course it doesn’t look like the book but seems good enough to me. Anyone have any thoughts on it?

I used the old smaller race and my old tcase shaft to seat the race.
Here it is all together. Backlash is 0.17 give or take a few all around.
Here is the final pattern. Of course it doesn’t look like the book but seems good enough to me. Anyone have any thoughts on it?
Last edited:
It's pretty close to the edge - but that's the coast side. The drive side favors the toe and the root which is desirable I think. Looks like the pinion depth could be reduced a but to make both sides happy. Or just run it. Tons of good pics on gearinstalls.com
- Thread starter
- #75
I have been considering changing the shim to move the pinion away from the ring gear or shallow I believe. You guys motivated me to now and at least pattern it. I love the gear installs site and I’ve watched YouTube and read webpages for hours about gear patterns now. I appreciate the help.
- Thread starter
- #76
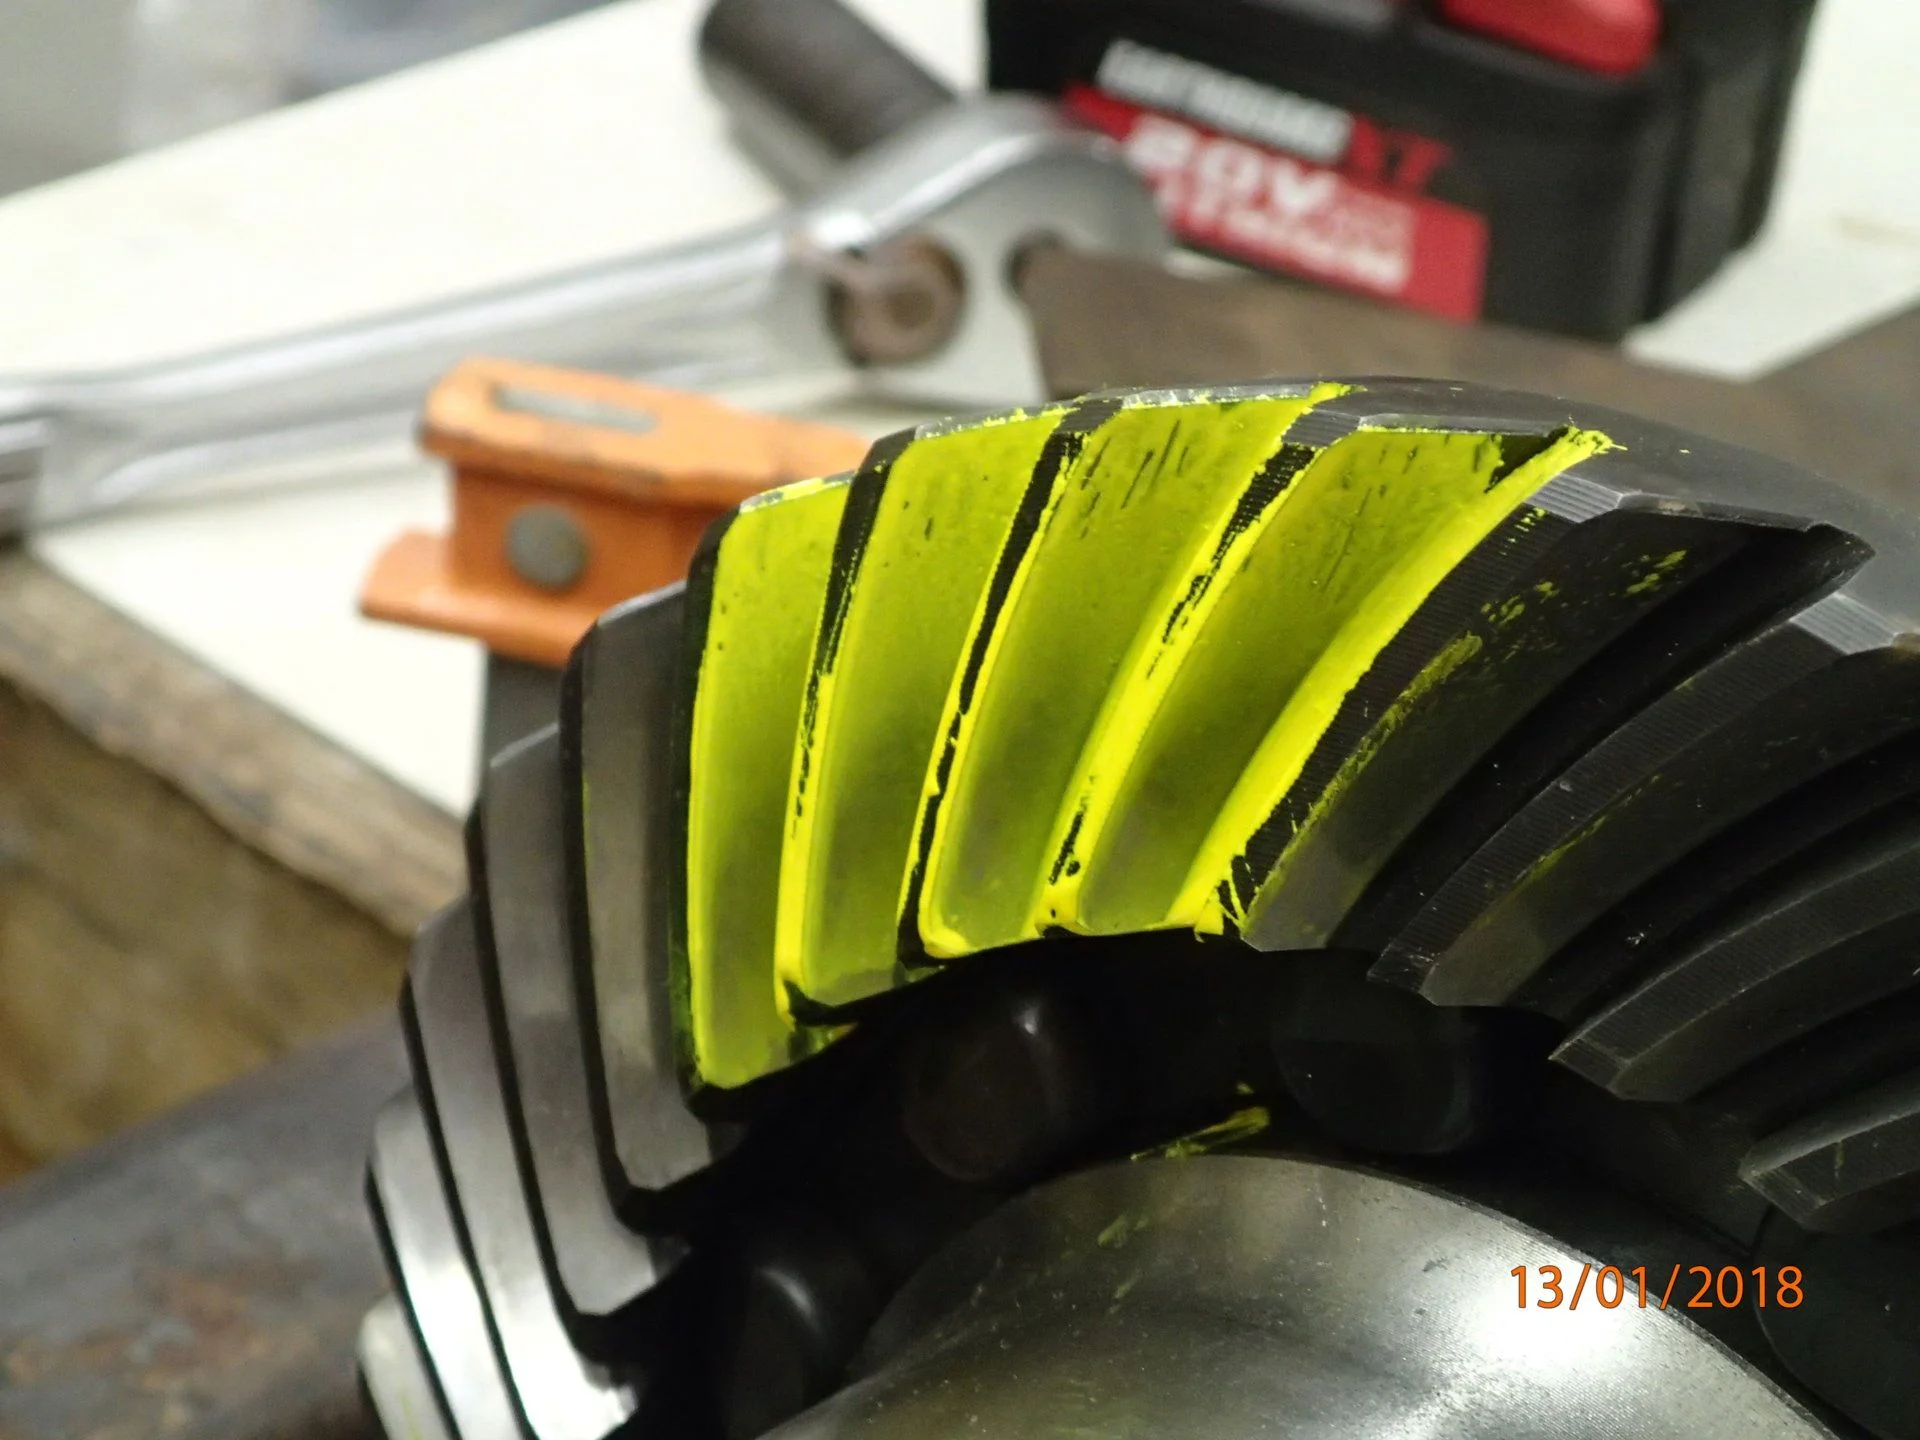
Went from a 0.40 to a 0.30mm shim under the large pinion bearing.

Went tighter on the backlash also. From what I have read the pinion depth tends to change the face to flank position and backlash changes the heel to toe. Of course they interact but it looks like the shallower depth did move the contact towards the face. I don’t feel comfortable tightening. The backlash much more. Most teeth are 0.15 but a few 0.14 are there too.


Now the pinion preload is low also. Came in at 11 or so in lbs. That is only 145ft lbs on the nut so hopefully I can put some more ft lbs and get some more preload. There is a small shim that can come out if really needed though also. Man these things are complex to set up.
Went tighter on the backlash also. From what I have read the pinion depth tends to change the face to flank position and backlash changes the heel to toe. Of course they interact but it looks like the shallower depth did move the contact towards the face. I don’t feel comfortable tightening. The backlash much more. Most teeth are 0.15 but a few 0.14 are there too.
Now the pinion preload is low also. Came in at 11 or so in lbs. That is only 145ft lbs on the nut so hopefully I can put some more ft lbs and get some more preload. There is a small shim that can come out if really needed though also. Man these things are complex to set up.
Dustin Messina
SILVER Star
Looking good. Get this all figured out so you can come in stall mine!!!Went from a 0.40 to a 0.30mm shim under the large pinion bearing. View attachment 1942501
Went tighter on the backlash also. From what I have read the pinion depth tends to change the face to flank position and backlash changes the heel to toe. Of course they interact but it looks like the shallower depth did move the contact towards the face. I don’t feel comfortable tightening. The backlash much more. Most teeth are 0.15 but a few 0.14 are there too. View attachment 1942502
View attachment 1942498
Now the pinion preload is low also. Came in at 11 or so in lbs. That is only 145ft lbs on the nut so hopefully I can put some more ft lbs and get some more preload. There is a small shim that can come out if really needed though also. Man these things are complex to set up.
That looks really good to me. .15mm = .006" which is the low end I think. Don't go less on the BL. I'd button her up and run it.
Not to muddy your thread but here's what I ended up with on my front.
I had BL .007-.009 which concerned me a little bit. But it's a front so who cares. If you've read a lot on Zuk's site you know he feels that pre-load is most important once the pattern and BL are in range.
Nice work.
Not to muddy your thread but here's what I ended up with on my front.
I had BL .007-.009 which concerned me a little bit. But it's a front so who cares. If you've read a lot on Zuk's site you know he feels that pre-load is most important once the pattern and BL are in range.
Nice work.
- Thread starter
- #79
Thanks for the pics and help. Yes he does tend to set it later. So hoping it works out for me. .15 is the low end for bl for sure but still in spec per the fsm so I left it. Wish I had done 10 of these diffs before so I would feel more confident.That looks really good to me. .15mm = .006" which is the low end I think. Don't go less on the BL. I'd button her up and run it.
Not to muddy your thread but here's what I ended up with on my front.
I had BL .007-.009 which concerned me a little bit. But it's a front so who cares. If you've read a lot on Zuk's site you know he feels that pre-load is most important once the pattern and BL are in range.
Nice work.
- Thread starter
- #80
Installed the pinion seal using a 54mm axle socket and torque/staked the pinion nut.

Then came installed the air line system. I took it slow and ended up leak testing with a homemade tester.


The fitting on the housing uses a clever double oring to seal everything up.


Harbor freight stuff with a couple Napa couplers to make it connect.
Then came installed the air line system. I took it slow and ended up leak testing with a homemade tester.
The fitting on the housing uses a clever double oring to seal everything up.
Harbor freight stuff with a couple Napa couplers to make it connect.