pillguy's 4runner build (with pics) (2 Viewers)

This site may earn a commission from merchant affiliate
links, including eBay, Amazon, Skimlinks, and others.

next

So here we are with the bend complete, one thing I forgot to mention is you really have to think in 3 dimension and backwards as well because if you lay the template down the wrong way, you end up cutting the groove on the wrong side.
Sorry not to show the welded up back side, I blew threw in one area and had to carefully, fix it filling it in. Looks OK.
P1000377.JPG
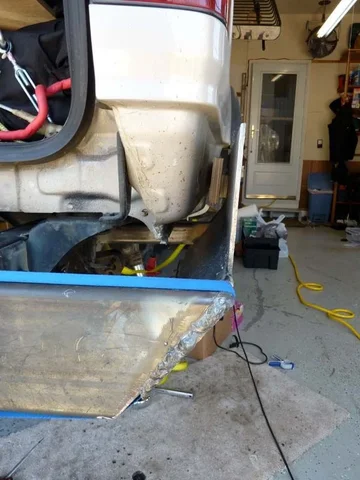
next, as mentioned I figured out how to hold it in place, duh... using a strap, worked like a charm. I did have to place a clamp at the bottom as it tended to drop a bit when I ratcheted down on it

P1000379.JPG
next, welded up. I will cut off about 3/4" on bottom and about 1-2 inches in to match it up real nice.
Question to all, what should I do about the top of the side, leave it or add a small piece at a 90 degree angle to the side plate. Problem is , I wanted to leave some room for any body flex.
P1000380.JPG
the plan is to put my mud flaps back on if every thing works out.... cannot have any unnecessary stone chips in my nice new shiny bumper

next steps. finish fabing other pieces, weld on, remove bumper, strip, etch and paint. I should be done in time for Durhamtown....
P1000377.JPG
P1000379.JPG
P1000380.JPG
 
Looking good PG. Might want to think about a little reinforcement, something that ties the side plates into the frame so it wont collapse if hit from the side.

Is that bubble gum on the corner? :flipoff2:
 
Ted,

I reinforced with 2x2 x 3/16" at the front if you look closely at the last picture. I will probably put a few small gussets here and there. Got 2 more pieces cut out tonight (brrrrrr!) and will gear up for the final drill out of the left corner of the bumper to take the spindle which will sit in a tube of schedule 80? tube which I will weld to the frame. I am getting done and need to think about priming and painting. Also need to lay my hands on some more pipe to build the kick outs and weld them in.
Then, will go for the design of the swing out carrier.
Looking good PG. Might want to think about a little reinforcement, something that ties the side plates into the frame so it wont collapse if hit from the side.

Is that bubble gum on the corner? :flipoff2:
No, JB weld :hillbilly::hillbilly::hillbilly::hillbilly::hillbilly:
 
update

Well, this past weekend not much happened on truck, We get home from dinner on Friday night and no water. WTF?
Neighbor shows up and shut off our water as a busted irrigation pipe was the culprit (uggh!!)
So we do the usual, fill up the buckets and shut off H2O for the evening. I call my neighbor as I was concerned we would have to call a plumber in....
So Sat morning rolls by and we start by digging a hole. We only need to dig down about 18". Off to HD and $20 bucks and 3 hrs later we fix it.

So not much done on truck other than welding in the hitch and drilling out the spindle on the bumper and cutting and bending & welding in the small back plates on bumper. They turned out nicely after a bit of grinding and :bang:. I will be sleeving it and welding to sleeve and then weld the sleeve to the bumper.

Here is my status, we are a bit off as it has to be perfectly parallel. IMG00123-20100301-2202.jpg
IMG00123-20100301-2202.jpg
 
Weld the right side first, the weld may pull it plumb. Let it cool and weld the other side and you should be good to go.
Looks good :beer:.
 
excellent idea, still need to do some filing on left side
Weld the right side first, the weld may pull it plumb. Let it cool and weld the other side and you should be good to go.
Looks good :beer:.
 
big night

:):):):) tonight I took the bumper off for the final welding, cutting and grinding to be done. If all goes well, I will be priming and painting this week and hopefully get it back on in time for Durhamtown next week. got to fit it in with all the other house stuff I need to do....:mad::mad::mad:
 
bumper update

Well folks, sorry for the delay, but we are cutting it really close to the wire. I did not get much done this weekend due to a family gathering that wiped out my entire Saturday. I am starting to get burned out on it...:meh:
So here is what I got done.

Bumper removed,
Near completion of the final welding of all pieces
Here are some pics
P1000409.JPG
got the diamond plate welded on
P1000405.JPG
whats left to do

need to weld this angle section in, had cut something else out, but felt it was overkill.
P1000408.JPG

I have 2 options
1 put my old bumper back on for durhamtown or

make a few gussets to cut and weld in
cut off some small sections needing to be removed on the wings
prime and paint the back of it
throw a coat of primer to protect the rest and paint it after durhamtown.

Whats do the people want???:)
P1000405.JPG
P1000408.JPG
P1000409.JPG
 
update

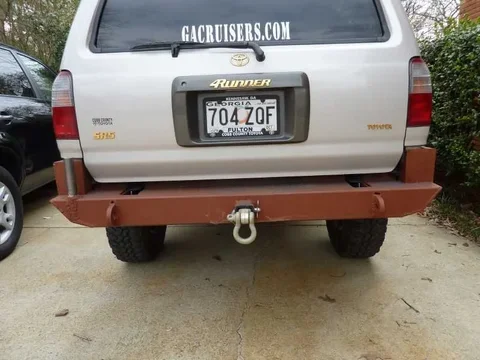
Well folks, unfortunately I missed durhamtown, got bumper on, but had some minor fit issues that put me too late to meet up at 10am.

Got bumper on and here are some pics.
P1000413.JPG
Have to figure out something for the hitch, ie attach chains to. Am thinking from back side to minimize loss of departure angle
P1000414.JPG
back
P1000415.JPG
side, ok am just a bit off on being parallel to body lines. opps....

beyond sanding disks, anyone have good ideas for removing mill scale?
P1000413.JPG
P1000414.JPG
P1000415.JPG
 
Looks great! Not much of a fan of the color though :flipoff2: I know I know, that primer thing again.

Grinding wheel and sanding pads are your friend, trust me I've gotten very good at using them after I weld. the only way around it that I'm aware of is to become a better welder, myself included.

Where's the tire carrier, I see the spindle but no carrier? :meh:
 
Yes, am noticing that sanding disks cover up some welding errors. I noticed it is hard to weld on a vertical and my ready welder, is pretty potent as the 110 is a bit more forgiving. On a horizonal plane, I am much better with the RW and 110 is pretty smooth.
I think I am going to have to consult Chuck on some ideas for the tire carrier, as I wanted to use some tubing to make it along with some square tube. I have some ideas from pictures, but am trying to keep the weight down.
Currently, I think I am at about 100lbs. I have to get the scale out to garage and get an exact weight.

Also, helmet type seems to make a difference, I have a cheapy NT LCD helmet and a cheapy old fashioned one. Still not sure what is better to see out of.

Chuck knows far more than I do but here is what I have learned as a semi experienced booger welder (John & Josh try to teach but I'm a lousy student)

1) Auto darkening helmets are worth every penny! Seen them at Harbor Freight for $50+/-
2) Gas on the welder makes a huge difference, not as much splatter and much better looking welds when done properly
3) Practice!

After that, more practice.
 
brakes

Where can I start?
Brakes have been a problem since last annual meeting. Took it into Toyota dealer, had the oil changed and had them adjust the brakes. (yea Right.....) who knows what they did.
So, I decided to upgrade my front brakes, new rotors, pads, etc. still no difference and then I run into limited brakes the day I left for one of the trail rides last month.
Good call.
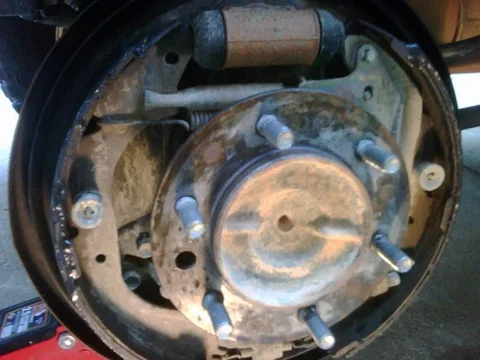
Here is what they looked like
rreardrumleak.jpg
here is the problem, looks ok to me
P1000737.JPG
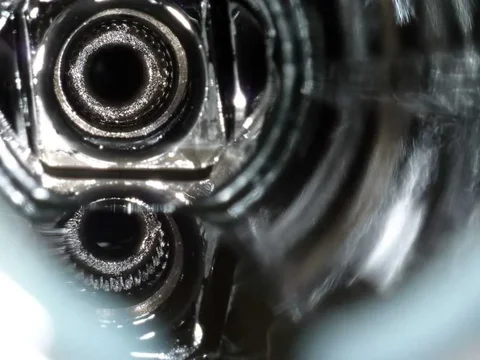
got off the axle and here is a rare look into the tube
P1000738 copy.jpg
rreardrumleak.jpg
P1000738 copy.jpg
P1000737.JPG
 
axle repair

So I ordered parts and got the bearing pressed off and replaced.
I did not replace the skid rotors as the place I took them to made a device to save them (otherwise they get cut off). not shown, but they look like a gear.
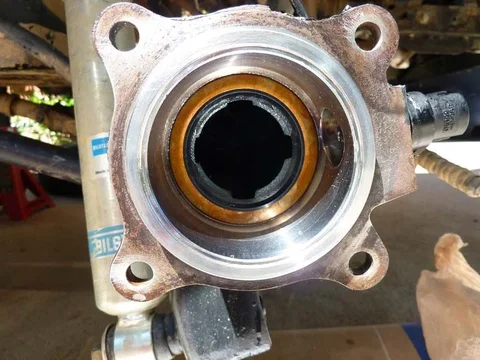
Here is the left side getting ready to pull the seal.
at the 3o'clock position is the ABS sensor
P1000744.JPG
Seal removed and ABS sensor backed out
P1000745.JPG
finally all back on, rather than using a ton of brake cleaner, I scrubbed brakes with degreaser and water and then used brake cleaner to finish it off.
P1000746.JPG
refilled diff with 3/4 quart of fluid, and buttoned everything up.
Got to put the wheels back on today and test drive it.
P1000744.JPG
P1000745.JPG
P1000746.JPG
 
rear drawer system (not)

did a lot of reading on drawer system and decided to make one without pullouts and a center divider that is removable.
I liked Nick's as it was simple and functional and was similar to one I was thinking of...
had to do a lot of finess work to get it in.
I used 7/16s plywood, next time I would spend the extra money and get furniture grade plywood.
P1000742.JPG
another view. P1000743.JPG
in truck.
storage4runner.jpg
This way I can configure my storage boxes however I decide.
Its a bit high, but I can stuff my wheel under there if I need to till I finish my tire mount.
let us say that a sander really hides a lot of sins
P1000742.JPG
P1000743.JPG
storage4runner.jpg
 
I like the storage compartments, you will enjoy them....they are a little high, but as long as you can see out the back you should be fine, plus you can fit more stuff underneath them...


Yours look better than mine :meh:
 
AC belt what is that??

Well guys a new year has begun and I had a bit of time over the new years weekend to do some work on my truck.
First up was the repair of my AC belt.
Stupid me thought it was the PS belt, and I searched high and low to the cause of my woes as it was grinding and whining and smoking over a short Xmas day drive.
But lo and behold... upon closer inspection I saw a belt at the bottom of the engine and was wondering why it looked like my AC belt was missing and saw it was my AC belt.
AC_idl_03.jpg
AC_idl_01.jpg
AC_idl_02.jpg
D@mn... now I need a new AC compressor $$1100 repair at dealer and about $150 used for just compressor.
I looked a bit closer and checked the idler pulley and it was frozen solid.
So off to the PC and yotatech Mud and I confirmed it was the idler pulley.
see here Idler pully rebuild - TTORA Forum

So after about 2 years of mudding, I guess it was time for it to wear out.
AC_idl_01.jpg
AC_idl_02.jpg
AC_idl_03.jpg
 

Users who are viewing this thread

Back
Top Bottom