pillguy's 4runner build (with pics) (1 Viewer)

This site may earn a commission from merchant affiliate
links, including eBay, Amazon, Skimlinks, and others.

Guys,
These are great ideas. One challenge with the 4runner is the frame does not extend to end of body, about 3" short I think. Hence, using 1/4" right angle bracket butted up against the bar and welded. I am envisioning 2 options
1) I could get fancy and do a cut out (on right angle frame bracket) so the bar lays on top of the horizontal portion of the right angle bracket and it would increase the welding area

2) Cut some 3/16" plate triangles and weld to bottom of both tube and right angle bracket.

Thoughts?

I may mock this up on scrap and post a few pics when I get back....

Andrew,
I am not visualizing your geometry and description, so pictures will be very helpful.
 
Larry,

It will have to be this weekend as I am traveling this week. I will make something up on scrap steel and post.


Andrew,
I am not visualizing your geometry and description, so pictures will be very helpful.
 
2) Cut some 3/16" plate triangles and weld to bottom of both tube and right angle bracket.

I got this part, it'd look very similar to the stock FJ40 front bumper mounting assembly.

I assume the 4 Runner has the rear C channeled frame? I would definitely box it out before any heavy bumper additions. Maybe add some frame extensions so the bumper could sleeve into the frame w/ perpendicular bumper mounts (?) A huge fan of sleeve connections here :D
 
Good info,
so how would I make sleeve connections to box out the frame? My Not sure what c-channel frame is. I think you mean 2 pieces of C channel steel welded together to make a box.
I believe my measurements were 2.5"w x 3.5" high.
I was going to make some bolt plates to slide inside the frame on bottom and side so I could mount the right angle bracket to them like a sandwich.
Is that reasonable or would you do something else?

2) Cut some 3/16" plate triangles and weld to bottom of both tube and right angle bracket.

I got this part, it'd look very similar to the stock FJ40 front bumper mounting assembly.

I assume the 4 Runner has the rear C channeled frame? I would definitely box it out before any heavy bumper additions. Maybe add some frame extensions so the bumper could sleeve into the frame w/ perpendicular bumper mounts (?) A huge fan of sleeve connections here :D
 
Just cut some 3/16" or 1/4" plate & box out the frame rails, prolly 8" - 10" long. Then, figure out what type of mounting system, along w/ how you want to affix the shackle mounts. Post up some pics of what you already have started on & a pic of the rear frame rail.
 
Just cut some 3/16" or 1/4" plate & box out the frame rails, prolly 8" - 10" long. Then, figure out what type of mounting system, along w/ how you want to affix the shackle mounts. Post up some pics of what you already have started on & a pic of the rear frame rail.


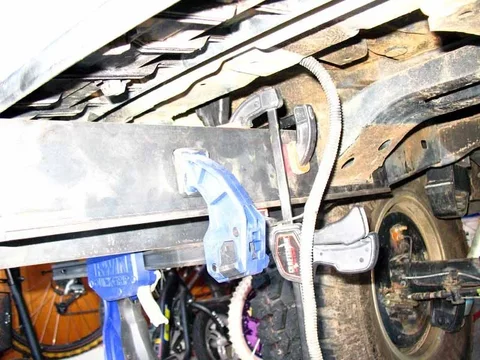
Here is a pic of the frame and hitch:). I cannot completely box it in because of the body mount. I could do 3 sides like in one of these pics. (used s****). IMG00059-20090927-2035.jpg

Another view
IMG00059-20090927-2035.jpg

And finally, an example of the possible solution. using 2 L shaped steel 3/16" x 4 IMG00055-20090926-1452.jpg

ANy thoughts
IMG00055-20090926-1452.jpg
IMG00058-20090927-2034.jpg
IMG00059-20090927-2035.jpg
 
Andrew,
I am not visualizing your geometry and description, so pictures will be very helpful.

Larry,

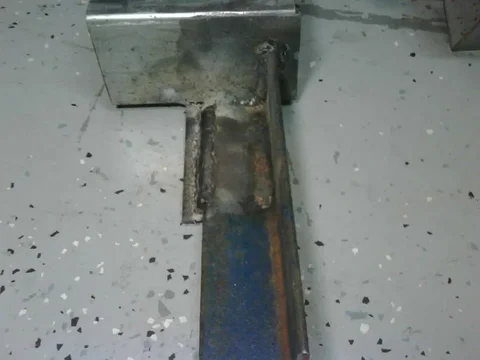
Here is one example I was thinking of.

L angle steel welded to bumper tube
IMG00052-20090926-1403.jpg
Plate added (view from bottom)
IMG00056-20090927-2032.jpg
View from top.
IMG00057-20090927-2033.jpg

I think this is a good option to mount. I also could as additional reinforcement weld gussets (triangle) pieces to the frame and tube for additional lateral strength.
THoughts


Andrew
IMG00052-20090926-1403.jpg
IMG00056-20090927-2032.jpg
IMG00057-20090927-2033.jpg
 
Larry,

Here is one example I was thinking of.

L angle steel welded to bumper tube
View attachment 358593
Plate added (view from bottom)
View attachment 358594
View from top.
View attachment 358595

I think this is a good option to mount. I also could as additional reinforcement weld gussets (triangle) pieces to the frame and tube for additional lateral strength.
THoughts


Andrew

Andrew,
Your "L" channel idea can provide a lot of attachment strength for bumper, but at the 'expense' of how far you run the L along your frame. More length would add weight and could complicate your concerns of warping. My thought here is a small amount of warping in welding a long(er) L channel to the bumper could result in larger tolerance buildup (warp angle x channel length ~ tolerance). Overall, I like you idea of the channel and bolting it to the frame rather than welding to the bumper to the frame.
 
more bumper build pics

OK, so I had a bit of time this weekend and did some more work.
Figured out a solution to the frame brackets and am going to to with my 2x5 steel tube.
IMG_1794.JPG

here are the inner and outer brackets views
IMG_1797.JPG IMG_1798.JPG
IMG_1794.JPG
IMG_1797.JPG
IMG_1798.JPG
 
Are you going to keep the trailer hitch or integrate it into the bumper?
I will integrate it into the bumper. still a lot of work to go
 
more work this weekend

Well,

I finished the brackets, welded up and fit (tight). They are nice and even, and stick out about 5.5 inches beyond the frame ends.
Next is to work on interior (frame) plates (3/16) and weld the bolts that I got and after that is to set up the bumper itself, mark it and then cut back sections out to insert the frame mounts.
below is left internal bracket.
rear7.jpg
I may do some additional tweeking on them. Let me know what you think.
rear7.jpg
 
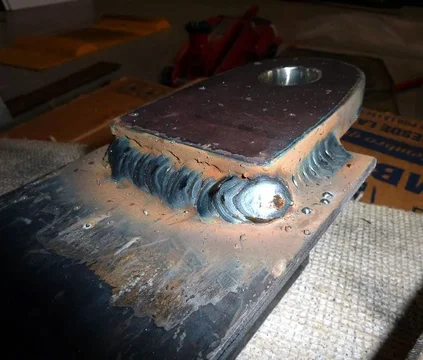
Went to see LC_Hamma to weld my tow points to my frame brackets. He has a much bigger welder than I do and it welds great for this big material. He also gave me a few welding pointers as well. Sorry I did not get any pics while we were welding.

P1000240.JPG

P1000243.JPG

P1000241.JPG

He has two nice land cruisers and the fab work is impressive. Thanks again Chuck, I will catch up with you again to weld a few other thick items together.

A
P1000240.JPG
P1000243.JPG
P1000241.JPG
 
Went to see LC_Hamma to weld my tow points to my frame brackets. He has a much bigger welder than I do and it welds great for this big material. He also gave me a few welding pointers as well. Sorry I did not get any pics while we were welding.

View attachment 379859

View attachment 379860

View attachment 379861

He has two nice land cruisers and the fab work is impressive. Thanks again Chuck, I will catch up with you again to weld a few other thick items together.

A

Andrew,
Your welds look very nice. Did you use the 'triggering method' with the MIG to layer the puddle like you were using a TIG or stick welder?
 
Larry,

Thanks for feedback. What welds are you talking about? and what is this triggering method? I have read about it in posts, but not sure I understand it.
In welding the brackets, I used my welder and used Chuck's to weld the brackets.
As I have been reading about welding on line and on mud, my technique was a bit weak (keeping arc ahead of puddle) on my brackets and I think I have to run them over again with chucks welder on a few areas to ensure strength.
I know I am at the limit of a 110, but as I have read several people have built entire rigs, SAS, etc. with 110 welders and good technique.
Its been too slow a process and I am anxious to get done.

Andrew

Andrew,
Your welds look very nice. Did you use the 'triggering method' with the MIG to layer the puddle like you were using a TIG or stick welder?
 
exhaust reposition options

Hi All,

I have to reposition part of my exhaust pipe to route between the frame and body and out the rear bumper. Basically, raising the last 18-24 inches up and out pretty much the same way.
What are my options?

Andrew
 
more work

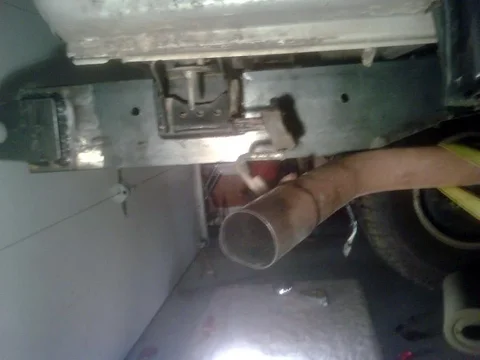
Got a bit of time in over break to do some final fitting and drilling of the bolt holes that will be supporting the frame mounts.

Had to build a jig to hold them in my drill press. Seems to work pretty well
IMG00100-20091230-2055.jpg
currently being held in by two bolts from tow hitch points.
IMG00102-20100103-1954.jpg
IMG00103-20100103-1956.jpg
you can see in the last one the need to move the exhaust pipe.
IMG00100-20091230-2055.jpg
IMG00102-20100103-1954.jpg
IMG00103-20100103-1956.jpg
 
Lookin' good!

Just cut the tail pipe at a 45* angle down & out back at the bend.

Maybe something like this: (excuse the editing skills)
Andrew Exhaust pipe.jpg
 
Last edited:
I am thinking along those lines, cut, bend and patch for now. I still would like it to go through the frame long term. Does anyone have a pipe bender?
I figured if I can pick up a used section, I can cut off part of it (keep what is bolted to the muffler) and bend a new section and weld it in.
 

Users who are viewing this thread

Back
Top Bottom