pillguy's 4runner build (with pics) (1 Viewer)

This site may earn a commission from merchant affiliate
links, including eBay, Amazon, Skimlinks, and others.

DO NOT do a rebuilt if you go to replace!!!!! wwwaaaayyyy ttooooo many problems with rebuilt MCs. resist the temptation!!!!!!

I orders a master cyl rebuild kit along with the caliper rebuild kit....

best of luck with the rebuilt, just don't say i didn't warn you. :meh:
 
Last edited:
:doh:
Don't worry, it will be your fault no matter what!:hillbilly::hillbilly:
Why, what problem did you have?
 
:doh:
Don't worry, it will be your fault no matter what!:hillbilly::hillbilly:
Why, what problem did you have?

went through 2, maybe 3 (can't remember exactly) bad rebuilt MC right out of the box. Of course did not figure that out until after many hours of bleeding, re-bleeding, diagnosing and re-bleeding again. Even pulled the guts out of the "good" rebuilt MC and put them in my old MC and even that didn't work. Finally went to Napa and got a new one out of frustration and desperation, instantly made all the difference. Swore I'd never do it again, for all the hours i spent on my back (and john) under the truck it just was not worth the piddly few dollars in savings.

after the fact i researched and found i was not the only one who experienced this.

If you jump on 1 foot and pat your head 50 times you might just get lucky but as someone who has no problem recycling parts this is one I'll never do again. I promise!
 
Last edited:
master cyl rebuild

Hi guys,

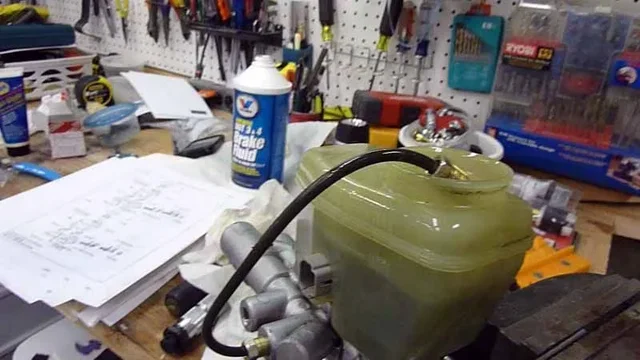
Got a question, rebuilt the master over the weekend. HEre is a pic of the bleeding process. will post a video later.
My question, the FSM mentions something about adjusting the pushrod on the brake booster to make sure there is no slack or too much. P1010927_edited-1.jpg
Is this necessary?
P1010927_edited-1.jpg
 
can't say what that would do if anything. I never touched mine.
 
followup

It says in the haynes manual (**** that it is) says to measure it to be on the safe side and my handy dandy precision caliper will help me with that just to be sure.

Just for your viewing pleasure, I posted a video of the bench bleeding process.

:wrench:slow process:bang:
 
It says in the haynes manual (**** that it is) says to measure it to be on the safe side and my handy dandy precision caliper will help me with that just to be sure.

Just for your viewing pleasure, I posted a video of the bench bleeding process.

:wrench:slow processthe only thing I have to add to your post is thaty the Hayes manals are :bang:

I take the MC was not bleed very well assuming this was taken right off the truck for our viewing pleasure? I threw my Haynes manual in the round file, it's much more useful there.
 
So guys, I am still plagued with brake woes and may have to go with tundra brakes. :bang:
On another note, I am seriously thinking of redoing My rear bumper, looks nice,but heavy. Am thinking of doing tube bumper to keep weight down versus square tube

Any thoughts?
 
On another note, I am seriously thinking of redoing My rear bumper, looks nice,but heavy. Am thinking of doing tube bumper to keep weight down versus square tube

Any thoughts?

i sent this via email but you might as well have it here as well.

For the trouble and expense I'd look at Trail Gear's/Marlin's bumpers for $350+/-. Bending tube is an art form that I've yet to master and more muddle through.

If you simply want to build one I can certainly respect that but isn't the easiest thing to do. You'll need to notch the connecting points and get the bends in the proper locations otherwise you'll just eat up tube.


http://www.marlincrawler.com/armor/rear-bumper/rear-bumper-4runners

 
dumb question, but how do you bleed a master cylinder? I thought air flowed right through the system.

A

Maybe old news now but was reading through...

if you pull your mc off and let it leak all the fluid out or you plan to install a new MC ...best route is to "bench bleed" the MC first.

In the old days MC from the auto parts stores came with a small dual hose kit... Two clear plastic hoses about 10 inches long with plastic fittings that screw into the MC brake line fittings. The plastic fittings are threaded on one side and are made to accept a hose connection on the other (push on).

So what you do is take the MC...set it up in a vise or other method so that you have access to to the booster side of teh mc. Set mc level in the vise such that fluid will not simply pour out or leak.

Attach plastic fittings to the mc and then the hose to the fittings...route the hose over into its respective resivor area... Use tie straps or soemthing to control the hoses so they stay in their respective resivor area.

Fill mc up with brake fluid about half way, and making sure to keep plastic tubing submerged in fluid. Take a small hammer or other object and work the cylinder of the mc back and forth...slow. You will see air bubbles working their way out. Keep the action of the cylinder going and don't run out of fluid and don't let the plastic tubing get loose or get air in the system. Keep working the mc cylinder until all air is out and you see no air bubbles in the clear plastic tube.

Fill mc up with fluid, removde plastic tube and fittings, install top. Install ms on truck without letting all the fluid drain out of the MC. Once installed fill MC up again and don't let it run dry...proceed to bleed brakes at the four corners.

If the MC will not "bench bleed" you have a paper-weight and you can proceed to get another MC to try.
 
Last edited:
I may go back with square tube and a better design.
I saw the marlin bumper, but it reminds me of the same conclusion that I could build a better one and learn something.
Besides they are not for my truck
i sent this via email but you might as well have it here as well.

For the trouble and expense I'd look at Trail Gear's/Marlin's bumpers for $350+/-. Bending tube is an art form that I've yet to master and more muddle through.

If you simply want to build one I can certainly respect that but isn't the easiest thing to do. You'll need to notch the connecting points and get the bends in the proper locations otherwise you'll just eat up tube.


Rear Bumper for 4Runners | Marlin Crawler, Inc.

 
Did u see post 146?
Took me a bit to make this
Maybe old news now but was reading through...

if you pull your mc off and let it leak all the fluid out or you plan to install a new MC ...best route is to "bench bleed" the MC first.

In the old days MC from the auto parts stores came with a small dual hose kit... Two clear plastic hoses about 10 inches long with plastic fittings that screw into the MC brake line fittings. The plastic fittings are threaded on one side and are made to accept a hose connection on the other (push on).

So what you do is take the MC...set it up in a vise or other method so that you have access to to the booster side of teh mc. Set mc level in the vise such that fluid will not simply pour out or leak.

Attach plastic fittings to the mc and then the hose to the fittings...route the hose over into its respective resivor area... Use tie straps or soemthing to control the hoses so they stay in their respective resivor area.

Fill mc up with brake fluid about half way, and making sure to keep plastic tubing submerged in fluid. Take a small hammer or other object and work the cylinder of the mc back and forth...slow. You will see air bubbles working their way out. Keep the action of the cylinder going and don't run out of fluid and don't let the plastic tubing get loose or get air in the system. Keep working the mc cylinder until all air is out and you see no air bubbles in the clear plastic tube.

Fill mc up with fluid, removde plastic tube and fittings, install top. Install ms on truck without letting all the fluid drain out of the MC. Once installed fill MC up again and don't let it run dry...proceed to bleed brakes at the four corners.

If the MC will not "bench bleed" you have a paper-weight and you can proceed to get another MC to try.
 
I may go back with square tube and a better design.
I saw the marlin bumper, but it reminds me of the same conclusion that I could build a better one and learn something.
Besides they are not for my truck

my bad, thought you were sporting a '95 but i see it's a '97 in your signature line.

I'm all for design it / built it yourself, anxious to see what ya come up with. :cheers:

maybe some inspiration, stolen from Pirate: this should keep yo buy for awhile

P5100146.jpg


P5100144.jpg


P5100151.jpg


here's the thread: What do you guys think - Pirate4x4.Com Bulletin Board

and an updated version: Let me know when you get the dimple tool, I'll make good use of it. :flipoff2:
P8240313.jpg
 
Last edited:
Get mud flaps, my new truck doesn't want a black eye!
 
I like this one clean and tight lines.
One thing I would do is create better brackets to mount rear bumper, wing mounts are fine thought.
Wish I had a dimple die as you could really build in some structural support.
Am seriously considering the HF tube bender just for kicks, they are having a big sale on turkey day
Right now, am gonna finish the tire carrier this weekend. Again, one thing is the going from concept to build.
How do you do it Ted?
You seem to make it seem effortless:confused:

my bad, thought you were sporting a '95 but i see it's a '97 in your signature line.

I'm all for design it / built it yourself, anxious to see what ya come up with. :cheers:

maybe some inspiration, stolen from Pirate: this should keep yo buy for awhile

P5100146.jpg


P5100144.jpg


P5100151.jpg


here's the thread: What do you guys think - Pirate4x4.Com Bulletin Board

and an updated version: Let me know when you get the dimple tool, I'll make good use of it. :flipoff2:
P8240313.jpg
 
Tire placement suggestions

Hi All,
Got a bit more work done on the tire carrier. Need some suggestions regarding placement height.
Do I leave it where it is at or do I drop it down a bit.
2011-11003 copy.jpg

2011-11004.jpg
THis last pic is a mock up of the cut I will need
2011-11006.jpg

Thanks,
2011-11003 copy.jpg
2011-11004.jpg
2011-11006.jpg
 
that's too high. Most of the ones I see sit roughly 2" above the top of the bumper. The higher you put it the higher you have to lift it and the more restrictive your view out the back window will be.

It's also centered too much, needs to move to the driver's side a little more. The further off of center you have it the better your rear view will be. Move it just enough to not restrict the view of the drivers tail light from directly behind.
 
good feedback, I was not sure of the height as well.
that's too high. Most of the ones I see sit roughly 2" above the top of the bumper. The higher you put it the higher you have to lift it and the more restrictive your view out the back window will be.

It's also centered too much, needs to move to the driver's side a little more. The further off of center you have it the better your rear view will be. Move it just enough to not restrict the view of the drivers tail light from directly behind.
 
ugh, Ih8mud....

Well, sort of, found another problem with my brakes, the never ending saga...
looks like the remains from my mud run at Ralphs.
2012_4Rbrakes.jpg
I had to get the drum turned and sanded the shoes a bit. as well as order a part for them:bang:
I still think I am going to go to Tundra pads up front. We will see the prices I get for rotors, and calipers:wrench:. If I do, then I go in and do the driveshaft boots as well
2012_4Rbrakes.jpg
 
rear bumper update

Here is what I have done with the tire carrier.been a while since I posted some work on the tire carrier,
Its pretty much welded up, ran into a few goofs along the way

. P1020422.JPG
This is a bit close, but an illusion as there is about 1" of room between the hatch and the carrier
P1020423.jpg
I painted using a rust bullet like product that was much cheaper at Sherwin Williams. Went on much smoother, but you got to sand it to get anything to grab.
P1020526.JPG

P1020422.JPG


P1020423.jpg


P1020526.JPG
 

Users who are viewing this thread

Back
Top Bottom