Old Yella gets a 5th gear!

This site may earn a commission from merchant affiliate
links, including eBay, Amazon, Skimlinks, and others.

Pictures

Ok, I've been lazy and should have posted these pictures earlier.

I've been driving around in old yella (still no tranny cover ;p) and it's been great. I love this truck :).

Here's some pics of the install, mostly for reference. I would like to think that others considering the same thing can use the information on this thread to avoid any of the pitfalls that I encountered.


The new front driveshaft clearance - and the clearance using the HJ75 clutch housing on the right for reference. The difference is like night and day.
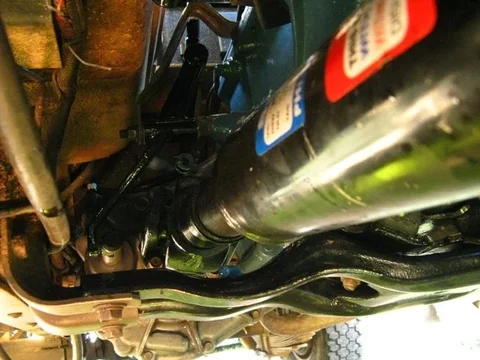
new clearance.webp clearance A.webp


The transmission as viewed from inside. Note the cutout in the sheetmetal at the front of the tranny tunnel that I made when I first installed the transmission compared to how it sits now. That is the difference in offsets of an HJ47 and an HJ75 clutch housing.
The transfer shifter has since been bent into a different position (away from my shin!) and the handbrake lever is just for show ;)

new gbox.webp
new clearance.webp
clearance A.webp
new gbox.webp
 
More pics

Had to drill and tap the HJ47 clutch housing to accept a tach sender (although I don't have a tach on the dash - for later)

tap housing.webp


A side by side comparison of the two clutch housings. HJ75 on left, HJ47 on right. Note the position of the rib indicated by the red arrows. Also, you'll notice that the mounts for the clutch release cylinder are different. I had to make my own clutch release push rod, as the original was not long enough.

clutch housings.webp

The connector from the HJ75 transmission wiring loom - which is not compatible with the HJ47s wiring loom - I will fix this later by replacing both this connector and integrating the HJ47's loom into this. (probably at the same time I get around to installing a tacho ....... ) the connected wires are for the reverse lights.

connector.webp
tap housing.webp
clutch housings.webp
connector.webp
 
Couple more pics

Transfer lever bent into final position (thanks herbs for the photo earlier - very helpful for guidance):

transfer lever1.webp

This one is in High 4 position:

Transfer lever2.webp

Also repainted my air filter housing while I had the old brush out :D

airfilterhousing.webp

Thanks everyone for the help and support along the way. Once I get the floors done, more pics will be forthcoming.
Then there's just the dent to tackle, the panel rust, a fresh paint job on the body and chassis, door and roof seals to replace, new complete wiring loom to install, power steering and disc brakes to install, new leaf springs and 33 x 10" to buy, an LSD 3rd member to install in the front, then maybe a cable locker for the back, a Ramsey winch to rebuild and install, A spare wheel carrier to put on the back, a long range tank to fit where the spare used to live, maybe turbo the 2H ... then I can kit the back out as a sleeper with ample storage for camping complete with fridge and cooker. And that's about it .... for now :D.
transfer lever1.webp
Transfer lever2.webp
airfilterhousing.webp
 
haha! How much needs cutting out?

A lot, I'll post some pics of the horrors sometime, it's not the worst I've ever seen, but grapefruit sized holes in the floor and rear quarter panels are actually quite depressing, some panels are pure throwaway items. I'll get it done sometime.

But on the upside:D - my HJ 45 is back on the road, 60/75 series steering swap complete, it's a dream to drive now. What way are you going with power steering? the 40 series steering is easy to install, but the original P/S setups are getting way too pricey - plus the fact that it's not actually that good. A 60 series steering box is the way to go, easy to drive and it doesn't wander all over the road!:clap:
 
Looks like your project came out very well. I don't know the exact details, but in the states there was a change to the 60 series regarding the angle of the transfer case. Early model 60's had the four speed but it was short. Then after 85 the 4 speed for us had a spacer in it, where the 5th gear is on an H55. Then all we got in 88 was the automatic FJ-62's. At some point in the late 80's the angle changed ever so slightly and made the transfer case drop down a bit more to make the angles of the driveshafts better. It must have been a change to the bellhousing, but I don't know for sure. I have read it somewhere on the net.

Either way, it appears the 70 series which was very similar to the 85 and up 60 series must have had the same alteration done to it from the get go, to make the driveshafts flatter. Everything before 85, which was 40 and 60 series technology must have the straight up and down gearbox.
 
yeah pretty interesting - I suppose its all to do with where the output flanges sit relative to the diffs and also the chassis rails - of course this would be different for certain models. And the transmission angle is probably most easily aligned through offsets in the clutch housing casting - but this was something I just did not expect to find, as its not something I had simply not entered my mind. I only used the HJ75 clutch housing because it already had a threaded hole for the tacho, as my HJ47 one did not. Anyway, its very good to know, and I hope this information comes in handy for others considering a transmission swap. Cheers for the info, MoCoNative!

I still haven't got onto doing the floors or the tranny hump plate yet ... lacking a lot of spare time at the moment due to other commitments. For now I've put cardboard over the tranny and some temporary carpet to dampen some of the noise - and stop a lot of hot air blowing into the cab!

I've also decided to sell my HJ60 to a friend and instead pick up another 1981 HJ47 with disc brakes and power steering, some good panels and HEAPS of spare parts - to be used as a parts rig.

But I'll keep this thread updated when I get onto the tranny hump and floors.

Cheers,

Matt
 
Nice job you did there!
One thing i would consider, is modifying the bracket that keeps you from shifting into 2LO.
Did it on mine, (pix in the link below) -it's nice to be able to drive slow without having to engage the front axle, and less wear while going on easy trails, moving in tight spots, and i find myself using it all the time in different situations.

Edit: added the photo, but you'll get the idea just by looking at your own bracket.
19112009583.jpg
 
Have you noticed any big increase in fuel mileage since putting the 5 speed in? Nice build photos.
 
To be honest I haven't been keeping track of the mileage since the install - but I should do!

But I have noticed a slight increase in the range I get out of a tank of diesel - not huge, but noticeable.

If I figure out the actual new mileage, I'll let you know :)

Cheers,

Matt
 
a.k.a. "box end" wrench
 
These are for reference:

Front driveshaft, flange-to-flange length: 797mm (31.38")
Rear driveshaft, flange-to-flange length: 1190mm (46.85")

Cheers,

matt
 
Cheers for that mate, will be handy for when I get around to putting the whole show in, bought the gearbox and transfer rebuild kits today, plus a good front split case housing, so I'm almost ready to go. My wallet hurts though.:bang:

Edit: With the front shaft, did it originally have a double cardan joint at the transfer end?
 
Last edited:
No worries man.

Driveshaft had a single cardan, always did. They are the original HJ47 driveshafts you see in the photos, just re-lengthened. I'm not sure if the HJ75 had a double cardan at the transfer end, but I don't think it would .....

Hey good luck with the rebuild and install!

Cheers,

Matt
 
Tranny cover!

It only took me about a year of driving around with a piece of cardboard covering the transmission inspection hatch til I finally built a proper cover - here she is:

IMG_4888.webp IMG_4889.webp IMG_4890.webp

This was my first ever sheet metal welding project and I think it came out ok..... good experience for me before I get stuck into the bodywork of Old Yella :D

Essentially its just a modified tranny plate with a raised section, and the shift lever exit points shifted back. Coated in POR15, filled a bit with body filler, primed and coated underneath with spray on body deadener - which makes a huuuuge difference to noise reduction (and leg breezes ;))

What do you guys think?

Cheers,

Matt
IMG_4888.webp
IMG_4889.webp
IMG_4890.webp
 
Looks awesome! Great work for the first metal project.

What is the lower small hole for below the 4wd shifter? Ashtray?
 
Looks awesome! Great work for the first metal project.

What is the lower small hole for below the 4wd shifter? Ashtray?

Thanks dude!

haha! That hole is for the handbrake lever to sit in (as you can see in the third photo) but its current use is pretty much that of an ash tray, as I still don't have a handbrake :hillbilly:
 
Looks pretty cool, done much else on the old jalopy? My gearbox is still in pieces, kinda lost motivation and enjoying driving the troopy around. As an aside, sold some 33 inch tyres to a mate yesterday, two hours later his (also yellow) hj 47 got t-boned by a woman doing 60-70 km/h through a give way sign. Wipe one hj 47 trayback. He'll be ok though.


:frown::mad::censor:
 
As an aside, sold some 33 inch tyres to a mate yesterday, two hours later his (also yellow) hj 47 got t-boned by a woman doing 60-70 km/h through a give way sign. Wipe one hj 47 trayback. He'll be ok though.

That's one of the reasons I'm strongly considering fabricating some sliders for my Troopy. Glad he'll be OK.
 

Users who are viewing this thread

Back
Top Bottom