Good deal. I'm ordering all the parts now. Hoping to tackle it soon. Thanks againI'm exceedingly paranoid about things like that. Just take the time to grease your drill bit and tap, and when tapping, remove to clean and apply new grease every half to three-quarter turn in. This is how I did it 17 years ago and I've had zero indication of any shavings-induced problem since.
Plug I installed is still in there solid as a rock with absolutely no seepage.
Navigation
Install the app
How to install the app on iOS
Follow along with the video below to see how to install our site as a web app on your home screen.
Note: This feature may not be available in some browsers.
More options
Style variation
You are using an out of date browser. It may not display this or other websites correctly.
You should upgrade or use an alternative browser.
You should upgrade or use an alternative browser.
My First Galley Plug Fix
- Thread starter Eporter
- Start date
This site may earn a commission from merchant affiliate
links, including eBay, Amazon, Skimlinks, and others.
More options
Who Replied?@Eporter I just finished the job. Thank you for the great write-up. Only issue I ran into was the right angle drive attachment I ordered from Dewalt only takes hex bits. For the life of me I couldn't find an F drill bit with a hex. Ended up just buying a right angle drill. Drilling and tapping into the block was pretty nerve racking. Thanks again to everyone that chimed in.Good deal. I'm ordering all the parts now. Hoping to tackle it soon. Thanks again
Great write up. The plug from my motor fall out this past weekend so I went to the local Toyota and found the part. It’s officially called a Straight Plug. Also there is a second plug on the manifold side, so make sure you get the correct one for the correct side. In case anyone is looking for a OEM part here is the part number Toyota 90334-07009 Plug, Straight.So I dove in yesterday, after reading, and re-reading tons of posts on here. I will share my successful method, and add it to the pile:
It was time to adjust my valves, so I figured since I was in up to my elbows, why not fix the galley plug, too?
Total time was about 2.5 hours. That included removing a steel heater pipe against the firewall for drill clearance (and draining the radiator so as to not make a mess).
Everything went well, and I'm glad I did this! I feel way more confident about driving around in my truck after I pulled out the tiny, weeping, oil galley plug.
I had previously sourced everything I needed for this job.
-Vermont American "Dual Speed Angle Drive Kit" p/n 17172
-Irwin/Hanson 5/16"-18NC Tap, with "G" drill bit kit p/n 80235
-Irwin/Hanson T-handle tap wrench for sizes 1/4"-1/2"
-Stainless Steel Set Screw Socket 5/16"x3/8"(Bag of 2) Barcode p/n 3069973858
I bought the angle drive kit at a local hardware store. The tap&drill set, tap handle, and set screws came from Home Depot. Buying the tap & drill as a kit was helpful. The tap is a USA-made, high carbon steel plug tap. I searched for a true tapered tap, but couldn't easily find any. A couple specialty tool supply places had them, but they were spendy. (I know Home Depot isn't the best place to look)
View attachment 1586803
So, note the weeping oil galley plug:
View attachment 1586804
I removed the head bolt, and stuffed my custom-made crap-catcher in. It's a 2-3" square of cloth & a zip tie.
View attachment 1586805
Note the installed position. I pushed the cloth into the hole until just below the oil galley hole. This will allow any crud that goes through to be pulled up and out when I'm all done.
View attachment 1586806
I then center-punched the plug with a cheap Harbor Freight center punch tool.

Then drilled with a 1/8" bit, moving up to 13/64". The plug is very soft & easy to drill. It's only about 1/4" long, while the galley passage is about 1" to the head bolt bore.
I found a random coarse-thread eye bolt in a jar of misc. bolts. I threaded it in until the galley plug started rotating and popped out:
View attachment 1586807
My engine was rebuilt a few years back, so I'm not sure if this was the factory plug. Too bad they didn't fix it for me! Note how short it is, compared to the 5/16"x3/8" set screws:

On to the drilling & tapping. First, I cracked a can of Moxie. It seemed appropriate. My housemate's friend shipped a case of the stuff to us. It's a New England thing...
I used the "G" sized bit supplied with the tap. Oiled the bit, drilled, & removed shavings.
I then used the tap. This is the part where everything can go wrong. I've never tapped something so carefully! I filled the flutes of the tap with grease to catch the metal chips & sprayed some light cutting oil into the galley hole. I would do about 1/8th of a turn cutting, then back off 1/2 a turn.
Repeat several times until you feel added binding on the cutting turn. This binding means the flutes of the tap are full of metal chips. DANGER! DANGER! Back the tap out of the hole before you break it! Clean both the tap and the hole. A pipecleaner & q-tip came in handy for this.
**Tighten the tap wrench just enough on the tap. This makes backing out easier, as you can loosen the tap a bit, then pull the wrench off and un-thread, clean, grease, & re-thread the tap by hand. The PCV metal plumbing on the block just barely got in the way of my tap wrench's handle.***
This part of the process took awhile, and I really wanted to rush it. I think that's why there are the varied "I broke this, please help!" threads. Yes, taps can snap for no reason. However, I didn't want to give my tap ANY reason to break!
S..l...o...w......a...n...d.......s...t...e...a...d...y...........
I tapped in a little further than I needed to for the two set screws. I didn't tap clean through to the head bolt hole, as I wanted the set screw to bind in the galley hole, and not be able to continue into the head bolt hole. I then cleaned out the hole, and blew out any grease with a little brake cleaner, using a straw through the head bolt hole. This will leave a nice surface for the loctite to bind into.
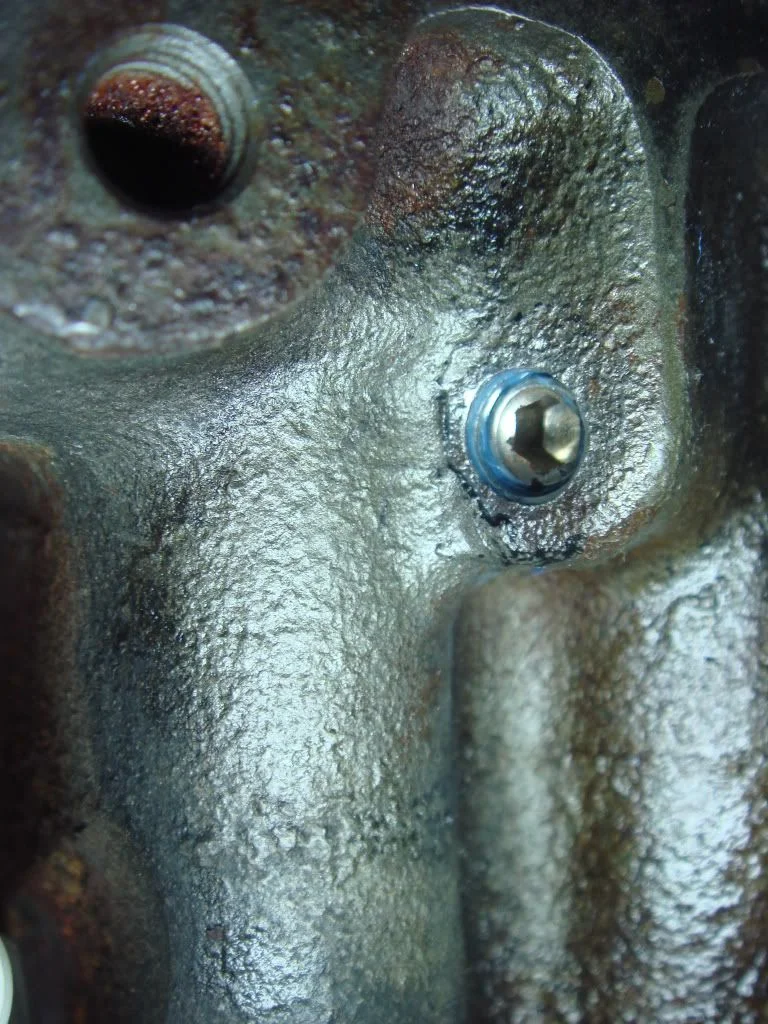
Look at that beautiful, threaded hole!

What's better? Why how 'bout the same hole with not one, but TWO set screws in it? WITH Loctite! (I didn't have any red, but blue is good, & the screws are bound into the hole & each other):
And, here's all the crap I took out of the head bolt hole:

***Don't forget to put the head bolt back in***
SO, hope that helps anyone concerned about trying this. It really isn't that bad.
I was very easy to insert the new OEM straight plug by tapping it in with a 1/4 chisel tap. Will probably add some JB weld to help keep it in place . Here is a pic of the new plug .Great write up. The plug from my motor fall out this past weekend so I went to the local Toyota and found the part. It’s officially called a Straight Plug. Also there is a second plug on the manifold side, so make sure you get the correct one for the correct side. In case anyone is looking for a OEM part here is the part number Toyota 90334-07009 Plug, Straight.
View attachment 3825885
Ackcruisers
SILVER Star
Well, that’s way easier to do…what about just coating the inside with red thread locker prior to driving plug in?
I thought about that, after the fact. I think the plug is designed to fit super tight. When I was done, a small aluminum ring was left over from the plug on my chisel pin . Should have taken a photo, but you get the idea.Well, that’s way easier to do…what about just coating the inside with red thread locker prior to driving plug in?
Oh man, aren't you worried about that failing in 40 years!
HahaOh man, aren't you worried about that failing in 40 years!
I went with the oem plug with red thread locker and then high heat JB Weld. Its holding up well so far.
Similar threads
Users who are viewing this thread
Total: 1 (members: 0, guests: 1)