Millermatic Vintage, what's it worth.

This site may earn a commission from merchant affiliate
links, including eBay, Amazon, Skimlinks, and others.

splitshot

Head cook, Bottle washer, and Peace keeper.
Joined
Nov 17, 2006
Threads
546
Messages
7,931
Location
Rodent Central, Az
Trade off for an electrical job I'm doing. No bottle or regulator.
 
Trade off for an electrical job I'm doing. No bottle or regulator.

$800 - 1200 depending on condition. Same internally as the legendary Millermatic 200.
 
Cool, thanks, this thing looks like it has not too many hours on it.
 
Hauled it home yesterday, the more I look at it, I think it may be a score. Picked up a bottle of 75/25 and regulator on Friday.
100_1181.webp
100_1183.webp
 
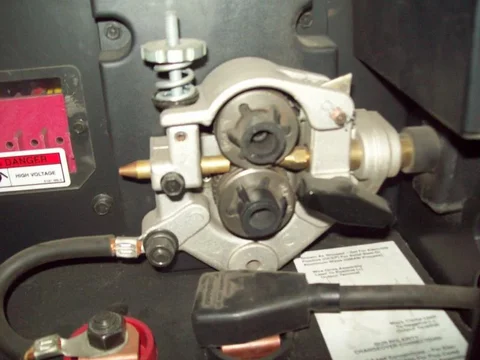
Couple of questions: Drive wheels are stamped .035 on the outside face, but the inside grove is the one that drives the wire...Both groves the same?

Also, looks like it has been set up for a 40~lb spool, I sold all my smaller stuff, will a 12lb spool fit this hub?

100_1178.webp

100_1180.webp

'Spose I need to do a search for a user manual...
100_1178.webp
100_1180.webp
 
Couple of questions: Drive wheels are stamped .035 on the outside face, but the inside grove is the one that drives the wire...Both groves the same?

Also, looks like it has been set up for a 40~lb spool, I sold all my smaller stuff, will a 12lb spool fit this hub?

'Spose I need to do a search for a user manual...

Nice score and it looks to be in good condition and not abused.

Outside stamp on the drive roll is for the inner V groove. Good chance your drive roll has .035 on both V grooves.

Yes, it will work with 10-12# spools of wire. Standard 2" hub.

Go here for the manual.
Miller - Service & Support

If you get a chance, take the cover off and use air to blow the inside clean. From the looks of it, I don't think it is going to be too dusty in there.

Also, make sure all of the lugs to the big cables are good and tight.

*** Important *** look at the power input settings/jumpers by the drive roll hub. Under the clear plastic cover with pink background.
Make sure this is set for 230V if using at your house. Edit: Looking at the picture, if your machine is a 200/230v model, then it is already set for 230V.
Document page 13 of the manual will have the jumper settings.


You'll love this welder. Most of your welding will be done with the low voltage tap.
 
Last edited:
The wire inlet guide is in backwards. This is the brass bullet shape thing where the wire feeds into the drive rolls.
 
Thanks for the link and .02..
:cheers:
 
Lol, Charles, your like the D' Animal of the welding world..:D

Found it locally (suppliers appreciate it when you call with the part #).

Any special distance from the drive rolls when I reverse the inlet guide?
 
Lol, Charles, your like the D' Animal of the welding world..:D

Found it locally (suppliers appreciate it when you call with the part #).

Any special distance from the drive rolls when I reverse the inlet guide?

I'm not as ugly as D' Animal and only have 10% of his fur. I have only 2 Stihl chain saws. I think Dan have around 150. ;-)

Just make sure the wire inlet guide does not touch the drive rolls when it is feeding. Look inside the wire inlet guide. If there are small grooves from the wire, flip it over so it will feed on the smooth side.

Also, make sure the back end of the mig gun does not touch the drive rolls.
 
Last edited:
I'm not as ugly as D' Animal and only have 10% of his fur. I have only 2 Stihl chain saws. I think Dan have around 150. ;-)

Ok, but how many welders do you have, lol.

I'm happy. First run on some scrap, need to fine tune my speed along with the settings. Pile on if you have any constructive criticism.

Also, all I get from the manual is to run 25 cfh on the gas, sound right? (seems like I lost a bunch doing this).
100_1187.webp
 
Last edited:
Ok, but how many welders do you have, lol.

I'm happy. First run on some scrap, need to fine tune my speed along with the settings. Pile on if you have any constructive criticism.

Also, all I get from the manual is to run 25 cfh on the gas, sound right? (seems like I lost a bunch doing this).

I'm down to 8 welders now.

Try cleaning the scrap before welding. Grind off the rust and mill scale and you'll get much cleaner welds.

25CFH shielding gas is not needed. More is not better and can cause problems as it creates too much turbulence and starts to suck in air. Try turning down the flow rate until the weld quality suffers. At this point, increase the flow to the point where you have proper shielding. Many people get away with just 15-20 CFH if welding indoors.

The weld looks good, but it is a little high in the middle and the toes needs to filled in. The "toe" of the weld is edge of the weld. In the picture, the toes would be the top and bottom of the weld bead (looking horizontal). Try more voltage and/or move across the center quicker and spend more time on the toes to let it fill in.

What size metal and what welder settings are you using? Are you left handed?

If right handed, try pushing the weld by starting on the right and moving right to left. You moved left to right and were pulling the weld. Pulling will cause a taller bead profile, but result in more penetration.

Yep, I knew they were a little high in the center. This was done on a piece of 1/8 and the other 16 ga. 48 & 3 on the settings, 4 flattened it out a little better, but either I wasn't moving fast enough, or it was a little to hot for the 16.
(Wish I could get more that 15 minutes at a time to mess with this).
Nope, right handed, always have gone left to right, hmmm, another great tip to try out...Keep 'em coming..:)
 
Ok, spent a little more time today, same settings just dropped the gas down to 15 cfh. Pushed right to left, then pulled left to right (and adjusted my technique). I'm getting into the "I can live with this" zone..

Great advice Charles, I've spent most my life welding stick and mig with a 120v with Co2, this machine blows both away.:cheers:
100_1188.webp
100_1189.webp
 
Looking much better.

I'd be curious to see how your welder works with straight CO2 compared to C-25 (75% argon, 25% CO2). I'm guessing it should be okay since that welder should have been designed to run with C02 since the internals are supposed to be the same as as Millermatic 200.

I know my Millermatic 200 was designed to use CO2 as a shielding gas. Even states it in the owners manual.

You have a real keeper. Enjoy your welder because most other single phase mig welders will not weld nearly as well as yours.
 
Well I cant wait to get working with it, with some of the side jobs lined up I should be able to pay for the out of pocket money invested. Did I say I was happy?:D (Estatic comes to mind).;)

Maybe my round tubing welds will even turn out better, always have been a pita to look good. May pick your brain again, Thanks.

Be sure to clean the ends of the tube (inside and outside) before welding. Use acetone or denatured alcohol to clean. Brake clean works also, but can be a problem (health wise) if you don't let it dry completely before welding.

There will be light coat of oil on them which is bad for welding. Load up some quality solid .030 wire (Hobart HB-28) and go to town.

Quality welders = very happy people..
 

Users who are viewing this thread

Back
Top Bottom