Nice post; FTFY;inserted a breathe or two
I just finished rebuilding the rear actuator on my 96 FJZ80 LC.
Before you begin, do your research. There are several links here that are invaluable.
Here is one: rear e-locker actuator rebuild pics. There are others that will come in handy, particularly the ones that address clocking the actuator.
Here are some of the things I found in order of disassembly:
Use a reliable rust buster on the nuts and bolts holding the shield on.
Use of 6 point sockets is advised.
There are two 14 mm nuts and one 12 mm bolt holding on the shield.
Once the shield is off, remove the electical plug bracket and vent tube.
Next, remove the cover on the rear diff for the actuator plunger.
The bolt holding the plunger to the locker linkage has factory installed thread locker)
Main Housing
When removing the spring/gearcase cover, use plenty of rust buster. Be careful when placing the housing in a vice so you don't damage it. (I broke one bolt in the case disassembling the spring cover.)
Take your time. When removing the cover, you may find that the aluminum around the seal has corroded and some of the case will disintegrate when you split the cases. For this reason, I used an adhesive sealant (Permatex Right Stuff) to seal the gear case and motor cover. New O rings will not seal if the sealing edge has corroded.
Almost all of my problems were in the clocking springs and gear shaft. The springs were rusted and clogged, the gears were seized up(the shaft had stuck on both ends. Remove the gears, springs and shaft as a unit. Try rotating the shaft and springs both clockwise and counter clockwise, the springs should rotate both directions smoothly. The upper spring bracket had seized in the upper cover on mine.
After assembling, I could hear the motor run but the worm shaft would not move. Took the gear cover back off and realized that the spring bracket seized to the case bushing as well as the big and small gears. I would encourage you to disassemble the gear shaft, gears and springs. A thorough cleaning, rust removal and lubricating of the springs, gears and bushings in the housing will make things work so much better.
When reassembling the small gear onto the shaft, make sure to install the shoulder on the small gear against the large gear. This spaces the smaller gear against the motor worm gear correctly. If you install it backwards it will not make the correct contact and could eat the gear up.
Check for a pic of the correct clocking alignment for the springs and gears. This is crucial to the operation of the actuator as the gear controls the on/off and reverse operation of the acturator and will not work correctly if you install it unclocked.
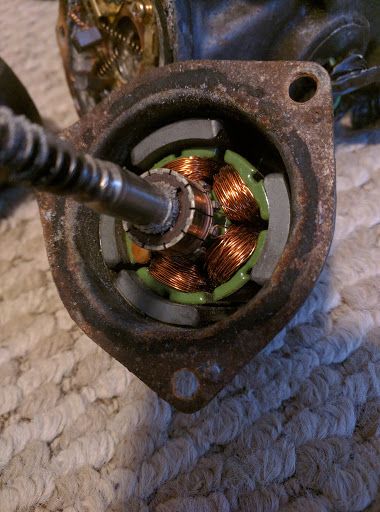
Electric Motor
The electric motor cover is the toughest part to remove. We had to PB blast and Vice Grip the phillips head screws to get them off. I used socket head stainless screws as replacements. Once you get the motor cover bolts out, most likely you will notice that some of the motor cover aluminum has turned to powder and will come off when the motor cover is removed. Pry gently all the way around.
I found two of my magnets had come unbonded. I checked the other two and used JB weld to reattach the magnets to the case. If you have ever fiddled with brushes and springs, they are not a big deal. Just be careful if the end of the armature comes out and the brushes spring out. If you are not careful, the springs will leave the brush mounts and disappear forever. I can attest to this. If you do lose the springs, use your imagineation. You can use the springs off of a harbor freight grinder(or drill or other like electrical device) or use ball point pen springs. I found one that wasn't too stiff and cut it in half. Make sure that the cut springs will fit in the brush housing.
Once you get the brushes in place, carefully tuck the wires aournd the brush holder to keep them in place and insert the armature.
It is impossible to guess what is causing your acuator to operate so keep an open mind and do all the research you can before taking one out and trying to repair it. Some units failed due to electrical issues, some because of mechanical issues. Mine had both. It is a GREAT feeling to get it installed and hear it actually operate!
I just finished rebuilding the rear actuator on my 96 FJZ80 LC.
Before you begin, do your research. There are several links here that are invaluable.
Here is one: rear e-locker actuator rebuild pics. There are others that will come in handy, particularly the ones that address clocking the actuator.
Here are some of the things I found in order of disassembly:
Use a reliable rust buster on the nuts and bolts holding the shield on.
Use of 6 point sockets is advised.
There are two 14 mm nuts and one 12 mm bolt holding on the shield.
Once the shield is off, remove the electical plug bracket and vent tube.
Next, remove the cover on the rear diff for the actuator plunger.
The bolt holding the plunger to the locker linkage has factory installed thread locker)
Main Housing
When removing the spring/gearcase cover, use plenty of rust buster. Be careful when placing the housing in a vice so you don't damage it. (I broke one bolt in the case disassembling the spring cover.)
Take your time. When removing the cover, you may find that the aluminum around the seal has corroded and some of the case will disintegrate when you split the cases. For this reason, I used an adhesive sealant (Permatex Right Stuff) to seal the gear case and motor cover. New O rings will not seal if the sealing edge has corroded.
Almost all of my problems were in the clocking springs and gear shaft. The springs were rusted and clogged, the gears were seized up(the shaft had stuck on both ends. Remove the gears, springs and shaft as a unit. Try rotating the shaft and springs both clockwise and counter clockwise, the springs should rotate both directions smoothly. The upper spring bracket had seized in the upper cover on mine.
After assembling, I could hear the motor run but the worm shaft would not move. Took the gear cover back off and realized that the spring bracket seized to the case bushing as well as the big and small gears. I would encourage you to disassemble the gear shaft, gears and springs. A thorough cleaning, rust removal and lubricating of the springs, gears and bushings in the housing will make things work so much better.
When reassembling the small gear onto the shaft, make sure to install the shoulder on the small gear against the large gear. This spaces the smaller gear against the motor worm gear correctly. If you install it backwards it will not make the correct contact and could eat the gear up.
Check for a pic of the correct clocking alignment for the springs and gears. This is crucial to the operation of the actuator as the gear controls the on/off and reverse operation of the acturator and will not work correctly if you install it unclocked.
Electric Motor
The electric motor cover is the toughest part to remove. We had to PB blast and Vice Grip the phillips head screws to get them off. I used socket head stainless screws as replacements. Once you get the motor cover bolts out, most likely you will notice that some of the motor cover aluminum has turned to powder and will come off when the motor cover is removed. Pry gently all the way around.
I found two of my magnets had come unbonded. I checked the other two and used JB weld to reattach the magnets to the case. If you have ever fiddled with brushes and springs, they are not a big deal. Just be careful if the end of the armature comes out and the brushes spring out. If you are not careful, the springs will leave the brush mounts and disappear forever. I can attest to this. If you do lose the springs, use your imagineation. You can use the springs off of a harbor freight grinder(or drill or other like electrical device) or use ball point pen springs. I found one that wasn't too stiff and cut it in half. Make sure that the cut springs will fit in the brush housing.
Once you get the brushes in place, carefully tuck the wires aournd the brush holder to keep them in place and insert the armature.
It is impossible to guess what is causing your acuator to operate so keep an open mind and do all the research you can before taking one out and trying to repair it. Some units failed due to electrical issues, some because of mechanical issues. Mine had both. It is a GREAT feeling to get it installed and hear it actually operate!