"Joe Dirt" voice DAAAAAANG!
Navigation
Install the app
How to install the app on iOS
Follow along with the video below to see how to install our site as a web app on your home screen.
Note: This feature may not be available in some browsers.
More options
Style variation
You are using an out of date browser. It may not display this or other websites correctly.
You should upgrade or use an alternative browser.
You should upgrade or use an alternative browser.
Builds Keeping it low with Rockwells (a.k.a. under the knife again)
- Thread starter Eskimo
- Start date
This site may earn a commission from merchant affiliate
links, including eBay, Amazon, Skimlinks, and others.
More options
Who Replied?This makes my full width project look easy.
It is amazing what those peices of frame actually weigh isn't it?
Looking good my man....
Looking good my man....
Tapage
Club 4X4 Panamá
Dude .. those are ARB's . ? 
Eskimo
SILVER Star
- Thread starter
- #65
Dude .. those are ARB's . ?
Ouverson spool & locker, 16 spline. ARB's on a Rockwell are like ballet shoes on a linebacker.
Thanks Nolan.. What surprised the s*** outta me was that it felt like the front part of the frame weighed as much as the rear, which had that 1/4" wall receiver tubing running all the way up past the shock mounts!
Need to make the rear subframe narrow to allow for turning clearance, and this is the first (and probably last) time I'm glad rockwells don't steer sharply.. I wouldn't have the room!
Also re-set the rig and the axles on the jackstands to reflect 19" at the belly with the suspension fully stuffed, and the height of the 42's... Should be no problems with clearance around the engine, after the latest re-design of the front links.. (Hint: I wish we were more precise when we made and mounted the sliders)
Off to NJ for a week for a dang funeral
 , so I won't be getting anything done this weekend... Was hoping to start bending some tube!
Tapage
Club 4X4 Panamá
Ouverson spool & locker, 16 spline. ARB's on a Rockwell are like ballet shoes on a linebacker.
hahahaha ok ok ok ok I got the idea !
Sorry for my comments .. ARB sure you smile when read this ..
Eskimo
SILVER Star
- Thread starter
- #67
Saturday, I "Rob"bed some guy's house and grabbed a plasma cutter, band saw, tubing bender, notcher, and some other goodies to help me along...  (Actually it's my friend Rob's stuff the other half of RnrFab) Also chased the threads on all 48 of the knuckle studs.. they NEEDED it..
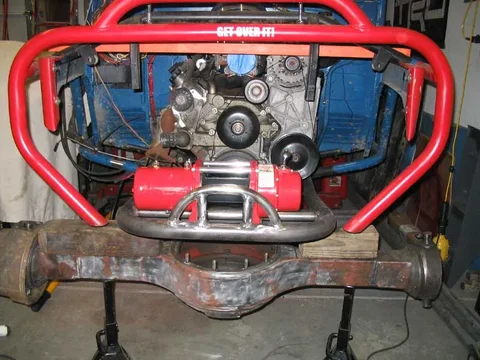
Today, made the front frame rails, winch mount & fairlead. The chunk will slide up between the front of the engine and the crossmember. This would be SO much easier if I built one of those sky-high rockwell rigs you see all over the place.


 (Actually it's my friend Rob's stuff the other half of RnrFab) Also chased the threads on all 48 of the knuckle studs.. they NEEDED it..
Today, made the front frame rails, winch mount & fairlead. The chunk will slide up between the front of the engine and the crossmember. This would be SO much easier if I built one of those sky-high rockwell rigs you see all over the place.


Last edited:
Bwhaha, that must be nice to wake up to. I only have a fuel cell and ram assist sitting my room 
I like the front. Looks tight and clean.
Eskimo
SILVER Star
- Thread starter
- #73
Not much of an update, but an un-named parts vendor messed up my original order for a spare axle shaft (it was really cheap, since I was looking for the rzeppa style, not the stronger u-joint style), and sent me a long side shaft.
Because my axles are narrowed, I don't run any long sides, so when I sent it back, turns out he had sold the short side. I didn't even ask, but he sent me a u-joint short side shaft, at a fraction of the cost of what it should.
Well, what to do, except buy another u-joint to convert the rear axle over? So, a pair of the new style axle seals from the Pirate vendor that don't leak and another short side u-joint shaft are on the way. The weak link is now.. ummm, the front shafts.. With 39's-42's, that's gonna take some doing. I'd say the driver is the weak link.

These u-joints are HUGE!! Biggest thing I've seen this side of something with "Kenworth" on the grille...
Because my axles are narrowed, I don't run any long sides, so when I sent it back, turns out he had sold the short side. I didn't even ask, but he sent me a u-joint short side shaft, at a fraction of the cost of what it should.
Well, what to do, except buy another u-joint to convert the rear axle over? So, a pair of the new style axle seals from the Pirate vendor that don't leak and another short side u-joint shaft are on the way. The weak link is now.. ummm, the front shafts.. With 39's-42's, that's gonna take some doing. I'd say the driver is the weak link.

These u-joints are HUGE!! Biggest thing I've seen this side of something with "Kenworth" on the grille...
Tapage
Club 4X4 Panamá
These u-joints are HUGE!! Biggest thing I've seen this side of something with "Kenworth" on the grille...
we have a problem .. pics !
Eskimo
SILVER Star
- Thread starter
- #75
we have a problem .. pics !
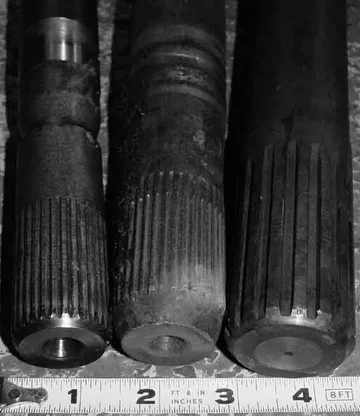
I figured people had seen 'em before.. Here's the axle spline end.. Dana 44 (Toyota size), 35 spline Dana 60, Rockwell.

u-joint stuff.. Dana 44, 60, Rockwell. The Rockwell u-joint is just over 5(!) inches across, and each cap is 1.625" diameter..

Pics don't do it justice till you're holding it.. it's sick. I wish I still had a Toyota knuckle, I'd shoot a photo of the toyota one inside the rockwell knuckle..
Tapage
Club 4X4 Panamá
damn ! dude .. it look pretty tough
- Joined
- Sep 26, 2005
- Threads
- 38
- Messages
- 1,824
- Location
- Port Orchard, WA
- Website
- www.projektenterprises.com
Eskimo
SILVER Star
- Thread starter
- #80
A little more progress.. Much of my weekend was spent helping make the steering arms or running errands, so not alot of progress..
Managed to replace all the axle seals after figuring out how the seals come out... weird! Assembled the chunk into the axle and put it back up in place. Lucky for me, Toyota offset the OEM motor to the left, so I did too. It's a TIGHT squeeze in there, about 1/2-3/4" between the pinion flange and the crank pulley.

finished capping the frame and supporting the "frame rail", used 1/4" plate in 3 pieces, so the new front rail isn't butt welded to the cap, it goes through it.

Got hi-steer? Though my role was minor ("cut this, turn this, bore that"), it was still really neat to play a part in the creation of such sweet parts! Yes, I was in awe, and giggling like a school girl watching all this take shape.


Managed to replace all the axle seals after figuring out how the seals come out... weird! Assembled the chunk into the axle and put it back up in place. Lucky for me, Toyota offset the OEM motor to the left, so I did too. It's a TIGHT squeeze in there, about 1/2-3/4" between the pinion flange and the crank pulley.

finished capping the frame and supporting the "frame rail", used 1/4" plate in 3 pieces, so the new front rail isn't butt welded to the cap, it goes through it.

Got hi-steer?

Similar threads
- Replies
- 0
- Views
- 561
- Replies
- 212
- Views
- 20K
Users who are viewing this thread
Total: 1 (members: 0, guests: 1)


 (It was hers from years back, it's just covering an unused bed in a spare bedroom)