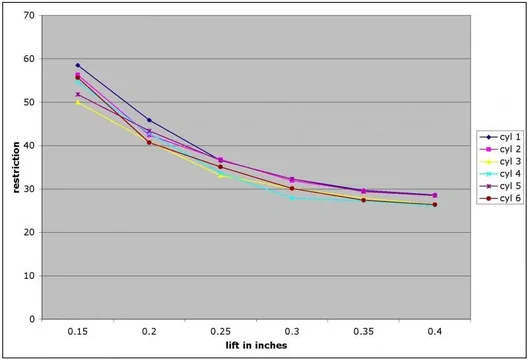
Okay, so I've gone through and gathered some "vacuum" readings off of the flow bench. This round is from the unaltered head, with no intake bits attached. As you can see from the photos, I rimmed the port with some plasticine to kill the impact of the 90* corner. Values were gathered from 0.15" (0.10" for one good cylinder) to 0.40". On the poorer flowing cylinders, the vacuum created at 0.10" lift would collapse the cone on the flowbench set-up. There is a fair spread of measured restriction, and it seems that odd numbered cylinders get the better stock flow.


The probe is made from thin brass tubing, and is hooked to a separate manometer. It is used to pick out where exactly the flow is concentrated in the port. I need to play around with it some more, but it seems clear at this point that for ports that lead straight in from the manifold (cyls 2 & 5) the flow is pretty evenly spread in the port, while for ports the "swing" into the bowl (1 & 6) the flow is concentrated on the inside of the arc. It's also apparent that the majority of the flow hugs the port floor and short radius in the bowl area, and dumps through the near side of the valve (at the flow the vacuum cleaner can generate at least). This suggests the valve guide/boss/stem significantly impede flow, and attention paid here (undercut stems on the new valves, removing metal from the boss area, narrowing the cross-section of the guide) should pay dividends.


Values given are height to which the water is pulled up the inclined manometer (i.e. vacuum) but I'm not going to bother converting to inches of water or anything, given that there is no way key it to flow units with this booty fab unit. The set-up is zeroed in with a "standard" orifice plate after every 2 readings to make sure that the readings are suitable for comparison between cylinders, and of before and after results. The values can be thought of as "restriction", the greater the restriction, the greater the vacuum value read off of the flow bench. I figure the measurement error in the readings is around 0.5 (cm) when the value is around 35 (cm), and greater when the value is greater. There is likely a bit of error in the lift for each reading as well, since this isn't a precise set-up (lift set with a set of vernier calipers, and held with the vice-grips and rubber tube). I think the variation seen between cylinders greatly overshadows any error, however.


 Sweet.
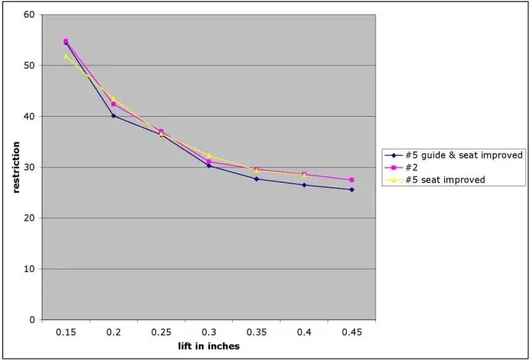
 2, 4 and 6 were still plugged from when I poured the silicone. So, when I have a chance, I'll re-do the stock flowbench testing on the odds, and see what's been gained on #6 so far. Then back the the grinding the next warm day we get. Once the seat transitions are all done and tested, I'll move on to the valve guide/boss area and see what can be done to try and get more flow over to the far side of the valve.


 Good to know there are some keeping an eye on this. I kind of like scrolling through all the photos too


