HZJ40 RestoMod v3.0 (New, improved, and now with fewer sparkplugs)

This site may earn a commission from merchant affiliate
links, including eBay, Amazon, Skimlinks, and others.

Very impressive, doesn't look like you're over your head to me.

just read this thread for the first time... my comment was going to be

"for a guy who is in way over his head you sure look like you know what the hell you're doing!"

on a side note where did you score that two way splitter on the passenger frame side rail? I seem to have misplaced my stock one.
 
And Now For Something Completely Different!

I guess you could say I decided on a choice of powerplant!

After a lot of soul searching/wallet searching I decided the best choice in dumping my small block for something more Toyota'ish and modern would be a 3F-E. I landed a good donor from Georg at Valley Hybrids this weekend. Here are some photos of the carnage.

This started out life as a '88 FJ62 but by the time I got it had been reduced to a FJ31:

3198CD66-C2D9-479D-91E0-3443AA2E6CEF-7332-00000C50CC8A8C13_zpse123e523.jpg


I took it to my uncle's shop in Ripon and three hours later had the whole thing stripped to the bone:

6DCABD35-919E-4915-9445-9B3DBB3681C0-7332-00000C5096BC4AB6_zps6d42c0d1.jpg


The whole front wiring harness was removed and tagged:

BBA12899-364C-4784-A329-F7B6A2DE0FB0-7332-00000C50D5D10EA7_zps11d381fd.jpg


Oh yeah, this is going to be a piece of cake:

1FB70AAA-2559-4C0F-BC1D-C5DC180E85C5-7332-00000C5079EE4FF9_zps6b59960f.jpg


Once everything of conceivable value was removed, the FJ31 was cut into a FJ15.5:

5AED9638-8760-4567-BBA6-87C8EFF3BC4B-7332-00000C50889C1547_zpsa60bc3ec.jpg


36F71A74-DBA2-42D1-8B62-A15FE5F936B5-7332-00000C509DC1F4B0_zps87951837.jpg


Loaded up and ready to go home:

21030E9B-2630-47AC-9C00-6824DC76F21E-7332-00000C50A788AC80_zps73579885.jpg


Got back late last night but had enough time to get it off the trailer and disassemble some of the ancillary components:

0BACFF11-DF73-4A39-B085-2559E81F727D-7332-00000C50E9BE9B25_zps152ade50.jpg


3B0545E9-AE2C-4C12-A367-C16334047F11-7332-00000C50E21C2637_zps2eac97af.jpg


That crank pulley nut is being an absolute b*tch.


I also took my borescope and poked around in the cylinders through the spark plug holes (which also looked very good.) The piston tops and clyinder walls look good (from the side I can see). No signs of impending doom so far... The ODO on the dash indicated 316,000 miles but I'm pretty sure at this point that either the engine wasn't original to the truck or has been rebuilt at some point. The RMS looks very new and a lot of the hardware I'd expect to be caked with oil/grime are in very clean condition. Aside from a couple bungled duct tape smog equipment repairs the engine looks very well kept and in good shape.

I'm going to run a compression test and poke around a bit more. For the moment, my plan is to clean and reseal the -easy to get to- gaskets/seals and button her up. I'd like to get it in and running sooner rather than later. It also makes the project easier to tackle. If I can get it in and running, I can spend a future winter doing a full rebuild if necessary.

I'm also of the opinion right now that the easiest way to get the engine wired is to use the FJ62 front harness and adapt it to mate to my steering column, gauge cluster, dash knobs and rear lights, etc.

Wish me luck. I'm a gluton for punishment. :)

[STRIKE][/STRIKE]
 
Yesterday, I put the tub back on the frame so I can start figuring out how best to adapt the FJ62 wiring harness to the FJ40 tub. This is not going to be an easy task.

EFFAE62D-55B6-49AB-8AC8-7C29C9980CA2-7715-00000C9A058A7B09_zpsb76e745c.jpg


I also got the engine put on my table so I can begin to clean it up.

(I have an engine stand, but don't trust it with this engine so until I get a heavier one, this is where it'll stay.) :)

7FE4C583-DEE2-4402-88C6-5721C511D36F-7715-00000C99F53C422D_zpsc1510cb1.jpg
 
Oh boy...

777F2D13-B490-412A-8DA2-07B965C509A1-7715-00000D53E7D98E94_zpsafeca1ea.jpg


The most daunting aspect of this, by far, has been the wiring. I get sick to my stomach when I think of cutting into two perfectly good wiring harnesses.

I'm firmly committed to grafting the 40 harness to the 62 harness (or vice versa) at this point. Here's a photo of the state of affairs last night:
2768D76D-1A70-4E05-88F6-AE7D55681D3A-15057-00001AE881513F75_zps741b986d.jpg


I'm committed now.

The only things I'm keeping from the 62 harness are the ECU leads (including peripherals such as the fuel pump lead, neutral start switch, etc.) and the alternator charging leads to the fusible link. This should (I think) ensure that the harness can handle the increased loads from the 62 alternator. Right now, I'm trying to decide if I want to add a second fuse panel (like a 6 fuse panel) that I can use to run the ECU stuff or if I should just dump the factory glass tube panel in favor of a new style aftermarket panel. Or, I could even try and find a way to use the 62 fuse panel. ... haven't decided if I want to open that can of worms.

FD432C26-EA46-461B-B02F-E780CE97D4ED-15057-00001AE8721F1BF3_zpsd9244ffc.jpg


More to come!
 
Last edited:
Got a load of stuff back from the powdercoating shop. I also took all the hardware to a local plating outfit and had everything plated in yellow zinc.

Now, we start the process of reassembly.


It should also be noted my intention is to clean up and run this engine as is for a while. I've got a line on a second 3FE I want to purchase that will go under the knife for a proper and extensive rebuild.
 
Last edited:
Been plugging away at this. I've got the motor mounted and have been bolting up all the accessories to make sure everything is going to fit. The body is still sitting in epoxy primer while I focus on figuring out where I'm going to mount everything.


Does anyone know what this bracket is for?


I think I'm going to run a power steering cooler in front of the radiator:


Looking good in primer!

 
Last edited:
I got the gauge cluster restored and finally reassembled:


I'm a little concerned about the clearance for the e-brake cable. Not a lot of room here:


Another 'mudder graciously donated a ignition coil perch to replace the one Farmer Joe ripped off during the ill-fated V8 swap:


I've traced out the route for the clutch and rear brake circuit on the firewall. I'll actually bend the lines once the engine is out of the way:


I also found a good bracket to hold the speedo cable away from the exhaust manifold:


Zang.


I also found a problem with the passenger side seat bracket. It looks like it must have broke at some point in the past and the repair was (shockingly) poorly performed. The right seat leg is about 2.5" off the floor:


I suspect this is the cause of the problem. Looks like this has been rewelded at some point and I think I'm going to have to cut and redo it.


Also, what are these rubber grommets for on the hard top sides?


Also, I was never really happy with the way I had mounted the main ignition relay and new "switched ECU relay" to the FJ62 fuse panel. It was a good idea, poorly executed. Also, I was not happy with my choice of the firewall/engine bay to mount my two non-weatherproof headlight hi/lo beam relays. That was just a bad idea.

So, I picked up a 4 position relay panel off Amazon and am going to mount it to the underside of the dash on the driver's kick panel. I made up a simple bracket out of some sheet metal and some riv-nuts:


IMG_4608.JPG


It's a bit bulky but should fit just fine in the space provided:

IMG_4607.JPG


Here's the new panel ready to go in, complete with properly color coded pig tails (I knew I kept all that spare wire for a reason!):

IMG_4611.JPG


I'm going to wait until I have the pedal cluster out of the way before I graft it in. There's just no room to maneuver in there right now.

IMG_4615.JPG

More to come...

IMG_4613.JPG
 
Last edited:
is that rainbow gold/yellow finish yellow zinc... or cad plating?

your truck looks beautiful
 
Got new shoes on Gunner, yesterday.

IMG_3902_zpscca31b79.jpg


Been doing a bit more work on the truck as well. I've been trying to figure out where I'm going to park all the EFI components in the limited amount of space available in the 40.

I put the ECU in the glovebox. I really tried hard to avoid this because I wanted to have the glovebox...well, just be a glovebox. But, there really isn't another location that you can use to keep it high and dry and out of the way of the heater/blower/defroster ducts. If only Toyota had made this thing 2 inches smaller.


I do want to keep it neat as possible so I cut a hole in the side of the glovebox to allow the connectors to attach from the outside of the glovebox. I'm going to make a bracket to hold the ECU in place and use strips of rubber to isolate it from vibration.


The Main Relay is mounted on the back side of the passenger fender:


I decided that the circuit opening relay really didn't look too weatherproof so I put it on the other side of the glovebox:


I'm mounting the distributor vent valve in a location similar to the FJ62. On the passenger side of the firewall:


The brake proportioning valve is low and out of the way on the driver's side:

I'm really digging my new riv-nut tool:


I've got the harness sort of attached to get an idea of the fit. I've moved some bits around as needed to fit the FJ40 body better. I added some length to the circuit opening relay so I could move it under the dash. I had to shorten the battery and alternator leads. The 62 is a much bigger truck!


Anyway, more to come.

I got the wire harness test fit to make sure the connectors will reach the ECU:

Check.


And I also cut the upper fuse panel tab off and repositioned it to accomodate the larger FJ62 fuse panel:

Check.


I used a strong magnet to hold it while I tack welded it in place. It didn't come out that pretty because I couldn't see what I was doing. I'll try to clean it up next weekend. But, I'm really happy with the way the fuse panel sits in there. It looks very factory!

 
Last edited:
Thanks! I really agonized over whether to go with the 10.5 or 12.5 width on the tires. I think I'm glad I went with the narrow of the two.

I also got my seat heaters installed and the seats reupholstered yesterday. My 4Runner has spoiled me and I can't live without seat heaters anymore!


On to the air cleaner setup!

I cut off all three mounting ears. I'm going to reweld them on in a position to fit on the driver's side fender:


I put on the hood to check for clearance and with the canister/MAF positioned here. I have about 1.75" of clearance between the MAF and the hood:


I cut off the long leg on the bottom and bent the steel over to make a good attachment point for my repurposed bracket.


IMG_4602.JPG


IMG_4604.JPG
IMG_4603.JPG


It's going to work fine, I think.

:)


I had to slightly bend the vacuum lines so that they don't rub, but you can see there is room between the plentum and the canister on this side:


The gap between the radiator hose and the MAF is also tight but I think it'll be fine:


With a bit of trimming of the MAF body, I may even be able to mount this thing without removing the engine lift hook (bonus):


A couple 90 degree silicone elbows and some extra clamps and I'm thinking this'll work. I want to run the pipe off to the side of the valve cover as not to cover the oil fill cap:


Last edited:
I've been trying to finish up the last bits of wiring before getting into the body work and paint (which I dread). I got my new Tuffy console in the mail and as soon as I had the switches I wanted, I started cutting it up. ...this was a little scary.


First off, the Tuffy console with the radio compartment is not really a good fit between the FJ40 seats. I really have to squeeze it in there and I'm pretty sure the driver's seat won't slide easily now.

I decided to mount my aux switches and seat heaters to the front of the console as opposed to the dash. There was a lot of "measure three times, cut once" involved in this. I also added a 12v socket and a dual USB charger as well just for grins.

The cupholder will likely be mounted directly to the transmission tunnel, just aft of the shift lever.

Oh, speaking of shift lever... I also had to take my newly powdercoated lever and put an elbow mid way down the shaft to work with the Tuffy console. Bummer.

Anyway, here are some photos:

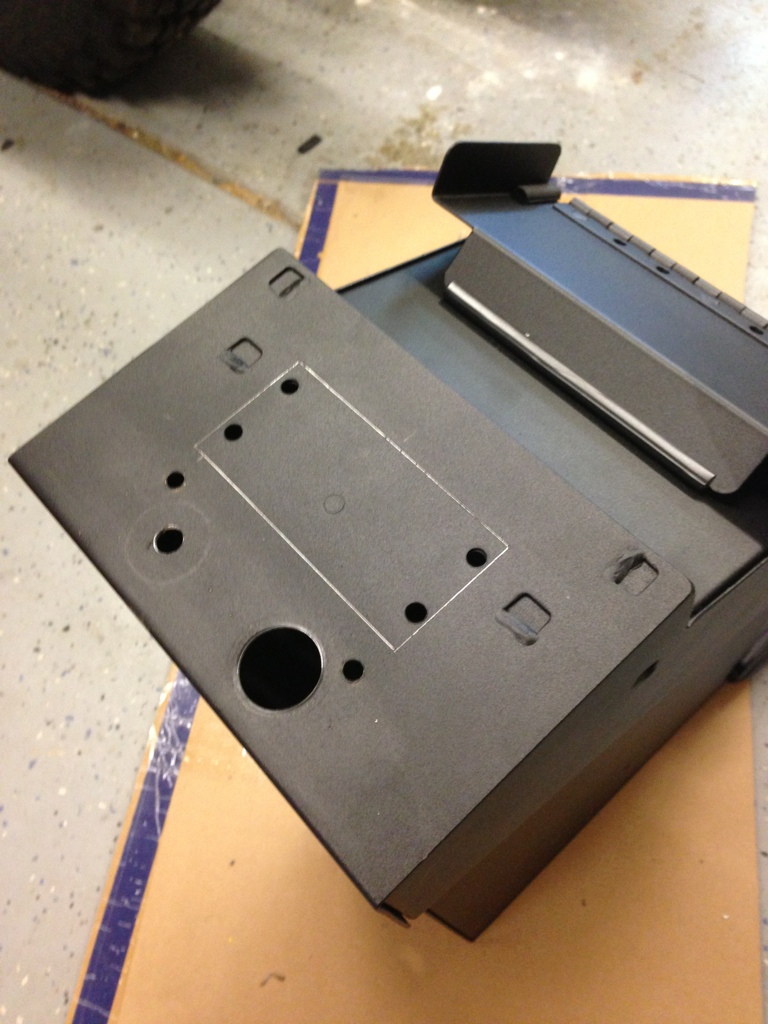
Scribed and ready to cut. Notice I positioned everything where it will cover or remove the existing cup holder holes. Also, I used a sheet metal punch to cut the holes for the chargers:


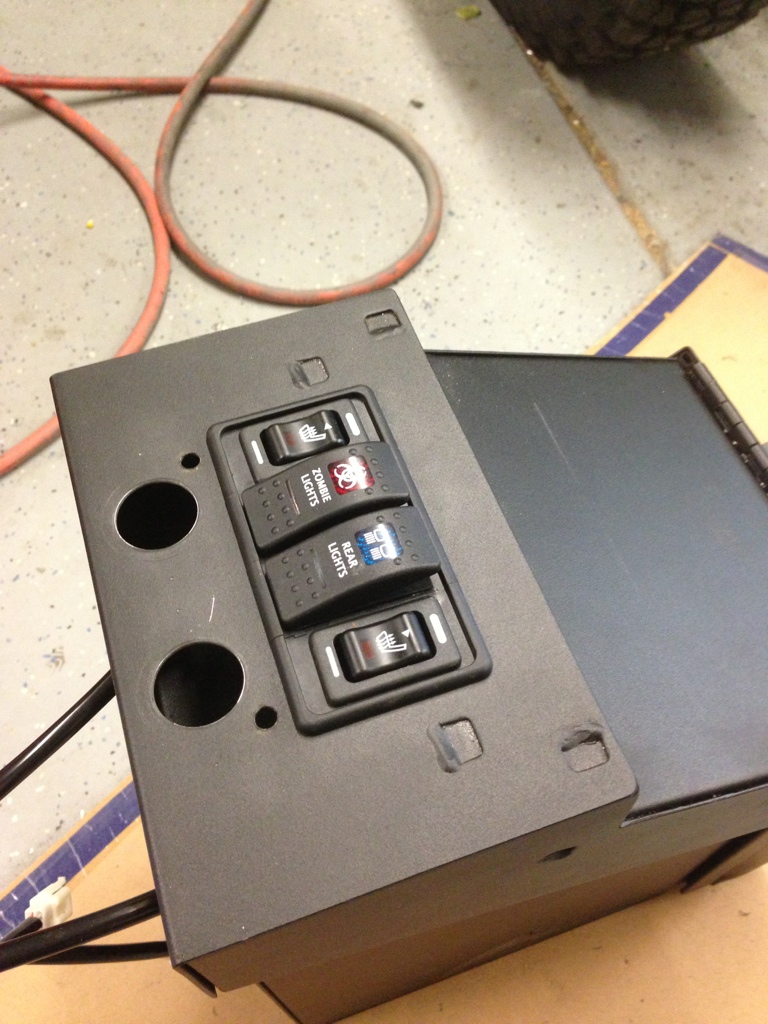
I used the modular carling switch brackets from Air On Board for the switches:


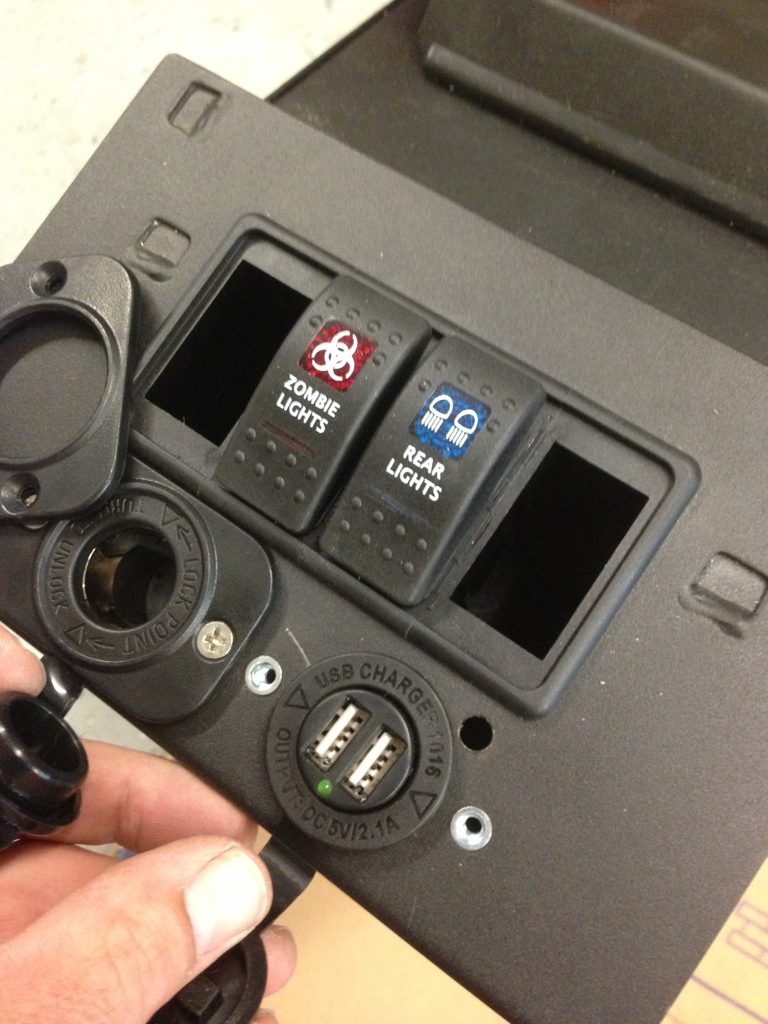
The rear light switch will control the spare tire mounted flood light I'm planning to use. I'm adding two interior lights using red LED lights. This will preserve night vision and since it'll look a bit like a battle ship CIC, I figured "zombie Lights" wasn't too far off. I also used nut-serts to hold the charger faceplates, which I thought was a nice touch.


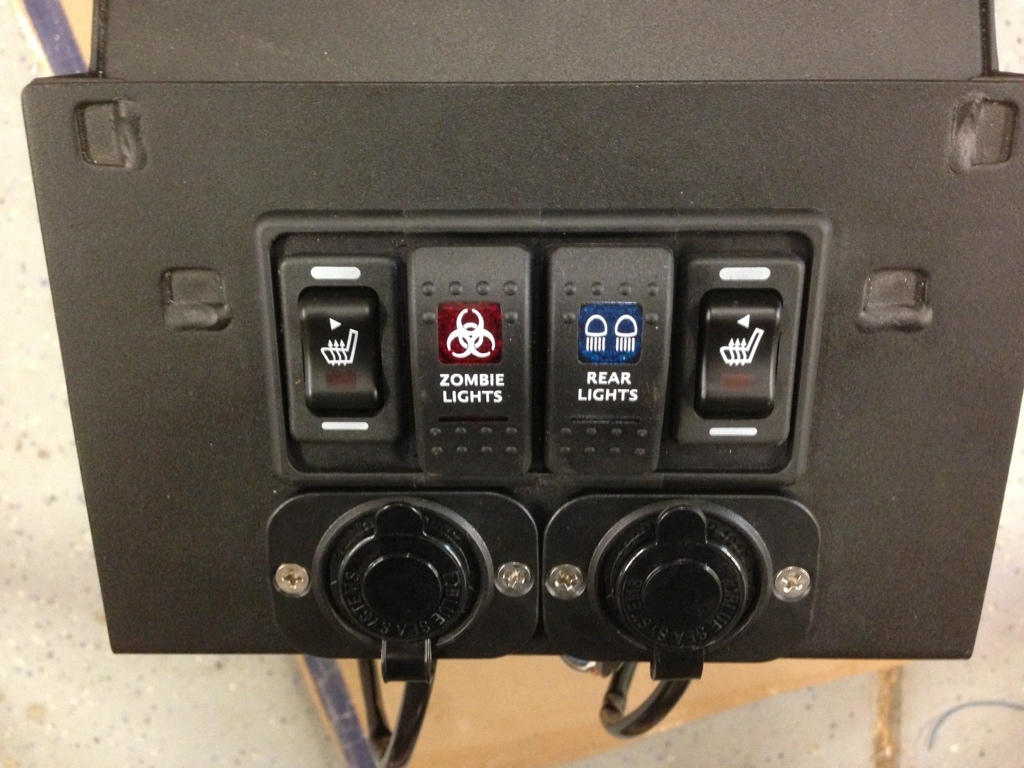
Heater switches mounted up and all done!

Also, my 55mm hole saw arrived today so I made good use of time and buttoned up the harness. Here's how it looks:

IMG_4599.JPG


With the blower ducting in place you can barely see the added grommet:

IMG_4601.JPG


Now that the majority of the "how am I going to do this" stuff is sorted, it's time to take the tub back off the frame and begin the dreaded body work.

I also whipped up a dolly to facilitate work on the tub:

IMG_4661.JPG
IMG_4660.JPG
 
Last edited:
Wow - very cool stuff. Keep up the good/creative work...
 
The first task was to cut out the botched V8 transmission tunnel and start over:


I also got to work on my auxiliary fuel tank filler. I'm not installing a tank just yet, but I figured now is the time to install the filler for a future installation.

On a related note, does anyone know what year truck this filler came from? The hole diameter is larger than the one on my '73 and I need to find a used filler neck assembly but don't know what year it came from.


Rough cut hole:


I also added a home made bracket to the bib to attach the emergency hood catch from a later 40.


I just know I'm likely to forget to latch the hood at some point and the thought of having my nicely painted hood fly up and self destruct makes me sick.

 
Last edited:
your attention to detail is amazing, as expected, :D

haven't looked at this in a while, love the zombie lights...
 
Looks great! Really nice work. I have my KM2s (33X10.5) on stock steelies and they work just fine. Also love the airhead in the background.
 

Users who are viewing this thread

Back
Top Bottom