How to Replace Oil Pump seal w/ Pics (2 Viewers)

This site may earn a commission from merchant affiliate
links, including eBay, Amazon, Skimlinks, and others.

Hi, I figure out I show off a little. :D Doing my seal right now and I had problems finding tool to hold crankshaft pulley so I made my own. I just did not like an idea of using chain or bumping with a starter
Here it is, 4 feet long, I made "ears" that hold the bolts but also lock themselves into the inside of the pulley to spread the load. This way snapping those M8 bolts is highly unlikely. Total cost of the tool in parts came to be around $30 but it fits like a glove and makes job easier.
CIMG1862.jpg

CIMG1863.jpg


Also there is a "ear" at the end of the tool that can be used to chain it, when working by myself
CIMG1864.jpg
 
Torque Wrench

OK, I completed steps 15 thru 17 with no needed updates to the step by step comments provided. I used a 600 ft/lb torque wrinch to tighten the crank bolt to 305 ft/lbs. I made it 310 for good messure just in case the calibration was off on it due to it being a rental tool.

Where in KC did you rental the torque wrench from. I live in Olathe, Kansas and need to do the same thing?
 
crank bolt off

Hi guys. I am hoping someone can give me some tips on how to get the crank bolt undone. I tried the starter motor trick last week but could not undo it. I knew the starter contacts were dodgy, so I replaced the contacts and plunger yesterday. I tried again today and I still couldn't move it using the starter technique. I know my primary battery is starting to fail, but I also have a dual battery system with a perfect auxiliary battery that I link with a switch, so plenty of current was flowing.


I then tried the trick of putting a socket on the torque converter and tried to undo the bolt with a breaker-bar. The socket on the torque converter eventually slipped off (14mm socket with a small extension bar - I don't have a 14mm deep socket). When the socket slipped I smashed my elbow into the ground, so there was a fair bit of pressure on it. I would like to avoid having to pull the radiator out if possible.

I have a leak and I am heading off into the Simpson Desert in central Australia in a few weeks, so I really need it done.

Thanks, Andrew.

How did you end up getting the crank bolt off?
 
Guys, I can't get the crank bolt off! Tried the 30mm with 3/4" brake over bar under the frame with PB Blaster trick.

Haven't tried heat yet!

Any other suggestions?
 
Cheater bar :wrench: I needed a 4ft one on mine, due to the angle you are working with. Just watch your knuckles and fender paint. Or, if you happen to also have the radiator out, an impact gun! I personally did not want to try the bump starter trick; but that may work for you, just be super careful :skull:
 
Guys, I can't get the crank bolt off! Tried the 30mm with 3/4" brake over bar under the frame with PB Blaster trick.

Haven't tried heat yet!

Any other suggestions?

I broke several breaker bars trying to get this 30mm nut off. I ended up using a 1,000 ft. lbs. breaker bar. I strapped it to the passenger side frame rail with 2 heavy duty straps. I bumped the starter and it came loose. Super easy if you do it with the right tools.

I posted up about the dilema that I had with this. The thread might help you. Just search under my name.\
 
Cheater bar :wrench: I needed a 4ft one on mine, due to the angle you are working with. Just watch your knuckles and fender paint. Or, if you happen to also have the radiator out, an impact gun! I personally did not want to try the bump starter trick; but that may work for you, just be super careful :skull:

So, how do I hold the crank as I'm using the cheater bar?
 
So, how do I hold the crank as I'm using the cheater bar?

I fabbed up a tool to bolt right to the pulley. There are some other fabrications by others in this thread and others iirc. There are some other methods like using a socket on the inspection plate, using a chain to hold the pulley, etc.

DSCF2204.JPG
 
i could not get mine off with a breaker bar. THat thing was bent like a fishing rod. Finally just had to pull the motor and get an impact gun on it and it came right off.
 
i could not get mine off with a breaker bar. THat thing was bent like a fishing rod. Finally just had to pull the motor and get an impact gun on it and it came right off.
I used 3/4 breaker bar + some pipe to extend it. Work like a charm wit hthe tool to hold the crankshaft. That part was easy, getting those Philips bolts off was the hardest part of that job :crybaby:
 
I used 3/4 breaker bar + some pipe to extend it. Work like a charm wit hthe tool to hold the crankshaft. That part was easy, getting those Philips bolts off was the hardest part of that job :crybaby:

no kidding! Luckily since my motor was out i was able to take an impact driver to remove the screws. I will be replacing those with something better. :bang:
 
no kidding! Luckily since my motor was out i was able to take an impact driver to remove the screws. I will be replacing those with something better. :bang:
My seal is done and next time I am removing that thing will be for Timing chain and lower oil pan O ring replacement. I bought new bolts with hex holes instead just Phillips. So when I have timing chain cover out I will replace them but for now they will have to run like that.
and reason why I needed to change my oil pump seal was....... I screwed up by tightening idler too much :bang:
 
Ok, so now I got four of the bolts and stripped the heads on three. What kind of tool to get in thereand drill them out and after that. What if I break off the bolt extractor in the hole I just drilled?

What a pain in ass!
 
Thanks Zane! Worked on oil pump cover and crank seal this afternoon and reading your post made it a breeze. Removed 30mm bolt with bump start and it came off on the first.
Got 6 screws off oil pump cover and was about to celebrate and then of course I strip the last screw. Drilled it out with 7/64 bit and 90 degree cordless drill into half the screws depth. Used Irwin extractor and was able to thread it off by hand. This proceedure to remove a damaged screw worked really well but I had several screw extracting experiences in the past which hepled on this one. Drilling staight through center is a must! Replaced with Torx screw kit from Houston FZJ80. Thanks Houston FZJ80, Torx is the way to go on this cover!
Welding up a device to hold the crank pulley tomorrow to crank the bolt back down and then put belts and fan back on. Then gotta continue working on the dreaded PO401.....:bang:
 
I replaced my oil pump seal a couple weeks ago. I pulled the cover only to find out there was no seal installed to begin with. It made sense why it was leaking. I put the new seal on and bolted everything back together. Started it up and got no oil pressure..... at all. I though the oil pump lost it's prime. I took the whole thing apart. stuffed the gears full of vasoline and put it back topether. Started it up and got very little oil pressure. I had to drive it to work. On the way home lost oil pressure. I took it all back apart. I removed the oil seal. reinstalled the cover. No one mentioned the half moon piece on the crankshaft was removeable. So of course when I tried to install the pulley, the half moon piece fell behind my brand new front crankshaft seal. I had to destroy that seal to get the moon piece out. Wait another day for Mr. T to order that seal. Seal came in. Put everything back together and started it up. Oil pressure came up and was perfect. I drove it home. Took it back apart to fix the oil leak.... again. I used a thin black layer of RTV and some HEX head screws to put it back together. Bolted everything back up. Started it. Now i have great oil pressure and the oil pump seal and front crankshaft seal dont leak..... as of today. Sorry for the drawn out story... But I believe some important things to take away from this is. GET SOME HEX HEAD SCREWS M6X12 and Make sure you really TIGHTEN them and MAKE SURE THE HALF MOON IS AT THE 12 O'CLOCK POSITION WHEN YOU TAKE THE CRANK PULLEY OFF.
 
Last edited:
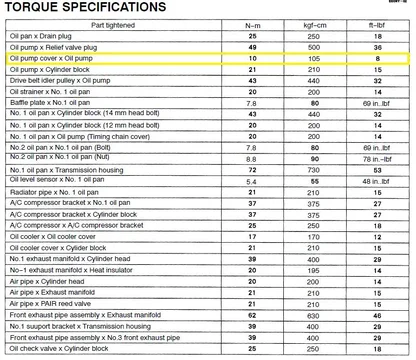
Just did this to mine, with Brett's Torx screws. I did find the torque spec in the FSM, it's 8 ft. lb, which equals 94 96 in. lb.

Oil pump torque.jpg
Oil pump torque.jpg
 
Last edited:
Hmm. I think I tied mine to 10 ft-lb :mad: Thats going to suck to remove them.
The good news I dotn think I am going have to remove them when on engine since I want to do chain guides and reseal oil pan 1 & 2 so it maybe not that bad removing all that on the bench.
 

Users who are viewing this thread

Back
Top Bottom