How to LS Swap a FJ60 or FJ62. Quick and dirty guide for regular folks wanting to do an engine swap in their driveway. (3 Viewers)

This site may earn a commission from merchant affiliate
links, including eBay, Amazon, Skimlinks, and others.

At this point you will be ready to pull your old motor. To give some perspective on why i think that all of you guys can do this swap, i had never ever pulled a motor before this swap. This might be pretty commonplace knowledge to some of you but im including it for people who might have never pulled a motor before.


First thing youre going to want to do is to take the truck up to a shop and have the AC Lines evacuated. Do this while the truck is still running and driving. Do not just open one of the lines and let it leak out. When you get home, remove your Tcase skid plate and your radiator splash guard thing. put all of the old bolts back into their holes so you dont lose them.

Next (and the order of this stuff doesnt really matter) youll want to drain your transfer case, transmission, engine oil, power steering, and coolant. When you drain this stuff, leave something under it and let it drain over night so it gets to drip as much stuff as you can out of it.

While you are letting everything drain, start taking off the front of your truck. You can leave your fenders on, but your front bumper needs to come off (if you still have the stock bumper riveted in place you can leave it on, its not mandatory), Remove the two headlight surrounds, then remove the center grille assembly. Use painters tape and tape all of the little screws to the parts so you dont lose them. Once those are out, remove your lower valence and put the 6 bolts back into the fenders so you dont lose them. From here you can remove the upper radiator support bar thing that is right in front of your radiator. Go put them in a safe area, you wont be touching these again for quite a while. Now you can carefully remove your AC Condenser, save the rubber grommets and bolts, set aside. Do the same for your radiator and your Drier. You should have full access to the front of your motor now.

From here you need to just start disconnecting stuff. The easiest way to go about it is find the electrical connectors that are connecting the engine to the body. When you disconnect something, put painters tape on it and number it, write down the corresponding number in a booklet or something. On a desmogged motor there will only be like 17 things you have to unplug. dont forget about the plugs under the passenger side of the motor on the starter and the ones connecting to the transfer case. You will also need to disconnect the fuel and return lines and remove your intake. The ground wire coming off the body next to your battery connects to the passenger side motor mount. I just cut that one, it was hard to get in there. Lastly remove your speedo cable from your T case.

***when the motor is completely out, you will never ever again have a chance to replace your speedo cable this easily. I highly recommend you replace it now, even if it is working. Thats if you are keeping your stock gauges. If you are switching to GPS gauges or something you can remove it as well. The stock gauges to me look 10000000x better than any of the after market gauges, but thats just like my opinion man

Now get a buddy to help you remove the hood to store somewhere safe.

Once you have everything disconnected, go back and check again to be sure. Get your engine hoist and connect it to the hooks on the motor and put light pressure on it. Put a jack under the transfer case and also put light pressure on it. Unbolt the motor mounts and disconnect the crossmember from the frame and then remove the crossmember from the trans. At this point you should have everything disconnected. You can now remove the motor/trans/tcase in one long piece. It is helpful to get a buddy working the jack behind the t case and one person lifting the motor as they pull on the jack. Youll pull the engine up and pull it back some. Once the engine is up and into the radiator core support you can start lifting the motor higher to get the t case to clear the core support as you pull it out. This sucks, and was probably one of the worst parts of the swap for me. Make sure you find some way to secure the chain to the hook. When the hook jumps a link on the chain you will die inside a little bit. What i did was use a smaller chain and wrapped it around the hook and used mini D Rings to secure the rings so it wouldnt move.


Once its out, set it on the ground near your other motor in your garage or wherever, and support it by the oil pan bolts with wood and by the trans or t case. Be careful because the oil pans on the 60s suck and might break if you put the weight of the motor onto the sump part.

Your engine bay will look kind of like this:

5LxiMhel.jpg


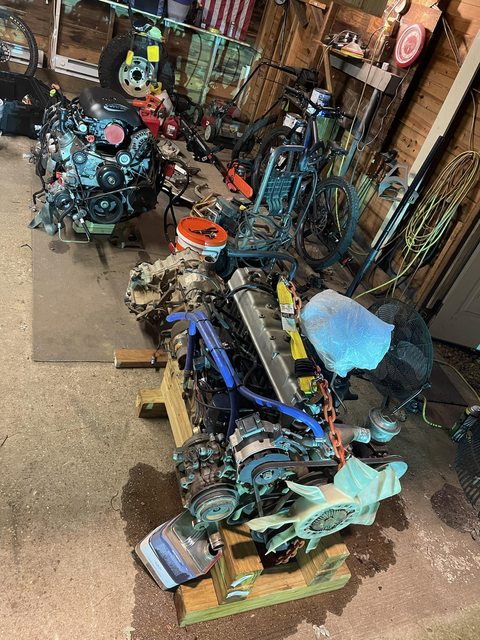
2 motors side by side

N4Ku6rzl.jpg


**if you are using a H55f with your swap and its already connected to your t case disregard this next stuff. If you are using a h55f and its not connected to the case, this will pertain to you. For all advance/marks adapters this will apply

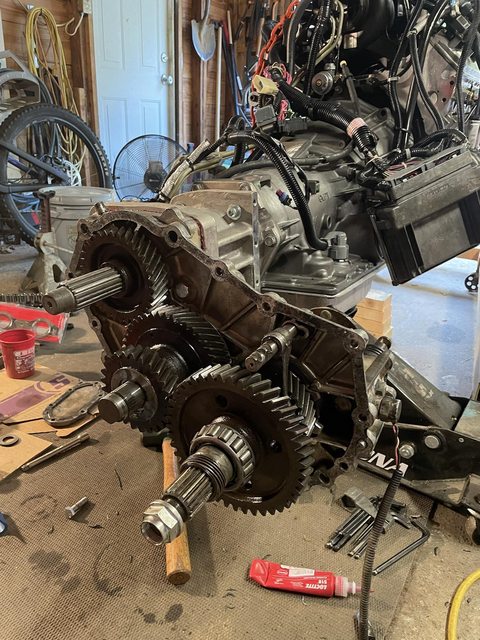
From here you will want to disassemble your transfer case from your transmission. This is pretty simple, just take all the bolts out until you get both sides off. Putting it back together is more important. Here are a few very helpful videos of assembly that will help you with removal


@orangefj45 has a great video


@OTRAMM also has a great video


Once you have the transfercase removed, sell your old motor and trans or whatever. Selling your old stuff can help offset some of the cost of the swap and could help another cruiser owner out. Karma is real and trust me, with the swap youll need some good karma

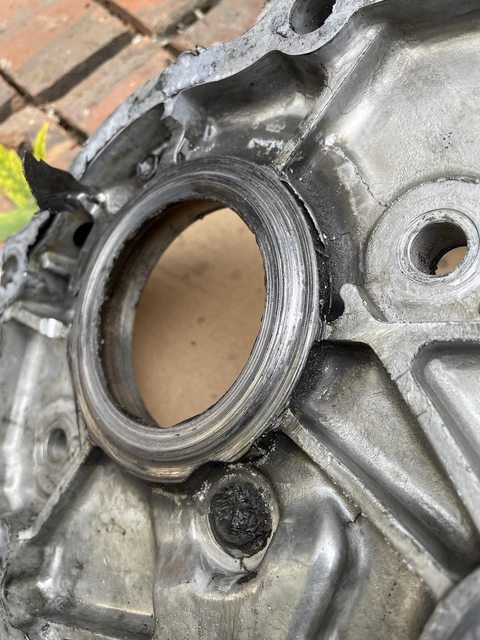
anyways, once the transfer case is removed, clean it with some gas or brake cleaner, take every bolt and run it on a brass wire brush to get the old crap off of the threads. Some people paint the outsides of the case, the PTO cover, and the trans output shaft cover at this point. It makes a swap look really pretty and professional.


So depending on what transmission you are running, at this point it gets a little different. If you are using the 4l60e or 4l80e or 6l80e you will use an adapter to mate the transmission to your transfer case. The adapter you will use for a H55f i believe is on the bellhousing side. If you are using a 4l60/4l65/4l80 etc, you HAVE TO USE A 2WD TRANSMISSION!!

4l60e (1997 and newer) to FJ60 19 spline split transfercase - Advance adapters PN: 50-0408A
4l60e (1993-1996) to FJ60 19 spline split transfercase -Advance Adapters PN: 50-0408
4L80e to FJ60 19 spline split transfercase - Advance Adapters PN: 50-1701
6L80e to FJ60 19 spline split transfercase - Advance Adapters PN: 50-9612
GM NV4500 to FJ60 19 spline split transfercase - Advance Adapters PN 50-0214
LS to Toyota H55f - Advance adapters PN: 713027-EK

From here forward, i will be talking about mating a 4l60e to a split case using the marks/Advance Adapter (they are the same thing). This is a really really good time to buy a transfer case rebuild kit from @orangefj45 or @cruiseroutfit

The adapter piece is pretty straight forward. Youll want to follow the GOD AWFUL instructions in the kit. You basically take off the cone looking output shaft cover from the transmission, measure from the trans to a spot on the output shaft and cut it off. The spud shaft will slide onto the cut output shaft and convert the gm output to toyota. I wont go too much into detail unless you need me to, but here are a few things to remember while you are doing this.

- you can always cut more but you cant add material. Measure a lot before you make the cut.
-Set the spacing for the VSS sensor after installing the smaller hexagon piece. Before installing the larger piece, or else youll have to take it back apart. to set the gap. use feeler gauges for this.
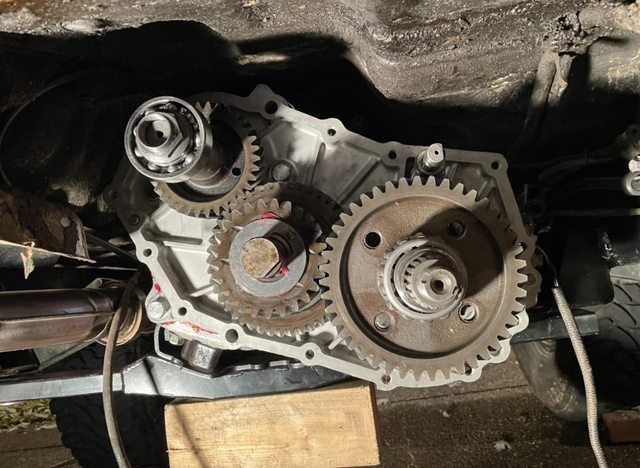
- Know which (toyota) output gear you have (top left gear when looking at all of the gears in the case), and whether or not you will need to use the AA little spacer or not. More than likely... youll need to use their spacer that they provide. I misread the instructions, didnt use it, and nuked my transfer case. When they are talking about the OEM spacer in the instructions, they are not talking about the longer PTO spacer. They are talking about the earlier transfer cases that had a spacer for the oil seal to ride on.


CKd03F5l.jpg

lIarCZwl.jpg


7zONYfLl.jpg

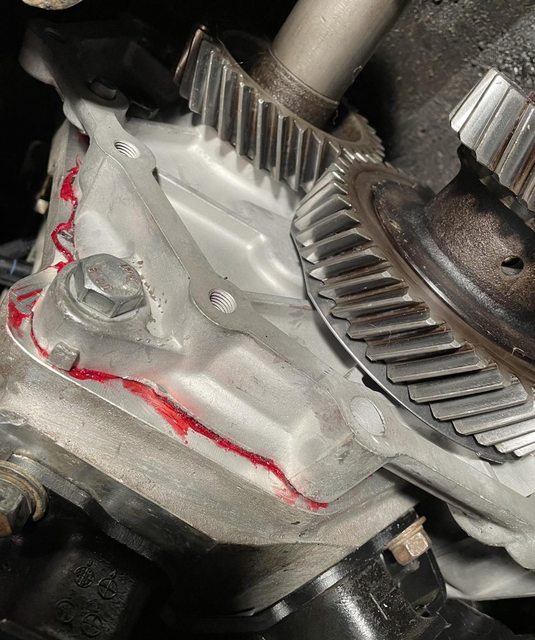
NOTE!!!!!! The top left gear, input gear, in this picture is WRONG. This is what happens when you dont use the spacer if you need to. See how it is so inset to the case body, and the gear isnt perfectly lined up to the idler gear? The input gear will be spaced out slightly from the case and will be flush with the idler gear when its installed correctly. This is what will happen if you dont use the spacer:

rzcOHpQl.jpg


This is how it should look:

v2BuWR9l.jpg

geXChWil.jpg


To assemble the transfer case, follow one of the two videos i posted above. Note, both Georg and otramm use anerobic sealer and not silicone rtv for the case halves. Install the PTO cover last, look inside, there should be NO space on the trans output shaft where your pto spacer is, your thrust washer on your idler shaft should not spin more than 1 or 2 degrees, and you should be able to turn everything by spinning the output of the transfer case.

*** When you are installing the little bracket plate for your transfer case shifter, you will need to make some modifications to it. First youll want to cut the top two mounting ear things off the top of it. Im not really sure what these are for but they are kind of in the way, so I just cut them off of mine so the plate doesnt even make that upper angle and its flat.

If you were to use the 3 supplied spacers in the kit with the bolts to mount it to the side of the adapter, The plate will be spaced out too far. You will notice that the little plastic cube on the bottom of the shifter arm doesnt sit down in the notch on the High/Low shift fork on the transfer case. Here are a few examples:

SJAVa4dh.png

siVmnY9l.jpg


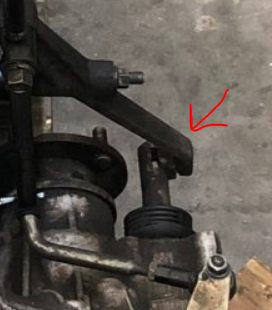
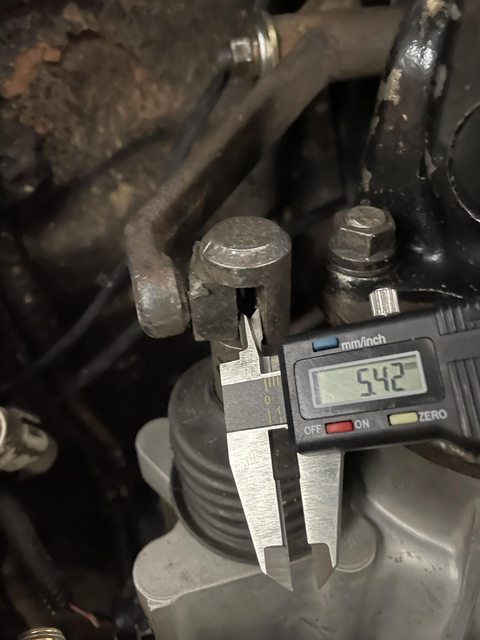
So as you can see theres like a 5mm gap. Youll want to take your 3 steel spacers and measure 5mm off one of the ends and cut it as straight as humanly possible. Band saw is the right tool for this. Once you cut the 5mm off save the end pieces that you just cut off. Now you will use the allen head bolt, a washer, the small side you cut off, then the plate, and then the longer side of the spacer in that order to mount the mounting plate onto the side of the adapter. This will pull the entire plate in 5mm closer to the side of the adapter. You still need to use both pieces of the spacer though if you want to reuse the bolt that came in the kit, thats why you are putting the smaller one on the outside of the plate and the longer one on the inside. Keeping this smaller piece will still allow you to use the same bolt. If youd rather not use both cut pieces, you can just get a bolt thats 5mm shorter or one that wont bottom out in the threaded hole of the adapter.

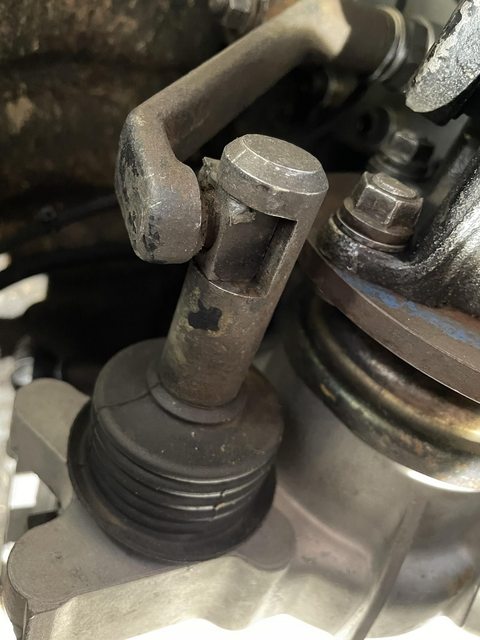
So the trick with shortening the steel spacers brings the mounting plate inboard 5mm and at the same time brings that little plastic square thing into sit flush in the shift fork but it messes up the angle and orientation of the shifter on the pivot shaft thing. Think of this shifter arm as a right triangle. To remedy this you need to add 5ish mm to the inside of the shifter arm on the bolt that it pivots onto (the one that bolts into the side of the plate that you bolted to the t case adapter). The easiest way to do this is to use 2 flat 16mm washers and a new wave washer. I only had one 16mm washer on hand so i went 16mm split lock washer > 16mm flat washer > 16mm wave washer > Shifter arm > 16mm wave washer > Smaller washer > then finally the nut. Its a lot of washers and stuff in there but it works flawlessly and takes up the weird misspacing. If you just use flat washers and no wave washers when you tighten the outer bolt it will cinch the arm down and you wont be able to move it.

You should have something like this afterwards:

xrBgPIQl.jpg


Its still not perfect vertically, but thats on Advance adapters, they should have mounted the plate down 2-3 mm from where it is supplied in the kit. This advance adapters kit kind of sucks.


Reading the AA directions or looking at the pictures online can be a little daunting but its not that bad. Just make sure you dont make the mistake i did with the spacer and youll be all good.

Once everything is assembled, give it a little bit of time to dry and fill it with gear oil to make sure you dont have any leaks, and its easier to fill while its sitting in your garage. I used redline 75w90. Use whatever brand you like best.


At this point, your motor is ready to be installed into your 60, however your 60 is not ready yet.

Is there anything I should keep from the old Fj60? A/C lines, etc?
 
Is there anything I should keep from the old Fj60? A/C lines, etc?

definitely keep your AC Lines and other AC Components if theyre still good. Nows a good time to check all that stuff to make sure its all in good shape. Other little things like the fusable link i keep and reuse if theyre good.
 
definitely keep your AC Lines and other AC Components if theyre still good. Nows a good time to check all that stuff to make sure its all in good shape. Other little things like the fusable link i keep and reuse if theyre good.
Sweet! Thanks for responding! Anything else you would recommend keeping? I've got a guy coming to take the old engine soon and I don't wanna give away anything I would need to do the swap
 
So theres about 50 different ways you can go with the shifters on the LS Swaps. For the Transmission, most people choose to go with the Lokar Shifter that looks like a manual shifter. I went this route as there wasnt many other options that looked good. B&M has a shifter as well, but it looks more 70s muscle car. Another option would be to use a FJ62 automatic Trans shifter. This is the route I wanted to go with but I couldnt find one in good condition. You could wipe off the paint on the lights on it and get Mo Faraz to make you some Dry transfer decals for them and wire them into a AT Temp light or whatever you wanted them to be. These are kind of hard to find in super good condition so I just ended up using the Lokar Cable Shifter. One of the coolest shifters ive seen was my buddy adapted a Tacoma column shifter to his steering column and used a column shift kit from lokar for the 4l60e in his LS Swap in his firstgen 4runner. This freed up his floorboard completely down there for a storage area with BMW cupholders that he 3dprinted. The sky is really the limit with this stuff.


If you go with Lokar, make sure you get the cable operated one. The Linkage one will rattle like crazy. If you have ever adjusted or installed a shifter on a bike, you are already overqualified to install the cable shifter. Theres no cable tension adjustments or barrel adjusters. Just follow the instructions and its simple to install. The cable ones go out of stock quicker for this reason. I originally had a black 12 inch shifter with a black shift knob PN: CO4L60ECXMB ordered through motorstate but it was backordered so long that I ended up just buying a 16 inch Silver shifter that was in stock and painting the lever arm black and put a black shift knob onto it. The 16 inch length Cable shifter puts the shifter right at the same height my h55f shifter was at. I was hoping to get it a little lower and out of my dash but due to covid i had to make due. The good thing is all of the parts for these shifters are available for order so if you dont like the length you have, you can order a different length or a different shift knob. The mushroom knob, the one that i got, is kind of the most used one out there. I really wanted the Hi-Tech black knob but again, out of stock. Just make sure you order the matching shifter for your transmission and it comes with 90% of what you need to install. The Part numbering system is on page 9 of this pdf to help you figure out which shifter you want to order. Cable operated 16 inch single bend will pretty match up to stock, the rest is just what color and knob you want. Basically, CO4L60ECXMB means Cable Operated 4L60E C(12inch single bend) X(black shifter lever) M(mushroom shift knob) B (Black Shift Knob)


You can aim where you mount the shifter so it doesnt interfere with your cig lighter and get it as forward in park as you want it to be.

As for mounting the assembled shifter to the floorboard you can kind of get creative here. I Traced out a plate of steel and covered as much of the hole in my floorboard as i possibly could. I then traced out where the shifter would go on that template and drilled holes and welded nuts to the plate to hold the shifter to that plate, finally i cut a hole for the shifter arm to pass through. They make specific weld nuts for this. Theyre not needed but they work a LOT better. Make this hole as small as you can possibly get it and have no interference with the shifter arm, this will keep road noise and heat out of the cabin of your truck! To fasten the plate to the floorboard i just shared the holes for the shifter boot. Be sure to check the throw of the shifter arm. I didnt the first go round and had to trim some of my floorboard and also trim the shift selector arm a little bit. Underneath the plate use some rubber mastic tape as a gasket to get a perfect rattle free seal between this plate and your floorboard. Disregard the sharpie lines on the plate, i was originally planning on making the plate sit down in the hole but gave up on it.

Voltage a little high on the nut tacks hah

AvDYJUtl.jpg

TC3Jr6Ol.jpg


Had the shifter a little too far left to share that bottom left hole with the shift boot, had to trim the corner out of it. Having it this far left also made the shifter interfere with my shifter boot. I would recommend not trying to share that bolt hole with your shifter if you can and getting it a little bit more forward than this.

jPtJK1kl.jpg


TGnba3ml.jpg


You will have to drill 2 holes under the front of your center console floorboard area to hold the cable holder, if you have nice carpet youll need to remove the carpet. If you are planning on replacing your gross carpet, send it.

The shifter placement you can get a little creative with. Just kind of move it around and see where you want it to live, theres no real RIGHT way to do this. I kind of rushed this, when i replace my carpet i am going to go back and stiffen up the plate i made a little bit. It flexes ever so slightly since its sheet metal. A few thicker support straps in there and it will be rock solid.


The transfer case shifter is pretty simple with the 4l60e. With the 4l80 and 6l80 you will need to make some kind of bracket to hold the shifter pivot to the side of the transmission. For the 4l60e, make sure you have mounted the t case shifter bracket to the side of the t case adapter like explained in the bottom of this post.

If the mounting bracket is modified like in the post, you can just use your stock transfer case shifter. You will set it up pretty much the same way, however you will need to add length to the Shifter arm. Theres no real science to this, just kinda get someone to hold the shifter lever from the top where you want it to sit and measure how much length you need to add to the shifter and get some Steel rod from the hardware store and weld it together. This part is pretty simple.

85Fyxsdl.jpg


If you notice on the left side where the extension rod is connected, I have it offset to the left a good bit from the old shifter. This moved the entire shifter over left and closer to me in the driver seat so i dont have to reach as far to shift into 4wd. The weld is fat as s*** there because the root pass had to be pretty thick to fill the offset pieces. The shifter is plenty strong, i tossed it off of my roof into the street and there was no damage. This is also a good time to add an extension to the shifter to make it longer and easier to reach Like this one here. Just be sure the shifter doesnt hit the walls of your floorboard at any time in operation, and give it a little extra room to account for your driveline moving so it doesnt pop out of gear.


Another option is to use a twin stick. This is a less stock looking option but it will operate much better. The design is much better as well. In hindsight, probably should have just done this.

p1020021-jpg.891709


Here is the finished product of the Lokar 16 inch cable shifter installed onto the floorboard and my modified T case shift lever. You can see that the tcase lever offset to the left some to make it easier to reach


RFdJFt5l.jpg


Also, dont worry about wiring anything to the shifter if you are using an automatic transmission. All of the neutral safety stuff, reverse lights, etc are contained in the transmission and its harness, NOT the shifter. The only reason you would use some of the wiring on the shifter is if you were trying to add a PRNDL but even those kits use their own wiring to your transmission.
Do I need to keep the Toyota transfer case? Or do I use the one that comes with the donor engine?
 
Do I need to keep the Toyota transfer case? Or do I use the one that comes with the donor engine?
Other more experienced folks will weigh in, but it’s my understanding that most people source a 2wd drive train (LS with a 4l60e behind it). There’s an adapter kit from advance adapters that will let you mate the Toyota xfer case to the donor driveline. So, yes. Keep the Toyota xfer case.
 
Do I need to keep the Toyota transfer case? Or do I use the one that comes with the donor engine?
yeah you’re going to want to hold onto it unless you’re sourcing a new one. If your 4l60e is 4x4 you can run a np241 t case and it will bolt to the back of the 4l60 without an adapter if you get one with a vss on it. Only downside is that its center output so you’ll need to run a centered rear diff.

Most people just use an adapter and the stock Toyota tcase though
 
Just swapped my old tired 5.3 LM7 to a same new Crate, the shop that did it cut bunch of wiress and could not pair them up. So they installed new wiring for the EFI. Running a 38gal LRA with in tank pump and a C5 Filter/FPR. So, got it back with 64-66 psi fuel pressure and a P0327 code that they nor me could fix. Spoke with previous owner and builder he suggested new stand alone harness Blue/ Green PCM connection. Well I found a BP Automotive harness with the 4L60E but running a H55F. I am mostly eletrical incompetent, searching for any/all info of possibly delete or options for the Tranny leg of harness. Any suggestions would be appreciated. Did get an answer from LT1swap but also looking for possibly direct hands on Yota swapper experience.
Thanks
Hey do you have other issues, or is it just the PO327 code? PO327 is a knock sensor code. That is a pretty straightforward diagnostic. The two wires coming out between the intake and the valley plate on the back of the motor are the front and rear knock sensors. Easy way to diagnose would be to swap the two wires in the harness plug mounted on the drivers side of the intake and see if your code stays as PO327 or if it switches to a PO332. This will tell you if you have a bad knock sensor, or an issue with the wiring.

You can also check the knock sensor by checking continuity to ground. They should be between 90 and 110 ohms.
Put in another new set of the knock sensor (easy) but the same result. There is a cut wire at the pcm and replaced with another from their new harness.
But I am going to put in the new harness I bought.
Biggest Question is what to do with the Auto transmission leg of harness.
 
Put in another new set of the knock sensor (easy) but the same result. There is a cut wire at the pcm and replaced with another from their new harness.
But I am going to put in the new harness I bought.
Biggest Question is what to do with the Auto transmission leg of harness.
I don’t like more Spaghetti under the hood than already present. Want to get all old stuff out.
 
Are you able to return it? I think they have harnesses specifically for manual transmissions. They cost the same.
I’ve looked and found T56 as the closest I could get. But comes with the Blue and Red PCM connectors, not sure how important that is. The guy that built it wanted to make sure I had the Blue/Green one. 🤷
 
I’ve looked and found T56 as the closest I could get. But comes with the Blue and Red PCM connectors, not sure how important that is. The guy that built it wanted to make sure I had the Blue/Green one. 🤷

They are very similar. Are you dbw or dbc? I have half of my blue/green wired up like a red blue. I used the T56 one on the last swap i did that used a nv4500
 
I added it back. I removed the cruise control and AC stuff because people were trying to take info i was putting out here for free to help people to produce and sell for a profit and that was pretty lame. I put the Cruise one back.
Yeah that sucks man sometimes your better off keeping tech to yourself
 

Users who are viewing this thread

Back
Top Bottom