


My next thought is to look for GM OEMs that may fit with adapters. They all seem to be some hybrid of aluminum and plastic but last foreverIm thinking about switching back over. at least you can repair brass/copper
Follow along with the video below to see how to install our site as a web app on your home screen.
Note: This feature may not be available in some browsers.
This site may earn a commission from merchant affiliate
links, including eBay, Amazon, Skimlinks, and others.
My next thought is to look for GM OEMs that may fit with adapters. They all seem to be some hybrid of aluminum and plastic but last foreverIm thinking about switching back over. at least you can repair brass/copper


What about moseley motor radiator I think @cruisermatt and @TRAIL TAILOR uses his.
Mosleys is FSR, and has also reported issues leaking I thinkWhat about moseley motor radiator I think @cruisermatt and @TRAIL TAILOR uses his.
its crazy, i took out the ORIGINAL radiator when i did my swap and no leaks. even my wifes 100 series has 200k on the radiator. GM oem might be a good option tbhMy next thought is to look for GM OEMs that may fit with adapters. They all seem to be some hybrid of aluminum and plastic but last forever
thats what this one is, but even the ron davis ones have leak issues tooWhat about moseley motor radiator I think @cruisermatt and @TRAIL TAILOR uses his.

You can use a tundra mechanical fan from a 3ur on a LS.I hear that. But I have faith in the Japanese parts I have that are rebuildable and adjustable. Unless there’s a comparable direct fit adjustable fan clutch that can be modded? That’s the question I suppose. All the ACDelco clutches I see are sealed.

Fan, maybe. But I'm talking about the clutch. The 3ur clutch mounts the same way as all the other Toyotas do, with a 4 bolt flange. The LS fan clutch uses a threaded boss.You can use a tundra mechanical fan from a 3ur on a LS.
Once again no need to have anything else than the gm fan and fan clutch readily available at any auto parts store.Fan, maybe. But I'm talking about the clutch. The 3ur clutch mounts the same way as all the other Toyotas do, with a 4 bolt flange. The LS fan clutch uses a threaded boss.

At this point you will be ready to pull your old motor. To give some perspective on why i think that all of you guys can do this swap, i had never ever pulled a motor before this swap. This might be pretty commonplace knowledge to some of you but im including it for people who might have never pulled a motor before.
First thing youre going to want to do is to take the truck up to a shop and have the AC Lines evacuated. Do this while the truck is still running and driving. Do not just open one of the lines and let it leak out. When you get home, remove your Tcase skid plate and your radiator splash guard thing. put all of the old bolts back into their holes so you dont lose them.
Next (and the order of this stuff doesnt really matter) youll want to drain your transfer case, transmission, engine oil, power steering, and coolant. When you drain this stuff, leave something under it and let it drain over night so it gets to drip as much stuff as you can out of it.
While you are letting everything drain, start taking off the front of your truck. You can leave your fenders on, but your front bumper needs to come off (if you still have the stock bumper riveted in place you can leave it on, its not mandatory), Remove the two headlight surrounds, then remove the center grille assembly. Use painters tape and tape all of the little screws to the parts so you dont lose them. Once those are out, remove your lower valence and put the 6 bolts back into the fenders so you dont lose them. From here you can remove the upper radiator support bar thing that is right in front of your radiator. Go put them in a safe area, you wont be touching these again for quite a while. Now you can carefully remove your AC Condenser, save the rubber grommets and bolts, set aside. Do the same for your radiator and your Drier. You should have full access to the front of your motor now.
From here you need to just start disconnecting stuff. The easiest way to go about it is find the electrical connectors that are connecting the engine to the body. When you disconnect something, put painters tape on it and number it, write down the corresponding number in a booklet or something. On a desmogged motor there will only be like 17 things you have to unplug. dont forget about the plugs under the passenger side of the motor on the starter and the ones connecting to the transfer case. You will also need to disconnect the fuel and return lines and remove your intake. The ground wire coming off the body next to your battery connects to the passenger side motor mount. I just cut that one, it was hard to get in there. Lastly remove your speedo cable from your T case.
***when the motor is completely out, you will never ever again have a chance to replace your speedo cable this easily. I highly recommend you replace it now, even if it is working. Thats if you are keeping your stock gauges. If you are switching to GPS gauges or something you can remove it as well. The stock gauges to me look 10000000x better than any of the after market gauges, but thats just like my opinion man
Now get a buddy to help you remove the hood to store somewhere safe.
Once you have everything disconnected, go back and check again to be sure. Get your engine hoist and connect it to the hooks on the motor and put light pressure on it. Put a jack under the transfer case and also put light pressure on it. Unbolt the motor mounts and disconnect the crossmember from the frame and then remove the crossmember from the trans. At this point you should have everything disconnected. You can now remove the motor/trans/tcase in one long piece. It is helpful to get a buddy working the jack behind the t case and one person lifting the motor as they pull on the jack. Youll pull the engine up and pull it back some. Once the engine is up and into the radiator core support you can start lifting the motor higher to get the t case to clear the core support as you pull it out. This sucks, and was probably one of the worst parts of the swap for me. Make sure you find some way to secure the chain to the hook. When the hook jumps a link on the chain you will die inside a little bit. What i did was use a smaller chain and wrapped it around the hook and used mini D Rings to secure the rings so it wouldnt move.
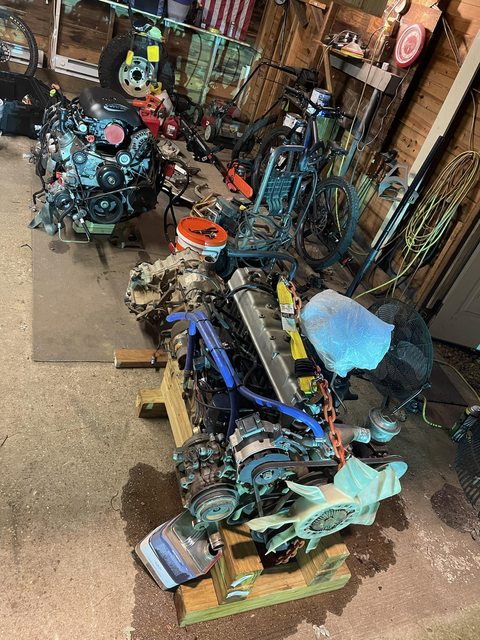
Once its out, set it on the ground near your other motor in your garage or wherever, and support it by the oil pan bolts with wood and by the trans or t case. Be careful because the oil pans on the 60s suck and might break if you put the weight of the motor onto the sump part.
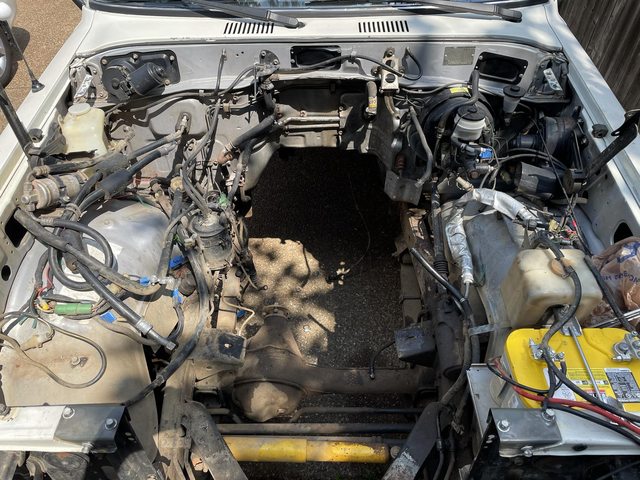
Your engine bay will look kind of like this:
2 motors side by side
**if you are using a H55f with your swap and its already connected to your t case disregard this next stuff. If you are using a h55f and its not connected to the case, this will pertain to you. For all advance/marks adapters this will apply
From here you will want to disassemble your transfer case from your transmission. This is pretty simple, just take all the bolts out until you get both sides off. Putting it back together is more important. Here are a few very helpful videos of assembly that will help you with removal
@orangefj45 has a great video
@OTRAMM also has a great video
Once you have the transfercase removed, sell your old motor and trans or whatever. Selling your old stuff can help offset some of the cost of the swap and could help another cruiser owner out. Karma is real and trust me, with the swap youll need some good karma
anyways, once the transfer case is removed, clean it with some gas or brake cleaner, take every bolt and run it on a brass wire brush to get the old crap off of the threads. Some people paint the outsides of the case, the PTO cover, and the trans output shaft cover at this point. It makes a swap look really pretty and professional.
So depending on what transmission you are running, at this point it gets a little different. If you are using the 4l60e or 4l80e or 6l80e you will use an adapter to mate the transmission to your transfer case. The adapter you will use for a H55f i believe is on the bellhousing side. If you are using a 4l60/4l65/4l80 etc, you HAVE TO USE A 2WD TRANSMISSION!! Why??? a 2WD not 4WD??
4l60e (1997 and newer) to FJ60 19 spline split transfercase - Advance adapters PN: 50-0408A
4l60e (1993-1996) to FJ60 19 spline split transfercase -Advance Adapters PN: 50-0408
4L80e to FJ60 19 spline split transfercase - Advance Adapters PN: 50-1701
6L80e to FJ60 19 spline split transfercase - Advance Adapters PN: 50-9612
GM NV4500 to FJ60 19 spline split transfercase - Advance Adapters PN 50-0214
LS to Toyota H55f - Advance adapters PN: 713027-EK
From here forward, i will be talking about mating a 4l60e to a split case using the marks/Advance Adapter (they are the same thing). This is a really really good time to buy a transfer case rebuild kit from @orangefj45 or @cruiseroutfit
The adapter piece is pretty straight forward. Youll want to follow the GOD AWFUL instructions in the kit. You basically take off the cone looking output shaft cover from the transmission, measure from the trans to a spot on the output shaft and cut it off. The spud shaft will slide onto the cut output shaft and convert the gm output to toyota. I wont go too much into detail unless you need me to, but here are a few things to remember while you are doing this.
- you can always cut more but you cant add material. Measure a lot before you make the cut.
-Set the spacing for the VSS sensor after installing the smaller hexagon piece. Before installing the larger piece, or else youll have to take it back apart. to set the gap. use feeler gauges for this.
- Know which (toyota) output gear you have (top left gear when looking at all of the gears in the case), and whether or not you will need to use the AA little spacer or not. More than likely... youll need to use their spacer that they provide. I misread the instructions, didnt use it, and nuked my transfer case. When they are talking about the OEM spacer in the instructions, they are not talking about the longer PTO spacer. They are talking about the earlier transfer cases that had a spacer for the oil seal to ride on.


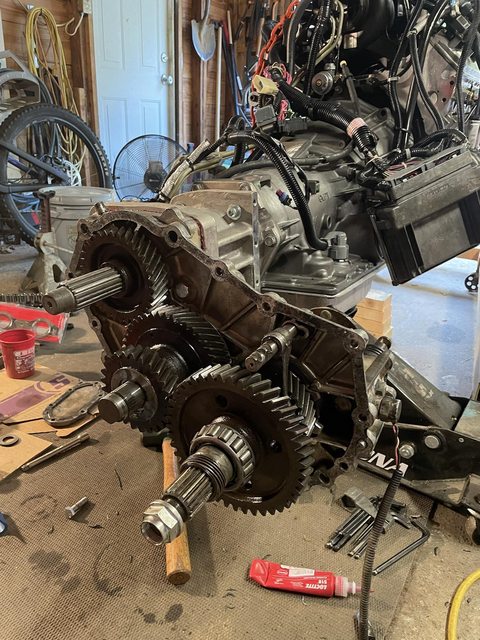
NOTE!!!!!! The top left gear, input gear, in this picture is WRONG. This is what happens when you dont use the spacer if you need to. See how it is so inset to the case body, and the gear isnt perfectly lined up to the idler gear? The input gear will be spaced out slightly from the case and will be flush with the idler gear when its installed correctly. This is what will happen if you dont use the spacer:
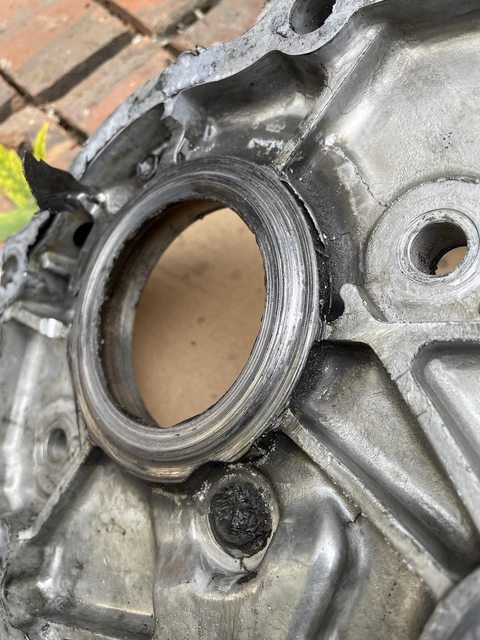
This is how it should look:
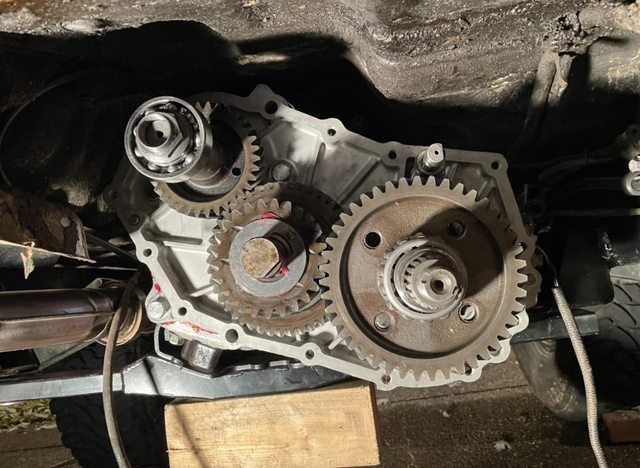
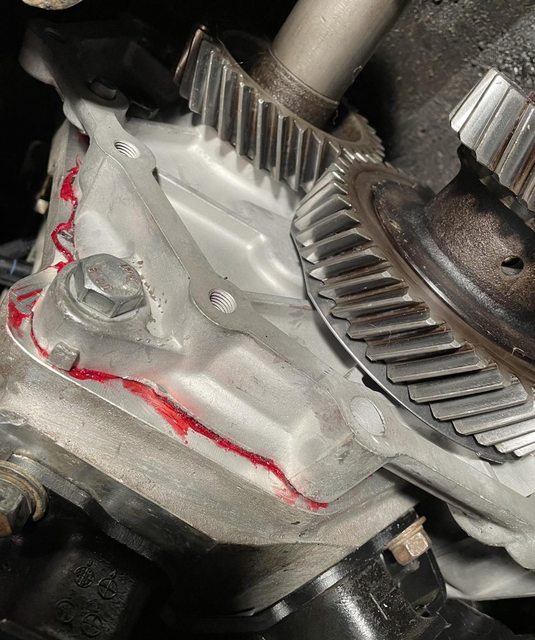
To assemble the transfer case, follow one of the two videos i posted above. Note, both Georg and otramm use anerobic sealer and not silicone rtv for the case halves. Install the PTO cover last, look inside, there should be NO space on the trans output shaft where your pto spacer is, your thrust washer on your idler shaft should not spin more than 1 or 2 degrees, and you should be able to turn everything by spinning the output of the transfer case.
*** When you are installing the little bracket plate for your transfer case shifter, you will need to make some modifications to it. First youll want to cut the top two mounting ear things off the top of it. Im not really sure what these are for but they are kind of in the way, so I just cut them off of mine so the plate doesnt even make that upper angle and its flat.
If you were to use the 3 supplied spacers in the kit with the bolts to mount it to the side of the adapter, The plate will be spaced out too far. You will notice that the little plastic cube on the bottom of the shifter arm doesnt sit down in the notch on the High/Low shift fork on the transfer case. Here are a few examples:
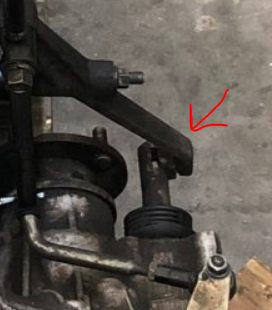
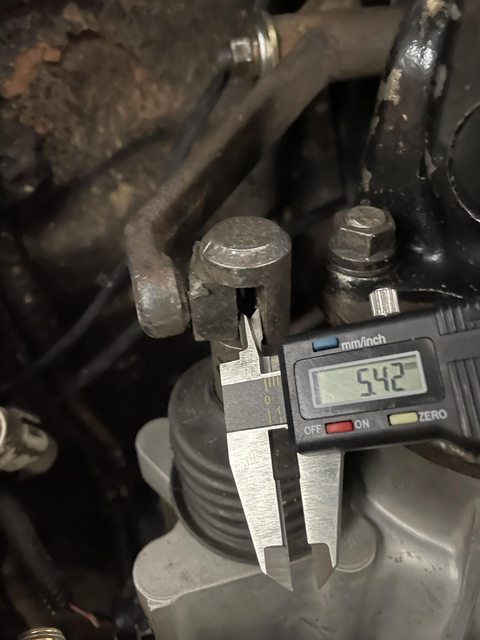
So as you can see theres like a 5mm gap. Youll want to take your 3 steel spacers and measure 5mm off one of the ends and cut it as straight as humanly possible. Band saw is the right tool for this. Once you cut the 5mm off save the end pieces that you just cut off. Now you will use the allen head bolt, a washer, the small side you cut off, then the plate, and then the longer side of the spacer in that order to mount the mounting plate onto the side of the adapter. This will pull the entire plate in 5mm closer to the side of the adapter. You still need to use both pieces of the spacer though if you want to reuse the bolt that came in the kit, thats why you are putting the smaller one on the outside of the plate and the longer one on the inside. Keeping this smaller piece will still allow you to use the same bolt. If youd rather not use both cut pieces, you can just get a bolt thats 5mm shorter or one that wont bottom out in the threaded hole of the adapter.
So the trick with shortening the steel spacers brings the mounting plate inboard 5mm and at the same time brings that little plastic square thing into sit flush in the shift fork but it messes up the angle and orientation of the shifter on the pivot shaft thing. Think of this shifter arm as a right triangle. To remedy this you need to add 5ish mm to the inside of the shifter arm on the bolt that it pivots onto (the one that bolts into the side of the plate that you bolted to the t case adapter). The easiest way to do this is to use 2 flat 16mm washers and a new wave washer. I only had one 16mm washer on hand so i went 16mm split lock washer > 16mm flat washer > 16mm wave washer > Shifter arm > 16mm wave washer > Smaller washer > then finally the nut. Its a lot of washers and stuff in there but it works flawlessly and takes up the weird misspacing. If you just use flat washers and no wave washers when you tighten the outer bolt it will cinch the arm down and you wont be able to move it.
You should have something like this afterwards:
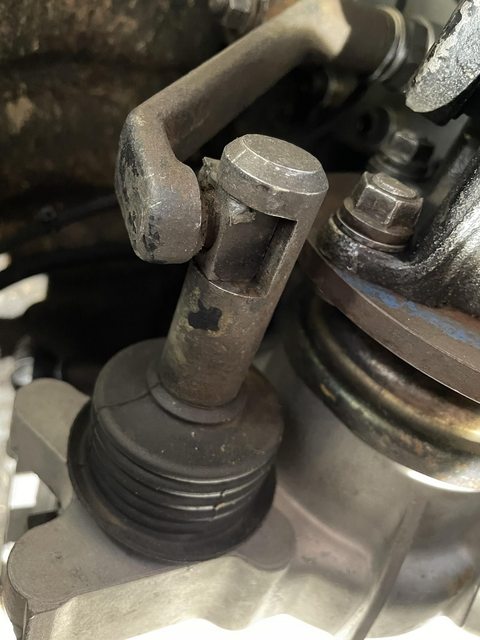
Its still not perfect vertically, but thats on Advance adapters, they should have mounted the plate down 2-3 mm from where it is supplied in the kit. This advance adapters kit kind of sucks.
Reading the AA directions or looking at the pictures online can be a little daunting but its not that bad. Just make sure you dont make the mistake i did with the spacer and youll be all good.
Once everything is assembled, give it a little bit of time to dry and fill it with gear oil to make sure you dont have any leaks, and its easier to fill while its sitting in your garage. I used redline 75w90. Use whatever brand you like best.
At this point, your motor is ready to be installed into your 60, however your 60 is not ready yet.
Any pics of where your bracket locates it? Wondering if it will fit in my engine bayWe have a VC120 bracket coming very very soon
So as a total noob mistake i forgot to label all the A/C wiring before removing the engine, No i have the A/C running manually ( (by running the fan from the dash and connecting the compressor directly to power ) i need the easiest way to run the A/C (i can't locate the high pressure switch and run with the amplifier and from reading all the posts the amp needs tach signal ( not connected yet ) so if my best option is to run from the compressor switch directly please guide on how to do it without burning any of the the other circuits)HVAC and AC.
This is one step that really adds quite a bit of expense to the swap. This first part is just replacing all of your AC Components with new parts. It is not completely necessary to do, so if your old parts are still okay, give them a clean and re use them. Reusing old good parts will save you a chunk of money. Get a new dryer though. Theyre cheap. I am unsure if evacuating your old AC components removes the old oil from the system or not. Maybe someone can chime in on that. I used all brand new parts so had to add PAG46 oil to dry parts.
Denso AC Condenser - 8057-05239744
Denso Evaporator - W0133-1748697
Toyota AC Expansion Valve - 88515-87004
Toyota Pressure Switch - 88645-30250
Four Seasons 33403 Filter Drier
@ChaserFJ60 Receiver Dryer Spacer Link
You are going to want to use R134a and not R12 for your AC. The replacement Denso dryer is set up for R12. The R134a dryers that work for the system are smaller in diameter than your dryer holder so thats what the spacer is for. Dont remove the ports on the dryer until you are about to connect your AC lines to them.
Whether or not you are going to change your Evaporator or not, youll need to remove it. You can do this with only removing your glove box. Heres a good thread on it:

AC Evaporator box install advice needed
Need some AC experts to give a bit of advice on the best way to get the AC evaporator box installed. How much of the dash needs to come out? Have the glove box out already, but it will not fit in. Do these other AC parts it hooks up to on both sides need to be loosened? Removed? Does the...forum.ih8mud.com
Once removed, mark all of the electrical connectors in there so you remember to connect all of them. Its easy to forget one and youll spend an hour wondering why your compressor isnt kicking on with the dash button being pressed.
Once the lower evaporator is removed you can either replace it with the new parts or clean out all the dirt and leaves from it. Before putting it back in add 2 oz of PAG46 oil with dye to one ports and blow it into the evaporator.
(not recommended) Then youll remove a resistor from the Amplifier shown in this link here:

The A/C Amp Thread
*************************
(recommended) You can also bypass the Toyota Amplifier completely and wire the AC to work to mirror the GM system, but its a little bit more work involved and using the toyota stuff is much easier. And much less work. Controlling the AC with the ECM or PCM is a much bettter move than using the 35 year old board that is the amplifier, and it will be all self contained. Later on in the thread I’ll show you how to bypass the Toyota ac system to work with the GM pcm to control ac idle up and e fans, if you are using a Gen 3 pcm.
Its here in post #79
Get your Evaporator reassembled and reinstalled into your dash and make sure to reconnect the plugs.
If you are wanting to replace your heater core this is a pretty great time to do it. I didnt and just flushed mine and havent had any issues.
Your Condenser should already be reinstalled, so youll need to relocate your dryer bracket somewhere. I mounted it next to the radiator on the support, you can really put this anywhere. Just make sure the hoses have a clear path.
Remove your GM Compressor and remove the drain screw and try and remove as much oil as humanly possible from it so you can start from scratch on the oil amounts. You basically turn it upside down and spin the belt pulley until it all drips out. Once its pretty empty youll need to fill it back up. I ended up putting about 3 OZ of PAG46 with dye back into it before reinstalling it with the ports plugged off. This is for the Denso 10S17F compressor that came with my motor. If your donor truck had rear AC you will have a larger compressor that is a little bit different. The 10S17F is the most common compressor out there for these motors though
The hoses are where youll run into some problems. You can do one of two things. Rebuild the ends of your Toyota hoses, or Use adapters. I used a guy locally here in Memphis named Metal Mike at Automotive AC Hose repair. He basically will take your Old lower evaporator hose that goes from the Evaporator to the GM compressor, and the Compressor to the Condenser and braze on GM compressor fittings onto one end of them. That way its toyota on one end and GM on the other. You will reuse your upper Evaporator hose and your hose from condenser to dryer without modification. Im sure you can reach out to him and see if he can do the same for you, but most automotive hose places or hydraulic line shops can do this. Whoever does this will need your two toyota hoses to modify them. You will need to have the exact measurements of hose lengths you need for them to build the hoses for you. You can also go to the salvage yard and pull AC lines from a GM vehicle that match up with your AC compressor for like next to nothing. This way it will be OEM GM end fittings. Doing it this way will allow you to bolt the hoses directly to the AC Compressor instead of using aluminum adapter fittings on the compressor housing. If you look at the photos of my hoses below, the metal part of the lines with the elbows were made by Mike. The GM side was braised onto a hose end fitting he had, and he added the high and low pressure ports to them. He then crimped them onto new rubber hose with a hydraulic crimper. Its worth giving this dude a call. He does incredible work for literally everyone in the Memphis area, and people even resell his hoses on the internet. That being said, if you have an automotive hose or hydraulic hose shop locally to you, they can totally do this for you.
The other option is to use adapter fittings on your Compressor. I believe you will still need to have your hoses rebuilt to match these adapters so might as well just use the GM ends.
**** Very important, if you are planning on running a gen3 motor, and you are planning to run your AC through your PCM so you can have Idle speed increased when the compressor is on and have the computer control your fans to come on when you turn the compressor on, you will also need a pressure sensor port welded/braised or crimped onto your high pressure line somewhere.
Links:
-weld on
-Crimp on
-For more information on the High pressure ports and sensors and wiring the AC system up, please read this thread in this link here

You will need to Fill your components with PAG46 with dye refrigerant oil for R134A. The silverado and tahoe have an 8 oz capacity of PAG46 and the FJ60/62 has a 5.2-6.2 capacity for the R134a swap. I ended up using 7oz of total oil for the system. The GM Denso compressor looks to be bigger than the Toyota Denso one so im assuming the oil quantity difference is there. I put 3 oz into the compressor and 2 oz into the condenser and 2 oz into the evaporator.
Once your lines are built you can connect everything up. Try to minimize the time that the dryer is exposed to open atmosphere and connect the lines quickly. It is pretty obvious where the lines want to route through the core support and depending on where you mounted your drier the rest will probably run along the passenger fender.
Until your motor is able to crank and run, you are done with the AC lines for now. All that will be left is filling it with R134a refrigerant. Since you used PAG46 with dye, you can run straight refrigerant without oil or dye. It is cheaper. I used 3 or so cans of Chemours R134A-12v from oreilly. Its like $10 a can
I'm sure more experienced folks will chime in, but I'd guess that the simplest way to do it would be to grab the switched power wire coming off of the AC button on the dash and use it to trigger a relay to power the compressor. Route the compressor ground through a binary switch that you can thread into the plugged fitting on the side of the receiver/dryer and you'll have high and low pressure protection as well.So as a total noob mistake i forgot to label all the A/C wiring before removing the engine, No i have the A/C running manually ( (by running the fan from the dash and connecting the compressor directly to power ) i need the easiest way to run the A/C (i can't locate the high pressure switch and run with the amplifier and from reading all the posts the amp needs tach signal ( not connected yet ) so if my best option is to run from the compressor switch directly please guide on how to do it without burning any of the the other circuits)
Thanks
Yeah i did something similar to this. but im using the GM ecu to send signal to my relay, and using the toyota low pressure switch to give me power to the relay.I'm sure more experienced folks will chime in, but I'd guess that the simplest way to do it would be to grab the switched power wire coming off of the AC button on the dash and use it to trigger a relay to power the compressor. Route the compressor ground through a binary switch that you can thread into the plugged fitting on the side of the receiver/dryer and you'll have high and low pressure protection as well.
At this point you will be ready to pull your old motor. To give some perspective on why i think that all of you guys can do this swap, i had never ever pulled a motor before this swap. This might be pretty commonplace knowledge to some of you but im including it for people who might have never pulled a motor before.
First thing youre going to want to do is to take the truck up to a shop and have the AC Lines evacuated. Do this while the truck is still running and driving. Do not just open one of the lines and let it leak out. When you get home, remove your Tcase skid plate and your radiator splash guard thing. put all of the old bolts back into their holes so you dont lose them.
Next (and the order of this stuff doesnt really matter) youll want to drain your transfer case, transmission, engine oil, power steering, and coolant. When you drain this stuff, leave something under it and let it drain over night so it gets to drip as much stuff as you can out of it.
While you are letting everything drain, start taking off the front of your truck. You can leave your fenders on, but your front bumper needs to come off (if you still have the stock bumper riveted in place you can leave it on, its not mandatory), Remove the two headlight surrounds, then remove the center grille assembly. Use painters tape and tape all of the little screws to the parts so you dont lose them. Once those are out, remove your lower valence and put the 6 bolts back into the fenders so you dont lose them. From here you can remove the upper radiator support bar thing that is right in front of your radiator. Go put them in a safe area, you wont be touching these again for quite a while. Now you can carefully remove your AC Condenser, save the rubber grommets and bolts, set aside. Do the same for your radiator and your Drier. You should have full access to the front of your motor now.
From here you need to just start disconnecting stuff. The easiest way to go about it is find the electrical connectors that are connecting the engine to the body. When you disconnect something, put painters tape on it and number it, write down the corresponding number in a booklet or something. On a desmogged motor there will only be like 17 things you have to unplug. dont forget about the plugs under the passenger side of the motor on the starter and the ones connecting to the transfer case. You will also need to disconnect the fuel and return lines and remove your intake. The ground wire coming off the body next to your battery connects to the passenger side motor mount. I just cut that one, it was hard to get in there. Lastly remove your speedo cable from your T case.
***when the motor is completely out, you will never ever again have a chance to replace your speedo cable this easily. I highly recommend you replace it now, even if it is working. Thats if you are keeping your stock gauges. If you are switching to GPS gauges or something you can remove it as well. The stock gauges to me look 10000000x better than any of the after market gauges, but thats just like my opinion man
Now get a buddy to help you remove the hood to store somewhere safe.
Once you have everything disconnected, go back and check again to be sure. Get your engine hoist and connect it to the hooks on the motor and put light pressure on it. Put a jack under the transfer case and also put light pressure on it. Unbolt the motor mounts and disconnect the crossmember from the frame and then remove the crossmember from the trans. At this point you should have everything disconnected. You can now remove the motor/trans/tcase in one long piece. It is helpful to get a buddy working the jack behind the t case and one person lifting the motor as they pull on the jack. Youll pull the engine up and pull it back some. Once the engine is up and into the radiator core support you can start lifting the motor higher to get the t case to clear the core support as you pull it out. This sucks, and was probably one of the worst parts of the swap for me. Make sure you find some way to secure the chain to the hook. When the hook jumps a link on the chain you will die inside a little bit. What i did was use a smaller chain and wrapped it around the hook and used mini D Rings to secure the rings so it wouldnt move.
Once its out, set it on the ground near your other motor in your garage or wherever, and support it by the oil pan bolts with wood and by the trans or t case. Be careful because the oil pans on the 60s suck and might break if you put the weight of the motor onto the sump part.
Your engine bay will look kind of like this:
2 motors side by side
**if you are using a H55f with your swap and its already connected to your t case disregard this next stuff. If you are using a h55f and its not connected to the case, this will pertain to you. For all advance/marks adapters this will apply
From here you will want to disassemble your transfer case from your transmission. This is pretty simple, just take all the bolts out until you get both sides off. Putting it back together is more important. Here are a few very helpful videos of assembly that will help you with removal
@orangefj45 has a great video
@OTRAMM also has a great video
Once you have the transfercase removed, sell your old motor and trans or whatever. Selling your old stuff can help offset some of the cost of the swap and could help another cruiser owner out. Karma is real and trust me, with the swap youll need some good karma
anyways, once the transfer case is removed, clean it with some gas or brake cleaner, take every bolt and run it on a brass wire brush to get the old crap off of the threads. Some people paint the outsides of the case, the PTO cover, and the trans output shaft cover at this point. It makes a swap look really pretty and professional.
So depending on what transmission you are running, at this point it gets a little different. If you are using the 4l60e or 4l80e or 6l80e you will use an adapter to mate the transmission to your transfer case. The adapter you will use for a H55f i believe is on the bellhousing side. If you are using a 4l60/4l65/4l80 etc, you HAVE TO USE A 2WD TRANSMISSION!!
4l60e (1997 and newer) to FJ60 19 spline split transfercase - Advance adapters PN: 50-0408A
4l60e (1993-1996) to FJ60 19 spline split transfercase -Advance Adapters PN: 50-0408
4L80e to FJ60 19 spline split transfercase - Advance Adapters PN: 50-1701
6L80e to FJ60 19 spline split transfercase - Advance Adapters PN: 50-9612
GM NV4500 to FJ60 19 spline split transfercase - Advance Adapters PN 50-0214
LS to Toyota H55f - Advance adapters PN: 713027-EK
From here forward, i will be talking about mating a 4l60e to a split case using the marks/Advance Adapter (they are the same thing). This is a really really good time to buy a transfer case rebuild kit from @orangefj45 or @cruiseroutfit
The adapter piece is pretty straight forward. Youll want to follow the GOD AWFUL instructions in the kit. You basically take off the cone looking output shaft cover from the transmission, measure from the trans to a spot on the output shaft and cut it off. The spud shaft will slide onto the cut output shaft and convert the gm output to toyota. I wont go too much into detail unless you need me to, but here are a few things to remember while you are doing this.
- you can always cut more but you cant add material. Measure a lot before you make the cut.
-Set the spacing for the VSS sensor after installing the smaller hexagon piece. Before installing the larger piece, or else youll have to take it back apart. to set the gap. use feeler gauges for this.
- Know which (toyota) output gear you have (top left gear when looking at all of the gears in the case), and whether or not you will need to use the AA little spacer or not. More than likely... youll need to use their spacer that they provide. I misread the instructions, didnt use it, and nuked my transfer case. When they are talking about the OEM spacer in the instructions, they are not talking about the longer PTO spacer. They are talking about the earlier transfer cases that had a spacer for the oil seal to ride on.
NOTE!!!!!! The top left gear, input gear, in this picture is WRONG. This is what happens when you dont use the spacer if you need to. See how it is so inset to the case body, and the gear isnt perfectly lined up to the idler gear? The input gear will be spaced out slightly from the case and will be flush with the idler gear when its installed correctly. This is what will happen if you dont use the spacer:
This is how it should look:
To assemble the transfer case, follow one of the two videos i posted above. Note, both Georg and otramm use anerobic sealer and not silicone rtv for the case halves. Install the PTO cover last, look inside, there should be NO space on the trans output shaft where your pto spacer is, your thrust washer on your idler shaft should not spin more than 1 or 2 degrees, and you should be able to turn everything by spinning the output of the transfer case.
*** When you are installing the little bracket plate for your transfer case shifter, you will need to make some modifications to it. First youll want to cut the top two mounting ear things off the top of it. Im not really sure what these are for but they are kind of in the way, so I just cut them off of mine so the plate doesnt even make that upper angle and its flat.
If you were to use the 3 supplied spacers in the kit with the bolts to mount it to the side of the adapter, The plate will be spaced out too far. You will notice that the little plastic cube on the bottom of the shifter arm doesnt sit down in the notch on the High/Low shift fork on the transfer case. Here are a few examples:
So as you can see theres like a 5mm gap. Youll want to take your 3 steel spacers and measure 5mm off one of the ends and cut it as straight as humanly possible. Band saw is the right tool for this. Once you cut the 5mm off save the end pieces that you just cut off. Now you will use the allen head bolt, a washer, the small side you cut off, then the plate, and then the longer side of the spacer in that order to mount the mounting plate onto the side of the adapter. This will pull the entire plate in 5mm closer to the side of the adapter. You still need to use both pieces of the spacer though if you want to reuse the bolt that came in the kit, thats why you are putting the smaller one on the outside of the plate and the longer one on the inside. Keeping this smaller piece will still allow you to use the same bolt. If youd rather not use both cut pieces, you can just get a bolt thats 5mm shorter or one that wont bottom out in the threaded hole of the adapter.
So the trick with shortening the steel spacers brings the mounting plate inboard 5mm and at the same time brings that little plastic square thing into sit flush in the shift fork but it messes up the angle and orientation of the shifter on the pivot shaft thing. Think of this shifter arm as a right triangle. To remedy this you need to add 5ish mm to the inside of the shifter arm on the bolt that it pivots onto (the one that bolts into the side of the plate that you bolted to the t case adapter). The easiest way to do this is to use 2 flat 16mm washers and a new wave washer. I only had one 16mm washer on hand so i went 16mm split lock washer > 16mm flat washer > 16mm wave washer > Shifter arm > 16mm wave washer > Smaller washer > then finally the nut. Its a lot of washers and stuff in there but it works flawlessly and takes up the weird misspacing. If you just use flat washers and no wave washers when you tighten the outer bolt it will cinch the arm down and you wont be able to move it.
You should have something like this afterwards:
Its still not perfect vertically, but thats on Advance adapters, they should have mounted the plate down 2-3 mm from where it is supplied in the kit. This advance adapters kit kind of sucks.
Reading the AA directions or looking at the pictures online can be a little daunting but its not that bad. Just make sure you dont make the mistake i did with the spacer and youll be all good.
Once everything is assembled, give it a little bit of time to dry and fill it with gear oil to make sure you dont have any leaks, and its easier to fill while its sitting in your garage. I used redline 75w90. Use whatever brand you like best.
At this point, your motor is ready to be installed into your 60, however your 60 is not ready yet.

Its definitely the 2wd 4l60. You remove the tail cone and the adapter goes there. The 2wd trans output shaft is longer than the 4x4You state to only use 2wd transmission but on the advanced adapter product page it has conflicting information from what you have written.

If you change the output shaft on a 4x4 to a 2wd that would work wouldn’t it? The 2wd rear section of the 4l60e is just a bolt on cone that you are removing anyway; is that correct?Its definitely the 2wd 4l60. You remove the tail cone and the adapter goes there. The 2wd trans output shaft is longer than the 4x4


