
So in hindsight, fab a bracket to adapt to stock one or stick with cable actuated?There was a thick chunk of ice on the part where the cable enters into the cable housing down on the trans. I just chipped it off with a screw driver and it worked fine
Navigation
Install the app
How to install the app on iOS
Follow along with the video below to see how to install our site as a web app on your home screen.
Note: This feature may not be available in some browsers.
More options
Style variation
You are using an out of date browser. It may not display this or other websites correctly.
You should upgrade or use an alternative browser.
You should upgrade or use an alternative browser.
How to LS Swap a FJ60 or FJ62. Quick and dirty guide for regular folks wanting to do an engine swap in their driveway.
- Thread starter dbbowen
- Start date
This site may earn a commission from merchant affiliate
links, including eBay, Amazon, Skimlinks, and others.
- Thread starter
- #262
Lokar has a bracket shifter it’s just rattley. Honestly if you don’t have many snowy days the cable one seems fine. I think snow slushed up on it from doing snow donuts and froze overnight when temps dropped.So in hindsight, fab a bracket to adapt to stock one or stick with cable actuated?
When folks have used PSI for their 60 series LS swap using a pre-loomed kit, was everything spaced and located correctly? Did you have to de-loom and reposition much? I was on PSI website and they offer a builder’s harness that is slick. Basically 15’of wire terminated on one end with all GM connectors needed for engine sensors and PCM of choice, like their pre-loomed kit. Route everything and tuck things neatly were you need and then loom it. Terminations of wiring at the fuse box is where you have some extra work. Prefer to buy the preloomed kit of all fits well. Otherwise think of builders kit.
- Thread starter
- #264
When folks have used PSI for their 60 series LS swap using a pre-loomed kit, was everything spaced and located correctly? Did you have to de-loom and reposition much? I was on PSI website and they offer a builder’s harness that is slick. Basically 15’of wire terminated on one end with all GM connectors needed for engine sensors and PCM of choice, like their pre-loomed kit. Route everything and tuck things neatly were you need and then loom it. Terminations of wiring at the fuse box is where you have some extra work. Prefer to buy the preloomed kit of all fits well. Otherwise think of builders kit.
I think all of the preloomed kits will have extra wiring when you install them into the 60 based on where you mount the computer and fuse box. They have to make it so as many people can install it in many different vehicles so they leave a good bit of excess. You can tuck a bit of it above the bellhousing in the space there though.
FWIW, I just dropped a BP Automotive harness in my 62 and it was pretty darn close for sensor harness lengths, but the main harness back the computer is like 2-3 feet too long.
- Thread starter
- #266
My painless harness was the exact same way. Thats a ton of wires to cut and shorten haha.FWIW, I just dropped a BP Automotive harness in my 62 and it was pretty darn close for sensor harness lengths, but the main harness back the computer is like 2-3 feet too long.
Indeed. I'll probably just tuck them up out of the way.Thats a ton of wires to cut and shorten haha.
- Thread starter
- #268
Thats what i ended up doing with mine.Indeed. I'll probably just tuck them up out of the way.
Any pics?FWIW, I just dropped a BP Automotive harness in my 62 and it was pretty darn close for sensor harness lengths, but the main harness back the computer is like 2-3 feet too long.
Your post 73 describes what the PSI builder harness will be like. I know you used a painless system.Next you are going to want to take your new harness you bought (hopefully unloomed) and install it into the engine bay. This sounds like a pain, but you want to install it 100% onto the motor. Figure out all of your wire routing here. Plug in every single plug onto the motor.
Good place to start is figure out where the left bank and right bank wires are. Then figure out where you want your Injector wires to live. I found if you spin the injectors to face the rear of the vehicle, you can tuck the injector wires in pretty neatly, along with the coil wires. Plug in your TB and MAF on the passenger side, and your ect and alt on the other.
Once this is done you can find where the rest of the wiring will split off behind the intake near the firewall. you will have a ton of room back here, even if you spaced your motor as far back as it will go. This big area is a good place for the main junction of your harness to live, as half of your wiring will go down the bellhousing and towards the back.
Run each side of the harness down each side of the bellhousing for your trans wires, o2, etc on the driver side, and your starter wires, o2, crankshaft position sensor wire, starter solenoid, etc down the passenger side. These you obviously wont need to connect just yet. Once all of these wires are ran to where they need to be, you should have a fuse box just dangling around and your PCM/ECM connector just hanging out. This is now the part where you will find a place for these items to live.
You CAN depin the 30 or so wires from the PCM connector and run it through the firewall and run the computer inside the truck, most harnesses allow extra wiring to do so. This is also a giant pain so more power to you if you do this. You could just open up the hole in the firewall to be large enough to run the pcm connectors through it as well. All of these GM vehicles had the computers in the engine bay so they are safe under there. On the 60 theres a few spots right on the firewall near the back of the fenders on both the driver side and passenger side that is free real estate, as well as along the fenders or if you have ditched your wiper washer bottle, that bracket is pretty easy too.
If you are using a Gen3 motor you will also need to keep in mind you will need to mount the Tac module as well. With your harness mounted, you will see where you have wire length to mount your PCM/Tac Module/ and Fuse box. Mount the Tac module after the PCM as it connects to both the gas pedal and the PCM.
This is just what I did, there are surely other ideas out there but just kinda looking at it this is what I came up with. I didnt want to be able to see the big pcm so i tried my best to hide it. If you dont care you can make brackets or mount it elsewhere.
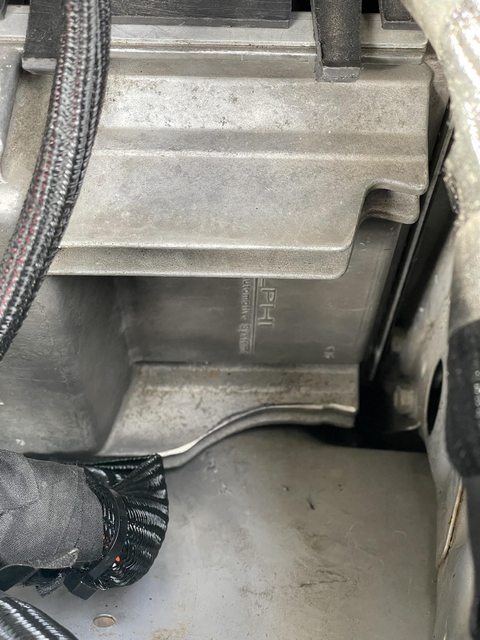
I used NAL-15995679 from summit, which is a stock plastic PCM bracket. I Cut all of the tabs off of the end of it and found 2 existing holes on my firewall and drilled holes into the center of the bracket and counter sunk them and used countersunk allen bolts to mount it to the firewall. Then i trimmed one of the cooling fins to match the radius of the fender so i could shove it even further down into the bottom of the engine bay. Lastly I bent 2 brake lines to give me better access and mounted the PCM under and to the right of the Brake MC. I used the heat shield that is already there for my harness and ran it inside of it and into the back area of the motor behind the intake. You can also drill holes and use rivnuts to mount this if you want to mount it somewhere else. There are also a ton of other ECM/PCM brackets out there. Both aftermarket and factory from a variety of different vehicles. Find the one that you like the best and will allow you to mount. You want the PCM/ECM to be able to be removed in case you need to change wiring on the connector or if for some reason down the road the pcm needs to be replaced.
Doing it this way hides the PCM pretty well and gives me direct access to the hole that was once my Clutch master, which was used to run the cabin wires through. I still need to clean up the wires better, but this is how it sits now. I am thinking about making a cover plate to block off the entire corner so all of it is hidden.
Note* Mounting the PCM here gives you a lot of extra wire on the thick part of the harness that mounts to the pcm. Im too lazy to depin every wire so i just kind of twisted it and kept the slack. You can also see here that i used the old hood hinge bolts to mount my Tac module to the fender here and spaced it out slightly to allow the Gas strut from the hood to pass behind it. I really really dont like the look of all these wires in this corner. Thats a project for down the road.

Clearanced fin on PCM to allow deeper depth installation.
Bent Brake lines and running the harness behind the heat shield for protection. Be careful bending these lines, they are really long and if you break one youre going to have to replace the entire brake line. You can fit a brake line bender in there barely.
You can also see here that I replaced the bad toyota brake wiring connector with a Delphi GT150 connector. While you are in here, its a great time to replace your old dry rotten connectors with MUCH better delphi connectors. They are safer, and have locks on them, and are also more water and weather resistant. Do this on as many plugs as you can

Once you have the PCM mounted where you want it mounted, and make sure you can connect the connections to it, then mount your Tac module somewhere. Most of the kits give you a TON of room on these wires so youll want to use the delphi terminals and your open barrel crump to cut these wires, crimp new ends to them and shorten them once you have the positioning of the tac module good.
Lastly youll mount your fuse box. I didnt want to see this thing either but still needed access to it, so i mounted it low on the fender under my air compressor. You really can mount this anywhere you have the wire length to mount it. Just make sure its not too hidden that you cant access the fuses or get a multimeter onto it. For this just drill holes and put some rivnuts into the sheet metal

This is a part of the swap where you can get creative. Theres no one set way to do it. you can tuck and hide wires, position things so its not in direct eyesight etc. Theres a million ways to mount this stuff. Check out shops and other swaps to see what you like and dont like. Or just wing it like i did. Theres really no wrong way to do it.
Once you have everything mounted where it needs to go, here is where you will take your harness and group stuff together. Use a combination of painters tape and colored zipties to connect wire runs that are travelling to the same area so you can bundle them together, then mark where they split off. This way you can buy less loom and it will look better. Instead of a ton of loomed wires youll have fewer thick ones with smaller branches. For example, you can lump the TB wire and the MAF wire together all the way until they split near the TB, then after that they will get their own loom. You will be looming this on the floor or whatever and not in the truck, so at this point you are trying to get as much info as you can.
Next youll want to mark the wires that are near heat. O2s, starter wires, etc. Anything coming REMOTELY close to your exhaust on either side of the transmission. You are doing this because youll want to buy some insultherm high temp loom for these sections. You can do your entire harness in this stuff but its pretty expensive and its not split so youll have to depin every plug to feed the wires through it. I only did the wires that come close into contact with heat.
Lastly, youll want to start marking wires that are too long on your harness. You want to shorten the wire runs so theres a little bit of slack, but too much slack and wire laying down for no reason looks junky. The reason you 100% connected your harness to where you want it to live is to get the exact lengths of every wire run after you have done your fancy wire routing to hide wires and what not. 90% of the time you are going to be shortening wires, but depending on your routing you might need to lengthen one. Mark all of this stuff now so you can remember to do it on the floor when you are looming it up. You will be using your open barrel crimp tool for this and your delphi GT150 terminal ends. If you want to shortcut it i guess you could cut the wires and then splice the already crimped ends to the shorter wire but with how cheap the delphi terminals are, just do it right and youll never have to touch it again.
When shortening the runs, take a ton of pictures so you remember what color wire goes where in the plug. This will help you a ton.
After all of this is done, you can remove the entire harness from the vehicle and lay it out on your floor. You should have all of your bundled shared runs next to each other and paired off together. Here you will start measuring for what type of loom you are going to need, if your harness didnt come with loom. You will need different sizes so just measure the thickness of the shared runs, and then where they split off for the lengths. After you have your total lengths of loom, add 5 feet to each size just in case for mistakes. Also remember to measure for your Insultherm high temp loom here as well on the pieces you marked that were exposed to heat.
In this photo you can see the grouped wire runs together, the big split on the lower end from the large bundle to the smalller runs on the bottom is the back of the engine by the firewall.

Figure out what type of loom you want to buy for the normal pieces, Split woven loom is pretty cheap, you can get it on summit, or amazon or whatever. Its all the same stuff. This stuff is mostly for abrasion resistance and doesnt have a super high heat tolerance so getting expensive loom for your entire harness is a waste. You can just order it off amazon or ebay and be all good for a quarter of the price of the name brand stuff.
For the high temp stuff, youll want name brand loom like insultherm, fire wrap, or volcano. You can order this stuff by the foot online if you look for it. I got a few samples and the insultherm looked the best. It works kind of like a Chinese finger trap, you push it together and its bigger, pull it apart and its smaller in diameter. Measure your wires accordingly.
When you get the loom, youll want to remove the zip ties from your harness that are holding it together and replace with loom, your own zip ties, and Tessa high temp tape as you go. Dont remove all the zipties at once, this will help it stay organized. You can use the tessa tape on the ends and on the unions of wires to seal the loom better and cover the ends. When you are running junctions in the loom always be sure to overlap your loom by a few inches for the best protection then run the tape over the junction. If you just butt them up together it will slide apart or youll have some exposed wires depending on how you twist it.
Also when you are cutting the split woven loom use very sharp scissors, then hit them with a lighter quickly on the ends to melt the frays. If you hold the lighter there too long it will fray even more. Youll get the hang of it really quickly.
Also, pretty important, do one of these at a time, and when you loom the wires, re tape your wire labels that came on the harness very securely, some of these wires will be pushed through the firewall and if you lose a label it will add time to figure out what is what.
Here is my loom partially loomed up and taped. This was still waiting on the Insultherm and to shorten the super long Tac module wires to the left.

Once the harness is completely loomed, you are ready to install it back into the engine bay for the final time. After doing all of this you can see why you want to get an unloomed harness. It is more work, but you are able to tailor your harness to your engine bay much better than if you had bought a preloomed harness and just threw it in.

- Thread starter
- #271
Theyre all pretty similar since they all use and mirror the oem GM wiring colors thankfully. It makes explaining it all so much easier. The painless one was okay, going with a BP Automotive harness on this swap i am doing currently and interested in comparing themYour post 73 describes what the PSI builder harness will be like. I know you used a painless system.
Couple of quick snapshots. The injector harnesses and the lengthy main harness. BP routes their main harness so it exits the rear of the engine not the driver slide (like it does stock). Maybe they all do that?Any pics?
I purchased the bare harness, i prefer tesa high heat harness tape and high temp split loom. Not in the 40 yet but did test fire engine on the stand. The PSI has no provision for ac fan control that i could find. I think the AC is a can of worms i will dive into later.

- Thread starter
- #274
+1 for high temp Tessa tape. Their interior tape is really nice too. Soft and fuzzyI purchased the bare harness, i prefer tesa high heat harness tape and high temp split loom. Not in the 40 yet but did test fire engine on the stand. The PSI has no provision for ac fan control that i could find. I think the AC is a can of worms i will dive into later.
View attachment 3235527
I'm finishing up a swap with BP. The product is ok, if you want to speak wtih someone about details before ordering, good luck.Theyre all pretty similar since they all use and mirror the oem GM wiring colors thankfully. It makes explaining it all so much easier. The painless one was okay, going with a BP Automotive harness on this swap i am doing currently and interested in comparing them
Had some specific questions because I'm doing an emission legal swap and it was painful with BP. Have a few issues after installation and while I understand the email for communication & tracking, they are awful with aftersale tech support. They constantly point you to the instructions even if the instructions dont address the questions I was asking.
I've used PSI before and will use them in the future.
- Thread starter
- #276
Damn I had no idea. I used painless and they like were almost as interested in my swap as I was. The guy I talked to on the phone called me back the next day to see if I was able to get it figured out hahaI'm finishing up a swap with BP. The product is ok, if you want to speak wtih someone about details before ordering, good luck.
Had some specific questions because I'm doing an emission legal swap and it was painful with BP. Have a few issues after installation and while I understand the email for communication & tracking, they are awful with aftersale tech support. They constantly point you to the instructions even if the instructions dont address the questions I was asking.
I've used PSI before and will use them in the future.
Thank for this. I have access to an LT1 out of a corvette. A buddy owes me some money and hecis offering the motor for payment. The vette is a POS but the motor runs perfectly fine.Ok so you have decided that you are tired of driving in the slow lane with your foot on the floor or getting 9-10 mpg, now what???
This is the first part of your entire build, youll need to do things like budgeting out what you are willing to spend, where you are willing to make some sacrifices, and REALISTICALLY your ending budget. Read through this thread before you get started and create a parts list and make sure you have parts on hand to minimize downtime. Ill try and include as many part numbers as i can.
Doing all of the work yourself with tools you already have, you should expect to spend 7-15K on parts. Dont let this number discourage you. 7-15K is with you buying really nice stuff, replacing a lot of things along the way, and without you selling off your old stuff. This figure is with you purchasing a used motor in good condition. If you plan on ordering a brand new motor, say from GM performance, add about 9K-10K to that number. If you are in California, that might be your only option due to CARB, I dont have any experience with that, and people on here from california will have to chime in on it. I live in the south and dont have emissions, so i eliminated all of the emissions for the most part. This swap can be done for much much cheaper if you reuse your radiator, all of your ac system components, make your own trans crossmember, etc. It really just comes down to how you spend the money and what you spend it on
Once you have come to terms with the reality of the price of the swap, and youve talked your SO into it by telling her how much better fuel economy you will be getting, how much quieter the ride will be, and how much more reliable it will be.... You need to find a motor. But what motor??
So there are a few LS Motors along the years... Lots of engine codes and variants. Yes Vortec motors are LS motors. They are all Pushrod V8s with coil over plug ignition systems and they are all fuel injected with Aluminum cylinder heads. Vortec motors used Iron blocks for a long time, but some of the vortec motors came with aluminum blocks. All of the Car motors were Aluminum blocks for what i can tell. They are all small block motors. There are two different generations of these motors with some advantages and disadvantages to each.
The newest motors are not called LS at all and are called LT motors and are direct injection. This thread wont talk about these because those were out of my budget when i did my swap.
Im not going to go too much into detail on each of these.. you can read on google about the differences.
Car Motors-
-LS1/LS6 - 5.7L Aluminum Block
-LS2 6.0L - Aluminum block (NOT the same as the 6.0L Vortec)
-LS3 - 6.2L Aluminum block. this is the one i wish i could have afforded
-L99 - 6.2L Aluminum block, with Displacement on demand. If you have the money for a L99, buy a LS3
-LS7 - doesnt matter, too expensive
-everything else - I have no clue, all of the other car LS motors cost more than my entire swap so i didnt even bother reading about them.
Truck Motors (what you will more than likely be buying. Much more affordable and plentiful)
[Gen3]
-LR4 - 4.8L Cast iron block higher compression
-LM7(most common)/L59 5.3L Iron block
-LQ4/LQ9 - 6.0L Iron blcok
[Gen4]
-L20/LY2 4.8L Iron block
- LY5/LMF/LMG 5.3L Iron Block
-LC9/LH6/LH8/LH9 5.3L Aluminum
-L76/L77 6.0L Aluminum
-L96/LC8/LY6/ 6.0L Iron
-L92/L9H/L94 6.2L Truck Aluminum - if i had the money i would have gone with one of these. $$$
There are big differences between all of those motors. Besides displacement, they have different heads, different pistons and internals, etc. There is also a Huge freaking price difference between all of those. An aluminum 5.3 is going to cost more than an Iron 5.3. A 6.0 is going to cost more than a 5.3. Aluminum blocks are going to save you some weight right off the bat, but you sure as hell will pay for it. The weight thing kind of doesnt matter as much in a 60 versus say a 240sx. Youll pay for the larger motors too. 6.0 will be much more expensive than 5.3. Aluminum 6.0? Better turn out them pockets son!
There are also going to be different transmissions attached to these motors, most of the 6.0s have 4l80es behind them, most of the older 5.3/4.8 have 4l60es behind them. The newer motors have the 6 and 8 speed transmissions behind them. The most common and easiest automatic to run behind these things is the 4l60e. Its not the strongest transmission out there but on a stock motor will work fine. There was a very rare 5.3 that came with a 4l80e, and all of the larger 6.0 motors had the 4l80. The 4l80 is MUCH stronger than the 4l60e, but much harder to adapt to your stock transfer case. The 6l80e is slightly less strong than the 4l80, but has 2 more gears. If you want a 6speed, the 6l90e is the one you want. You can get the Gen4 computers to talk to the 6L80/6l90 transmissions, but to run them on a gen3 motor youll need to run a standalone harness to adapt it. Its doable, but youll need to set it up in HP Tuners for it to run right.
As far as manuals go, There are people running the stock 4 speed, H55fs, and NV4500s behind these things. I took out a h55f when i did my swap. Personally, I think the first gear on the h55f would be useless and the 5th gear would be pretty short, giving you a pretty high rpm at highway cruise. People do it all the time though and love it. So maybe look into that one. If i was going manual i would do a GM NV4500, if you get the gm one, i believe it bolts to the back of the motor just fine, and has a much deeper 5th gear.
There is a large disparity in price for Gen3 vs Gen 4. Part of this is due to the gen 4s usually having lower miles, a lot of them having aluminum blocks, etc. Gen 3 and gen 4 are not directly interchangeable, but a most of the parts are. The knock sensors, cam sensor and VVT are different, and the shape of the head ports are different. Older trucks use cathedral port heads which are rectangles with triangle points on the top of them, newer use rectangle port. Rectangle port heads flow better.
To be completely honest, buy whatever motor you can afford. You will see NO difference in gen 3 or gen 4 in your 60 besides installation and OBD stuff. No matter what anyone tells you. You could want the newer motor but dont get discouraged if all you can afford is a LM7. After driving a 60 with an aluminum block gen4 5.3, it was just like driving my iron block 5.3, and i paid much less for the motor.
There are also benefits to going gen4. Floating piston pins, improved timing chain, variable valve timing, revised coil packs, and coated piston skirts etc. While those are benefits (especially if you plan on adding boost), to me, the benefits dont outweigh the cons. The Con of going gen4 over Gen 3 is AFM (active fuel management). This is the engine automatically deactivating half of the engines cylinders under light load. They did this by using switching valve lifters and a lifter oil manifold in the lifter valley. These AFM lifters are notorious for failing, and these parts also cause an oil consumption problem. You can turn off AFM in the tune via HP tuners, or if you send off your computer, but your parts are still in the motor. If you plan on going gen4, plan on installing an AFM delete kit before you install it into your 60. Gen 4 ECMs are easier to set up and tune, and can do things like idle up for your AC up and control aftermarket electric fans better. It also can talk to aftermarket gauges better due to its updated OBD language.
Gen 3 has got slightly less power, older tech, you need a matching pedal and Tac module. PCM (engine computer) and Pedal computer (tach module) are separate. Older OBD2 language, harder to get your PCM to control an electric fan and idle up with AC, to name a few.
Quote: @Megadoomer "Great thread. I just did a 5.3 in my Pig and finished it last June. One thing I would add about the Gen3 and Gen4. The Gen4 basically came out in 2004 model years but in 2003 GM has a Late 03 GEN3 motor that is returnless fuel and DBW without AFM or DOD. The other difference I came across was the outer diameter of the cam bearings is larger on the late 03. Something that is good to know if you are going thru the motor like I did. I am not sure if other Vortec sizes have the same change, only worked with my 5.3 from a Silverado."
Big thing here while we are talking about engines. Once you decide on what motor and trans to buy, Make sure you get a COMPLETE engine with all of the accessories, wiring harness, Pedal and tac module if applicable, MAF, etc. As tempting as that cheap motor on FB marketplace looks that just needs heads or whatever, DONT do it. You want a complete motor from a good source.
If you are buying a crate motor from GM Performance, or an EROD motor from them, the motors WILL NOT come with AFM and you will not have to worry about the delete kit or the oil consumption issues. Thanks to @WSOPgold2012 for the info!
Quote:
"Per my GM Rep. The early 5.3L EROD crates and 5.3L had the AFM feature and was removed years ago, due to problems. 5.3L EROD IS NLA...
6.2L LS3, LS3 EROD crate and C&C kits do not have AFM.
Hot cam LS3 crate kits do not have."

- @TRAIL TAILOR
Quote:
"I would change this to, get the most complete engine for the money - a 140K 5.3 complete with working alt, starter, compressor, PS pump, intake for $1K is a lot better then a 70k 5.3 long block for $1500 that you then need to spend $2k in sub-$150 purchases to make usable in a vehicle" - @cruisermatt
If you are in the south east US, a great place to look for used motors is American Pickup and Salvage. Its in Paragould Arkansas. They helped me a lot with my motor and i was able to get a very low mile LM7 and trans for next to nothing.
If anyone has anything to add to this, please feel free. I am by no means an engine expert, these were all just things i took into consideration when buying my motor. This is just kind of a start for people to get people researching the differences between all of them and what to maybe look for.
At the end of the day though, none of this stuff matters. Buy the lowest mileage motor you can get your hands on. 4.8/6.0/5.3 doesnt matter, its all 2-3x the power of the junk you are about to pull out of your truck. Buy the motor to fit your budget. Id rather have a 70K mile LM7 than a 250K mile LS3
You mentioned LTs but said they were out of your budget. How much of a difference is a swap with an LT1 vs LS1,2 or 3? I am 100% novice but would love to do something like this with my kids.
- Thread starter
- #278
Do you know which LT1? Like what year was the corvette? There are 3 different LT1s between 1970 and 2014.Thank for this. I have access to an LT1 out of a corvette. A buddy owes me some money and hecis offering the motor for payment. The vette is a POS but the motor runs perfectly fine.
You mentioned LTs but said they were out of your budget. How much of a difference is a swap with an LT1 vs LS1,2 or 3? I am 100% novice but would love to do something like this with my kids.
87 convertible.Do you know which LT1? Like what year was the corvette? There are 3 different LT1s between 1970 and 2014.
I'm assuming I could NOT use the transmission attached to it, though?Do you know which LT1? Like what year was the corvette? There are 3 different LT1s between 1970 and 2014.