How to LS Swap a FJ60 or FJ62. Quick and dirty guide for regular folks wanting to do an engine swap in their driveway. (3 Viewers)

This site may earn a commission from merchant affiliate
links, including eBay, Amazon, Skimlinks, and others.

Ok back from vacation with a broken finger so these posts might not be as frequent as typing is kind of difficult but ill still get at it.
 
I have friends like you
Hahah I meant that more in splitting the cost of tools. When I was younger and was living with a roommate me and him would split the cost of things like motorcycle tire changing stand, torque wrench’s, floor jacks, tools that we would never both be needing at the same time. If someone’s on a budget splitting and engine hoist/transmission jack with a friend would be a great way to save some money. Then again, if you’re into saving money you probably shouldn’t own a 60.
 
Hahah I meant that more in splitting the cost of tools. When I was younger and was living with a roommate me and him would split the cost of things like motorcycle tire changing stand, torque wrench’s, floor jacks, tools that we would never both be needing at the same time. If someone’s on a budget splitting and engine hoist/transmission jack with a friend would be a great way to save some money. Then again, if you’re into saving money you probably shouldn’t own a 60.
I 100% borrowed my buddies engine hoist for my swap. And Eastwood flare tool. Good to have friends who are down to help!
 
Next is fuel. There are a ton of ways to skin this cat, and the setup is different for gen3 vs gen 4. Gen 3 motors use a fuel pressure regulator that is located on the fuel rail itself. Gen 4 uses an external fuel pressure regulator. Ill do my best to talk about both here.

So the absolute greatest way to do this is to call @orangefj45 or @wardharris and get a long range tank for a fj62, and then put a deatschwerks unversal in tank fuel pump in there. Then run your supply line with a fuel filter using -6 hose or bend you some stainless tubing to take the place of the stock fuel tubing.


In the real world, that whole setup is $$$$ so this is just a way to do it cheaper and simpler. This is what i did in the meantime, but am planning on eventually going with the long range tank with in tank fuel pump. The in tank fuel pump is much quieter and more reliable, but not totally necessary for your swap.


So earlier you removed your supply fuel line when you had the engine out of the truck. Go ahead and remove the brackets for your brake lines and your return line. Save the bolts and everything. Youll notice on the frame where it bends towards the rear there is a lot of empty non threaded holes. You can use rivnuts on these to secure your in line fuel pump. Move your lines around and try to make some room for your fuel pump to be mounted, its pretty obvious where things will want to live. If you mount it here it will be below your tank and wont run dry. I personally like the deatschwerks products over the warlboro stuff, but you can choose to use whatever. The Warlboro stuff has complaints about pressure falling off at higher RPM and the DW pump doesnt. If you have $$$ to spend aeromotive is probably the best fuel pump you can buy. For a stock LS, the DW250IL is plenty for a fuel pump. Its a little noisier but will give you a bit better performance.

Speaking of fuel pumps, you will want to use some rubber isolation on the pump bracket to eliminate some unwanted noise. From your rivnuts you can use these rubber isotors:

amazon link

Those are m6 so obviously use m6 rivnuts. they will isolate the vibration of the fuel pump bracket from your frame rail. Then use the supplied rubber that came with the fuel pump bracket to isolate the fuel pump from the bracket. I also added to my bracket with rubber mastic tape to increase sound dampening. You can mount the fuel filter to the frame rail closer to the front of the truck using an existing threaded hole and also a rivnut on a blank hole. Once this fuel pump bracket and the fuel pump is in place and the fuel filter is in place, you have a base of where to run your fuel lines. You want to come out of your gas tank with regular fuel injection rubber hose, into a pre filter, then into the fuel pump with normal fuel injection hose. From the fuel pump forward is where the high pressure AN hose begins.

You will build these hoses the exact same way you built the trans hoses in the posts above.

For a Gen 3 motor using the stock fuel regulator on the fuel rail you will use a regular high pressure fuel filter after the fuel pump. Then run -6 line all the way up to an adapter on the supply line on the stock fuel rail on the motor.

For the return, use the GM oem fuel return line that was on the motor. You will need to keep the GM return line but cut the metal hose 3 inches from the flex hose. This should give you a quick connect, the black flexible hose, and 3 inches of metal hose to use. With the GM quick connect attached to the fuel rail, attach a rubber fuel injection hose to the metal part of the hose you cut from the oem fuel line on the opposite end, and attach the other end of this rubber line to the stock toyota fuel return hard line that runs along the frame and back into your tank. You can use AN hose and fittings for this if youd like, but this is very low pressure and it is not needed. Worm clamps, or even better breeze clamps are fine for all of the normal rubber fuel injection hose as its low pressure. there is a special tool to remove the GM OEM fuel lines from the fuel rail, they sell them at HF or amazon. Definitley get a set, theyre cheap


Here is a diagram of the fuel supply line i drew out to help visualize it. All of these fittings are -6 in size and if you want to upgrade i would suggest vibrant. These fittings are a place where you can splurge some. Especially on the adapter for the fuel rail and the fitting off the adapter.

Klbx5yAh.jpg


Gen 4 will use a Fuel filter with a fuel pressure regulator built in and will have a return back to the tank from the filter. The Fuel pressure regulator and filter will look like this. The main difference in the line will be that your fuel rail will not have a return. You will need to remove your stock return line, and make a new return line off of this filter back to your tank. This will go in the same spot as the fuel filter for the Gen 3 diagram above.

corvette-style-filterregulator-with-an6-adapter-fittings-514088.jpg


Quote @Megadoomer " in 2003 GM has a Late 03 GEN3 motor that is returnless fuel and DBW without AFM or DOD. "

Here are some pictures from my setup.

Fuel rail. Notice the gen 3 fuel filter regulator on the fuel rail. Also the lower return line is the stock fuel hose modified and the upper is a -6 line with 2 AN fittings.

WcOHSPFl.jpg


ttBmShQl.jpg


Once your hose is built and your filter and pump are mounted you can tighten all of your AN fittings, and reuse the threaded holes in the frame to secure the fuel line with Adel clamps to the frame. You might have to share a bolt with some brake line for some of the brackets. There are plenty of threaded holes under there.


Also, while you are in here you can go ahead and knock out your vacuum hose that will attach to the brake booster. You can use the stock vacuum line fitting that is located on the back of the intake and use some of the old transmission hard line to shove into the plastic vacuum line fitting for the GM intake. I put a bend in the hard line and filed it down some and epoxied it into the plastic. Then you can use a Molded 90* 1969 camaro PCV hose to connect to your brake booster for a clean look. PN: EGP-1792. The trans line and the vacuum port on the brake booster are both the same size so you can just use this hose alone. You can see it in the photo with the fuel lines:

WcOHSPFl.jpg


If you would prefer not to do this vacuum hose for your factory brakes, this is a good time to swap over to Hydroboost brakes. You will need the PS Pump from a 6.0 truck, it will bolt into place. Then (if keeping stock 60 brake calipers) get a smaller bore Hydroboost master. 1 inch would be ideal if you can find it. If you go larger you will need larger brake calipers. I am still going back and forth on swapping to hydroboost personally.


Once you are done with this, check all your AN fittings again to be sure they are tight. This is the one dangerous part of the swap. If you overtighten a fitting or under tighten it at the fuel rail it will drip onto your exhaust. You really want to get this stuff right the first time and double check it after start up and check for smells or leaks. You should never smell any fuel in here.


As far as the Charcoal canister is concerned, I just removed mine completely. I attached normal fuel injection hose from the metal line along the frame rail by the passenger side firewall and ran it up behind my wiper washer bottle and put a 1 way breather valve on it. I have had no issues so far running it this way, and my buddies with LS Swapped 240s havent had any issues doing this either. You could use a fancy ARB breather if you wanted but the cheap dorman ones from Oreiley work just fine. I did have to shim my washer bottle out some from the fender with some washers so it would not kink the hose. You can also see my Fuel return line in this photo as well, both of these hoses are secured to the firewall with adel clamps using existing threaded holes. Ironically, before i removed my charcoal canister, i could never fill my 60 up past 16 gallons when completely empty. I always thought that they had 16 gallon tanks, but after doing this i can fill it up past 20 gallons. Im thinking something was wrong with my charcoal canister or something. I also had a lot of blowback when i opened the gas cap and the gas pump would always overfill out of the hole. Since doing this there is not really any blowback of fumes and the pump doesnt spew gas out of the filler hole anymore. It is hard to see from the photo, but there is DEI heat wrap wrapped around both the return rubber hose and the vent rubber hose down there under that little bracket. I have that running into another heat wrap covering the fuel hoses and wiring near the exhaust. That little section of frame rail gets pretty busy, but with some heat protection youll be all good.


vnSTaYCl.jpg
 
Last edited:
So with no charcoal canister and a vent straight to the gas tank, do you notice an excessive fuel smell?
I havent noticed any at all during normal driving, idling sitting in the truck, or idling the motor and working in the engine bay.
 
At this point you can go ahead and install an intake. There are a ton of ways you can do this. The easiest way would be to just use a silicone coupler from your throttle body to an aluminum tube to a cone filter in the corner of the engine bay. I wasnt too keen on this because its basically pulling in hot dirty air, but if youre fighting time or budget constraints this is an option. This image is from an old bring a trailer sale ad. This is what running a cone filter looks like. Theres a lot going on in this pic haha


1985_toyota_land_cruiser_fj60_1556131965e37a1859M66A8994-620x413-430091.jpg


Another option is to build an aluminum box with a plexiglass or clear plastic lid to enclose the cone filter and have a hole out of the end of it so you can run a snorkel tube to the hole in the front of the truck behind the headlight. Heres an example of that. This is in a friend of mines firstgen 4runner but the idea is the same and the hole behind the headlight is the same. To me personally, this looks a lot cooler than what i did, but if you want easy, its hard to beat the 62/80 series airbox on these things. If i was to do it again with more time, i would build and tig a box like this one up

kiuNiQkl.jpg


Basically you need to have the MAF in line with the intake tube and the filter element. You can kind of get creative with this and make whatever it is you want from simple to crazy.


***Ideally, you are wanting to avoid as many flexy joints, or crazy amount of silicone adapters, or weird plastic tubes. The intake is one of the first thing that the eye is drawn to when you open your hood. Aesthetically, this is just as important as the performance gain of the intake. If you have a cut up plastic intake from some random tahoe in there or a buch of plastic or aluminum tubing with 10 silicone adapters, it may work but it might make your entire swap look bad just based on this one thing alone. Even if this is your first ever LS Swap or Motor swap, there is absolutely no reason you cant make this part look very nice and pleasing to the eye. You are spending a ton of time and money on this swap, might as well make it look awesome


This is what I did, if anyone wants to add their airbox to this it would be greatly appreciated.

FZJ80/FJ60 airbox:

What I did and what i see a lot of people doing is use a FJ62 lower airbox and a FZJ80 (1996-1997) upper airbox lid. The earlier lids have a square outlet on the lid. The lower airbox from the 62 will bolt to the fender of a fj60 and if you are swapping a fj62 anyways youll have this already.

My ultimate dream for this motor and truck is a Garrett G series turbo with the exhaust routed in front of the motor and a PDI intercooler, so this airbox will probably have to go, but for the next few years, this is what im running.

mll2M4al.jpg


The main thing youll have to figure out is how to get the MAF to work with the 80 series airbox lid. The round outlet of the 80 series is smaller than the filter size of the LS MAF which is like 3.5 inches and the other side is like 4 inches.

Youll want to cut the small bracket off of the 80 series lid so its completely round. I tried to drill out the little rivets from the end of the 80 series airbox and it turned into a mess that was barely salvagable. Be warned, theres some glue or something in there as well as the small rivets.

You will notice there is a splitter vane in the 80 series airbox lid that will line up perfectly with the splitter vane of the LS MAF make sure you line these up with each other. From here you can decide how you want to connect these two together. Most people just use silicone intake adapters and call it done. This is super easy and takes up the least amount of time.

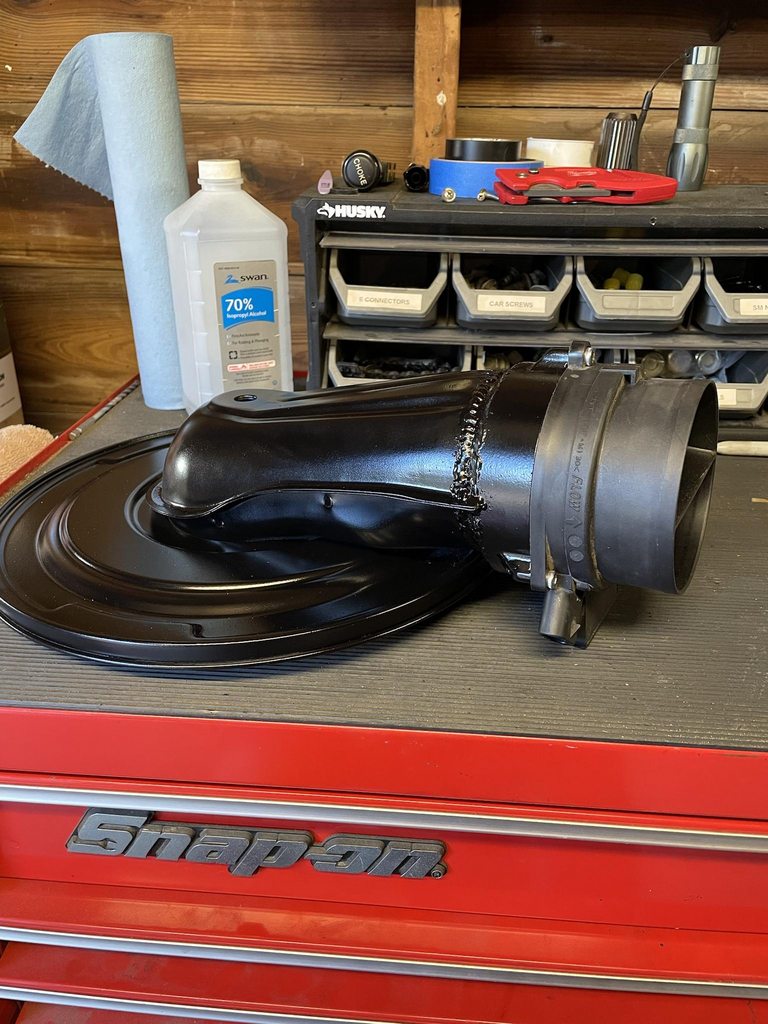
Your other option is to modify the lid to accept the LS MAF as a solid unit. My solution was to get some exhaust tubing and have an exhaust shop open one end out as much as they could, then used a small scrap piece that fit the LS MAF very tightly. I think i had to file the lip of the LS MAF a little to get it to fit. Here is the photo of all the pieces involved.

ZlCQSBGl.jpg


From there the pieces were trimmed down with a band saw to get them to adapt to each other without any extra length. They were then stitch welded together to make one adapter. If you do this be careful because the FJ80 airbox metal is ridiculously thin and you can burn through it with a mig welder very very easily. If i was ever to do this again it would have it TIG welded. Then some steel threaded inserts were welded to the outside and smoothened with a dremel to give the MAF bolt mounting positions.

tV06ilbh.jpg

z6nLqRkh.jpg


After that, I used a 3.5 silicone 60* elbow to mount the MAF to a 2' Mandrel Bent Aluminum 180° Bend, 3.5 diameter" aluminum tube that i cut to aim into a 4 inch to 3.5 silicone reducer. You will need to use t bolt clamps for all of this. Its all available on siliconeintakes.com and i got all of it shipped for like 87 bucks. You will also need to cut a small notch in the 60* silicone adapter so the silicone will but up to the maf square.

The Aluminum comes polished chrome, so if you are not into that you can spray it with wd40 and take a scotchbrite pad to it to do a brushed finish on it, which imo looks WAY better.

This is how the tubing comes from the factory:

aluminum_180_picture.jpg


h6YgQW1l.jpg

7NJk2dfl.jpg

CkvVgael.jpg


qKlTuiEh.jpg


jHFiv2ih.jpg


This is a little overkill but totally doable. The great thing about the 62/80 series airbox thing is that the lid is moves around 360, so if you are wanting to do a different routing for your intake you can. I just did mine this way becasue it followed the line of the fan shroud really well. You could do a much tighter radius bend if you wanted to or even do some cool pie cuts to make it look awesome.


*** On Gen4 LS motors i believe they use a card style MAF sensor and it will be mounted differently. On these you will not have to mount the round MAF to the airbox, but you can use an adapter such as this one, to mount it in line between some of your silicone adapters.

61k8ZuqYeWL._AC_SL1500_.jpg


If you are like me, and do not like a bunch of silicone adapters visible, you can also use one of these weld on flanges to mount it directly to the bottom of your intake tube so it is hidden from sight.

Car-Accessories-Mass-Air-Flow-Sensor-Bung-Billet-Mount-Weld-Flange-MAF-Replacement-for-LS-Engines.jpg_q50.jpg


Lastly, intake of the fj62 airbox or any airbox you build will be in your inner fender. If you have a fj60, and still have your intake hose, or have an intake hose from a fj40 you can connect it to the intake of the airbox, run it on the inside of your fender, and to the hole behind your headlight to pull in cold air from outside of the engine bay, or to a snorkel if thats your kind of thing.

If you dont have this intake hose you can get an oem replacement from @Racer65, or modify a spectre one from oriley to make it work. Either way, this intake hose will definitely pull cooler cleaner air from outside of your engine bay and is worth the extra 10 minutes to install.


Oh also before you do your final install clean your MAF with maf cleaner made by CRC, you can get it at any oriley. Might as well just clean it and get it out of the way
 
Last edited:
Great thread. I just did a 5.3 in my Pig and finished it last June. One thing I would add about the Gen3 and Gen4. The Gen4 basically came out in 2004 model years but in 2003 GM has a Late 03 GEN3 motor that is returnless fuel and DBW without AFM or DOD. The other difference I came across was the outer diameter of the cam bearings is larger on the late 03. Something that is good to know if you are going thru the motor like I did. I am not sure if other Vortec sizes have the same change, only worked with my 5.3 from a Silverado.

I also was pretty surprised at the cost you mention in the first post. I bought a whole motor and rebuilt it and the 4L60e myself and did all the install myself. I dont think I spent more than $4k on the whole thing.

Pic for fun
20210616_212236.jpg
 
The ammocan airbox is officially the coolest airbox ive seen on any vehicle. Thats a super super clean swap. Ill add the gen 3.5 stuff to the links! Thanks for the info!

My swap ended up being pretty high because of Just extra stuff i chose to buy, my radiator was a grand, fancy shifter, i bought a crossmember, motor mounts, ARB compressor, my airbox, full stainless exhaust with magnaflow/vibrant parts, the AA Adapter, replacing my entire AC System with Denso etc. You can definitely get the swap done for MUCH MUCH less money, you are completely right!
 
Last edited:
My swap ended up being pretty high because of Just extra stuff i chose to buy, my radiator was a grand
The ammocan airbox is officially the coolest airbox ive seen on any vehicle. Thats a super super clean swap. Ill add the gen 3.5 stuff to the links! Thanks for the info!
Thank you. I actually got the idea from another Mud member. I will post his name when I can remember it.

I got my radiator from Speedway. They have a nice LS swap series with a steam port adapter that you can get in 2in increments for width and they offer a nice fan shroud kit to match. It was about $300 for all and including the mounting kit. The temp never goes above 195. I defiantly went budget on my build because I was also redoing the Power steering and the front suspension at the same time.
Do you by chance have a link to the radiator and the shroud kit? This is a much better sounding option with what i went with and might save some people some money. Id like to add it to the radiator section if you dont mind. Your truck is really nice to have on the thread because it proves you can save money and still have a great looking swap instead of just throwing money at it like i did
 

Part # 917340

This is what I got. It is a double pass and the single is like $179 or there abouts. At the bottom has the links to the shroud kits. Keep in mind this does not have a trans cooler. I prefer an external anyway. My transmission has been very happy with that setup. Honestly I think the internal inside a radiator actually warms the trans up more than it needs to go.

I got the 26 inch radiator and I was able to fill in the whole space with the core. The 60 might even be able to fit a bigger radiator, not too familiar with them.
20210522_171235.jpg


If I had means to TIG or the time to TIG I would maybe suggest that for better looks, but this setup is working really well.
20210522_171132.jpg


This is with condenser and trans cooler.
20210606_174841.jpg
 

Part # 917340

This is what I got. It is a double pass and the single is like $179 or there abouts. At the bottom has the links to the shroud kits. Keep in mind this does not have a trans cooler. I prefer an external anyway. My transmission has been very happy with that setup. Honestly I think the internal inside a radiator actually warms the trans up more than it needs to go.

I got the 26 inch radiator and I was able to fill in the whole space with the core. The 60 might even be able to fit a bigger radiator, not too familiar with them.
View attachment 2871376

If I had means to TIG or the time to TIG I would maybe suggest that for better looks, but this setup is working really well.
View attachment 2871375


This is with condenser and trans cooler.
View attachment 2871377


Wow that is great! I am going to add that to the radiator link in the thread. That looks great, is functional and a fraction of the price of getting one custom made at a hot rod shop, or paying to have someone pay the hot rod shop to make it haha. If i would have known about that i probably would have gone that route 100%. Thank you for contributing to the thread, its greatly appreciated
 
No problem. I wish I was more organized and did a thread like yours. I did updates in my build thread but not super inclusive and i omitted a lot of the issues and only posted the final items. I have a few spreadsheets of parts I got but I changed directions a few times and didn't up date the list.
 
No problem. I wish I was more organized and did a thread like yours. I did updates in my build thread but not super inclusive and i omitted a lot of the issues and only posted the final items. I have a few spreadsheets of parts I got but I changed directions a few times and didn't up date the list.
Thats why i didnt put a parts list on mine. I must have changed parts like 20 times throughout the 7 weeks that my parts list has stuff that i didnt even use on it. Really wish i did this as i was doing it though, because im operating off of memory alone so its easy to forget stuff.
 

Users who are viewing this thread

Back
Top Bottom