HOW TO: installing a garage door opener into your 80 (1 Viewer)

This site may earn a commission from merchant affiliate
links, including eBay, Amazon, Skimlinks, and others.

if you are going to bother to extend the switch wires, why not mount the board & battery into a small project box or tupperware and put it behind the grill, in front of the radiator. That should give you great range.

As for how to power the board w/ 12v... it depends on how particular the board is, but you could just wire in two 3v leds in series for a total voltage drop of about 12v.
 
Well, this is actually my project for tonight. I got a small plastic box yesterday so I think tonight I will be moving the location to the grill area. Its fine where it is but it could be better. Being as I am going to move it again I am going to just keep the battery in it and no bother with direct wiring it for power.

if you are going to bother to extend the switch wires, why not mount the board & battery into a small project box or tupperware and put it behind the grill, in front of the radiator. That should give you great range.

As for how to power the board w/ 12v... it depends on how particular the board is, but you could just wire in two 3v leds in series for a total voltage drop of about 12v.
 
:clap::clap:this is probably the coolest and easiest mod I have seen. I already went to Home Depot and bought a spare opener and a momentary on switch that fits perfectly in the spare hole right below my key....tested it out...and just need to solder it and mount it.
 
Now you have the two wires that are there for the light. I really want to get the light to work with the dash lights. So I am assuming that just one wire to ground and the other tied into the dash light switch should suffice. Anyone else have a better idea?

Okay, even though you bought that 60 out from underneath me, I'll help you out.:D

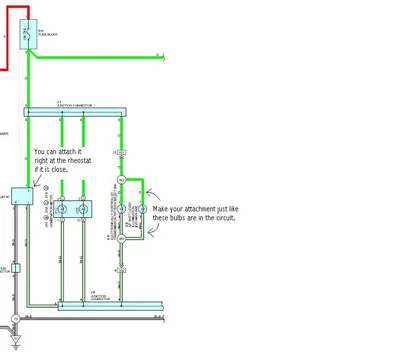
Don't wire it the way you talked about above. Here's an excert from the EWD:
Interior lamps.jpg

It should be fairly straightforward. You can use Scotchlocks or strip, solder, & heat shrink, that's been discussed elsewhere.:bounce::bounce2:
Interior lamps.jpg
 
Haha sorry about that. As soon as 450DUDE put the listing up I had already emailed and spoke to Zach. Its going to a good home, I promise! :beer::beer:

Okay, even though you bought that 60 out from underneath me, I'll help you out.:D
 
So I am just connecting the T and L pins on the rheostat? Looks easy enough. And yes, it's literally right next to it.
 
Haha sorry about that. As soon as 450DUDE put the listing up I had already emailed and spoke to Zach. Its going to a good home, I promise! :beer::beer:
You must have got to him first and seemed a sure thing, 'cause he never replied to me. I'll keep looking for another deal like that.

So I am just connecting the T and L pins on the rheostat? Looks easy enough. And yes, it's literally right next to it.

All other lights in that circuit are wired that way, with power from the "tail" fuse and ground controlled by the rheostat.
 
*****UPDATE******

Sooo, I started messing around with this thing some more because I was really unhappy with the decreased range AND it was intermittently cutting out and only giving a 10ft range. Basically meaning I had to be next to the door before it would open.

Because as it takes literally 3 minutes to remove the plastic trim, I decided to take the switch out and perhaps change its location. I thought about moving it above the rearview mirror but I really didn't want to deal with the headliner.

So instead I bought a really cheap project box my local electronics store. I did NOT want to use the opener case it came in because I didn't want it recognized.

So I took the first switch I made and took it back apart. This time running two 18 gauge wires to the front grill of the truck. I used Molex connectors on the switch to make it easily removable. I then soldered the two wires to the board again. It doesn't matter which wire goes where, all you are doing is completing the circuit.

Once it was soldered I used double-sided foam tape to stick the opener to the inside of the project box. I then used an alcohol pad and clean off the side of the driver's side headlight housing (it was flat) and used double stick tape to attack the project box to the headlight housing. I decided to use double-sided tape because I would be replacing a battery only once every year or so. But you can come up with your own attachment solution.
board_wired.jpg
opener_mounted_box.jpg
 
Once that was dine and tested, I then decided that it really didnt matter that there was a house icon on the switch because the truck is always garaged AND the remote is hidden. I will do up a quick HOW TO for relabeling the switches and stick the link here.

Sorry about the crappy photos. :flipoff2:

OK, now the pic of the house switch is seriously cool. That clinches it. I am selling my house and getting one with a garage to open via the switch I will fab, label and relocate.

This LC fetish is getting expensive...
 
What a coincidence as I installed the homelink option from a 2000 LX470 into my 1998 LC100 just yesterday. It took me a screwdriver, a wire stripper, some black tape and about 15 minutes and it looks like it came that way from the factory. Since there is no power molex connector as it was never an option in 1998, i just tapped into the overhead light switches which have constant power. Works like a charm and it's hooked right into the car battery so it never goes dead.

Greg
 
I guess I should clarify, I ordered 2pin and 4pin Molex connectors off the internet to use for such jobs.
 
What a coincidence as I installed the homelink option from a 2000 LX470 into my 1998 LC100 just yesterday. It took me a screwdriver, a wire stripper, some black tape and about 15 minutes and it looks like it came that way from the factory. Since there is no power molex connector as it was never an option in 1998, i just tapped into the overhead light switches which have constant power. Works like a charm and it's hooked right into the car battery so it never goes dead.

Greg

Pics?
 
You can pop the center square of the switch out. It is small and thin clear plastic. You can scrape the paint off and apply a reversed decal to the inside of it. Then use model cement to put it back in place. I did this to a couple of switches on my 80. Any sign shop can print the vinyl for you. They cut the letters out on black vinyl. Then I got lazy and just started using print at home CD labels and sticking them on top. For my winch I used the power antenna switch, in and out instead of up and down. with a hazard switch being used to arm it. These are especially nice on 91s-94s to the left of the wheel. On the 95-97s or an alternate place on a 91-94s is to use a 4Runner rear window switch. It is the small rectangular switch.

Unfortunately, Toyota changed the switch design for later Tacos, 100s, and FJ Cruisers and the switch is actually injected with white and black plastic. I've found no way to relabel the switch and still have the light work. Right now my driving lights are hooked up to a Toyota 4Runner DAC (downhill tranny control) switch.
 
Is this in the FAQ yet?
 
Haha, I'm not worthy!

:flipoff2:


Actually I've noticed there are a bunch of things that should really be in the FAQs that never make its way. :meh:

80 Series Registry took some pushing before it made it's way to a sticky...

This belongs in the same section as Nakman's underhood grill. :hillbilly:

Besides, this is an awesome mod. I just did it this morning. :D
 
80 Series Registry took some pushing before it made it's way to a sticky...

This belongs in the same section as Nakman's underhood grill. :hillbilly:

Besides, this is an awesome mod. I just did it this morning. :D

But by that logic then so would LX450LANDCRUISER's tailgate/stove mod :D


Or it could be we're not in the circle of trust :flipoff2:
 
LX450LANDCRUISER's tailgate/stove mod
That belongs in there, too. But it's not finished yet.

PM Romer, see if he'll add it.

BTW, I made the first quote in the car audio section. :flipoff2:
 

Users who are viewing this thread

Back
Top Bottom