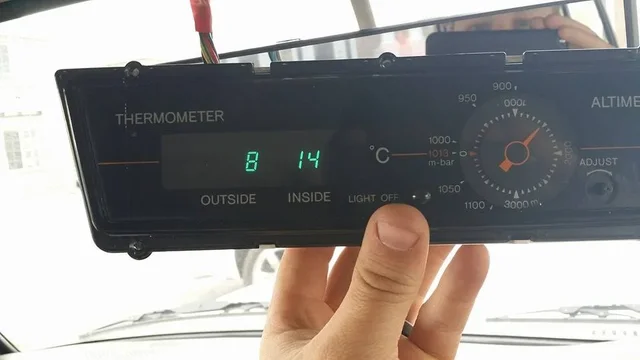
HJ61 in/out temperature gauge repair (1 Viewer)

This site may earn a commission from merchant affiliate
links, including eBay, Amazon, Skimlinks, and others.

The mounting points for the console are in the front besides the mirror(2 holes).You can feel them through the headliner.The two rear mounting points don't exist because there is no plate behind the headliner.So i decided to make my own.
First i carefully folded away the window rubber and started cutting the headliner where it sits under the rubber so after folding the rubber back in it's place you will not see any damage on the headliner.
Then i carefully started pulling out the headliner until i had a small gap.The idea was to slide a plate through the gap up under the headliner so i could use the console's 2 rear mounting points.Measured and made a cardboard test piece until i was happy with the results.Then i made a plate on the waterjet and bended it with the brake press.(its helps to have some machines at work).
DSC05321.JPG

Once that was done it was time to put it under the headliner and screw it in place.
I used the 2 mirror screwpoints for the obround holes so that give me some real stability.Then i marked out the rear holes and drilled and threaded them.Connected the wiring and put the console in it's place
DSC05325.JPG

Then it was time to connect the altimeter to the existing wiring.And installing the wiring for the outside temp sensor.I connected the inside sensor to the multicable and let it sitt behind the dashgauges for easy access.The outside temp sensor got it's place on the left side frame rails behind the bull bar
DSC05328.JPG
 
The sensor needed some protection so i made a 2mm Stainless bracket and mounted the NTC in a rubber grommet.
DSC05352.JPG

Here you can see it sitting in it's protective cage
DSC05353.JPG
 
The 24Volt plus was connected to the same fuse as the cigarette lighter and clock.The blue wire was connected to the headlight fuse so the temp indicators on the display would dim when switching on the headlights.That worked ,so it was time for maplights,which i could connect easy with help off the original wiring loom from a high roof model.
DSC05334.JPG

In the mean time i had decided to use the sliding roof switch as a extra central lock door switch.So this switch got connected to the central locking circuit and now i could open and close all doors from 2 positions.The original lock unlock switch on the door panel and the roof switch.
DSC05335.JPG

The only thing left to do is cutting the sunvisors because these are to long,if i will not find a pair OEM sunvisors made to go with the altimeter.Toyota doesn't sell them anymore sadly.
That's it, hope you liked the writeup.
 
sved,

That is some fantastic electrical work along with some very nice fabrication. Hats off to you for completing your project. I recently tried to get my temp display to work. I removed the console and tried to find any obvious signs of poor solders etc. Unfortunately I couldn't get it to work again. When I first bought the vehicle (1989 HJ 61) it would occasionally flicker and periodically display a temp value. I am hoping to get it functioning once again. Thanks for the well documented project.
 
Thanks ,it was a fun project especially the wiring in the A-pillar :bang::censor::censor::crybaby: but it worked out.:rainbow:Needed to rip out heaterducting and fusebox to get access to the wiring in the A-pillar.
Like i mentioned now i need the sunvisors.Do 80 series sunvisors,the ones that go with the overhead console, fit in a 60 series.??Anybody done that?.My sunvisors look like new,so i'm a little hesitating to cut them up.
 
Sved

Excellent write up and I'm glad that everything worked ok:D So if I come across another one, I might have a go at it.

:cheers: Spudman
 
Thanks Spud
You know what to do now,just follow my instructions;):cheers:
 
Thanks ,it was a fun project especially the wiring in the A-pillar :bang::censor::censor::crybaby: but it worked out.:rainbow:Needed to rip out heaterducting and fusebox to get access to the wiring in the A-pillar.
Like i mentioned now i need the sunvisors.Do 80 series sunvisors,the ones that go with the overhead console, fit in a 60 series.??Anybody done that?.My sunvisors look like new,so i'm a little hesitating to cut them up.

Hey Sved

I don't know how many wrecked cruisers you get over there, but I reckon either the sun visors out of a a 100 pr 200 series would work as both have the roof console in them.

If you want let me know the size you need and I'll measure the ones in my 200 series, but I'm not going to let you have mine :bang::grinpimp:

:cheers: Spudman
 
Spud, the sunvisors need to have the following dimensions,
From center mountingpoint to the point where i have to cut them.
DSC05358.JPG

DSC05357.JPG

Then they also have to match up with the other mountingpoint at 37,5 cm and maximum lenght is 41,5 cm measured from the first hingepoint.
So i don't know if there are some compatible landcruiser sunvisors which will fit these demands.
But if you can measure yours in the 200 then at least i will have one to compare.80 and 70 series maybe fitt,but i don't know if they all have the same mounting/hinging plate where the 2 screws go in.(first picture)
Interesting to know what would fit or not.Best would be OEM sunvisors from a JDM 61 but i haven't come across those yet.

Greetings
 
Spud, the sunvisors need to have the following dimensions,
From center mountingpoint to the point where i have to cut them.
View attachment 879918
View attachment 879919
Then they also have to match up with the other mountingpoint at 37,5 cm and maximum lenght is 41,5 cm measured from the first hingepoint.
So i don't know if there are some compatible landcruiser sunvisors which will fit these demands.
But if you can measure yours in the 200 then at least i will have one to compare.80 and 70 series maybe fitt,but i don't know if they all have the same mounting/hinging plate where the 2 screws go in.(first picture)
Interesting to know what would fit or not.Best would be OEM sunvisors from a JDM 61 but i haven't come across those yet.

No worries mate, I will have a look tomorrow and let you know.

:cheers: Spudman

Greetings
 
Hey Sved

Sorry about the delay mate. My visors are 450mm in length and the fittings look like this

09261be20feecbf7a25a626a91051246_zpsc14c8135.jpg

3c796080fb080fd795330372cb4901f4_zpsf15b2ebe.jpg


Hope that helps, let me know if you need more info

:cheers: Spudman
 
Hey Sved

Yeah that looks easy enough, best of luck mate.

:cheers: Spudman
 
Thanks to this thread I fixed my gauge! I had the sensors, the lights were just dim. I wiggled the wires and they would come on. So I found the buggered capacitor and bent it back into place and TADA!!!!!!!!! Works.

Now if I could just figure out what the Celsius to Fahrenheit conversion was ;)
Fixed Temp.jpg
 
"The idea was to slide a plate through the gap up under the headliner so i could use the console's 2 rear mounting points."

Hi Sved - thanks for pointing me to this thread, and the work you did. Now I have pretty good confidence that I can install the overhead console into my fj60. Question for you about the plate you made for the rear two mounting points. How secure is it - for example - does the console vibrate or bounce on bumpy roads?
 
Hi,the plate itself is fixed at the back to the inside of the roof with '3M dual lock' tape.It has been there for two years now without any isues.

Did you score a 12V or 24V version altimeter? you can see a voltage stamp on the backside.

 3M™ Dual Lock™ Reclosable Fasteners
 
Hi,the plate itself is fixed at the back to the inside of the roof with '3M dual lock' tape.It has been there for two years now without any isues.

Did you score a 12V or 24V version altimeter? you can see a voltage stamp on the backside.

3M™ Dual Lock™ Reclosable Fasteners

Thanks for the link to that fastener. I found a 24v model, so I was thinking of using a voltage converter. Maybe something like this...https://www.amazon.com/SMAKN®-Conve..._SR160,160_&psc=1&refRID=3C1KA1HB57GKSNYZGW1P
 
That voltage converter will certainly work for the main temp display function.The only problem with that converter is that you can't connect 2 different inputs(12V) at the same time.You need an extra 24v output for the dimmer function(night driving) of the display.If you choose not to use the dimmer function,it will be fine.
The bulbs in the map lights can be changed to 12V bulbs or LED (BA9S).
 

Users who are viewing this thread

Back
Top Bottom