Builds HJ45 Cab On HZJ80 Chassis (1 Viewer)

This site may earn a commission from merchant affiliate
links, including eBay, Amazon, Skimlinks, and others.

Looking good Shadow, gotta love v8's :), wicked idea moving the firewall forward. More room in the cab is always an improvement! Have you thought about starting a build thread? Would be nice to see how your build-up goes mate.
 
Looking good Shadow, gotta love v8's :), wicked idea moving the firewall forward. More room in the cab is always an improvement! Have you thought about starting a build thread? Would be nice to see how your build-up goes mate.

I agree, please start another thread so I can piss off my IT guy here at the office. He is getting tired of replacing my keyboard.

I tell them to get me a waterproof one, with all the drooling and all.
 
Hey g'day mate, love your build! I'm just down the road at kambalda and I have a 84 fj45 with a 1hz and 5 speed in that I'm about to put on a 80 chassis. Would love to check yours out at some stage. Where do you work?
null_zps8e270ad7.jpg

null_zps8ae0b658.jpg
 
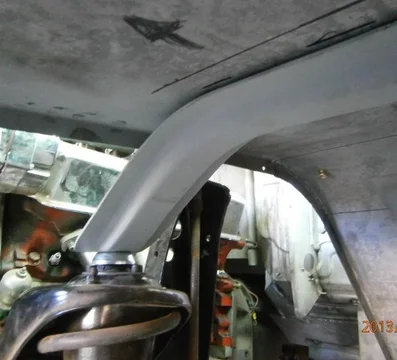
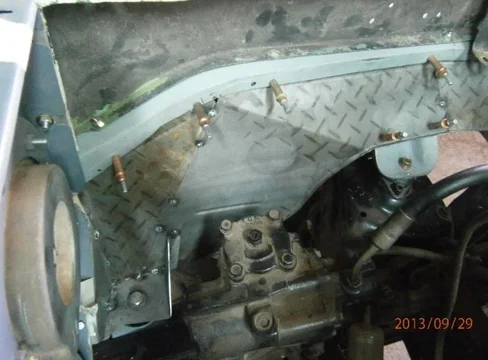
Update! Finally have some time to work on the beast this weekend and have made a bit of progress today. As per my original plan, I have decided to mount the mudguard to the top of the coil tower using a rubber flanged mount I sourced from Mackay rubber. I had hand formed a pair of front guard braces that would have fitted the 45's chassis. I modified them substantially to fit the new mounting location. I did intend to take photos of this modification but before I knew it, I had them modified, sandblasted bare and primed ready to go.
Front Guard Mount 1.webp
Front Guard Mount 2.webp
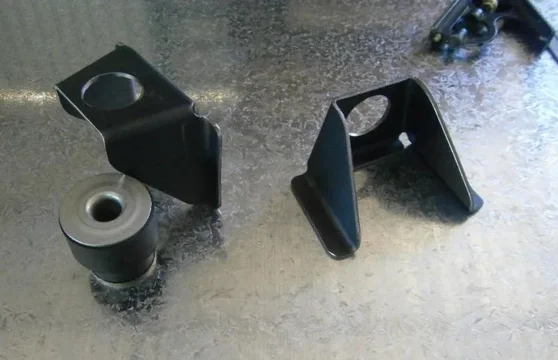
After mounting the guard brace, I looked at the fitment of the radiator and I have decided that another two cab mounts will be welded to help support the radiator and inner guard. I reckon this will help to stabilise the entire front end also (apron, guards, etc.) As always, I will hand form these mounts which will hopefully look just like the rest of the mounting points on the chassis. I started with 2 pieces of 3mm hot-rolled, marked them out, notched and punched the rubber mounting hole. With the help of the workshop's press brake, I folded the sides up the same configuration as the original ones are. For the rubber retaining sleeve, I swaged a piece of 1.6mm tube outwards and welded it to the mount to give it a factory like-look.
Front Chassis Mount 1.webp
Front Chassis Mount 2.webp
Front Chassis Mount 4.webp
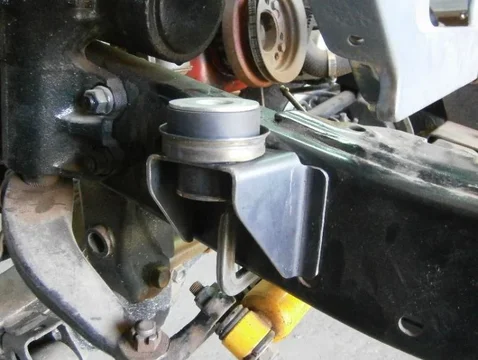
This is the basic position the mount will be welded in. This particular spot still allows for access to the chassis cleaning/inspection slot. This will be in line with the radiator's mounting channel and should prove to be quite solid. The particular rubber mount is the same holden hq-wb that is utilised under the cab and tray. The next step is obviously to tack the mounts to the chassis, then sort-out the inner guards and radiator support frame. More work will be done tomorrow, stay tuned.....

Front Guard Mount 1.webp


Front Guard Mount 2.webp


Front Chassis Mount 1.webp


Front Chassis Mount 2.webp


Front Chassis Mount 4.webp
 
Another day spent on the cruiser, another couple of things done. I sandblasted and primed both chassis mounts and tacked them to the chassis. These will be fully welded at the same time as the engine and transmission mounts. The position of the mounts are mostly governed by the placement of the radiator. The radiator's mounting brace will be bolted here at the bottom and will most likely feature a diagonal support that will mount to the inner guard, more on that when the time comes. For now, here is a photo of the mount tacked in.
Front Chassis Mount 5.webp
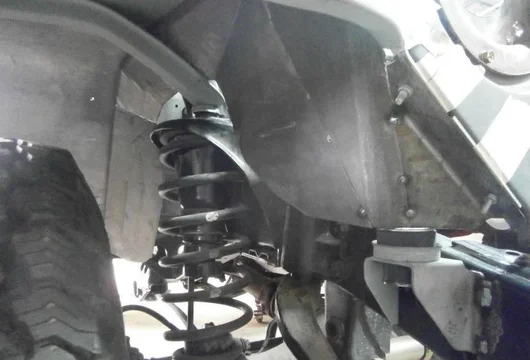
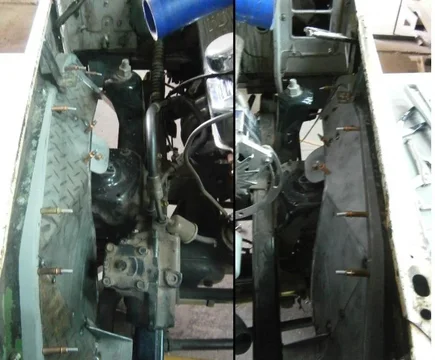
After tacking the mount on, I decided to set my mind on fabricating an inner guard. I find that with making something in position from scratch, I need to form it in pieces, rather than try and make it from a single part. This situation is a perfect example. So, with a bit of hammer and dolly work, I came up with this out of 1.2mm zincanneal. Sort of hard to photo, but here goes
Front Inner Guard 1.webp
Front Inner Guard 2.webp
Front Inner Guard 3.webp
The actual mounting flange is made from 2mm that will be fully welded to the inner guard later, with the rest of the seams. Eventually, the inner guard will have a rubber skirt clipped to it. I only got around to making the drivers side today, but tomorrow I will hopefully get the passenger side done. As Always, stay tuned!

Front Chassis Mount 5.webp


Front Inner Guard 1.webp


Front Inner Guard 2.webp


Front Inner Guard 3.webp
 
I really appreciate you posting pictures of your incredible work. This journey is exciting to watch, and I am in awe of your work.

How do you bend that 1/4 steel plate you made the radiator mount with?
 
Cheers 2fpower, the mounts are made from 3mm-1/8 actually and I folded them in the little 60ton press brake I have at work. I measured the original rear mount and its folded out of 3mm, if I didn't have access to a press though I would have make them out of 1/4 and welded the pieces together. I will upload photos later of the passenger side inner guard and radiator support channel I started to make yesterday.
 
Another Weekend down, didn't have as much time to play with the cruiser as last weekend, but still made some progress. I tacked together the passenger side inner guard and its mostly ready for welding. I will most likely spot weld the inner guard to the outer mudguard and run a bead of sikaflex prior to spraying the inside of the guard with stone chip/body deadener. Heres what they look like opposite each other.
Front Inner Guard 4.webp
With them tacked together, I turned my attention to the radiator's support frame. For this I chose to use 2mm zincanneal, mainly because it has an electro-coating that once painted should help it withstand coolant and water for quite a while. For the base of the radiator frame, I folded the 2mm in a channel with the radiator's mounts locating in the web of the channel through 2 rubbers. The radiator frame is bolted to the chassis through the same rubber mount that the inner guard is. I am using a standard Holden V8 VN radiator to cool the v8, this is probably the best fit for this situation as the radiator is about the biggest one I can see fitting without modifying tanks or core.
Rad Mount 0.webp
Rad Mount 1.webp
Rad Mount 2.webp
I folded some 2mm in a "Z" shape to help support the top mounts of the radiator. I will need to use two diagonal supports mounted to the inner guards to help make the radiator mount a little bit more solid. I will add photos of the bracing as I fab them. With the radiator mounted so close to the front apron, I will probably fab something that will cover the top portion of the rad. I reckon that a mesh panel will also be on the cards to stop any nasties trying to pierce the rad. Anyway, as usual, cheers for watching, stay tuned for more.....

Front Inner Guard 4.webp


Rad Mount 0.webp


Rad Mount 1.webp


Rad Mount 2.webp
 
Update, once again I find myself busy with other things that are taking up quality build time. I did have a chance this weekend to get my brand new aluminium radiator mounted in its cradle. It is a VN/VP holden 5litre radiator which should prove plenty for the 253 at this stage. The radiator support frame itself was fabricated with simplicity in mind. So if I needed to I could use a different radiator and just make the supporting bracket/channels again.
Rad mount 3.webp
The slots in the base are for water/coolant to escape, the holes in the side are just for fun really.:D
Rad mount 4.webp
Rad mount 5.webp
The size of the radiator, and the position of steering box unfortunately limits the location of the radiator to sit above the chassis rails and close to the front apron. I does however have about 1-2" of clearance from the rad cap to the underside of the bonnet. I will most likely mount the power steering oil cooler and filter underneath the radiator. I will eventually form up some 1.6-2mm aluminium sheet to make a shroud and mount for my 250watt 16" thermo pull fan to mount to. The shroud will most likely go over the top of the rad and bolt to the front apron, which will direct the air through a mesh panel in front of the core to catch bugs. I am also thinking of making a polished stainless steel grill to fit inside the bezel but more on that when I get there I suppose. Anyway, it might be a couple of weeks before I get stuck in again, until then, stay tuned!:cheers:

Rad mount 3.webp


Rad mount 4.webp


Rad mount 5.webp
 
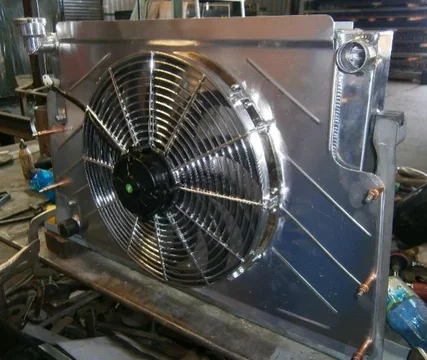
Update time! Well, after a few more weeks passing and not much getting done, I have finally found space and time to work on the beast. Today I formed up an aluminium thermofan shroud/mount for my alu radiator. For this, I chose 1.6 flat aluminium as I wanted to have a few beads rolled in it for strength. I could have used propeller or checker-plate but I think they look a bit too agricultural inside this engine bay. I will put a rubber/foam seal between the shroud and radiator so they don't rub and to make the fan be a little bit more effective when drawing air through.
Radiator Shroud 1.webp
Radiator Shroud 2.webp
Radiator Shroud 3.webp
The thermofan is a 16" 250watt 12v one I bought off ebay cheap, I chose chrome for laughs really, black one was the same price, I thought why not? At this stage I don't know if I will coat the shroud gloss black or leave it grained-finish. The fan shroud will also bolt to another section I will make, to cover the top of the radiator-to-front apron gap and may be a mount for some type of bonnet lock/latch system I am yet to finalise. Until next time, stay tuned!

Radiator Shroud 1.webp


Radiator Shroud 2.webp


Radiator Shroud 3.webp
 
Very nice! That looks great!
 
Once again, Cheers for the encouragement! Today I had a couple of hours up my sleeve, so I decided to continue with the radiator's shroud. After installing I decided to fold a safety-edge type strengthening rib at the top of the shroud. I used a press-brake and added a single piece of 1.6 mm aluminium welding wire to the inside of the fold to give it more of a radius. The area where the top of the shroud touches the radiator will have a piece of rubber to help seal the top and reduce any rubbing.
Radiator Shroud 4.webp
I also had the chance to form up the section which is between the front apron and radiator. Again, I used 1.6mm aluminium for this which I bead rolled, punched and folded to suit the gap. I intend to use button-head hex bolts for this little section, I think it will look nice!
Radiator Shroud 5.webp
Radiator Shroud 6.webp
I am utilizing the apron's mesh panel mounts for the front section to bolt to, of which I will have a fly/bug screen attached to, hopefully hidden from plain view. I will paint both the front aluminium section and the mesh panel black. The front aluminium section will have part of the mesh panel behind it also. Anyway, until next time I guess, :cheers:

Radiator Shroud 4.webp


Radiator Shroud 5.webp


Radiator Shroud 6.webp
 
That shroud design looks great but will perform bad.

I have a mate who made a shroud like that on his radiator and it was worse than no shroud because it basically just blocks the radiator except where the hole for the fan is.

We found you needed at minimum 20mm between the shroud and radiator otherwise you stop the flow through that section of the radiator.

He had no room for this so we just mounted a SPAL fan with a gasket on some strong tabs and it actually worked alot better particularly at highway speeds where it was overheating with the shroud
 
Cheers for the advice Shadow, the fan at the moment sits about 20mm off the core. I reckon if it gives me grief later on I will just fab a new one or punch some holes in the corners. I have also been told that the airflow coming through the front is just as important to be almost sealed into going through the core rather than hitting and flowing around the entire rad. I'll let you all know how it goes anyway:cheers:
 
ok it looks alot closer in photos, 20mm might be enough to work well. My friend had no room for even a 20mm space on his truck.
 
Yeah, the core is kinda offset to the tanks by about 15mm and the shroud sits 5mm off that again, I'm not too worried to be perfectly honest. Its all a learning curve mate, I don't mean to sound like I'm being rude or anything like that, any advice is welcome here!
 

Users who are viewing this thread

Back
Top Bottom