I've seen this is in person and the skill level of this bloke is unreal! And was kind enough to rebuild my factory wellbody tailgate for my hzj45. Thanks again rocket! Oh and when I say rebuild he literally did. I just thought he was going to straiten it out a bit but boy was I wrong! Don't mind if you throw a pic up rod 
Navigation
Install the app
How to install the app on iOS
Follow along with the video below to see how to install our site as a web app on your home screen.
Note: This feature may not be available in some browsers.
More options
Style variation
You are using an out of date browser. It may not display this or other websites correctly.
You should upgrade or use an alternative browser.
You should upgrade or use an alternative browser.
Builds HJ45 Cab On HZJ80 Chassis
- Thread starter RocketIron45
- Start date
This site may earn a commission from merchant affiliate
links, including eBay, Amazon, Skimlinks, and others.
More options
Who Replied?- Thread starter
- #142
Hey, cheers HZJ45, I do try! Anyhoo, I spent most of this weekend working on HZJ45's style side tailgate and didn't really do much to my 45 but that's ok, I need to make plans for the next part of the build anyway. HZJ45 is putting a style side tray on his 45 and the tailgates he had were both original but quite beaten up. Due to the rarity of this type of tray in good condition and even more rare still, the tailgate in good nick, a rebuild is the only option. The original plan was for me to hammer the dents and repair the broken parts.


As always once I started to clean it up, I found more reasons to entirely replace sections that were bent rather than persist with a hammer. Firstly, I cut the side pressings, top pressing, centre channel bracing and then set to work straightening the centre skin as its hard life was still showing! After a bit of hammer work I put it through the English wheel to smooth it out. With the panel nicer, it was just a matter of welding the outside sections to the panel and re-weld some other parts (tie-down hooks,etc) before final assembly the lower channel had received a spray of rust convertor and all join surfaces had rust convertor and galvanic primer coat to deter rust formation.


A few spots were primed where it would be difficult to coat afterwards as well. With that done, next weekend I should be able to take another step forward on the cruiser's build, Until then thanks for watching, Stay tuned!


As always once I started to clean it up, I found more reasons to entirely replace sections that were bent rather than persist with a hammer. Firstly, I cut the side pressings, top pressing, centre channel bracing and then set to work straightening the centre skin as its hard life was still showing! After a bit of hammer work I put it through the English wheel to smooth it out. With the panel nicer, it was just a matter of welding the outside sections to the panel and re-weld some other parts (tie-down hooks,etc) before final assembly the lower channel had received a spray of rust convertor and all join surfaces had rust convertor and galvanic primer coat to deter rust formation.


A few spots were primed where it would be difficult to coat afterwards as well. With that done, next weekend I should be able to take another step forward on the cruiser's build, Until then thanks for watching, Stay tuned!

Legend! Feel terrible about slowing your build down though. Thanks again rocket 
Legend! Feel terrible about slowing your build down though. Thanks again rocket
No you don't
Masterful work Rocket!
- Thread starter
- #145
Well, its been a while since my last update, mainly because other things have had my attention and the cruiser had to stay dormant. That's about to change shortly, as I will hopefully get stuck in again this week. For now though, my latest addition to the cruiser has been a couple of radiator support braces. I decided to make these as simple as possible so they didn't look too out of place. I was tempted to make them from stainless tube with internal threads to make them adjustable. I eventually steered away from this after deciding that wasn't necessary. I made them from 1.6mm #304 stainless, folded them in the workshop's 60t press brake, polished them for laughs and this is how they ended up after some careful hammering of the ends.
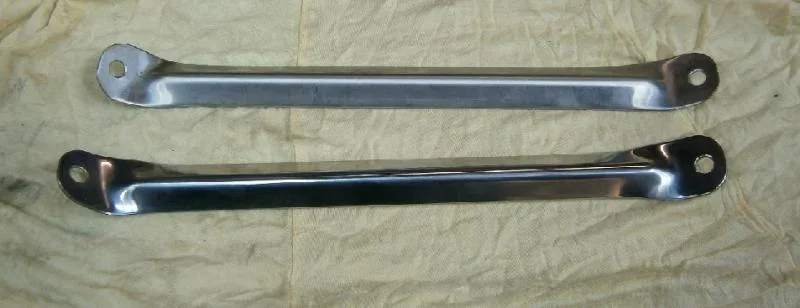


I mounted them to the top of the radiator support frame and to the inner guard. The inner guard has compensation plates added on the wheel side where the bolt goes through. As the inner guards and radiator support is rubber mounted to the chassis, I don't believe there will be much problem with this being too rigid. Time will tell I guess, anyhoo, hopefully I will have more photos and more updates as the weeks go by, until then, stay tuned


I mounted them to the top of the radiator support frame and to the inner guard. The inner guard has compensation plates added on the wheel side where the bolt goes through. As the inner guards and radiator support is rubber mounted to the chassis, I don't believe there will be much problem with this being too rigid. Time will tell I guess, anyhoo, hopefully I will have more photos and more updates as the weeks go by, until then, stay tuned

- Thread starter
- #146
Update. Today I had the opportunity to work on the beast once again. I turned my attention today towards the Radiator overflow bottle. The one I had didn't fit nicely, so I decided to make another from scratch. For this I used 90mm x 1.6mm 316 stainless tube, a reducer cone (which was an offcut of a different reducer) and I domed a piece of 1.2 for the base and top purely because I could I used 2mm stainless for the brackets which have either a fold or twist in them which help them to be a bit more sturdy.
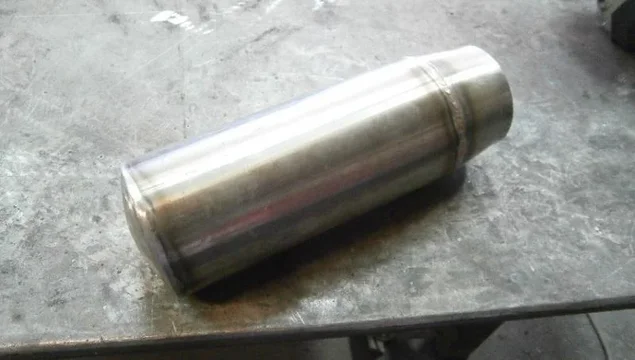


I also made the filler/opening by hand to suit the stock landcruiser cap. I am pretty happy with how it turned out, polishing it was probably the most difficult but most satisfying in the end. I still need to have a spreader/compensator plate where it bolts to the inner guard as it has a little bit of flex. Oh yeah, I am still real keen on having polished bling on this cruiser, so there is more to come Anyway, still plenty to do and I will do some more tomorrow. Until next time I guess


I also made the filler/opening by hand to suit the stock landcruiser cap. I am pretty happy with how it turned out, polishing it was probably the most difficult but most satisfying in the end. I still need to have a spreader/compensator plate where it bolts to the inner guard as it has a little bit of flex. Oh yeah, I am still real keen on having polished bling on this cruiser, so there is more to come

- Thread starter
- #148
Well croozy, more things will be happening to cruiser as the weeks fly past and I will post them all up, hopefully. Now, for today I decided that it was time to fold up the running boards. The previous owners version of running boards/sidestep were scaffold plank bolted through the weak sheetmetal of the sill panels. I reckon I can do better than that, so I folded up some 1.6 aluminium propeller plate.
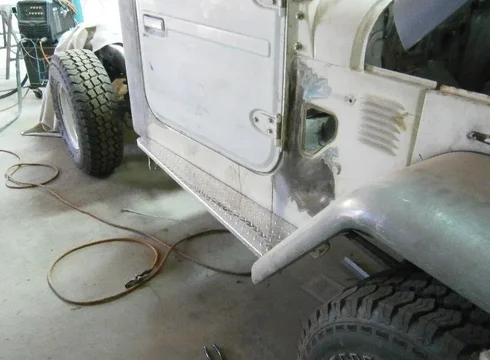


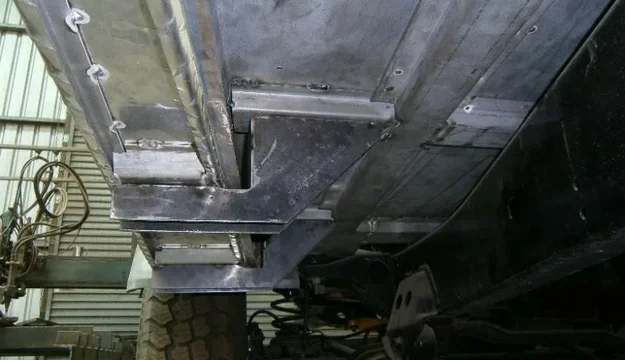
As for mounting the sidesteps, I plan to bolt them to the bottom of the mudguard at the front. The side of the step will most likely be bolted to the cab floor's hat channel frame from underneath, not the sill. I will form a few sections from 3mm aluminium to be bolted between the cab and sidestep that go underneath. Because 1.6 propeller plate isn't very heavy, a couple of aluminium stiffeners will be welded to it. I will post photos of them as it happens. Anyway, that's it for now, but more will follow soon


As for mounting the sidesteps, I plan to bolt them to the bottom of the mudguard at the front. The side of the step will most likely be bolted to the cab floor's hat channel frame from underneath, not the sill. I will form a few sections from 3mm aluminium to be bolted between the cab and sidestep that go underneath. Because 1.6 propeller plate isn't very heavy, a couple of aluminium stiffeners will be welded to it. I will post photos of them as it happens. Anyway, that's it for now, but more will follow soon

- Joined
- Sep 25, 2011
- Threads
- 89
- Messages
- 3,678
- Location
- Harbour City, the New Southern Wales
- Website
- www.freewayoneentertainment.com
Rocket's back..  Looking good mate.
 Looking good mate.
- Thread starter
- #150
Another day on the project, another step closer! Today I wanted to sort out the running board mounts. After work the other day I reinforced the 1.6mm propeller plate with 3mm folded angle and two hat channels either side for mounting. In the hat sections I thread-setted 2xM10 nuts. For the cab side of the mounting, I folded 1.6 zincanneal to the same shape of the floor hat channels and tacked them in position whilst I had the running boards clamped and cleco'd in. In these hat sections I welded two m10 nuts and zinc coated them before I tacked them to the floor. After much stuffing around, I finally had tacked together 4 running board brackets. Here is what I came up with
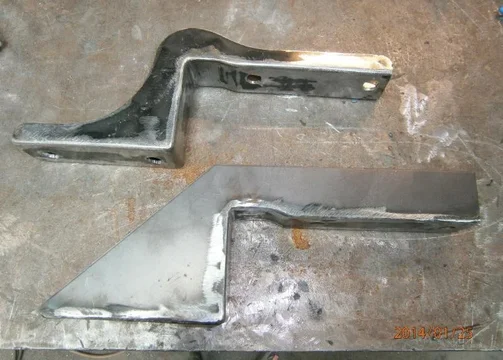
I fabricated the brackets out of 3mm black with the centre section being a single piece with two 'wings' welded to it to create a strong bracket. After some trimming down with a plasma torch and a grinder I got what I was aiming for! I reckon they look alright, almost factory


To test the sturdiness, I stood on them and jumped around a bit and I reckon they will be perfect! Also note that the channels are only tacked in at the moment, like the rest of the floor, that will be welded and finished whilst on the rotisserie as I'd rather not get burnt on my free time. Well, that's it for now, stay tuned for next weekends effort


I fabricated the brackets out of 3mm black with the centre section being a single piece with two 'wings' welded to it to create a strong bracket. After some trimming down with a plasma torch and a grinder I got what I was aiming for! I reckon they look alright, almost factory


To test the sturdiness, I stood on them and jumped around a bit and I reckon they will be perfect! Also note that the channels are only tacked in at the moment, like the rest of the floor, that will be welded and finished whilst on the rotisserie as I'd rather not get burnt on my free time. Well, that's it for now, stay tuned for next weekends effort

- Joined
- Dec 8, 2006
- Threads
- 158
- Messages
- 2,974
- Location
- Greenfield, MA
- Website
- thecarpentryway.blogspot.com
Very nice work on those running board brackets! 

- Thread starter
- #152
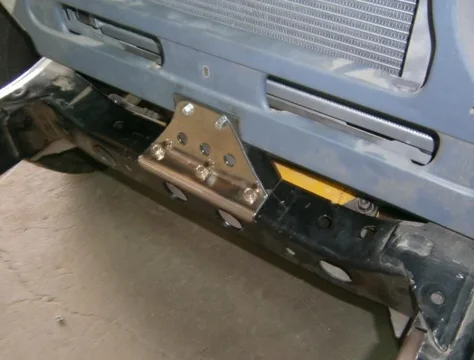
Another day's work on the cruiser done, another step closer to completion! A small step is still a step I say! So, for today I decided to focus my attention onto something that had been sort of bugging me. I had always wanted to fab something to bolt under the apron/bib to replace the original hinge mount. I had a few ideas but I settled on something I reckon is nice and simple. Due to the nature of the mounts I am using for the rest of the cab, they aren't very soft so I figure my mount suits the rest of them. Anyway, I started by cutting some 5mm flat rubber to use between the apron/mount face and the mount/chassis face. I used 3mm #304 stainless for the mounts which I folded in a hydraulic pressbrake and bolted them through the rubber onto the chassis and apron.

With them in position, I cut and punched another piece of stainless and tacked it into position

Then I cut, folded some more 3mm and blanked off the open sides, leaving the back open and cut out the corners for drainage.

With it all tacked together, I staggered and cooled each weld down to limit twisting and buckling from heat.

Of course, nothing I put on my cruiser is to be rough looking, so after welding, I sanded the welds and scratches down, buffed it, then gave it a polish.

I am pretty happy with how it worked out, looks good on the cruiser.....


With them in position, I cut and punched another piece of stainless and tacked it into position

Then I cut, folded some more 3mm and blanked off the open sides, leaving the back open and cut out the corners for drainage.

With it all tacked together, I staggered and cooled each weld down to limit twisting and buckling from heat.

Of course, nothing I put on my cruiser is to be rough looking, so after welding, I sanded the welds and scratches down, buffed it, then gave it a polish.

I am pretty happy with how it worked out, looks good on the cruiser.....
- Thread starter
- #153
This is how they look on the cruiser, keep in mind I hope to use button head hex (Allen keyed) bolts to hold the mount to the chassis and the apron. I think it should look a lot nicer than standard hex heads!

Well, that's it for today, hopefully I get some more time to work on the cruiser tomorrow! Anyway, stay tuned for more!


Well, that's it for today, hopefully I get some more time to work on the cruiser tomorrow! Anyway, stay tuned for more!

47coeman
Love those 45's
Way Nice, it is the detail that counts...
- Joined
- Sep 25, 2011
- Threads
- 89
- Messages
- 3,678
- Location
- Harbour City, the New Southern Wales
- Website
- www.freewayoneentertainment.com
One small step for Rocket..
Nice one mate. As usual your fabbing skiils are awesome. God help oncoming traffic with all your bling
Nice one mate. As usual your fabbing skiils are awesome. God help oncoming traffic with all your bling

- Thread starter
- #156
Once again, cheers for the encouragement everyone! Update time
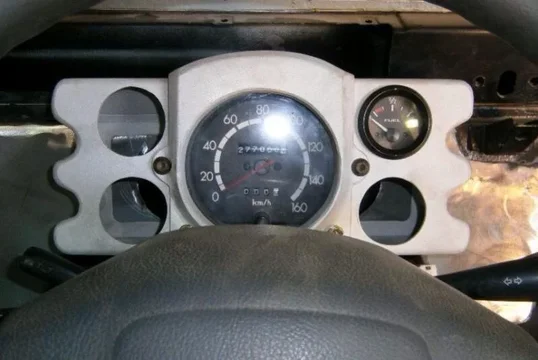
Well, today I seized the opportunity to play some more with the cruiser, this time I focused my attention to the gauge cluster. Due to the 80's tilt column being so large, space to fit the gauges was always going to be tight. I am using a 60 series speedometer because I like the look and the speedo cable goes straight in. I had contemplated many different ways of sorting out the instrument panel, but decided that it needed to bolt to the dash, not in the dash. For this I used 3 and 2mm aluminium flat, formed and welded together. I didn't take many photos during fabrication as I left my camera at home But I did manage to get some pictures of the cluster at the stage it is now. I have sandblasted it, that explains its dull appearance. Its not for everyone I suppose, but I am happy with the way its going.
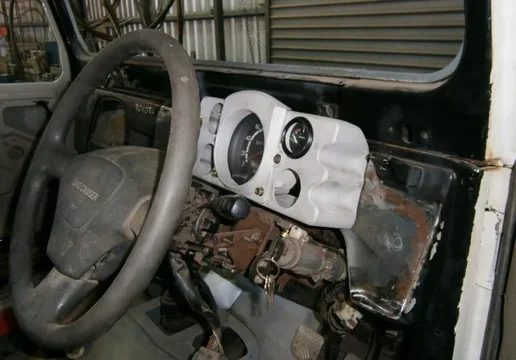
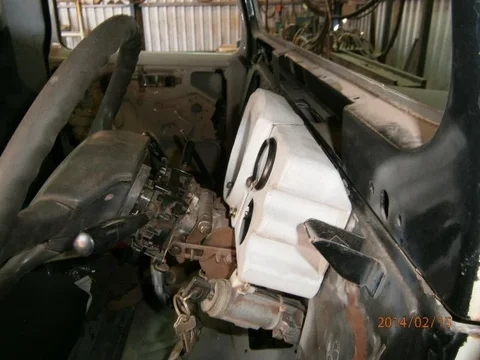
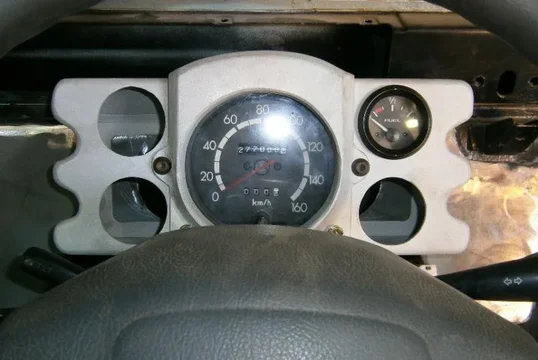
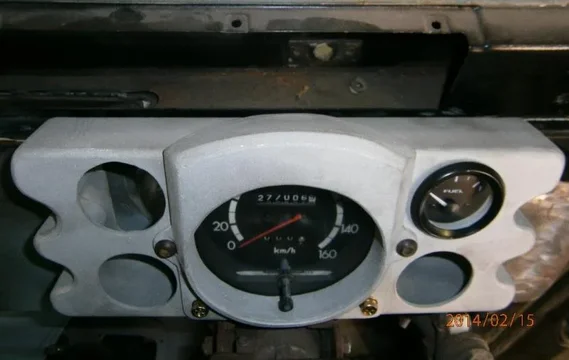
The shroud around the speedo is actually its mount. The two black inhex heads hold the speedo shroud to the cluster, of course the 2 grooves in either side will allow the cluster to be attached to the dash itself via 4 M8 button inhex bolts using threadsets through the sheetmetal. All bolts will be stainless steel button heads eventually. I only plan on using 4 gauges at the moment, FUEL, WATER TEMP, OIL PRESSURE, VOLTS. The indicator lights will be LED single bulb chromed ones, they will go in later. I will have a tacho mounted to the right of the cluster, I will build that later. I reckon the dash will be painted white like the outside of the cruiser, and the cluster and other things on the dash will be black. Might even vinyl wrap the cluster, don't know yet Anyway, that's it for now, next thing will be the tacho mount I reckon, until next time I guess


Well, today I seized the opportunity to play some more with the cruiser, this time I focused my attention to the gauge cluster. Due to the 80's tilt column being so large, space to fit the gauges was always going to be tight. I am using a 60 series speedometer because I like the look and the speedo cable goes straight in. I had contemplated many different ways of sorting out the instrument panel, but decided that it needed to bolt to the dash, not in the dash. For this I used 3 and 2mm aluminium flat, formed and welded together. I didn't take many photos during fabrication as I left my camera at home
 But I did manage to get some pictures of the cluster at the stage it is now. I have sandblasted it, that explains its dull appearance. Its not for everyone I suppose, but I am happy with the way its going.


The shroud around the speedo is actually its mount. The two black inhex heads hold the speedo shroud to the cluster, of course the 2 grooves in either side will allow the cluster to be attached to the dash itself via 4 M8 button inhex bolts using threadsets through the sheetmetal. All bolts will be stainless steel button heads eventually. I only plan on using 4 gauges at the moment, FUEL, WATER TEMP, OIL PRESSURE, VOLTS. The indicator lights will be LED single bulb chromed ones, they will go in later. I will have a tacho mounted to the right of the cluster, I will build that later. I reckon the dash will be painted white like the outside of the cruiser, and the cluster and other things on the dash will be black. Might even vinyl wrap the cluster, don't know yet

You built this out of aluminum?
View attachment 864508
Friggin' artwork, mate, worthy of a stay in a museum.
I was thinking the same thing! Holy s***.
2fpower
SILVER Star
Holy batdung, batman.
Mad skilz.
Mad skilz.
I'd be a crying effing shame to cover that in vinyl.
Although not my style, that ought to be polished and displayed for the artwork it is.
Man, I've been beating my head against a brick wall simply trying to repro a few interior Pig parts and, while not a professed artisan, your skillet degree is completely over the top, so I back away, my head hung in shame.
Similar threads
Users who are viewing this thread
Total: 1 (members: 0, guests: 1)

