H42 Transmission, Tcase, eBrake Rebuild in a '76 FJ40`

This site may earn a commission from merchant affiliate
links, including eBay, Amazon, Skimlinks, and others.

Pin is saying if there is enough room to drop on the bearing washer & install lock ring, then it is good.

Looking at the pichers, I'm pretty sure it is all the way on there. The shoulder of the bearing does not go against the gear teeth. It hits a radiused shoulder on the shaft about 1/8" away from the gear teeth.

Great. Just wanted to be 100% sure. This things got me a little leery now. Proceeding again with wild abandon. Carefully.
 
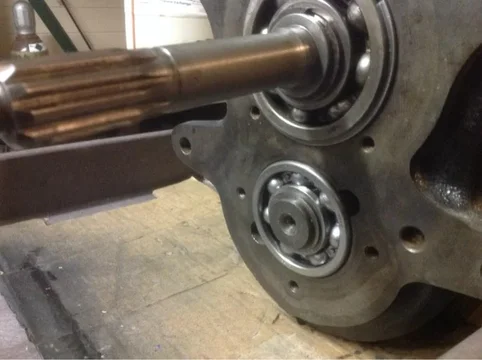
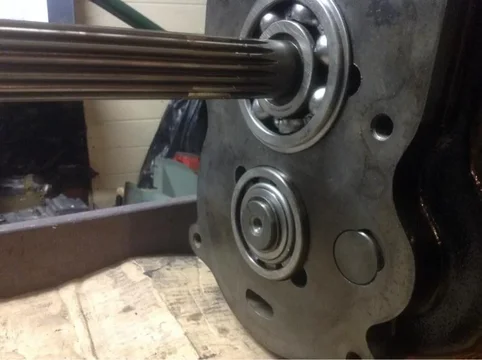
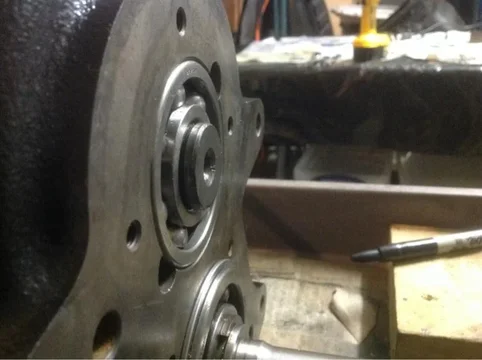
Ok. Tranny is reassembled, I think. I followed the directions from KiwiDog a few posts back on the countershaft bearings. It looks like the bearings on the countershaft are sticking out too far, but the snap rings are on both ends of the shaft, so I think it's right. Maybe? Photos for examination.

First, put on main shaft and output bearing. Then put bearing onto input shaft, and installed input shaft into case and onto main shaft at the same time by lightly tapping the outer race of the input bearing. I made sure to put the needle bearings in place (again) with some thick grease. They held in without any issues.

Then I flipped the case over (which helps a lot) to work on the countershaft.

I started with the counter input-side (front) bearing. KiwiDog said to tap it on the counter shaft using the inner race, while just barely starting the bearing on the output (rear) side to hold the countershaft in place. I used a brass drift and the soft hammer, and a bit with a 3lb sledge. I kept driving the input bearing until I could see the snap ring slot on the shaft.

image-1606718893.jpg
Started on the input side. Hit the inner race.

image-3398725001.jpg
Rear (output) bearing was just barely tapped in place until the front side was done. This is different from the FSM instructions.

image-3021715047.jpg
image-765728867.jpg
Put on the snap ring.


image-3470338655.jpg
image-1058098974.jpg
Then I used the soft hammer to tap the rear (output) bearing in place on the outer race (there is no inner race). The photos show the output bearing after I put the collar and snap ring back on and then flipped the tranny back upright.

I'm not crazy about the bearing sticking out so far. Is this right?
image-1606718893.jpg
image-3398725001.jpg
image-3470338655.jpg
image-1058098974.jpg
image-3021715047.jpg
image-765728867.jpg
 
Last edited:
Hmmm, just noticed the new counter shaft input (front) bearing has no retaining ring on it vs the old one. Is this ok? Seems troubling as there is nothing to locate the counter shaft in the case.


image-3414335914.jpg
Old Bearing


image-26990913.jpg
image-1325449885.jpg
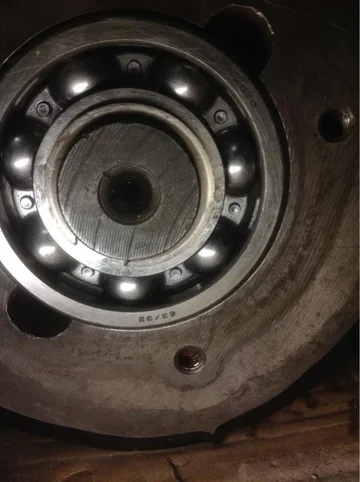
New bearing. No retaining groove.
image-3414335914.jpg
image-26990913.jpg
image-1325449885.jpg
 
The bearing can go on 2 ways, so maybe it is backwards.
Nope - numbering is facing out, no groove on the bearing, and no ring was included. It is the same number as the old bearing.

EDIT: Well, it's not the same number.

63/32 New, 63/32N old. Must be the wrong bearing in the kit from TPI.


image-2398989851.jpg
New


image-883630371.jpg
Old
image-2398989851.jpg
image-883630371.jpg
 
Front CS bearing

Hi Vae,

Sorry I didn't notice from any of your pictures that the front CS bearing didn't have an outer snap it could have saved you putting the wrong bearing on.
If you use the bearing without the outer SR than the whole CS can float in the case, retained by the front and rear retaining covers. This probably too much float. It is meant to be held fast in the case by the front retainer and outer snap ring on the ball bearing. and the rear CS roller bearing is meant to float in the case an be retained on the CS end by the small snap ring on the shaft.
You may be able to source the bearing from your local bearing supplier. I think it is a special 6300 series bearing so you maybe stuck getting it from MrT or someone like Kurt and Cruiser Outfitters.

Try not to get upset with the whole process, this is all part of the learning curve. It is not a bad idea to match up all the old parts you are replacing with the new ones to spot any significant differences. Your whole series of posts on the H42 build will be a great help to anyone under taking the process.

Thanks jb
 
Hi Vae, Sorry I didn't notice from any of your pictures that the front CS bearing didn't have an outer snap it could have saved you putting the wrong bearing on. If you use the bearing without the outer SR than the whole CS can float in the case, retained by the front and rear retaining covers. This probably too much float. It is meant to be held fast in the case by the front retainer and outer snap ring on the ball bearing. and the rear CS roller bearing is meant to float in the case an be retained on the CS end by the small snap ring on the shaft. You may be able to source the bearing from your local bearing supplier. I think it is a special 6300 series bearing so you maybe stuck getting it from MrT or someone like Kurt and Cruiser Outfitters. Try not to get upset with the whole process, this is all part of the learning curve. It is not a bad idea to match up all the old parts you are replacing with the new ones to spot any significant differences. Your whole series of posts on the H42 build will be a great help to anyone under taking the process. Thanks jb

Kiwi,
Yes, trying to find my inner peace here.

I know the answer to this, but am going to ask anyway: should I use the old bearing?

I have found one on SOR - $70. Yikes. I'll contact Kurt.

I'm not even going back to TPI for a refund.
 
I'm not even going back to TPI for a refund.

Why? I'd at least call and ask what's up... Maybe save the next guy down the line some hassle?

Thanks for the great write-up, btw :)
 
Why? I'd at least call and ask what's up... Maybe save the next guy down the line some hassle?

Thanks for the great write-up, btw :)

Sigh - Sure, I could let him know at least, as a courtesy.

It's just a lose/lose when dealing with Bob. No service after the fact, and he's not happy to provide it. I've just washed my hands of him, and he's 20 miles away. Avoiding the negative interaction.
 
I'm sure you could reuse the old bearing with no problems except it would bug you, so go get the right one. Maybe your local bearing shop will have it for cheap.
 
I'm sure you could reuse the old bearing with no problems except it would bug you, so go get the right one. Maybe your local bearing shop will have it for cheap.

At this point, it's bugging me that I cannot continue.

What I did learn however is that this is why I was beating the sh*t out of the bearings and broke that collar. I thought the bearings were going to be flush with the case. Had the snap ring been present, I would have seen that it was set in as far as it needed to be, and would have called it a day. Weeks ago.

But, I do understand the bearings better now since KiwiDog gave me a different install method.
 
It might be worth giving Dixie or Allied a call on the chance of it being available locally.
 
It might be worth giving Dixie or Allied a call on the chance of it being available locally.

Hey Craig! Yes, just called BDI. Out of stock, but it will be in Wed at latest. Ready for this, the cost was.....


$12


SOR wanted ~ $50 + $20 shipping. Geez.
 
..What I did learn however is that this is why I was beating the sh*t out of the bearings and broke that collar. I thought the bearings were going to be flush with the case. Had the snap ring been present, I would have seen that it was set in as far as it needed to be, and would have called it a day. Weeks ago. ..

These days I use my camera a lot to take before and after pictures.

If you're not in a hurry, I find it really helps to compare the shots to get things done exactly right...

If you'd been following this practice... then as soon as you started having trouble with the bearing, you could have gone back to your computer and had a squizz to see if you could spot anything wrong..

(Digital photography is certainly a major advance. You couldn't use the old film cameras for this purpose of course because of the delay for processing and the cost of each print.)

As kiwidog says, it's always good practice to directly compare old parts with their new replacements at every step too..

Oh... And never automatically trust ANYONE to give you the right part. (Even the best make mistakes)

But we've all learned (or received "learning reinforcement") here along with you ... so thanks VV...:beer:

Yes if you've not noticed I take a lot of pictures. The iPhone has revolutionized documenting. That's how I finally saw the missing ring.

I learned to compare parts now. My difficulty is that the last 1000 pics are on my phone/iPad but the other 3000 are on my network storage drive so I'd have to go look for them. Laziness is the issue.

I like your word "squizz" - is that a down under word?
 
My rule on rebuilding any trans or otherwise is to physically measure/compare every new part vs the old part with a micrometer - this will show any discrepancy in a hurry . In some cases it doesn't matter but most times a slight difference will totally screw things up .
Sarge
 

Users who are viewing this thread

Back
Top Bottom