This post contains a summary of the pertinent details from a rather lengthy thread I posted quite a while back that I have condensed here.
Why I did it: A few years ago I noticed that the radiator was partially obstructed with grey sludge. The sludge was visible from the radiator fill opening with the coolant drained down to uncover the top of the core.
Extensive flushing with garden hose and treatment with Prestone radiator cleaner was not at all effective in removing the sludge. So, I removed the radiator and took it to a radiator shop and had it flushed with a very high volume radiator flushing setup. They hooked it up and a massive amount of water came gushing out, soaking the hapless hired help who must have been low man on the totem pole. This flush removed all visible sludge from the radiator.
A year or so later I subsequently noticed more sludge in the radiator. So I then decided to install a filter to mitigate the problem. At some point in time I will replace my radiator, and want to ensure, to the best of my ability, that I can prevent the new radiator from becoming clogged.
The filter I installed is a bypass coolant filter normally installed in big rig diesel trucks that pull semi trailers.
How it works: The coolant feed to the heater cores is cut into with a tee fitting in order to supply coolant into the filter. The filter outflow is in turned tee'ed into the heater core return to the water pump. Thus, a portion of coolant flow to the heater cores bypasses the heater and flows through the coolant filter instead. This is why it is called a bypass filter. It must be installed in this manner, in parallel with the heater cores, not in series.
The filter is similar to a large oil filter. It contains a large pleated paper element that does the actual filtering. The filter is specifically manufactured for use as a coolant filter.
How it installs: The installation is very straight forward. It can be installed without making any permanent modifications to the truck. It is only necessary to remove two 90 degree bend hoses and replace them with new straight hoses and brass tee fittings. The rest is to just mount the filter, and that can be done using only existing threaded holes in the firewall. I did drill one additional hole in the firewall for a fourth bolt for the filter mount plate, this was optional, not necessary, and I would likely not do so again were I to repeat the installation.
Results: Over the course of several years the amount of visible sludge in the radiator has been substantially reduced. I have removed and cut open several filters and captured a portion of the junk that was filtered out.
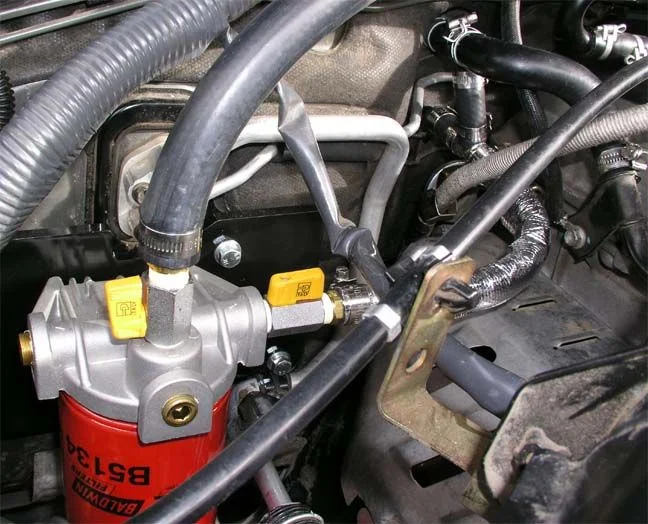
Below is a picture of the mounted filter. The coolant feed flows in through the hose leading to the top of the filter mount. The coolant return flow is through the hose on the right that is encased in the silver heat shield sleeve. The return hose connects to a brass tee that replaces the stock 90 degree hose. The shutoff valves with yellow handles minimize loss of coolant when changing the filter.
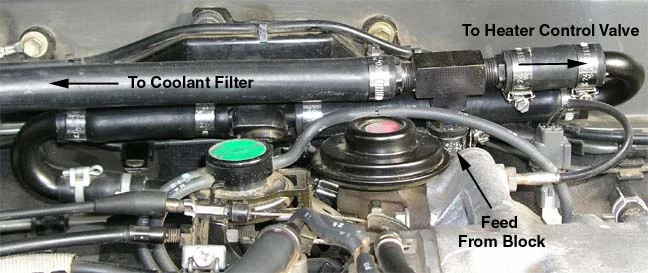
Below is a picture of the feed to the filter. The brass tee replaces the stock 90 degree hose.
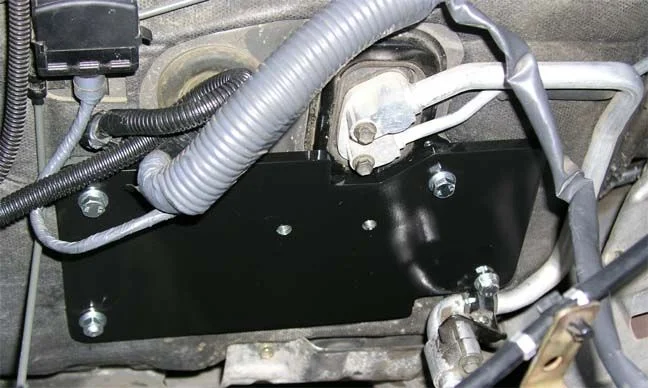
Below is a picture of the filter mounting plate. It is made from aluminum plate. Note: Unseen behind the plate are spacers behind the top two bolts and the the lower left bolt. Except for lower left, existing threaded holes in the firewall are used to mount the plate.
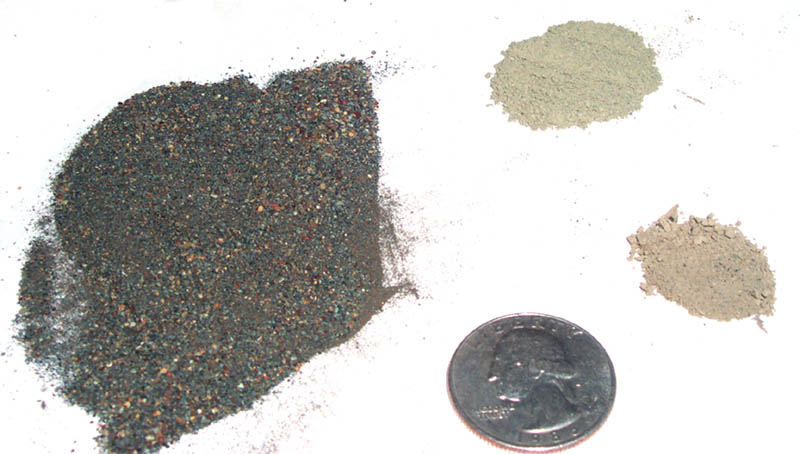
Below is picture of some of the crud removed by the filter. On the left is material that appears to be sand. On the right is material that appears to be a finely powered clay.
Here is a list of the parts I used:
The mounting plate I made myself. Used 12" x 6" x .375” aluminum. I used aluminum as opposed to steel in order to make it easier to cut and shape with my equipment and to save some weight. I also made spacers that are located behind the plate at three of the bolts holes. The spacers are .7" in diameter; which I turned down from .75 inch diameter aluminum rod and drilled for the mounting bolts. The aluminum I ordered from www.metalexpress.net.
The 4 plate mounting bolts I used are 8mm x 1.25 x 50mm.
I Used 2 10mm x 1.25 x 30mm bolts to mount the filter head to the plate. I threaded the plate for these bolts. You will need longer bolts if you wish to through bolt using nuts.
Baldwin Filter Head, part number CFB5000 - This is the filter head only. It does not include the plugs, valves, or hose barbs. www.baldwinfilters.com
Baldwin Coolant Filter, part number B5134 - This filter contains no SCAs (supplemental coolant additives). I believe only wet sleeved diesel engines routinely require SCAs be added to the coolant by the operator. I will omit the long explanation. But be aware most coolant filters include SCAs inside as most coolant filters are installed on diesel engines that require the addition of SCAs. Adding too much SCAs will cause problems. If the shop does not stock these filters, then you may need to buy a case of 12. That is is minimum order from Baldwin. I purchased the filter head and filters from a local Peterbilt service center.
All brass fittings are manufactured by Parker http://www.parker.com/ead/cm1.asp?cmid=396
Quantity 2 of 3/8” male NPT Countersunk Hex-Head Plug, Parker part number 219P-6 for plugging unused ports in filter head.
Quantity 2 of 3/8” male NPT x 3/8 female NPT mini ball valve, Parker part number MV608-6. Shutoff valves eliminate coolant from draining from the lines when changing filters. These are very cool.
Quantity 1 of 3/8” male NPT x ½” beaded hose barb, Parker part number 68HB-8-6, for the filter outlet.
Quantity 4 of 3/8” male NPT x 5/8” beaded hose barb, parker part number 68HB-10-6, 1 is for filter inlet, other 3 are for constructing tee connection to heater hose.
Quantity 1 of 3/8" female NTP x 3/8” female NTP x 3/8" female NTP tee, Parker part number 2203P-6, used with 3 of the hose barbs listed above to construct a 5/8" barbed tee. The supply store did not stock a 5/8" tee, so I made one up from the 4 parts. Find a good brass 5/8" tee and save some money.
Quantity 1 of 180 degree bend pipe, Toyota part number 87248-60480. This connects one side of the inlet tee to the heater valve.
Quantity 1 ½” x ½” x ½” tee, part number unknown, came out of the supply stores odds and ends bin, for connecting the filter outlet to the existing heater outlet hose.
The 5/8" feed hose I used is Gates Green Stripe. Need 4 feet (will have just a little extra left over), Gates part number 28441.
The 1/2" outlet hose I used is Gates Safety Stripe. Need 2 feet (and will have extra left over). I would have used Green Stripe, which is a premium hose, but couldn’t find any local stocking suppliers. If any of you know of a supplier (by the foot) for 1/2" Gates green stripe hose please let me know.
I covered the 1/2 return hose with a thermal protective sleeve, as it passes above the exhaust header. Thermo Sleeve from Thermotec, part number 14010 - www.thermotec.com.
The hose clamps I used are manufactured by AWAB. These are premium 316 all stainless steel clamps including the screw being stainless. The serrations do not pierce the band, so they do not chew up the hose. I bought these from West Marine. Need 8 to fit 5/8" hose and 6 to fit 1/2" hose. These will never corrode and will never fail. West Marine pricing for these clamps is expensive, but one of their stores is close to me and thus is convenient. These are premium quality hose clamps that are very unlikely to ever fail.
Why I did it: A few years ago I noticed that the radiator was partially obstructed with grey sludge. The sludge was visible from the radiator fill opening with the coolant drained down to uncover the top of the core.
Extensive flushing with garden hose and treatment with Prestone radiator cleaner was not at all effective in removing the sludge. So, I removed the radiator and took it to a radiator shop and had it flushed with a very high volume radiator flushing setup. They hooked it up and a massive amount of water came gushing out, soaking the hapless hired help who must have been low man on the totem pole. This flush removed all visible sludge from the radiator.
A year or so later I subsequently noticed more sludge in the radiator. So I then decided to install a filter to mitigate the problem. At some point in time I will replace my radiator, and want to ensure, to the best of my ability, that I can prevent the new radiator from becoming clogged.
The filter I installed is a bypass coolant filter normally installed in big rig diesel trucks that pull semi trailers.
How it works: The coolant feed to the heater cores is cut into with a tee fitting in order to supply coolant into the filter. The filter outflow is in turned tee'ed into the heater core return to the water pump. Thus, a portion of coolant flow to the heater cores bypasses the heater and flows through the coolant filter instead. This is why it is called a bypass filter. It must be installed in this manner, in parallel with the heater cores, not in series.
The filter is similar to a large oil filter. It contains a large pleated paper element that does the actual filtering. The filter is specifically manufactured for use as a coolant filter.
How it installs: The installation is very straight forward. It can be installed without making any permanent modifications to the truck. It is only necessary to remove two 90 degree bend hoses and replace them with new straight hoses and brass tee fittings. The rest is to just mount the filter, and that can be done using only existing threaded holes in the firewall. I did drill one additional hole in the firewall for a fourth bolt for the filter mount plate, this was optional, not necessary, and I would likely not do so again were I to repeat the installation.
Results: Over the course of several years the amount of visible sludge in the radiator has been substantially reduced. I have removed and cut open several filters and captured a portion of the junk that was filtered out.
Below is a picture of the mounted filter. The coolant feed flows in through the hose leading to the top of the filter mount. The coolant return flow is through the hose on the right that is encased in the silver heat shield sleeve. The return hose connects to a brass tee that replaces the stock 90 degree hose. The shutoff valves with yellow handles minimize loss of coolant when changing the filter.
Below is a picture of the feed to the filter. The brass tee replaces the stock 90 degree hose.
Below is a picture of the filter mounting plate. It is made from aluminum plate. Note: Unseen behind the plate are spacers behind the top two bolts and the the lower left bolt. Except for lower left, existing threaded holes in the firewall are used to mount the plate.
Below is picture of some of the crud removed by the filter. On the left is material that appears to be sand. On the right is material that appears to be a finely powered clay.
Here is a list of the parts I used:
The mounting plate I made myself. Used 12" x 6" x .375” aluminum. I used aluminum as opposed to steel in order to make it easier to cut and shape with my equipment and to save some weight. I also made spacers that are located behind the plate at three of the bolts holes. The spacers are .7" in diameter; which I turned down from .75 inch diameter aluminum rod and drilled for the mounting bolts. The aluminum I ordered from www.metalexpress.net.
The 4 plate mounting bolts I used are 8mm x 1.25 x 50mm.
I Used 2 10mm x 1.25 x 30mm bolts to mount the filter head to the plate. I threaded the plate for these bolts. You will need longer bolts if you wish to through bolt using nuts.
Baldwin Filter Head, part number CFB5000 - This is the filter head only. It does not include the plugs, valves, or hose barbs. www.baldwinfilters.com
Baldwin Coolant Filter, part number B5134 - This filter contains no SCAs (supplemental coolant additives). I believe only wet sleeved diesel engines routinely require SCAs be added to the coolant by the operator. I will omit the long explanation. But be aware most coolant filters include SCAs inside as most coolant filters are installed on diesel engines that require the addition of SCAs. Adding too much SCAs will cause problems. If the shop does not stock these filters, then you may need to buy a case of 12. That is is minimum order from Baldwin. I purchased the filter head and filters from a local Peterbilt service center.
All brass fittings are manufactured by Parker http://www.parker.com/ead/cm1.asp?cmid=396
Quantity 2 of 3/8” male NPT Countersunk Hex-Head Plug, Parker part number 219P-6 for plugging unused ports in filter head.
Quantity 2 of 3/8” male NPT x 3/8 female NPT mini ball valve, Parker part number MV608-6. Shutoff valves eliminate coolant from draining from the lines when changing filters. These are very cool.
Quantity 1 of 3/8” male NPT x ½” beaded hose barb, Parker part number 68HB-8-6, for the filter outlet.
Quantity 4 of 3/8” male NPT x 5/8” beaded hose barb, parker part number 68HB-10-6, 1 is for filter inlet, other 3 are for constructing tee connection to heater hose.
Quantity 1 of 3/8" female NTP x 3/8” female NTP x 3/8" female NTP tee, Parker part number 2203P-6, used with 3 of the hose barbs listed above to construct a 5/8" barbed tee. The supply store did not stock a 5/8" tee, so I made one up from the 4 parts. Find a good brass 5/8" tee and save some money.
Quantity 1 of 180 degree bend pipe, Toyota part number 87248-60480. This connects one side of the inlet tee to the heater valve.
Quantity 1 ½” x ½” x ½” tee, part number unknown, came out of the supply stores odds and ends bin, for connecting the filter outlet to the existing heater outlet hose.
The 5/8" feed hose I used is Gates Green Stripe. Need 4 feet (will have just a little extra left over), Gates part number 28441.
The 1/2" outlet hose I used is Gates Safety Stripe. Need 2 feet (and will have extra left over). I would have used Green Stripe, which is a premium hose, but couldn’t find any local stocking suppliers. If any of you know of a supplier (by the foot) for 1/2" Gates green stripe hose please let me know.
I covered the 1/2 return hose with a thermal protective sleeve, as it passes above the exhaust header. Thermo Sleeve from Thermotec, part number 14010 - www.thermotec.com.
The hose clamps I used are manufactured by AWAB. These are premium 316 all stainless steel clamps including the screw being stainless. The serrations do not pierce the band, so they do not chew up the hose. I bought these from West Marine. Need 8 to fit 5/8" hose and 6 to fit 1/2" hose. These will never corrode and will never fail. West Marine pricing for these clamps is expensive, but one of their stores is close to me and thus is convenient. These are premium quality hose clamps that are very unlikely to ever fail.
")
 perhaps I should have read all of the words in the post...I have more questions but will re-read what's already been posted to save myself the embarrassment...