
Navigation
Install the app
How to install the app on iOS
Follow along with the video below to see how to install our site as a web app on your home screen.
Note: This feature may not be available in some browsers.
More options
Style variation
You are using an out of date browser. It may not display this or other websites correctly.
You should upgrade or use an alternative browser.
You should upgrade or use an alternative browser.
Member Builds and Stories
This site may earn a commission from merchant affiliate
links, including eBay, Amazon, Skimlinks, and others.
Yea, I have been trolling dovebid. A lot of what they auction is jacked up. Like you, I want to be able to drive the van home. Then I know the motor is good. I'm also looking for one with power steering. Given that combo, it leaves my choices low. I'm patient though.
- Thread starter
- #24
You'll definitely find one then if you are patient. My van was funny because it was intercooled, had hyrdoboost (which I'll be using), but didn't have power steering. Plus is has a mechanical fan. The only reason I could come up with the mech. fan was that it provided at least some kind of airflow for the intercooler. I'm probably going to use a contour elec. fan and see if I can wire one side constantly on low to provide airflow for the intercooler.
Last edited:
Note to self:
Never let Boot4 pull one of my engines. If he starts at the rear bumper it's going down hill from there. LOL!
Nice build. To agressive for me but I'm glad to watch.
Never let Boot4 pull one of my engines. If he starts at the rear bumper it's going down hill from there. LOL!
Nice build. To agressive for me but I'm glad to watch.
OK so I've got a little more time to post pics. Lets get to some engine fun.
Here's what I brought home just two months ago. It started right up and was very close to my place. I had bid on a few on dovebid.com but did not have any luck and the prices seemed to be inflated at the time because now the vans in the NorthWest are going for much cheaper. If it's less than $3000 grand in the Northwest I think it is a good deal, at least from what I've seen for the last 8 months.

I found this one on portland's craigslist and was only the second one I'd seen since I'd been searching. Poor guy, he bought it to do a swap, found the jeep he wanted to put it in, went on vacation, came back and the jeep was stolen! So that pushed him far enough to decide to move to arizona where it didn't rain as much. So lucky for me he was selling all his stuff and that's how I picked up this one. The other lucky thing is that he neglected to state that this was the intercooled version! More power, better EGTs! Although I beleive in stock form it will easily pull my cruiser around and I don't plan on turning up the fuel screw for more power right out of the gate. I'm sure I won't be able to resist tinkering later though.
It had some shelves and stuff in it that I had to take out before I could start cutting away.

then I started going to town

more cutting

looks like the dude got stuck in the mud a couple of times. underneath was covered with caked-on mud.

that's how much I've cut off up to now. it was fun driving around the yard like this.

yanked the seat so moving it around became a balancing act pushing on the gas and brake and cranking on that steering wheel. This one did not have power steering but was easier once a lot of the body was gone.

then I drove it up to the concrete under it's own power for the last time to pull the engine.

the hoist just reached far enough to hook up. I ended up cutting that crossbrace by the tranny to make it easier since the intake elbow was hitting the top of the cowl. Many have pulled this out of an uncut van but I'm borrowing that hoist so I ended up cutting stuff first before I could get it to my place. It sure is nice when you've got some decent equipement for the job.

that's me getting some arm action on (pumping the hoist). That's why I'm called boots because I wear those things wrenching and wheeling. I'll have to get new ones soon since they are almost warn through the rubber.

Once it was up high enough it twisted inline with the hoist.

I pulled it around the front and in the shade. It's barely touching the tranny pan but nothing else. If for some reason it decided to fall I didn't want it to fall very far. I didn't have any problems but didn't mind being cautions with the heart of my engine transplant.

still have parts in there I'm going to use

I separated the tranny from the engine on the ground and then hung the engine on a stand and taped up all the openings. It was greasy so I soaked it with engine cleaner and rinsed it with my pressure washer. I sure enjoy having that pressure washer.

other side.

here's a quick shot of it a little cleaner

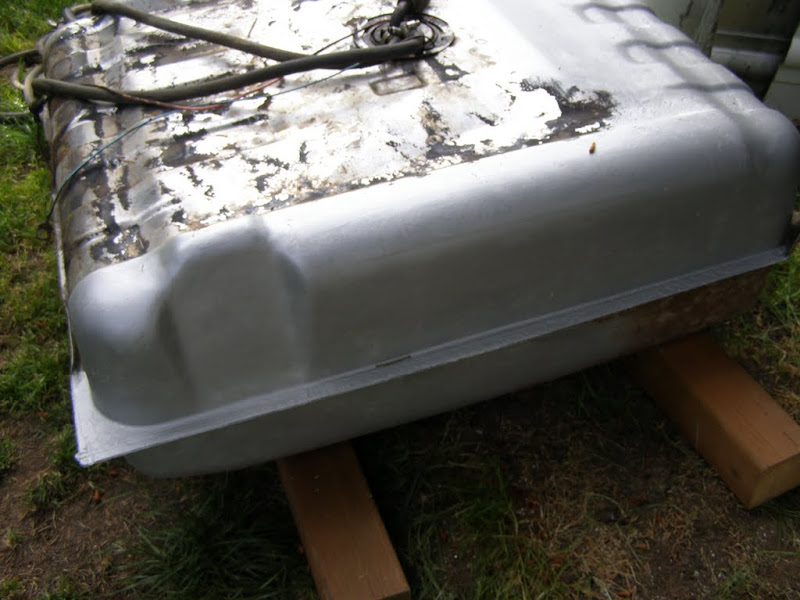
the idea for a larger gas tank starts here. This is the stepvan's tank. I think it's 30 plus gallons but don't know the exact amount yet, maybe someone seeing this does.

and use these crossmembers to mount it to the cruiser. I've seen tanks mounted to the body and to the frame. The cruiser is originally mounted to the body so I don't think it will be a problem to attach it to the frame. The crossmembers are shorter so I will have to lengthen them but that shouldn't be a problem. That is a 14 bolt and I was considering using it and was torn on that for a while, but I decided to run the cruiser axle instead. Running the 14 bolt I would have to run a centered Tcase, deal with the lug pattern, the width difference (I'm sticking with my FJ60 front), all of which can be solved but time and money play a part. If I snap a shaft I can always upgrade. Plus I like the offcentered diffs. If you have to plow with the front a path is already made for the rear.

driveshaft and exhaust from the stepvan

OK, I'm taking a break for now and returning to "work."
- Thread starter
- #28
I've been searching for a used np203 and found one locally last night that I picked up after work for only $40. There was a free one but it was a ford case and I read that those aren't compatible with the GM trannies. In order to mate the 203 to my 4L80 I'll need to do two things:
1. change out the input shaft to a 32 spline. this one was behind a turbo350 tranny and it is only 27 spline. The 203 behind the turbo400 has a 32 pline input but the junkyards wanted $300 for them. It will be cheaper to buy a 32 spline input shaft and swap it out myself. I've found some online and am still looking
2. redrill the bolt pattern and tap in new threads. Should be simple enough. Once I pick up my tranny tomorrow I'll be able to study that a little better.
No pics of this stuff yet but there will be, so on with the catch-up pics.
I'll finish off the stepvan stuff and then get back to the cruiser.
Those are the stupid-expensive motor mounts that I won't be using. I've seen prices of $200 plus used each to $800 plus each from the cummins dealer. I hope that was just web-inflation but even a motor mount costing $100 bucks is too much.
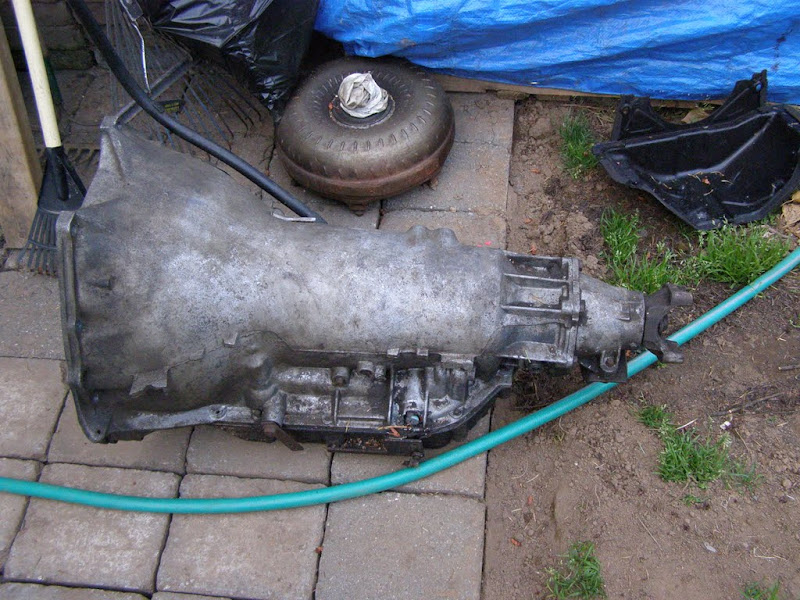
the turbo 400 that came with the stepvan. got someone just "looking" at it tonight.
I started painting the gas tank with rustbullet but I ran out. I just got some more this week so that could be a work night project.
here is the turbo on the 4bt. It's a holset wH1c which from the literature I've read says it's wastegated and has the 12cm turbine housing.

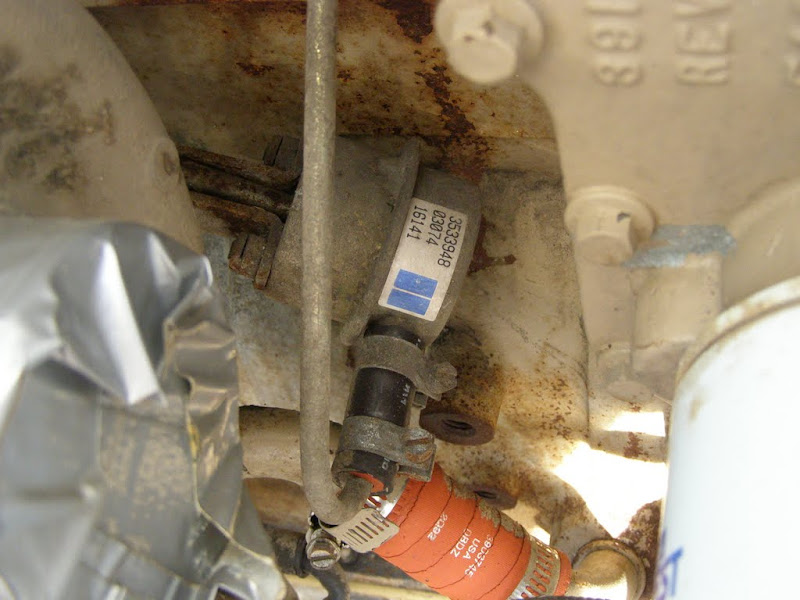
yup, there's the wastegate actuator
a turbo is basically two parts connected together. the turbine (exhaust side that gets the power) and the compressor (the part that does the work/boost). Interchanging these two parts can result in different boost levels at different loaded rpms. You can tune this to what you intend to do with your engine i.e towing, drag strip, etc. Anyways this is the compressor side and I have been getting some smoke due to oil being pulled past the seals. This can happen because of a dirty air filter or excessinve idling. I'm new to diesels so I did go out and start a lot it just to here the clatter and smell the diesel. Getting the diesel bug probably is some kind of sickness!
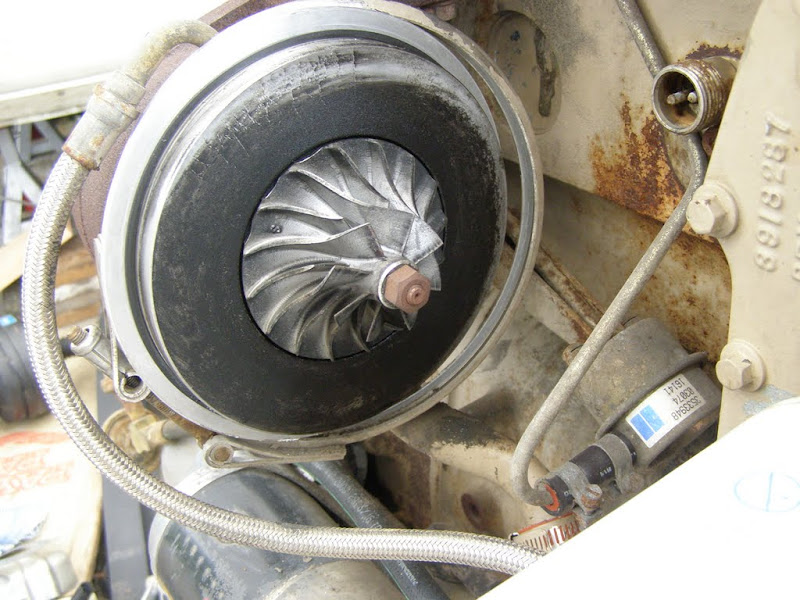
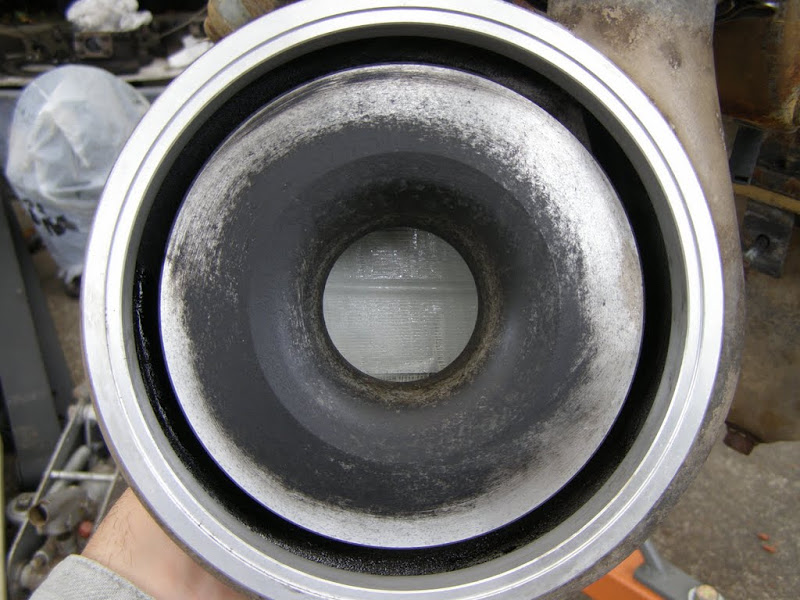
I checked the shaft for play and while I do have a little, I think I'm still in the normal range. For now I cleaned it up and am going to run it to get the cruiser on the road quicker. Pulling the turbo while in the truck shouldn't be too bad so I'll do a rebuild in the near future. This is the compressor housing.
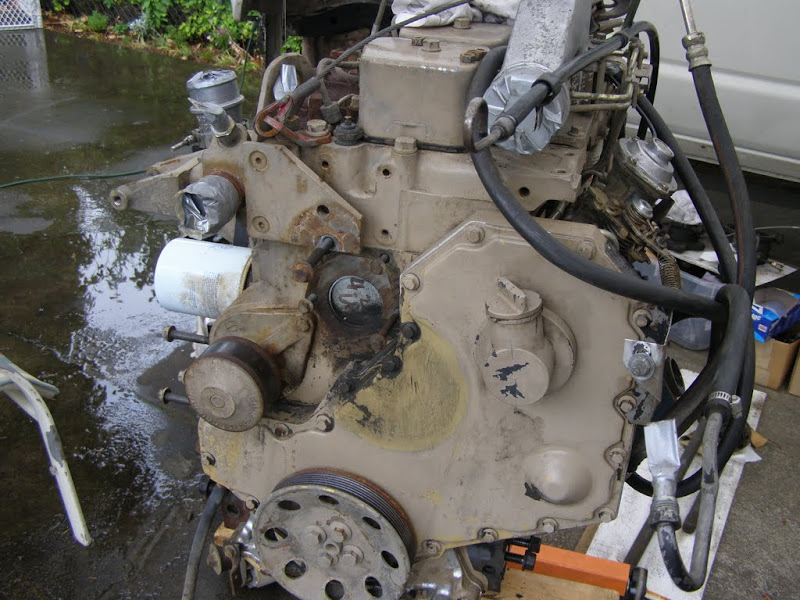
I pulled some stuff off the front so I can get in and address the KDP (killer dowel pin, this can come loose and cause havoc). The engine has obviouly been repainted. I'm not sure if that means its had an overhaul or not. It starts right up and ran great getting it home so I plan on looking at some other key replacement parts and run it.
1. change out the input shaft to a 32 spline. this one was behind a turbo350 tranny and it is only 27 spline. The 203 behind the turbo400 has a 32 pline input but the junkyards wanted $300 for them. It will be cheaper to buy a 32 spline input shaft and swap it out myself. I've found some online and am still looking
2. redrill the bolt pattern and tap in new threads. Should be simple enough. Once I pick up my tranny tomorrow I'll be able to study that a little better.
No pics of this stuff yet but there will be, so on with the catch-up pics.
I'll finish off the stepvan stuff and then get back to the cruiser.
Those are the stupid-expensive motor mounts that I won't be using. I've seen prices of $200 plus used each to $800 plus each from the cummins dealer. I hope that was just web-inflation but even a motor mount costing $100 bucks is too much.
the turbo 400 that came with the stepvan. got someone just "looking" at it tonight.
I started painting the gas tank with rustbullet but I ran out. I just got some more this week so that could be a work night project.
here is the turbo on the 4bt. It's a holset wH1c which from the literature I've read says it's wastegated and has the 12cm turbine housing.
yup, there's the wastegate actuator
a turbo is basically two parts connected together. the turbine (exhaust side that gets the power) and the compressor (the part that does the work/boost). Interchanging these two parts can result in different boost levels at different loaded rpms. You can tune this to what you intend to do with your engine i.e towing, drag strip, etc. Anyways this is the compressor side and I have been getting some smoke due to oil being pulled past the seals. This can happen because of a dirty air filter or excessinve idling. I'm new to diesels so I did go out and start a lot it just to here the clatter and smell the diesel. Getting the diesel bug probably is some kind of sickness!
I checked the shaft for play and while I do have a little, I think I'm still in the normal range. For now I cleaned it up and am going to run it to get the cruiser on the road quicker. Pulling the turbo while in the truck shouldn't be too bad so I'll do a rebuild in the near future. This is the compressor housing.
I pulled some stuff off the front so I can get in and address the KDP (killer dowel pin, this can come loose and cause havoc). The engine has obviouly been repainted. I'm not sure if that means its had an overhaul or not. It starts right up and ran great getting it home so I plan on looking at some other key replacement parts and run it.
Last edited:
- Thread starter
- #32
Kavik Great project! Very interested in the 4l80e to 203 adapt.
I'm pretty sure I'll have to redrill the bolt pattern and change out the input, but what I won't know until I get them together is if I'll need to shorten the the output on the tranny.
I've emailed murdak about the 203/splitcase adapter but haven't gotten a return. Are he and that other place mentioned in the 203 doubler thread the only ones that sell this adapter? I'll try calling him, too.
I got my adapter from Gary (Mudrak). I have a 700r4 w/ the AA tailshaft already installed. But, my donor 350tbi has a fresh 4l80e already bolted up.
Try the coloradok5.com forum for GM stuff...
Decisions, decisions....
- Thread starter
- #34
Let's try and finish the catch-up. The rest of the pics will be some misc. parts and the start of some of the little stuff.
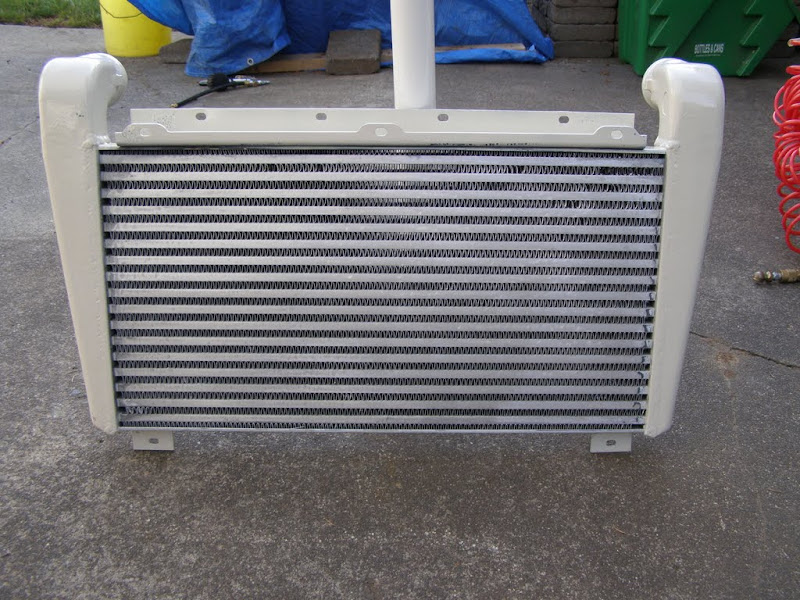
Here is the intercooler that came from the stepvan. It was black so I sanded off the paint from the fins and painted the ends a cream color. I like the aluminum look through the grill. It almost fits between the supports, so I'll have to do some cutting and this will go first in the cooling row.
I do have a question, but let me set it up first. I plan on stacking the cooling row like this: intercooler-FJ60 AC evap (if thats the right name for it)-FJ60 radiator. I'm going to run a large tranny cooler too, so where would you put it? In the cooling row or locate it separately?
infamous rusty inner channel being yanked
other side. It's not bad but I need to box in the rear section for the shackle mount and it doesn't make sense to leave it in to rust away.
it ended up taking me 1 full day just to get these suckers out! Only have a grinder, drill, and BFH, and prybar to get those out. I was sore the next day from pounding so much. But, alas... Victory!
You can see where the water stays and the rust forms. Luckily it will be fixed by cleaning and painting and not surgery. Back to the pass. side.
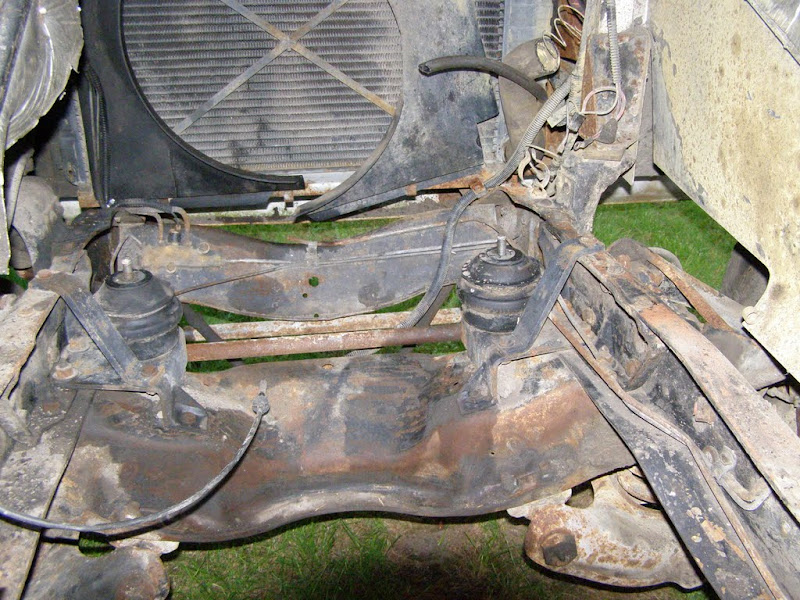
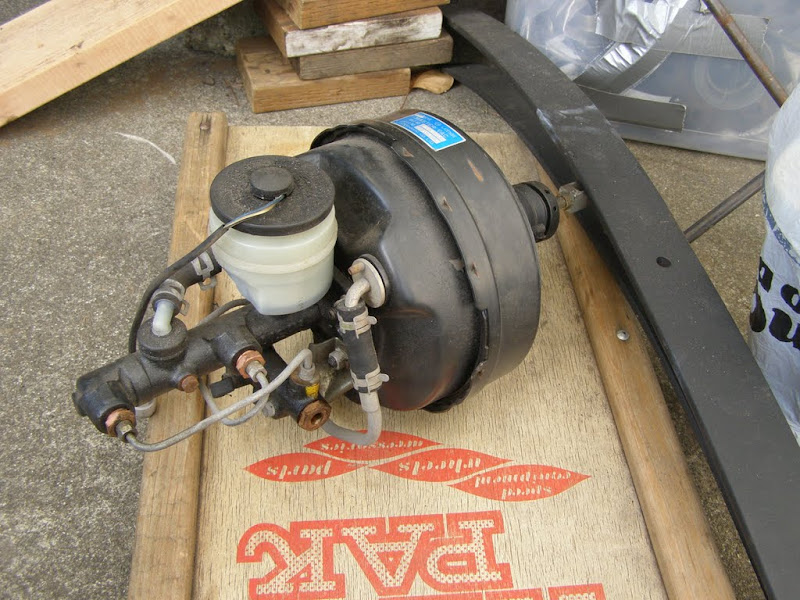
The brakes worked well on the stepvan so I'm using the system. Master cylinder painted with rustbullet.
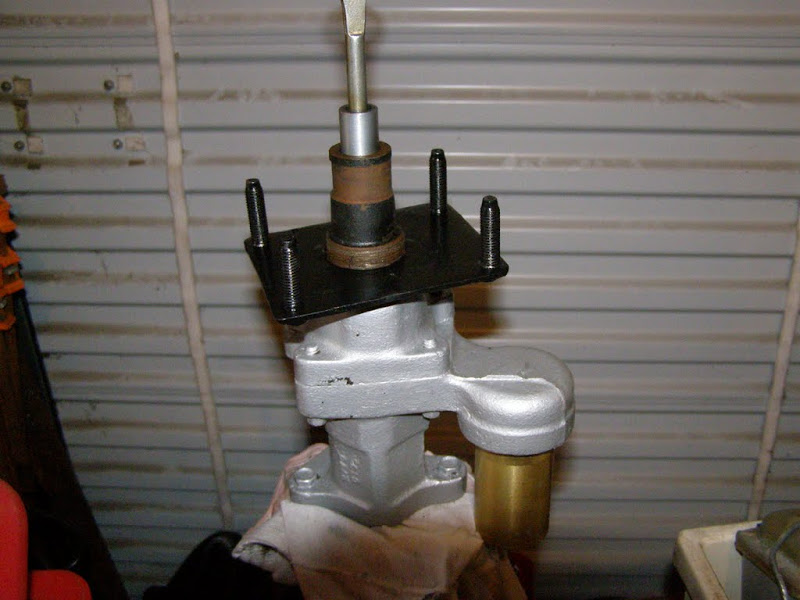
my hydroboost came with a separate resevoir. cleaned/painted.
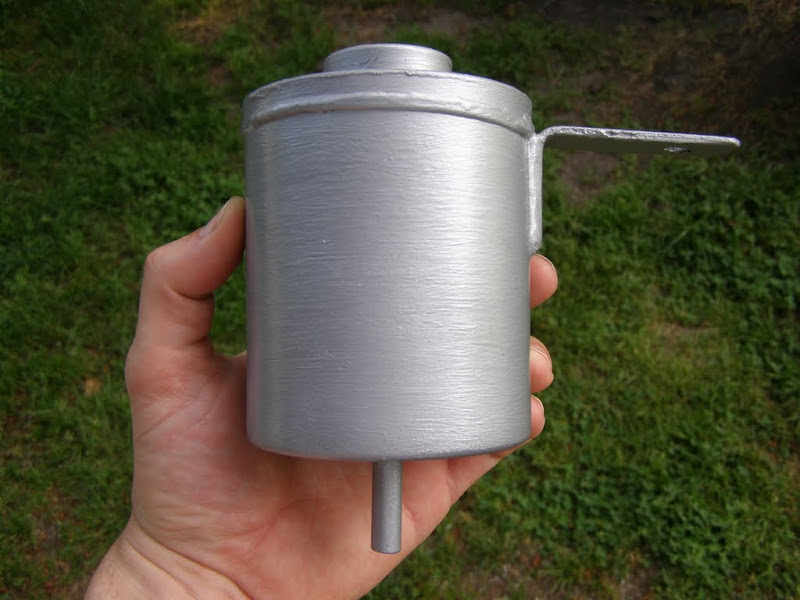
the hydroboost unit. Since diesels don't produce enough vacuum to run a brake booster I'd have to get a vacuum pump or go to hydroboost. Yup, that was an easy decision.
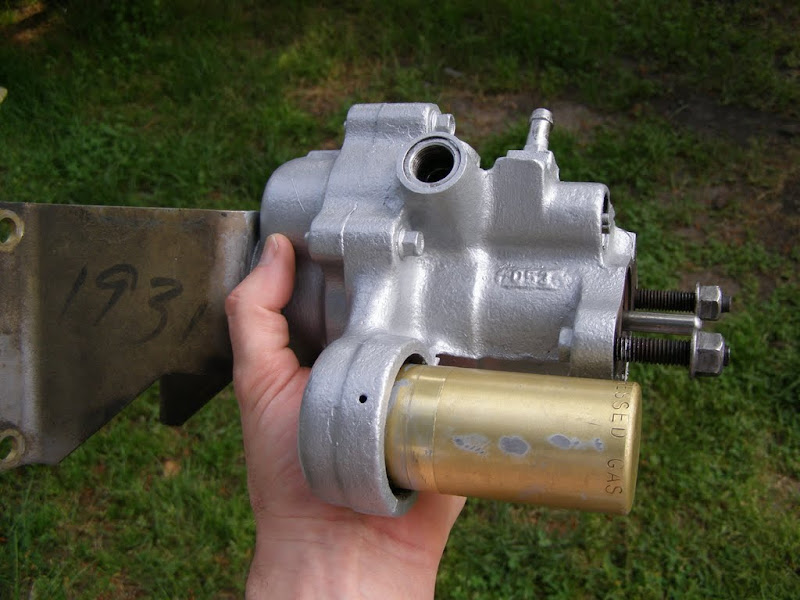
brake master goes on this side
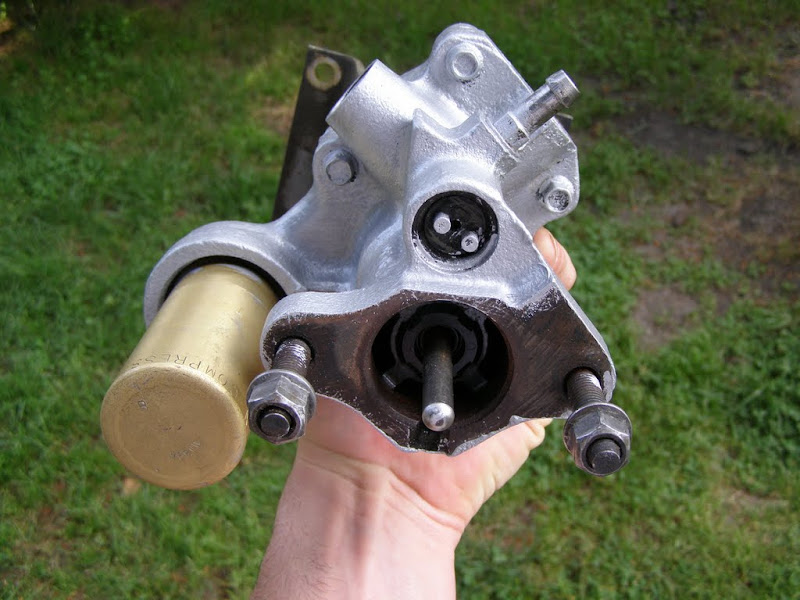
other side. it's got three ports.
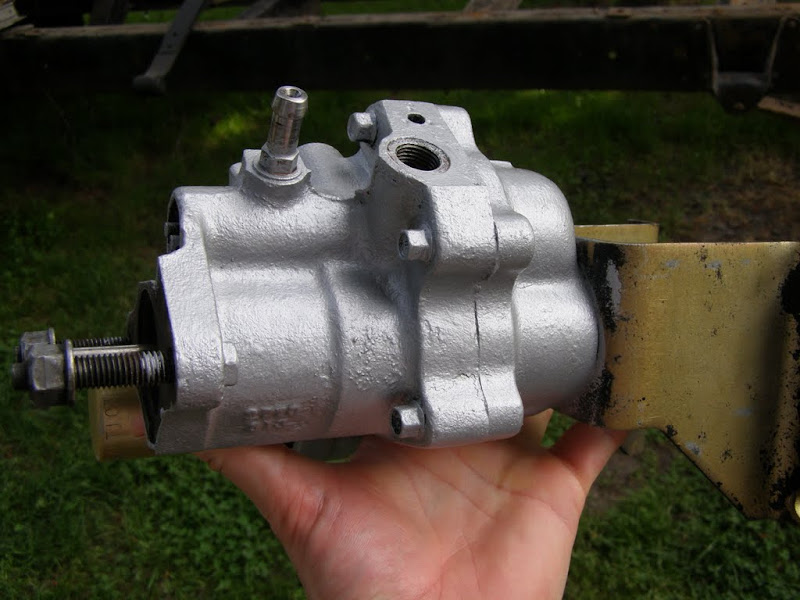
measured the distance from the mounting plate to the center of the hole on the back side of this to find out how deep to mount the hydroboost unit on the firewall
and then I made this
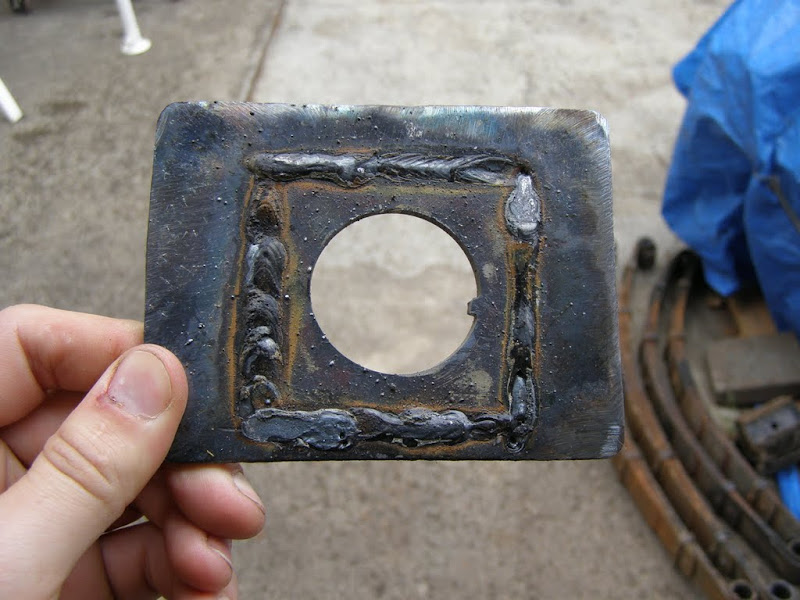
so that it could to here. reused some more parts from the original bracketry in the stepvan
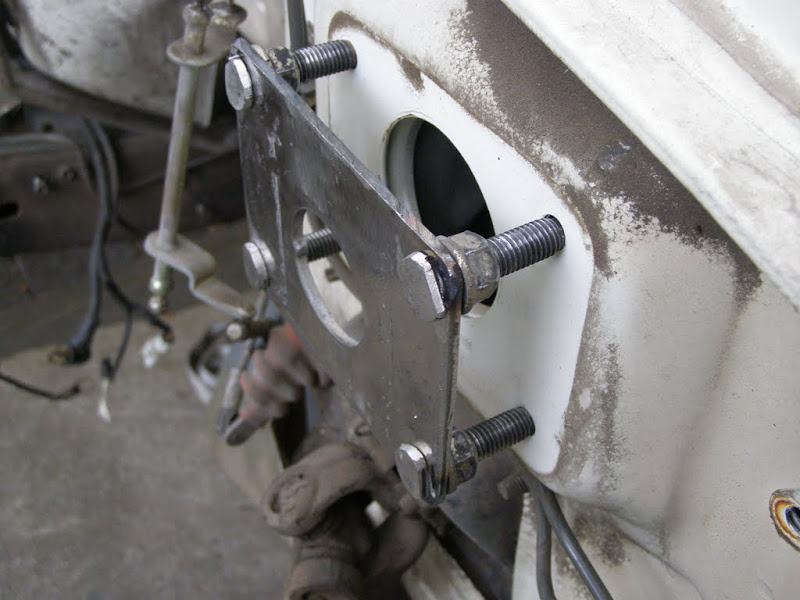
secured those studs and quickly slapped on some paint (I'll probably repaint it)
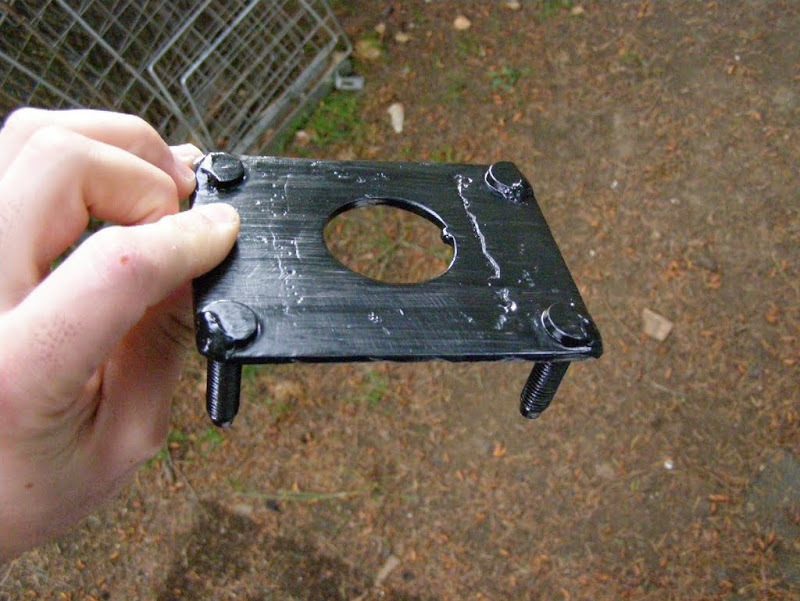
and it mounts to the back of the hydroboost unit like this.
I just cut up the bracket on it and welded the center section into a new plate. I did it that way because it has that notch in it and I didn't want to run to the store to find the perfect sized hole saw. I might not have gotten the notch in the right place meaning the tilt on the brake master might be too much. It did have some tilt on it and if it ends up being too much I'll probably just remove that notch in the circle and rotate it accordingly. The circle is a tight fit and I won't need to find something special to seal the hole on the firewall. I will reuse the cruiser gasket that was on the firewall when I took off the original unit. That should seal it up so I don't have air leaks for cabin comfort.
Here is the intercooler that came from the stepvan. It was black so I sanded off the paint from the fins and painted the ends a cream color. I like the aluminum look through the grill. It almost fits between the supports, so I'll have to do some cutting and this will go first in the cooling row.
I do have a question, but let me set it up first. I plan on stacking the cooling row like this: intercooler-FJ60 AC evap (if thats the right name for it)-FJ60 radiator. I'm going to run a large tranny cooler too, so where would you put it? In the cooling row or locate it separately?
infamous rusty inner channel being yanked
other side. It's not bad but I need to box in the rear section for the shackle mount and it doesn't make sense to leave it in to rust away.
it ended up taking me 1 full day just to get these suckers out! Only have a grinder, drill, and BFH, and prybar to get those out. I was sore the next day from pounding so much. But, alas... Victory!
You can see where the water stays and the rust forms. Luckily it will be fixed by cleaning and painting and not surgery. Back to the pass. side.
The brakes worked well on the stepvan so I'm using the system. Master cylinder painted with rustbullet.
my hydroboost came with a separate resevoir. cleaned/painted.
the hydroboost unit. Since diesels don't produce enough vacuum to run a brake booster I'd have to get a vacuum pump or go to hydroboost. Yup, that was an easy decision.
brake master goes on this side
other side. it's got three ports.
measured the distance from the mounting plate to the center of the hole on the back side of this to find out how deep to mount the hydroboost unit on the firewall
and then I made this
so that it could to here. reused some more parts from the original bracketry in the stepvan
secured those studs and quickly slapped on some paint (I'll probably repaint it)
and it mounts to the back of the hydroboost unit like this.
I just cut up the bracket on it and welded the center section into a new plate. I did it that way because it has that notch in it and I didn't want to run to the store to find the perfect sized hole saw. I might not have gotten the notch in the right place meaning the tilt on the brake master might be too much. It did have some tilt on it and if it ends up being too much I'll probably just remove that notch in the circle and rotate it accordingly. The circle is a tight fit and I won't need to find something special to seal the hole on the firewall. I will reuse the cruiser gasket that was on the firewall when I took off the original unit. That should seal it up so I don't have air leaks for cabin comfort.
Last edited:
- Thread starter
- #35
I really like what I've read about the 4L80. If you are going to run big power and that 700r4 is just stock I would lean towards the 4L80 but I know the decision isn't as simple as that.
Stuff you might know: to operate the 4L80 you will need a controller, either aftermarket or the computer that you got that combo out of. What I've read is it's easier to set up an aftermarket controller rather than trying to get the factory stuff to work right. Then there are the sensors like the VSS that you probably don't have since the 700r4 isn't electronically controlled. Plus the 4L80 is bigger and tranny mounts might not line up. The flywheel flex plate also has a different bolt pattern than the 700r4 so if you plan to slap the new engine and the 700r4 together that will have to be dealt with. You will probably get more money out of the 4L80 if you sell it, thus funding other projects.
I choose the 4L80 over the 700r4 mostly because I'm running a diesel and wanted the extra strength. The lower first gear ratio didn't matter to me because of the torque curve of this diesel. Sounds like a good decision to wrestle with.
Last edited:
I really like what I've read about the 4L80. If you are going to run big power and that 700r4 is just stock I would lean towards the 4L80 but I know the decision isn't as simple as that.
Stuff you might know: to operate the 4L80 you will need a controller, either aftermarket or the computer that you got that combo out of. What I've read is it's easier to set up an aftermarket controller rather than trying to get the factory stuff to work right. Then there are the sensors like the VSS that you probably don't have since the 700r4 isn't electronically controlled. Plus the 4L80 is bigger and tranny mounts might not line up. The flywheel flex plate also has a different bolt pattern than the 700r4 so if you plan to slap the new engine and the 700r4 together that will have to be dealt with. You will probably get more money out of the 4L80 if you sell it, thus funding other projects.
I choose the 4L80 over the 700r4 mostly because I'm running a diesel and wanted the extra strength. The lower first gear ratio didn't matter to be because of the torque curve of this diesel. Sounds like a good decision to wrestle with.
The 700r4 has been beefed up a bit during the rebuild, and the TBI will remain mostly stock. So, I think the simpler & "beefy enough" route is the 700r4. Plus all of the adapters I have are based on this combo.
That being said, the 4l80e should be perfect for your application. I know a good running diesel can produce some evil torque, so you should be in good shape on and off-road.
By the way, I'm doing a similar SOA lift (shackle reversal w/ low profile hangers, etc).
Your build is looking good. Keep up w/ the pics.

- Thread starter
- #37
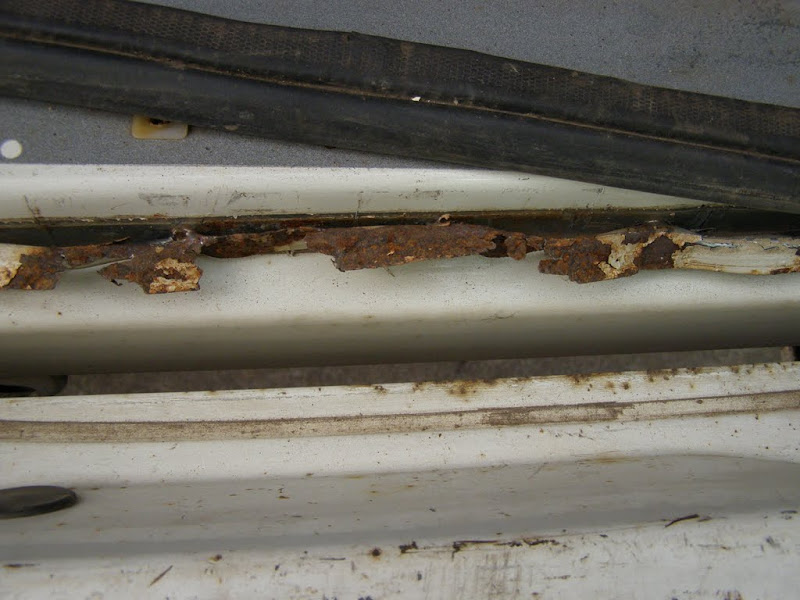
I've got some rust on the back lip that holds the weatherstripping on . I pried it away from the body and found minimal transfer of rust. I'll just replace it with some angle iron so that the gate will seal better.
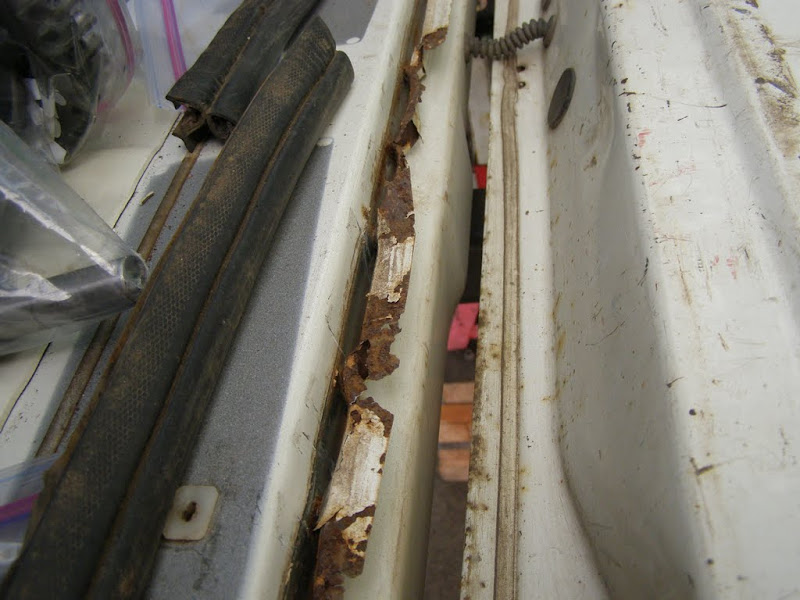
more rust
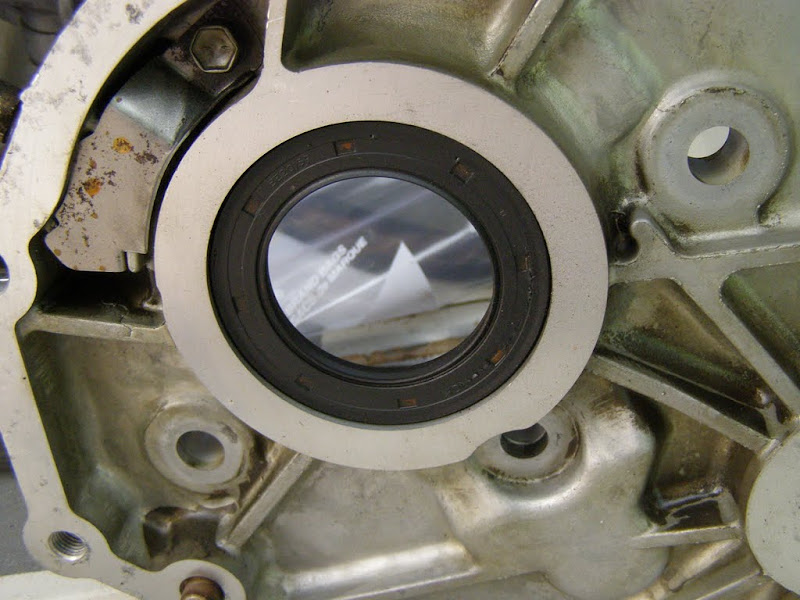
this is the seal between the tranny and transfercase. Mine leaked so I'll replace it. Too bad Marlin doesn't make a new improved seal for this like he does for the axles. I guess I'll have to do this again in another 20 years.
blacked out the headlight bezels

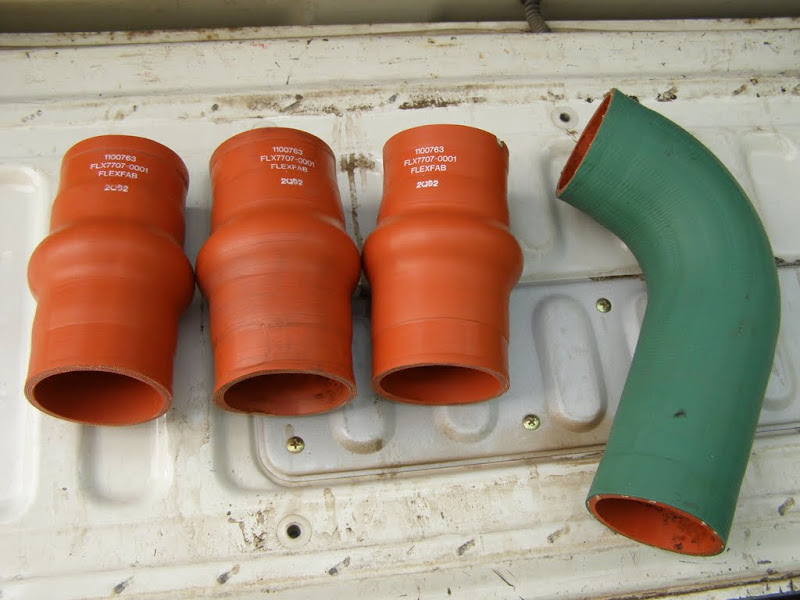
cleaned up the pressure fittings that connects stuff after the turbo
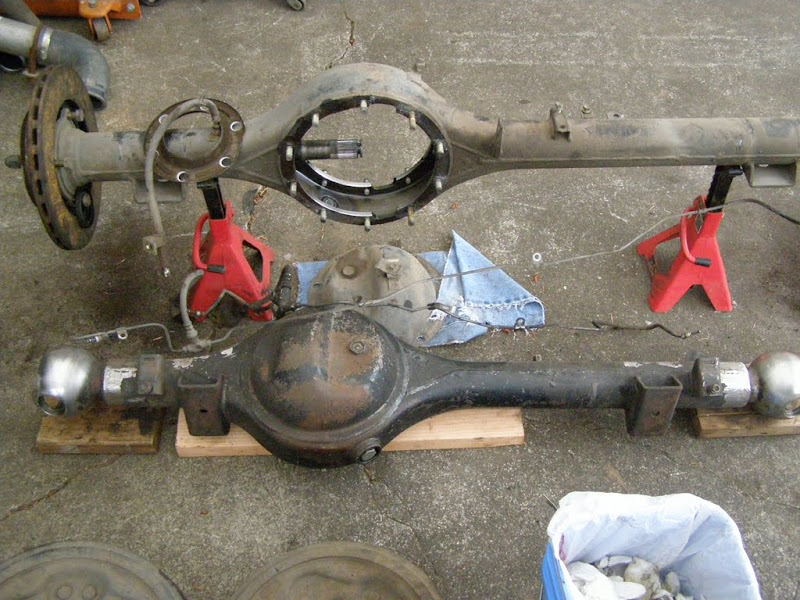
comparison between front and rear stock axles. Those rear landcruiser axles look stout!
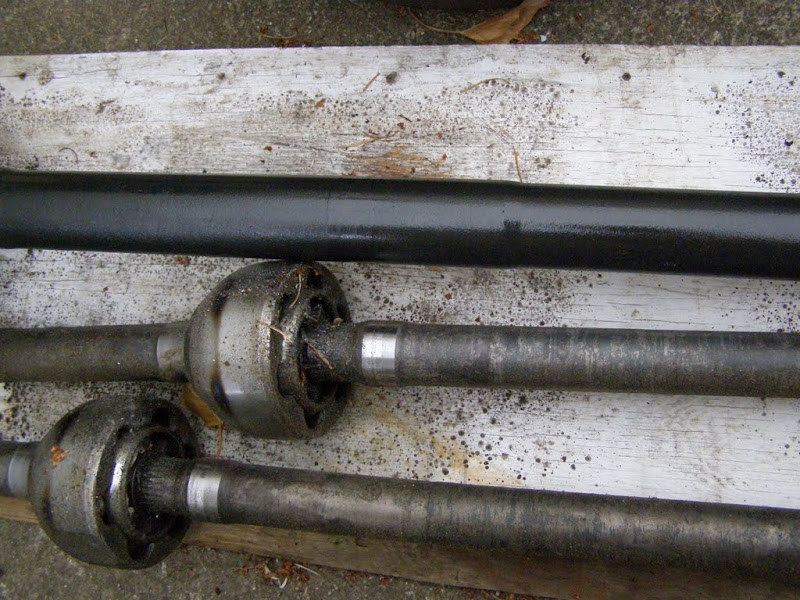
I'm just going to run the rears and if I break one I'll upgrade.
rear disc idea. I bought new front discs and plan on doing the 4runner upgrade but when I started pulling stuff apart the fronts looked pretty good. So, not to be wasteful, I'm going to use my old front stuff to set up rear disc brakes. The mounting ears for the drum assembly will need to be ground down just a little for clearance and I'll mount the discs to the backside of the axle since it won't fit over the flange. The original rear studs don't have a long enough shoulder to bite into the axle flange so I was going to check if front studs will work. If not I'll need to find some that will work. Then it's just making a bracket and lining up the caliper.

the nut on the bottom is what I pounded on to get the studs out. I'll get a new one.

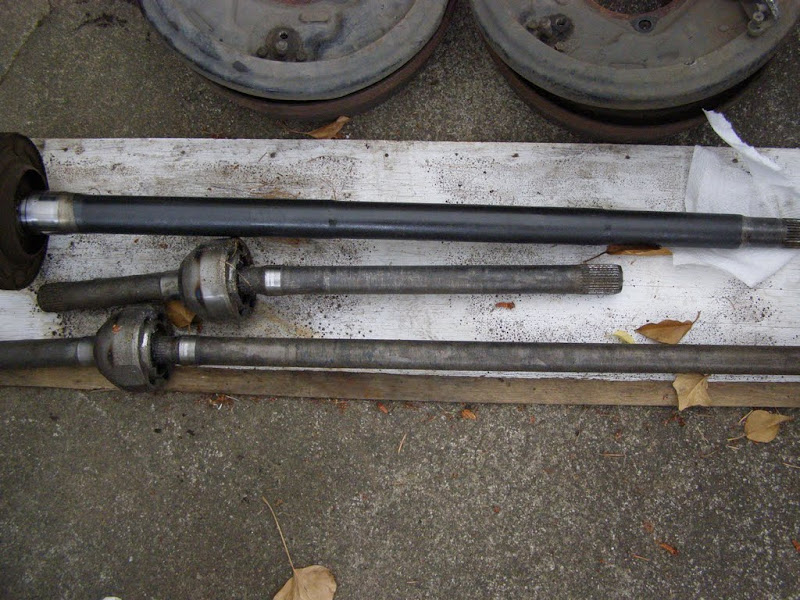
the axles
Well guys, I'm finally caught up. Thanks for going through so much in such a short time. I started the project only 5 or 6 weeks ago. I am plowing on so I hope to be wheeling in a couple of months. And I've finally decided on the configuration that I want to run so now it will be about getting some time on it, and of course sharing the pics along the way. I'll generally get new pics updated at the beginning of the week after a weekend of wrenching. Post away.
more rust
this is the seal between the tranny and transfercase. Mine leaked so I'll replace it. Too bad Marlin doesn't make a new improved seal for this like he does for the axles. I guess I'll have to do this again in another 20 years.
blacked out the headlight bezels
cleaned up the pressure fittings that connects stuff after the turbo
comparison between front and rear stock axles. Those rear landcruiser axles look stout!
I'm just going to run the rears and if I break one I'll upgrade.
rear disc idea. I bought new front discs and plan on doing the 4runner upgrade but when I started pulling stuff apart the fronts looked pretty good. So, not to be wasteful, I'm going to use my old front stuff to set up rear disc brakes. The mounting ears for the drum assembly will need to be ground down just a little for clearance and I'll mount the discs to the backside of the axle since it won't fit over the flange. The original rear studs don't have a long enough shoulder to bite into the axle flange so I was going to check if front studs will work. If not I'll need to find some that will work. Then it's just making a bracket and lining up the caliper.
the nut on the bottom is what I pounded on to get the studs out. I'll get a new one.
the axles
Well guys, I'm finally caught up. Thanks for going through so much in such a short time. I started the project only 5 or 6 weeks ago. I am plowing on so I hope to be wheeling in a couple of months. And I've finally decided on the configuration that I want to run so now it will be about getting some time on it, and of course sharing the pics along the way. I'll generally get new pics updated at the beginning of the week after a weekend of wrenching. Post away.
Last edited:
lookin great man...i want to put a 4bt into something i build in the future
what's the plan for an e-brake? interested in any ideas you've got, i'm stickin w/ the rear drums on my fj62 axles for now...not a fan of the GM swap or of the t-case mounted setup.
also, how large is that intercooler in relation to the radiator?
malphrus
what's the plan for an e-brake? interested in any ideas you've got, i'm stickin w/ the rear drums on my fj62 axles for now...not a fan of the GM swap or of the t-case mounted setup.
also, how large is that intercooler in relation to the radiator?
malphrus