Navigation
Install the app
How to install the app on iOS
Follow along with the video below to see how to install our site as a web app on your home screen.
Note: This feature may not be available in some browsers.
More options
Style variation
You are using an out of date browser. It may not display this or other websites correctly.
You should upgrade or use an alternative browser.
You should upgrade or use an alternative browser.
Builds Evolution of a Land Cruiser: My 80's build thread (2 Viewers)
- Thread starter jcardona1
- Start date
This site may earn a commission from merchant affiliate
links, including eBay, Amazon, Skimlinks, and others.
More options
Who Replied?Some nice mods Jose!
I love the HD pics, keep them coming.
I have subscribed as well!!
I love the HD pics, keep them coming.
I have subscribed as well!!
- Thread starter
- #263
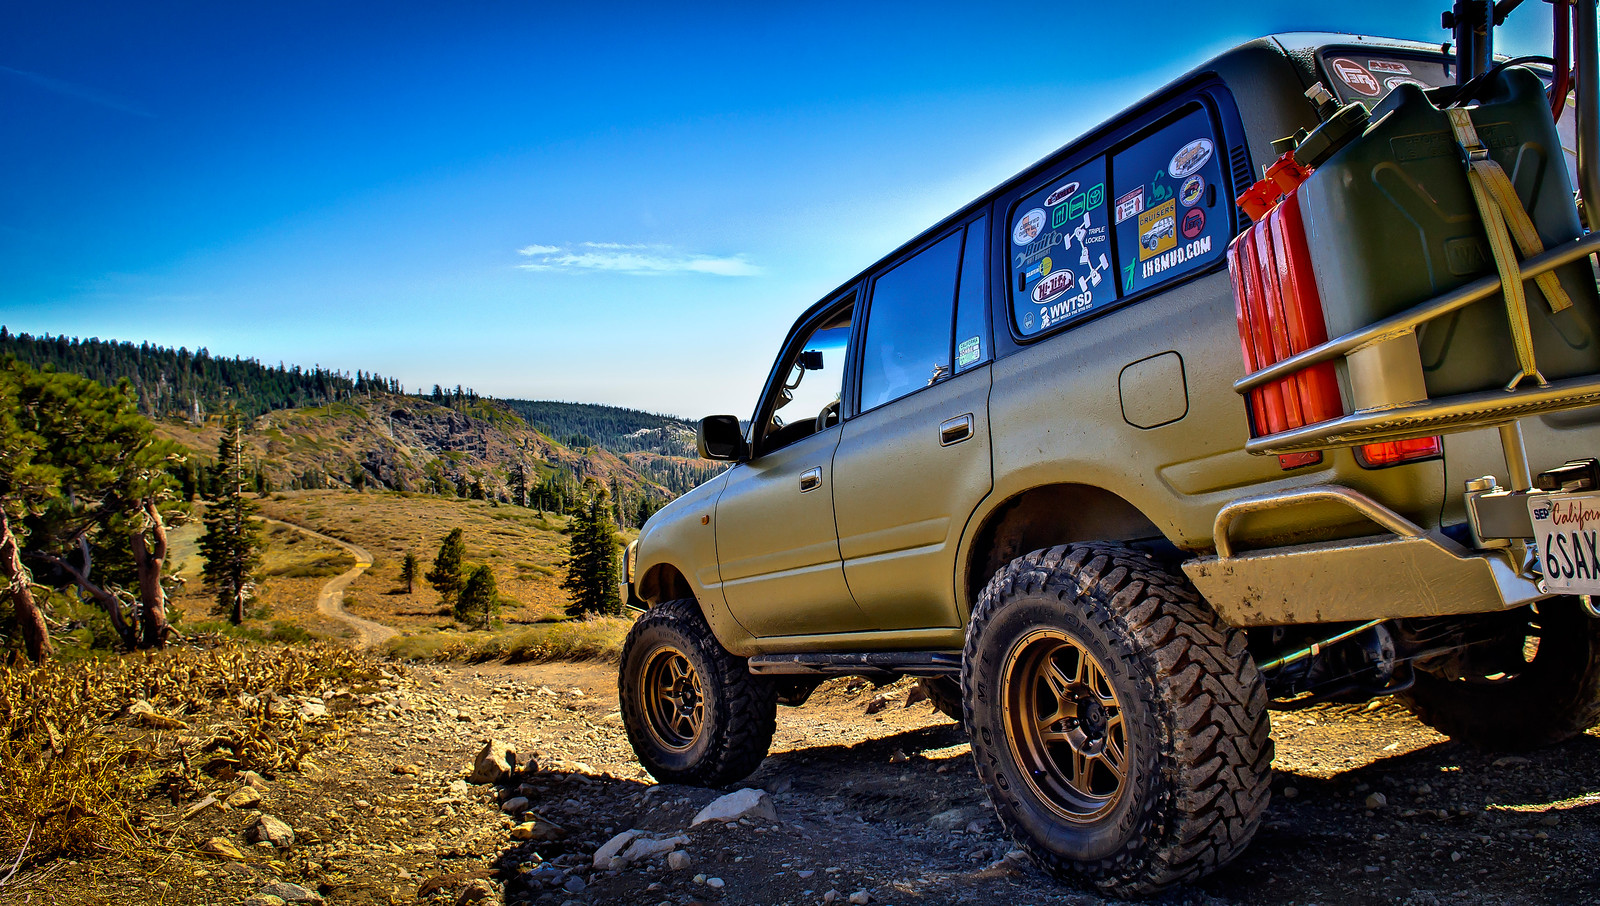
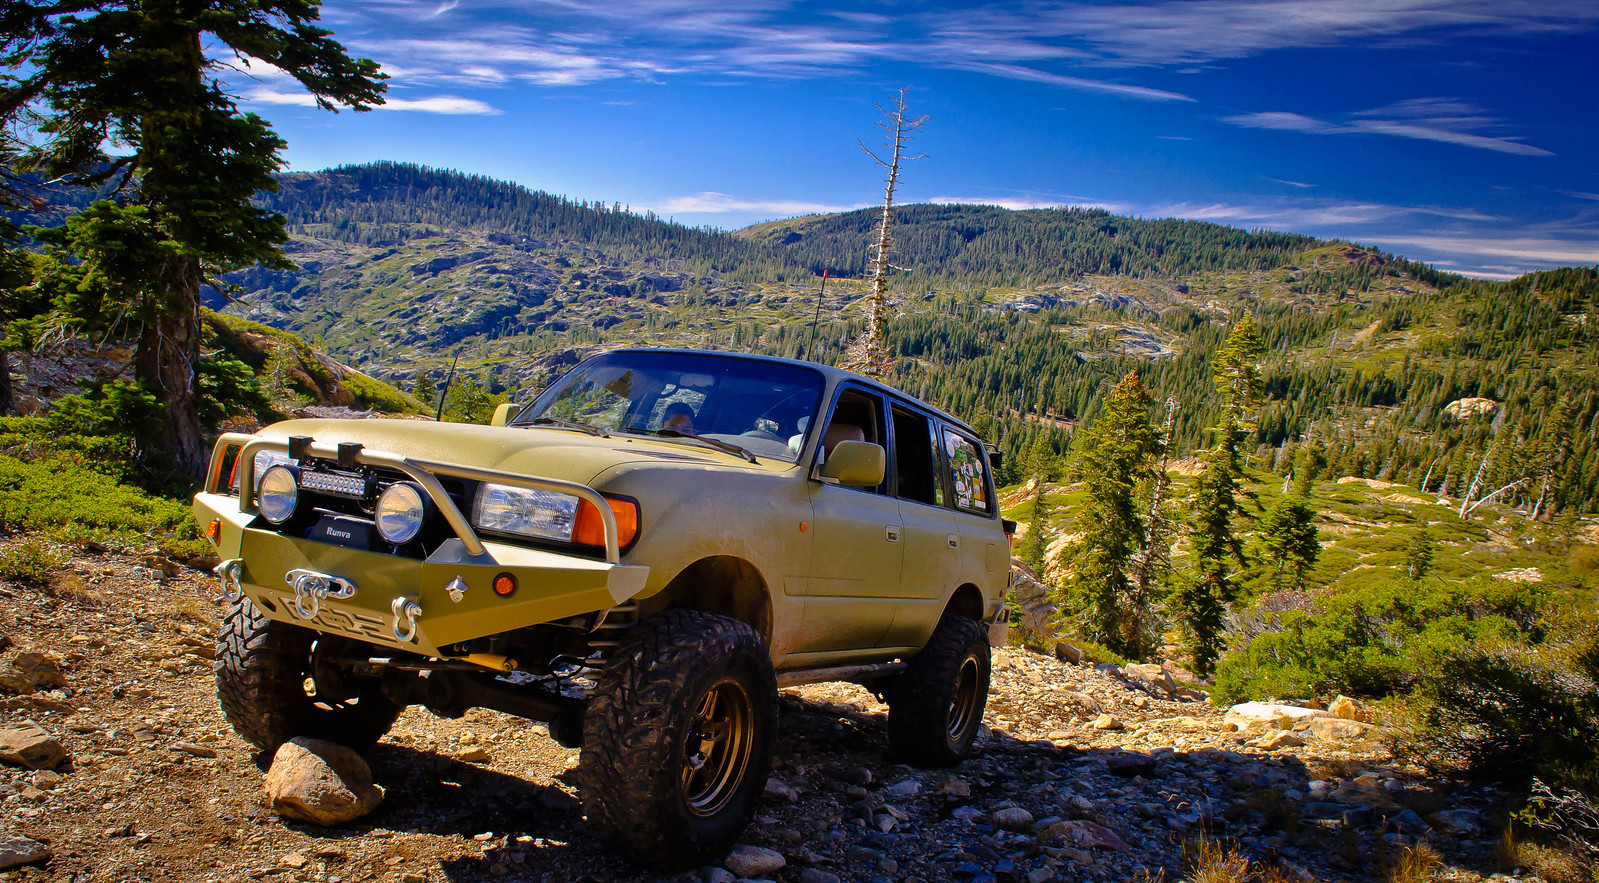
MORE WHEELING & CAMPING!
Just returned from a really neat wheeling trip for my bday weekend. Wife asked why we couldn't go out for dinner and drinks like normal people. Well, I'm not normal! I've been wanting to run Snake Lake for the longest time so I decided now was the time before it started to get really cold. It was an amazing trip. Will definitely be on of the more memorable trips.
Here's a map that I marked up with pink/yellow highlighting. We started up north in the Plumas Eureka State Park and went south on the Gold Valley OHV trail. We then took the short junction from the Gold Valley trail to the Snake Lake trail and ran that trail south to Little Deer Lake. I didn't do the full loop since it was just us and I didn't want to run into trouble on these desolate trails. Half of the loop proved to be very challenging. The last day we continued south on the Deer Lake trail and eventually out to the Sierra Buttes lookout tower.

This is the Gold Valley OHV trail. This is a very easy mellow drive perfect for stock rigs with amazing views.


You'll pass several lakes on the Gold Valley trail. These are Spencer Lakes. You can't drive to them, but you can hike down if you like.

And Wades Lake


Eventually you'll come up to trail that goes left (east). This is the short junction that leads you to the Snake Lake trail. From here on out the trail will get nasty. Even on this short section of trail I needed both lockers and got hung up on a few large boulders. And of course, I only stopped to take pics after I passed the hard parts")


And here's a short clip of my wife trying to spot me in between a large boulder and some exposed roots.
At the end of this junction trail you'll come to another intersection. Right (south) takes you down to the shore of Snake Lake and further on down, Little Deer Lake. This would be running the trail counterclockwise. Going straight takes you clockwise on the Snake Lake loop, which is the difficult route.
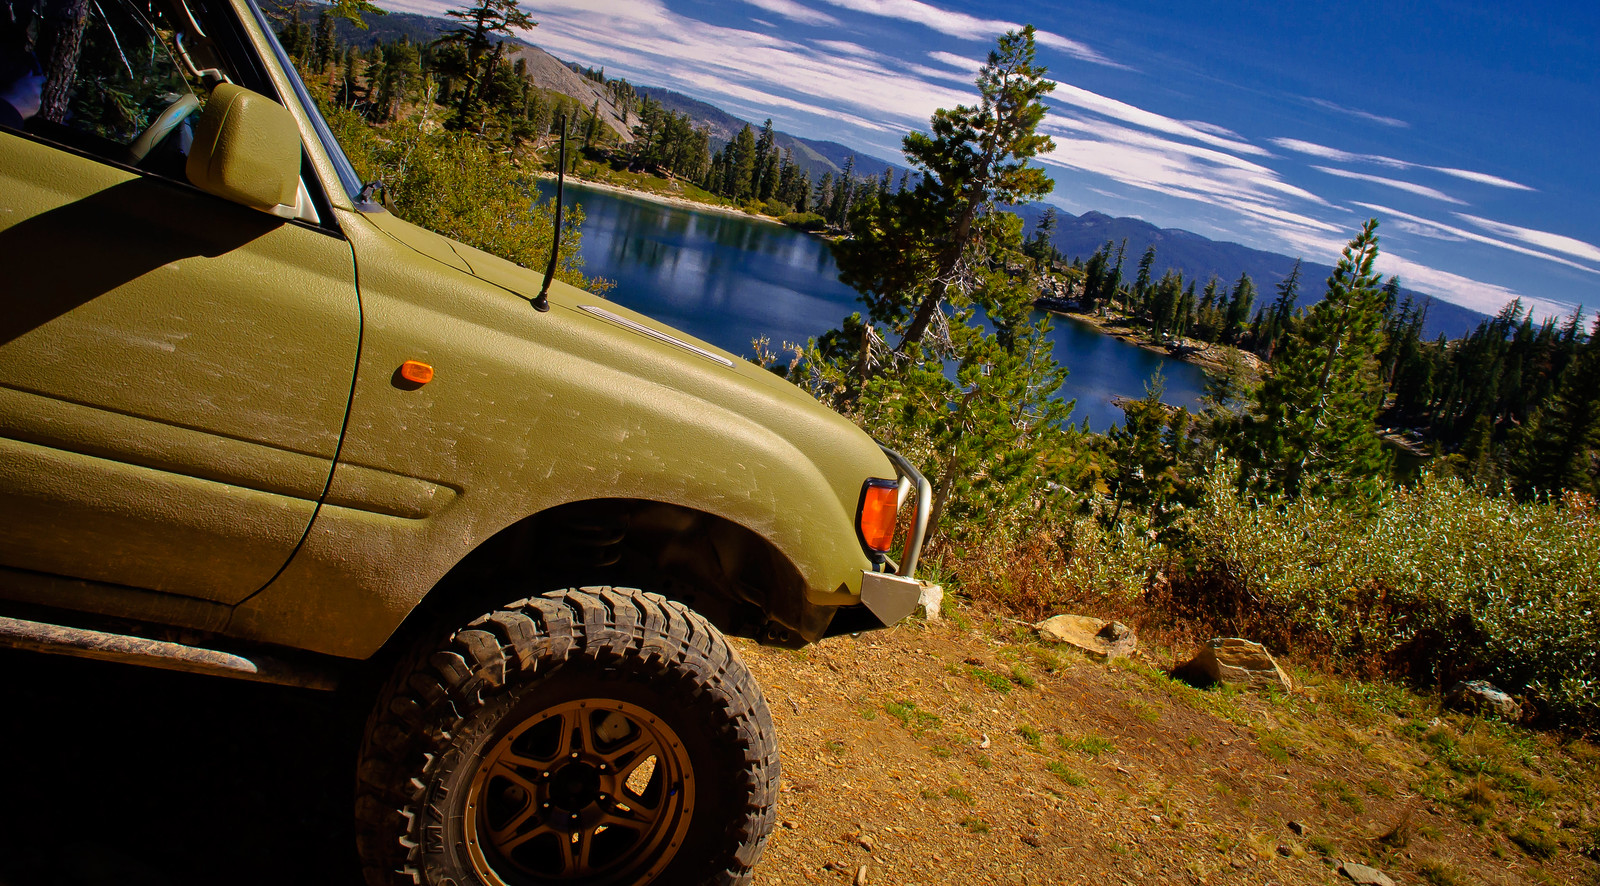
The beautiful Snake Lake


After leaving Snake Lake you'll have a few very steep climbs with loose rocks. I didn't even try climbing these without both lockers on. Didn't want to get in trouble out here alone.
And another short video clip. You probably can't get a feel via video of just how steep this was!
Just returned from a really neat wheeling trip for my bday weekend. Wife asked why we couldn't go out for dinner and drinks like normal people. Well, I'm not normal! I've been wanting to run Snake Lake for the longest time so I decided now was the time before it started to get really cold. It was an amazing trip. Will definitely be on of the more memorable trips.
Here's a map that I marked up with pink/yellow highlighting. We started up north in the Plumas Eureka State Park and went south on the Gold Valley OHV trail. We then took the short junction from the Gold Valley trail to the Snake Lake trail and ran that trail south to Little Deer Lake. I didn't do the full loop since it was just us and I didn't want to run into trouble on these desolate trails. Half of the loop proved to be very challenging. The last day we continued south on the Deer Lake trail and eventually out to the Sierra Buttes lookout tower.
This is the Gold Valley OHV trail. This is a very easy mellow drive perfect for stock rigs with amazing views.
You'll pass several lakes on the Gold Valley trail. These are Spencer Lakes. You can't drive to them, but you can hike down if you like.
And Wades Lake
Eventually you'll come up to trail that goes left (east). This is the short junction that leads you to the Snake Lake trail. From here on out the trail will get nasty. Even on this short section of trail I needed both lockers and got hung up on a few large boulders. And of course, I only stopped to take pics after I passed the hard parts
And here's a short clip of my wife trying to spot me in between a large boulder and some exposed roots.
At the end of this junction trail you'll come to another intersection. Right (south) takes you down to the shore of Snake Lake and further on down, Little Deer Lake. This would be running the trail counterclockwise. Going straight takes you clockwise on the Snake Lake loop, which is the difficult route.
The beautiful Snake Lake
After leaving Snake Lake you'll have a few very steep climbs with loose rocks. I didn't even try climbing these without both lockers on. Didn't want to get in trouble out here alone.
And another short video clip. You probably can't get a feel via video of just how steep this was!
Last edited:
- Thread starter
- #264
[continued]
And we finally reached out destination, Little Deer Lake! This is where we would set up camp. Time for pics!


The dog stopped moving long enough for just one photo

Such a gorgeous lake. We had it all to ourselves. Didn't see one other rig running this trail the whole time we were there!

Set up camp right in front of the water!

The next day it was time to pack up and get some more shots in front of the lake with the early morning light.


Why we do what we do!

The trail after Little Deer Lake wasn't bad at all, just a few more steep rocky climbs as we made our way down towards the beginning of the loop.
After passing the junction we continued on south on the Deer Lake trail. Fun little drive, moderate, suitable for stock rigs. When we reached Deer Lake, we took the short downhill drive to the parking area which is a surprisingly steep downhill climb!


After Deer Lake we continued on south ever further till we eventually came up on the Sierra Buttes OHV trail. This would take us to the Sierra Buttes lookout tower. This is an easy drive suitable for anything except a car but you will climb A LOT of ground. I ran the whole thing in L/L and truck was definitely working to get to top. You'll eventually come to a parking area but if you keep going you can skip some of the hike. You'll reach a locked gate where we parked the truck and hiked on up. I'm not a hiker so this was a tough 3/4 mile climb.
You'll eventually reach the stairs to the lookout tower. 8,600ft!!!!!!!!

The unmanned tower that is now open to the public

The breathtaking views. When you're this high up, there's not much you can't overlook. It was freezing up here, but well worth the effort.


And one last picture before climbing down!

Made the easy drive down the mountains and aired up before heading on home. We drove out through Highway 49 which was a beautiful drive all in itself. We had never driven down this stretch of 49 before so it was worth the long detour.
All in all, great trip. If you live in the area, this is a MUST DO!

And we finally reached out destination, Little Deer Lake! This is where we would set up camp. Time for pics!
The dog stopped moving long enough for just one photo
Such a gorgeous lake. We had it all to ourselves. Didn't see one other rig running this trail the whole time we were there!
Set up camp right in front of the water!
The next day it was time to pack up and get some more shots in front of the lake with the early morning light.
Why we do what we do!
The trail after Little Deer Lake wasn't bad at all, just a few more steep rocky climbs as we made our way down towards the beginning of the loop.
After passing the junction we continued on south on the Deer Lake trail. Fun little drive, moderate, suitable for stock rigs. When we reached Deer Lake, we took the short downhill drive to the parking area which is a surprisingly steep downhill climb!
After Deer Lake we continued on south ever further till we eventually came up on the Sierra Buttes OHV trail. This would take us to the Sierra Buttes lookout tower. This is an easy drive suitable for anything except a car but you will climb A LOT of ground. I ran the whole thing in L/L and truck was definitely working to get to top. You'll eventually come to a parking area but if you keep going you can skip some of the hike. You'll reach a locked gate where we parked the truck and hiked on up. I'm not a hiker so this was a tough 3/4 mile climb.
You'll eventually reach the stairs to the lookout tower. 8,600ft!!!!!!!!
The unmanned tower that is now open to the public
The breathtaking views. When you're this high up, there's not much you can't overlook. It was freezing up here, but well worth the effort.
And one last picture before climbing down!
Made the easy drive down the mountains and aired up before heading on home. We drove out through Highway 49 which was a beautiful drive all in itself. We had never driven down this stretch of 49 before so it was worth the long detour.
All in all, great trip. If you live in the area, this is a MUST DO!
Last edited:
Finnyfam60
Driving miss daisy
Great trip bro! It was my Bday weekend too! We just BBQ down here in the valley though.. We should plan another such trip before it gets too cold and get out there somewhere similarly remote but safety in numbers with two rigs.. Cheers!
Great pics and sounds like a good trip. FYI. Your secret spot on the Stanislaus NF didn't get burned
Tech. Glad to hear you had to exercise the lockers
Tech. Glad to hear you had to exercise the lockers
Jose, these photos were AMAZING!! Thank you for sharing
Great pics and trip report. We love the Lakes Basin area too, try to make it up there at least once every summer for mountain biking and wheeling. Crappy picture, but here's my old 80 at Deer Lake a few years ago.


- Thread starter
- #269
Great trip bro! It was my Bday weekend too! We just BBQ down here in the valley though.. We should plan another such trip before it gets too cold and get out there somewhere similarly remote but safety in numbers with two rigs.. Cheers!
Good stuff man, happy late bday
We really should! You ever ran Eagle Lakes before? That's one area I've been wanting to check out. I've been there twice, but we took the easy drive out to Bowman/Sawmill Lake instead. Great pics and sounds like a good trip. FYI. Your secret spot on the Stanislaus NF didn't get burned
Tech. Glad to hear you had to exercise the lockers
Thanks, and happy to hear the spot is holding up
Jose, these photos were AMAZING!! Thank you for sharing
Thanks, glad you enjoyed them!
Great pics and trip report. We love the Lakes Basin area too, try to make it up there at least once every summer for mountain biking and wheeling. Crappy picture, but here's my old 80 at Deer Lake a few years ago.
View attachment 812047
Thanks, it's such a nice area! Definitely going back next summer and hopefully run the entire Snake Lake loop. Deer Lake, how did you get down there? It looks like it's all blocked off now and you can only get down to the flat parking area, unless I missed the actual trail...
Thanks, it's such a nice area! Definitely going back next summer and hopefully run the entire Snake Lake loop. Deer Lake, how did you get down there? It looks like it's all blocked off now and you can only get down to the flat parking area, unless I missed the actual trail...
Things may be different now, haven't been back to that spot lately but there was an (admittedly somewhat creative) way to get down to the lake a few years ago. Treading lightly all the while, of course!

- Thread starter
- #272
Things may be different now, haven't been back to that spot lately but there was an (admittedly somewhat creative) way to get down to the lake a few years ago. Treading lightly all the while, of course!
Ah ok. I'm wondering if I didn't look hard enough. I did a staircase trail down to the bottom but looked like the entrance was blocked off with small rocks and they didn't want you driving down there. I also didn't see any tire tracks down there, so I didn't proceed further and instead walked down to the lake...
This looks really great...
How long do you have to drive to get to this trail?
Belgium is so small and you can't drive anywhere, no trails, nada. You're destroying the forest, bla bla bla
I'm jealous!
Thanks! This was actually one of my farther trips, it's about a 3hr drive from my place. Most of the time however we only drive 1~2hrs to reach the forest areas
93yotasr5
Come and take it
Wow man that rig is sexy! It's come a long ways since I saw it last!!! Great pics too
Jose,
Your truck is now the desktop wallpaper on my computer at work!

Your truck is now the desktop wallpaper on my computer at work!
This is an awesome build. Great work.
Great 80 you have there & some beautiful pics from that last trip .
Lovin' the trip reports Jose! Excellent photos and super cool seeing that unique truck of yours in the outdoors. I'm diggin the bronze wheels too!
- Thread starter
- #278
Wow man that rig is sexy! It's come a long ways since I saw it last!!! Great pics too
Thanks man! I know I've been saying this forever, but we really all need to get together one of these days. We need another GCC meet, and maybe I'll try to show up this time
Jose,
Your truck is now the desktop wallpaper on my computer at work!
Thanks, appreciate it! If you want any in the fullsize high-res versions just let me know. These are reduced in size a bit.
This is an awesome build. Great work.
Thanks!
Great 80 you have there & some beautiful pics from that last trip .
Thanks!
Lovin' the trip reports Jose! Excellent photos and super cool seeing that unique truck of yours in the outdoors. I'm diggin the bronze wheels too!
Thanks man! I think I'm finally happy with the wheel color for now

Finnyfam60
Driving miss daisy
Thanks man! I know I've been saying this forever, but we really all need to get together one of these days. We need another GCC meet, and maybe I'll try to show up this time
There's always Rubicon Tuesdays....
- Thread starter
- #280
Wanted to post an update of all the random things I've been working on lately so I don't lose track of it all!
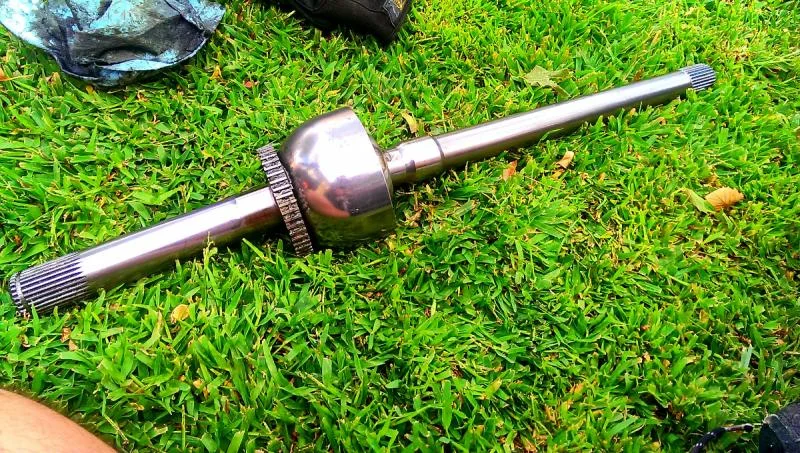
KNUCKLE REBUILD
The Monday after running Snake Lake I drove the truck to work and felt a horrible death wobble with very loose steering. Look underneath and sure enough, one stud gone, one on its way out and a bunch of grease everywhere. Luckily this didn't let go while driving at high speeds, could have been BAD!

So I decided it was time to do a knuckle rebuild anyway since I was starting to get a bit of grease seeping past the wipers. Ordered the parts needed from Cruiser Outfitters and got to work! I also ordered new OEM knuckle studs, cone washers, washers and nuts. Ran a tap through the stud holes and used blue Loctite. Nothing exciting, just a MESSY job. I think I'd rather do the head gasket again


Wheel bearings look to be in good shape so I just repacked them with fresh grease.
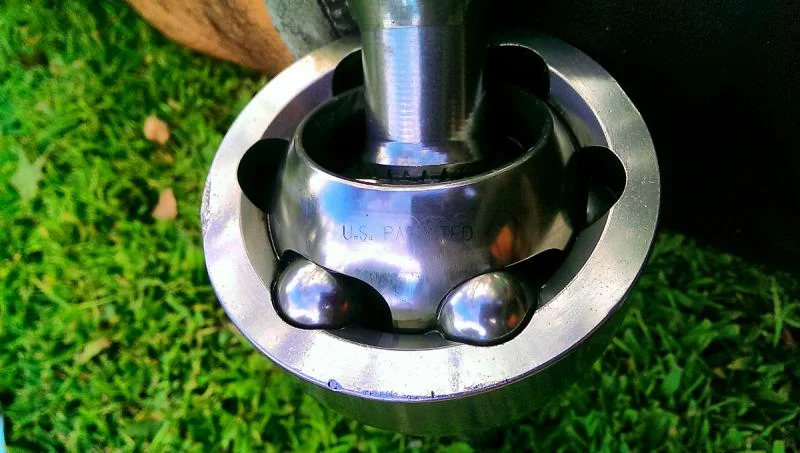
Also got the chance to inspect the purtty chromoly Birfs that were installed according to the PO

MANUAL PROPORTIONING VALVE
While the truck was on jack stands I decided to work on getting rid of the LSPV. Here's a copy/paste from my other thread:
**I haven't tested this on the road yet since my truck is on jack stands, working on a knuckle rebuild. But I did test the system and so far no leaks**
After fighting with my rusted-to-hell LSPV and trying to adjust it, I got fed up and decided to get rid of it. Debated and bypassing it and running 50/50 but finally settled on a manual proportioning valve to give me some control. My truck would nose-dive pretty bad during braking so I knew my front brakes were doing most of the work.
I'll try to make this short and sweet. There's more than one way to skin a cat, but this is mine
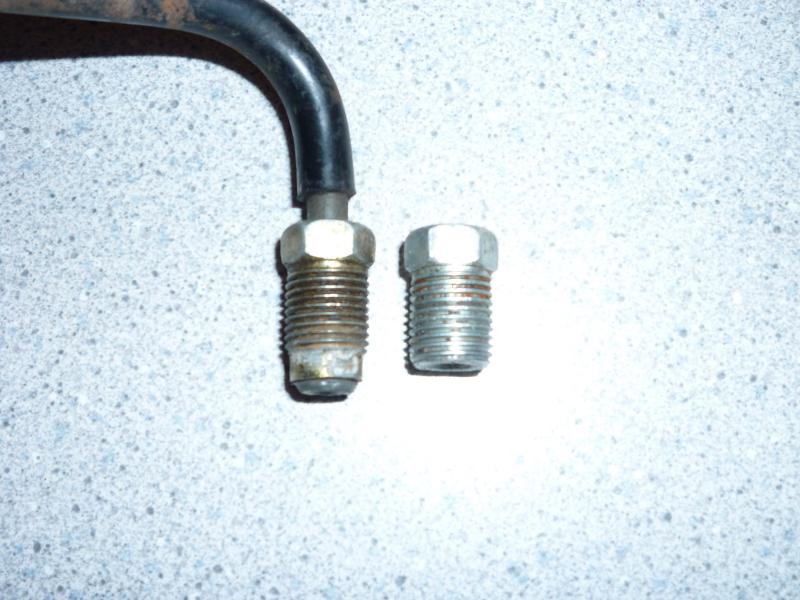
Toyota brake lines are 4.75mm OD and the fittings have a M10x1.0 thread. The flare is "double flare" also called "inverted" flare. The fittings on the left are on all the misc hardware (LSPV, tees, elbows, etc). The fitting on the right is on the master cylinder and ABS unit. They will leak if interchanged (so I read).
PARTS USED:
Wilwood 260-12627. It's threaded in M10x1.0 but the ports are bubble flare, not inverted flare. More on this later.
Wilwood Brake Proportioning Valves 260-12627
Two of these 12" lines with the M10 inverted flare fittings. You should be able to find these at any local parts store
http://www.oreillyauto.com/site/c/d....oap?ck=Search_N0834_-1_-1&pt=N0834&ppt=C0066
One of these, just for the nut fittings. The tubing was not used
http://www.oreillyauto.com/site/c/detail/AGS1/PAE308.oap?ck=Search_pae308_-1_-1&keyword=pae308
I used a small L-shaped metal bracket and attached the valve to an existing bolt on the ABS pump.

Here's the stock configuration of the lines. Start by unbolting 1, 2 and 3. 1 is the "OUT" port to the rear brakes. 3 goes underneath the MC into a tee fitting which then goes back to port #2. The other side of the tee feeds the other line to the LSPV...not sure what this one does, a bypass of sorts? Sensing line? The entire lines 2 and 3 will not be used.

The tee fitting underneath the MC. This whole thing gets scrapped. Remove it and unbolt all the ports.

Another look at the tee underneath the MC

One of the lines coming out of the tee goes down in the driver's side wheel well goes to this elbow bolted to the frame. Undo all this. Keep the elbow and cut off the bracket if you want, I did. This line running along the frame to the back of the truck will be scrapped. Leave it in place or try and fish it out.

Remove all the LSPV junk. You'll have some fun here. Cuss words are your friend. Bolt the main two lines together using the elbow we just removed from the wheel well. You can blow into the line at the wheel well to find out which line you're keeping and which one you're scrapping.

Back in the engine bay it's time to get to work. Connect one of the 12" M10 INVERTED flare lines to port #1 pictured above. As mentioned, the Wilwood valve has bubble flare ports. So you'll need to cut off the other end, use one of the nuts from the M10 BUBBLE flare line, and reflare the line for a bubble flare. I used a cheap $20 kit from a local store and it worked fine, no leaks. The newly flared line will go to the IN port of the Wilwood valve.
Now take the stock line that was connected to port #1, cut off the end and reflare like discussed above using the M10 BUBBLE flare fitting. This goes to the OUT port of the Wilwood valve.
Take the 2nd 12" M10 INVERTED flare line and connect ports #2 and #3.


And that's it! Easy right? Can't wait to get this thing back on the road and finally have some rear brakes!
KNUCKLE REBUILD
The Monday after running Snake Lake I drove the truck to work and felt a horrible death wobble with very loose steering. Look underneath and sure enough, one stud gone, one on its way out and a bunch of grease everywhere. Luckily this didn't let go while driving at high speeds, could have been BAD!
So I decided it was time to do a knuckle rebuild anyway since I was starting to get a bit of grease seeping past the wipers. Ordered the parts needed from Cruiser Outfitters and got to work! I also ordered new OEM knuckle studs, cone washers, washers and nuts. Ran a tap through the stud holes and used blue Loctite. Nothing exciting, just a MESSY job. I think I'd rather do the head gasket again
Wheel bearings look to be in good shape so I just repacked them with fresh grease.
Also got the chance to inspect the purtty chromoly Birfs that were installed according to the PO
MANUAL PROPORTIONING VALVE
While the truck was on jack stands I decided to work on getting rid of the LSPV. Here's a copy/paste from my other thread:
**I haven't tested this on the road yet since my truck is on jack stands, working on a knuckle rebuild. But I did test the system and so far no leaks**
After fighting with my rusted-to-hell LSPV and trying to adjust it, I got fed up and decided to get rid of it. Debated and bypassing it and running 50/50 but finally settled on a manual proportioning valve to give me some control. My truck would nose-dive pretty bad during braking so I knew my front brakes were doing most of the work.
I'll try to make this short and sweet. There's more than one way to skin a cat, but this is mine
Toyota brake lines are 4.75mm OD and the fittings have a M10x1.0 thread. The flare is "double flare" also called "inverted" flare. The fittings on the left are on all the misc hardware (LSPV, tees, elbows, etc). The fitting on the right is on the master cylinder and ABS unit. They will leak if interchanged (so I read).
PARTS USED:
Wilwood 260-12627. It's threaded in M10x1.0 but the ports are bubble flare, not inverted flare. More on this later.
Wilwood Brake Proportioning Valves 260-12627
Two of these 12" lines with the M10 inverted flare fittings. You should be able to find these at any local parts store
http://www.oreillyauto.com/site/c/d....oap?ck=Search_N0834_-1_-1&pt=N0834&ppt=C0066
One of these, just for the nut fittings. The tubing was not used
http://www.oreillyauto.com/site/c/detail/AGS1/PAE308.oap?ck=Search_pae308_-1_-1&keyword=pae308
I used a small L-shaped metal bracket and attached the valve to an existing bolt on the ABS pump.
Here's the stock configuration of the lines. Start by unbolting 1, 2 and 3. 1 is the "OUT" port to the rear brakes. 3 goes underneath the MC into a tee fitting which then goes back to port #2. The other side of the tee feeds the other line to the LSPV...not sure what this one does, a bypass of sorts? Sensing line? The entire lines 2 and 3 will not be used.
The tee fitting underneath the MC. This whole thing gets scrapped. Remove it and unbolt all the ports.
Another look at the tee underneath the MC
One of the lines coming out of the tee goes down in the driver's side wheel well goes to this elbow bolted to the frame. Undo all this. Keep the elbow and cut off the bracket if you want, I did. This line running along the frame to the back of the truck will be scrapped. Leave it in place or try and fish it out.
Remove all the LSPV junk. You'll have some fun here. Cuss words are your friend. Bolt the main two lines together using the elbow we just removed from the wheel well. You can blow into the line at the wheel well to find out which line you're keeping and which one you're scrapping.
Back in the engine bay it's time to get to work. Connect one of the 12" M10 INVERTED flare lines to port #1 pictured above. As mentioned, the Wilwood valve has bubble flare ports. So you'll need to cut off the other end, use one of the nuts from the M10 BUBBLE flare line, and reflare the line for a bubble flare. I used a cheap $20 kit from a local store and it worked fine, no leaks. The newly flared line will go to the IN port of the Wilwood valve.
Now take the stock line that was connected to port #1, cut off the end and reflare like discussed above using the M10 BUBBLE flare fitting. This goes to the OUT port of the Wilwood valve.
Take the 2nd 12" M10 INVERTED flare line and connect ports #2 and #3.
And that's it! Easy right? Can't wait to get this thing back on the road and finally have some rear brakes!
Last edited:
Similar threads
Users who are viewing this thread
Total: 3 (members: 0, guests: 3)