Dr Slug's 1983 BJ42 Build Thread - Yes I need a name for my truck (2 Viewers)

This site may earn a commission from merchant affiliate
links, including eBay, Amazon, Skimlinks, and others.

Well not much has been happening the last week on the truck. The :princess: was getting sick of me not finishing putting up a shade sail out on the back patio, so have been busy with that.

I've been playing around with the window wipers, and it's pissing me off trying to get them lined up. You would think that they would have the same amount of space between them when they are not moving, but the passenger side seems to be awfully close to the rubber seal on the edge.

100_0731.jpg


This was the best configuration I came up with so that the left hand wiper didn't rest on the rubber seal. I tried to match the numbers that are printed up on the back of the wipers but no luck there with any of the catalog numbers.

Well got out the Tectyl 506 out to cover inside the windscreen frame, should keep the frame from rusting out again if water ends up getting in there.

100_0733.jpg


Mounted the windscreen vents and then got the dash pad I bought a few weeks back mounted on, have to give it a bit of a clean though now that its mounted. Got the light working underneath the dash pad as well, although when I turned off the garage lights and sat there in darkness, it does absolutely nothing in the way of lighting up the dash. Is this a normal thing or should I get a stronger globe?

100_0738.jpg


:cheers:
 
Last edited:
Well weekend went too quick, but here's the updates-

Took out air filter box and painted it up. While I was there I replaced the oil pressure gauge sender that I fried the other week. Also installed another battery tray for an auxillary battery. Came up pretty good actually, although was worried I was going to run out of room to mount the radiator overflow bottle - this seems to work where it is, and shouldn't come into contact with the power steering belt.

100_0750.jpg


100_0757.jpg


Installed the bezel - yes it's the right way up

100_0756.jpg


And then mounted the sun visors after cleaning them up. They came up like new after soaking them overnight and a bit of elbow grease.

100_0755.jpg


:cheers:
 
looking good .. LOVE the colour too
 
Looking very nice Nick. :clap:

....I've been playing around with the window wipers, and it's pissing me off trying to get them lined up. You would think that they would have the same amount of space between them when they are not moving, but the passenger side seems to be awfully close to the rubber seal on the edge. ....

I have a possible solution for your wiper problem.

I bought these recently from CruiserCorps and I'm quite impressed (considering how cheap they are and how much difficulty I have had trying to locate similar short blades in this part of the world):
FJ40 11†Universal Windshield Wiper Blades - Pair

My OEM blades are 305mm long whereas these are 285mm long. So maybe with them being 20mm shorter, that left one won't hit your seal anymore.

Of course shipping from the States is a bit of a killer ....

Here's a pic of them fitted to my non-luxury (miserable 2-wiper) 1979 BJ40:
Wipers1.jpg

Wipers2.jpg

:beer:
Wipers1.jpg
Wipers2.jpg
 
Looking really good so far! What did you use to paint your front bezel? I'm looking at painting mine in the near future, and looking at your pics the colour looks alright.
I'll be using a rattle-can though. :hillbilly:

Love the pic with the water beading on the bonnet. Your breathing new life into the little beast. :)
 
..my non-luxury (miserable 2-wiper) 1979 BJ40:

Time to buy an LX Tom ! :p


BTW, what is that tab on the left windscreen hinge ? Non LX luxury ? :D
 
Looking really good so far! What did you use to paint your front bezel? I'm looking at painting mine in the near future, and looking at your pics the colour looks alright.
I'll be using a rattle-can though. :hillbilly:

Love the pic with the water beading on the bonnet. Your breathing new life into the little beast. :)

Hi Dan, yeah the front bezel was done with a rattle can as well - used a Rustoleum can from Bunnings. Wasn't too sure how it would turn out but used the same can on my last truck, and was happy with that. Gave hit a heap of coats though, seemed that my paint kept attracting flies :doh:

:cheers:
 
...BTW, what is that tab on the left windscreen hinge ? Non LX luxury ? :D

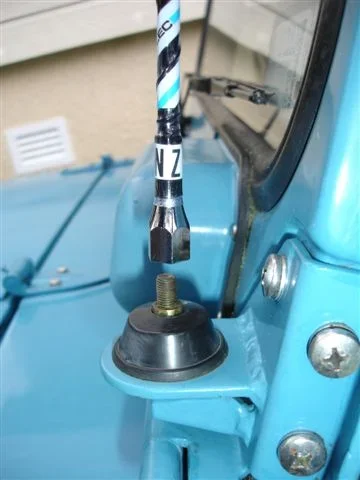
Looks like a CB radio antenna mount, pretty handy spot for mounting a small antenna really, I like it :clap:

Nick's right. But it isn't all that great really.

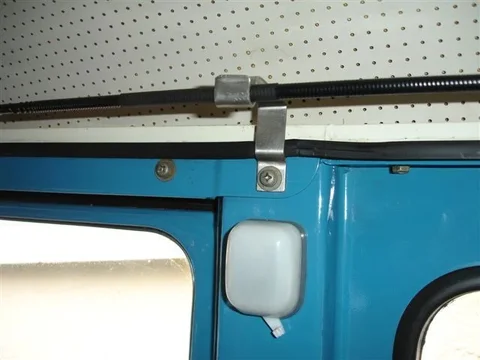
The aerial is normally tucked up under the roof (out of the way of vandals):
CB1.jpg

With a stainless holding-clip over the inside-light:
CB2.jpg

And with the base screwed into a fitting attached to the rear gutter:
CB3.jpg

Continued next post .............
CB1.jpg
CB2.jpg
CB3.jpg
 
The problem with my hinge-mount is that I found later (after I welded it on quite a few years ago) that the aerial had a tendency to whack the front edge of the roof guttering during wind gusts.

So after much head-scratching, my remedy was to fit this little device to the front LH corner of the guttering:
CB5.jpg

So now you pass the aerial through that teflon hole first before screwing the base onto the hinge ..... so ......
CB4.jpg

And the end result is this .....
CB6.jpg

Which to be honest I'm not all that happy with ... But it works well enough .... And I'm still not sure how I could have done it better (although I'm pretty convinced it could indeed be done better).

:beer:
CB5.jpg
CB4.jpg
CB6.jpg
 
Well sorry all for no updates on here for a while, have got a new computer and was having troubles with my photobucket login.

Well firstly I have painted up the drivers door now, here's some shots of the work-
100_0765.jpg


100_0766.jpg


Door was looking great for the month or so since it was painted up, until last week when I was pushing the truck out of the garage to work on it it came in contact with the side of the roller door. No dents or anything though, but I'll have to touch up the paint when I'm painting the passenger door later on. The joys of working in a single car garage :)

Painted the under body with stone guard paint, then fitted the new Old Man Emu shocks and steering damper-

IMG_0124.jpg


IMG_0122.jpg


Cleaned up the skinny wheels I had from the old truck, nothing that a bit of steel wool and elbow grease couldn't take care of-

IMG_0119.jpg


IMG_0120-1.jpg


Picked up a fibre glass tail gate just before Christmas as well, here's a pic of it fitted with some small hinges. Im not entirely sure if I will keep it fitted like this, or go down the path of having some bigger hinges on the outside. I was hoping to steer clear of having visible hinges on the outside of the vehicle, because I dont want to see them or holes there when I'm running the full roof with barn doors.

IMG_0186.jpg


IMG_0187.jpg
 
great job, subscribed. I had a bear of a time with wipers as well on mine. I had the same rust issue under the windshield hinge. Had to buy donor sections from $OR for both left and right side and totally cut out and replaced.

R
 
Well I've decided to ditch the mounting of the tailgate, I have ended up using some spare hinges I had for the barn doors. Had to create a new mounting for the lower hinge, but with a few drill bits and a plate of steel on the backside of it, they came up nice. Pretty strong as well, which should be good for a drop down table off the tailgate to put the bbq on later on-

IMG_0367.jpg


Started cleaning up the upper rear panels and painting them, the LHS one was absolutely rooted with rust, so I've picked one up on ebay after hunting for one for a few weeks. Was from an earlier model with the little pop out vent window, so I cut off the steel strip between the two windows. Both got the POR-15 treatment before the primer coat went on, hope to get some colour on them tomorrow-

IMG_0358.jpg


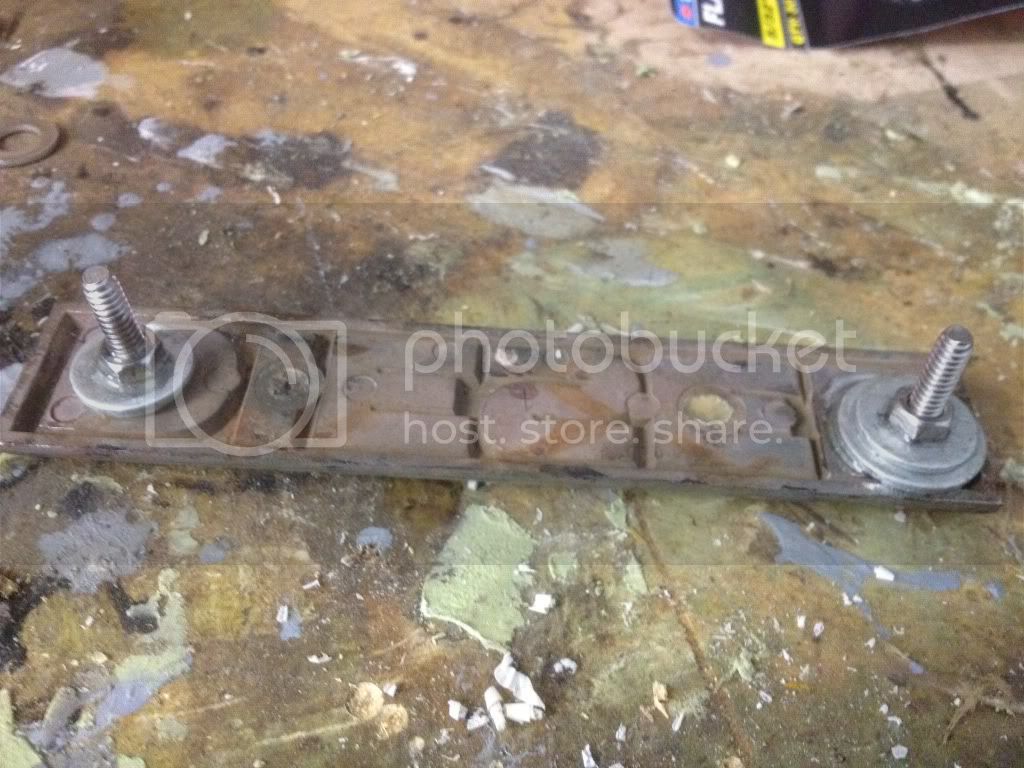
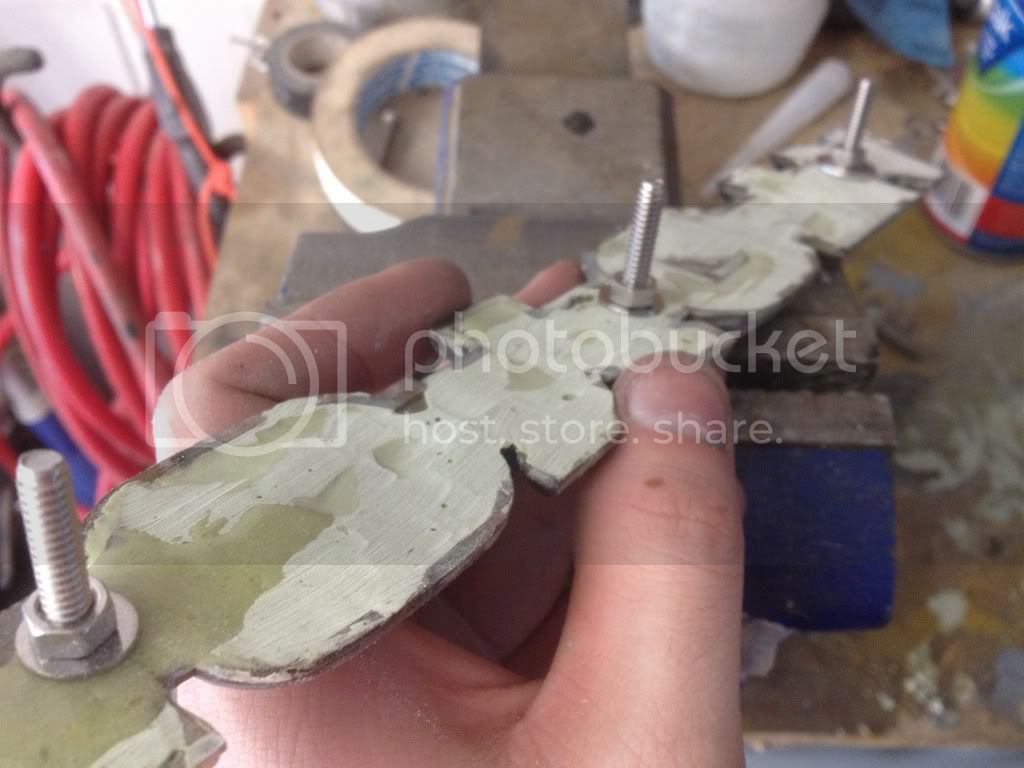
Also started playing around with the badges that go on the grill in front of the radiator. Now I don't like the plastic parts that sit through the grills, and mine have half snapped off. So I have countersunk some stainless bolts into them, then bogged over the top of the holes. Im painting them up and sanding them still, but here is some shots of what I have done so far-

IMG_0420.jpg


IMG_0421.jpg


IMG_0423.jpg


IMG_0425.jpg


IMG_0436.jpg


:cheers:
 
Well I havent been on here for a while, so thought I would update whats been happening with the truck.

I bought a used rollbar a few months back, which turned out to be exactly what I was after. The mounts on the bottom were badly rusted though, so I had to cut them off and weld new ones. First time using an arc welder, but seemed to get the hang of it pretty quickly, and its come up really nice I think-

Pic of the rollbar as I bought it-
IMG_0216-1.jpg


I decided to cut off the extra part at the top of it as well, apparently a tool box or similar was mounted to it in its previous life.

Here's a pic of it sitting in the truck when I was making sure it would fit when I had the roof back on. At the time I didn't have the rear upper side panels, so had to go off peoples measurements from this site.

IMG_0229.jpg


The new mounting plates on the bottom, 6mm plate -

bafcdd57.jpg


Now I am just wondering how high up I will mount the seat belts, the existing hole seems too low-

IMG_0345.jpg


Well in the last post I had on here I showed you how I was fixing up the badges that go on the front apron, here's the Toyota badge mounted on the front of the truck- Still need to touch up a little bit of it and then clear coat it, but I reckon it's come up pretty good.

49172519.jpg
 
Well I finally got around to painting the tailgate, I ended up going with the side opening hinges -

e9f460d1.jpg


Cleaned up the number plate holder as well, which came up really nice-

b7e34227.jpg


And finally painted the side panels. I ran out of room in the garage for these, so much to the :princess: delight, they sat in the lounge room for a few weeks.

a55ab6a1.jpg


Cleaned and repainted the sliding window frames, and replaced the rubbers the windows slide on-

b0366922.jpg


Here's a pic of the drivers side panel mounted. The sliding windows are a bit tight still, but I figure they will loosen up over time, not that I will probably be opening them too often anyway. I left the rubber edging on the top of the sill that you may remember from an earlier post I put around the whole rear of the car, made a really tight seal between the top panel and the body which I was happy with.

d791efd4.jpg


And finally painted up the passenger side door-

6eb79f29.jpg
 
Well I've mounted both of the side rear panels on the truck now, and its so much better in the garage not having to move something before getting to the bench.

c0c86ef4.jpg


Had a mishap with the roller door closing on the spare wheel carrier during the week, so decided it was time to finish off the lock part for it-

8dc3e0a8.jpg


Well I went to install the windows and locks back into the doors, and came stuck when the running channel attached to the glass came away. Had to scrape of 30 years worth of rust and gunk, then got the trusty liquid nails onto it to secure back on-

a81d0e6e.jpg


The bailey channel rubber I bought was clearly not the right one, it kept disapearing into the door frame when I wound the window up. Oh and one lesson learnt- dont use SikaFlex to hold it in place, the stuff goes everywhere.

Well the truck now is only missing the roof. Im on the hunt now for an early model lift up door for the rear - I cant be arsed taking off barn doors and putting the tail gate back on if I want to run the truck without the top on for a weekend.

2394db2a.jpg
 

Users who are viewing this thread

Back
Top Bottom