I decided last week to transplant all my old stereo Equipment from my FJ62 into the new FZJ80. Having done quite a few car stereos in my youth, as a professional car stereo installer, I was not about to pay some one to install my equipment.
So… – after a week of having the truck apart, and several beers..here is a short write-up of the install.
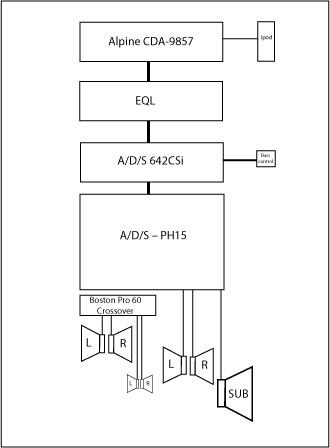
Equipment list:
Alpine CDA-9857 Head unit with Sat radio and Ipod control
A/D/S – PH15 Six channel Amp 6 x 50 watts
A/D/S 642CSi – Active Cross with Remote Bass control
EQL Equalizer/Pre Amp
Boston Acoustic Pro60 6.5”2-way component system
Boston Acoustic SL65 6.5” - 2 way car coaxial speaker
Boston Acoustic G2 12” Sub woofer
The Alpine Unit went in where the old radio was, not much to say here, removed the dash trim and the radio bolted write up to the existing brackets. – one beer job.

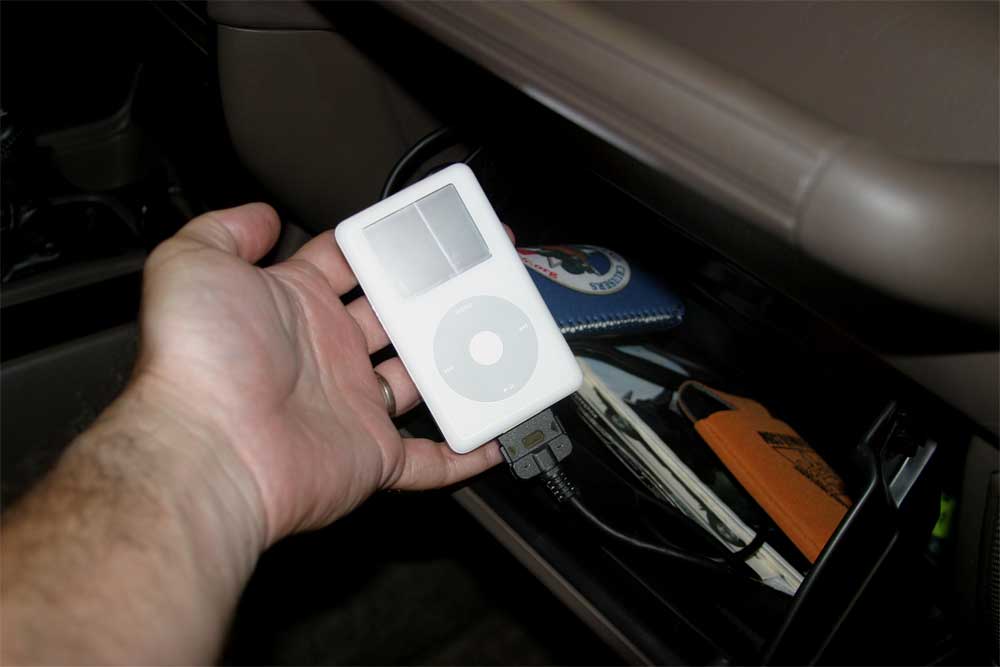
I routed the ipod cable to the glove box – one beer job.
The next step was to wire up the truck. I ran one large power wire to a spot under the center console. I used that fancy car audio wire 2 gauge. From that main power wire , I ran smaller gauge wire to the other components under the two front seats. Of course it all fused and grounded to one main ground. – another beer.
In car audio – everything must be grounded to one point. Even the Head unit has a ground wire running back to the same point as the amps and crossover. This eliminates ground loops in your system, if you have ground loops – you might get the annoying buzz – or whine, thru your speakers. You might never get this noise, but why risk it? So..everything gets a common ground.
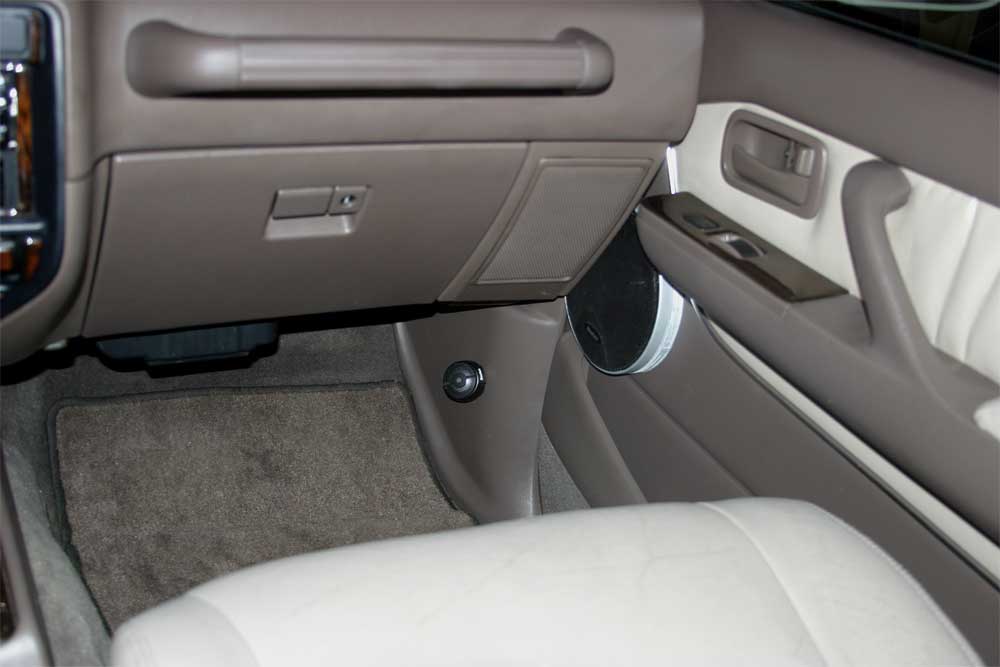
Then I ran all the speaker cables, and control cables for the remote Bass control that in the center console. The knob on the drivers side is the Bass control, and the button on the passenger side is the garage door opener, that is hidden in the dash.

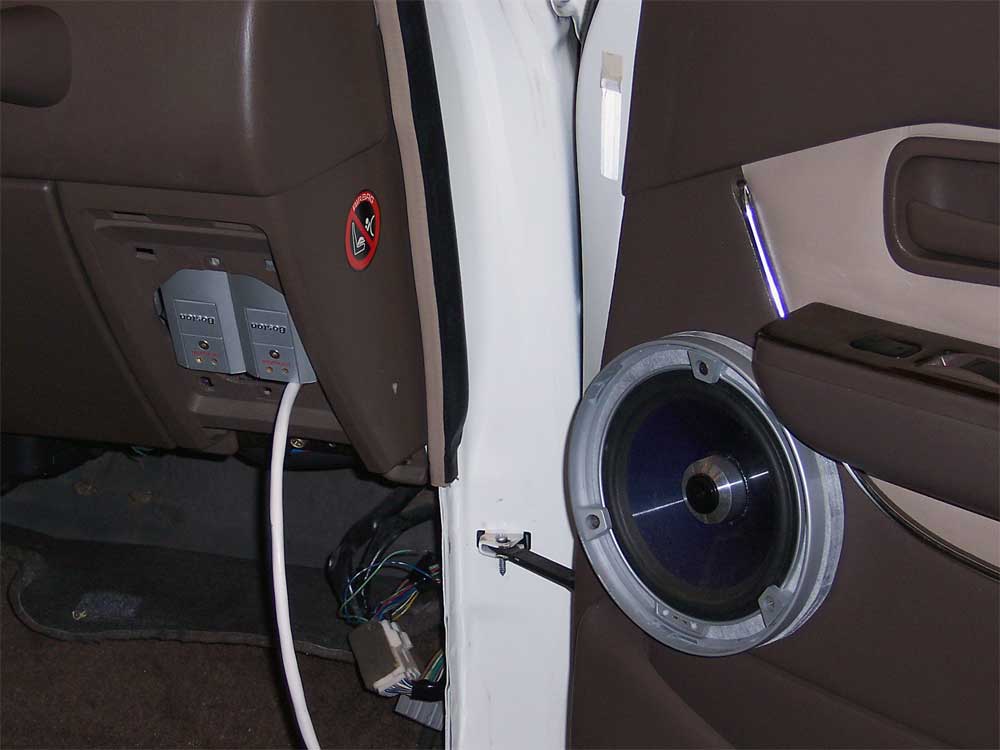
Under the drivers seat I installed the EQL and the A/D/S 642 CSI.

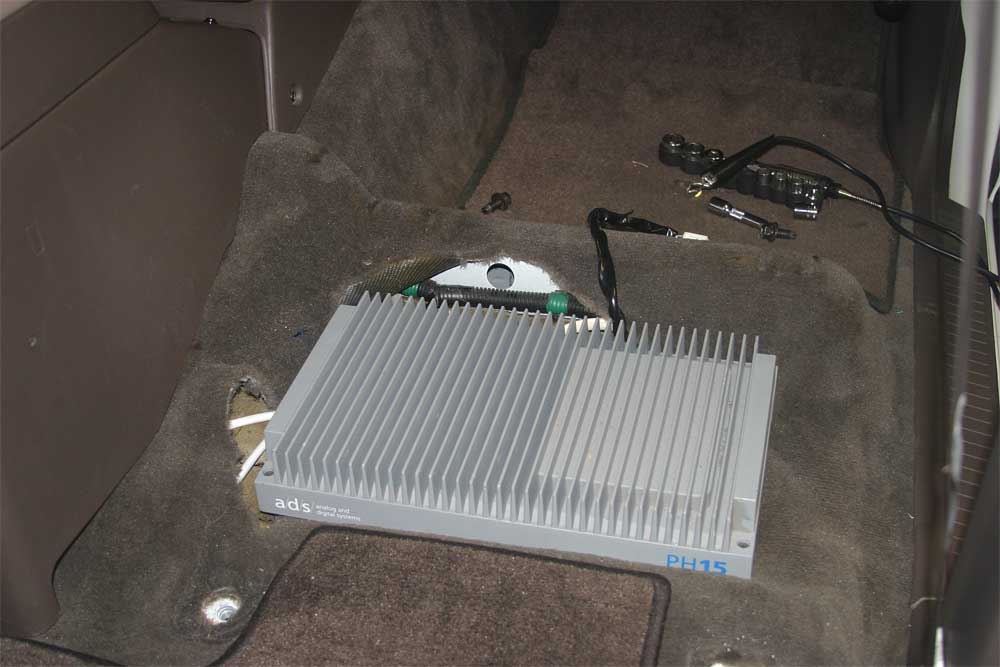
Under the passenger seat I installed the A/D/S PH15. Iam running this amp in 5-channel mode. This way the Subwoofer receives a mono 100watt signal for rear view mirror shaking bass.
I sacrificed the read heater for this. Living in Austin, Texas – our winters our mild and I won’t miss the rear heat. (Sorry, no pictures, I forgot to take one.) Pulling the rear heater was easy, I just cut the hoses and unbolted the unit. I then connected the two hard heater lines to each other with a couple of clamps and a piece of flexible heater hose. Then I made a plate to cover the hole in the floor, screwed it to the floor board, and sealed it up with silicone. – two more beers.
Why did I not place the amp in the rear area where the factory sub is? I have plans to use that for cargo area as well as my powerinverter.
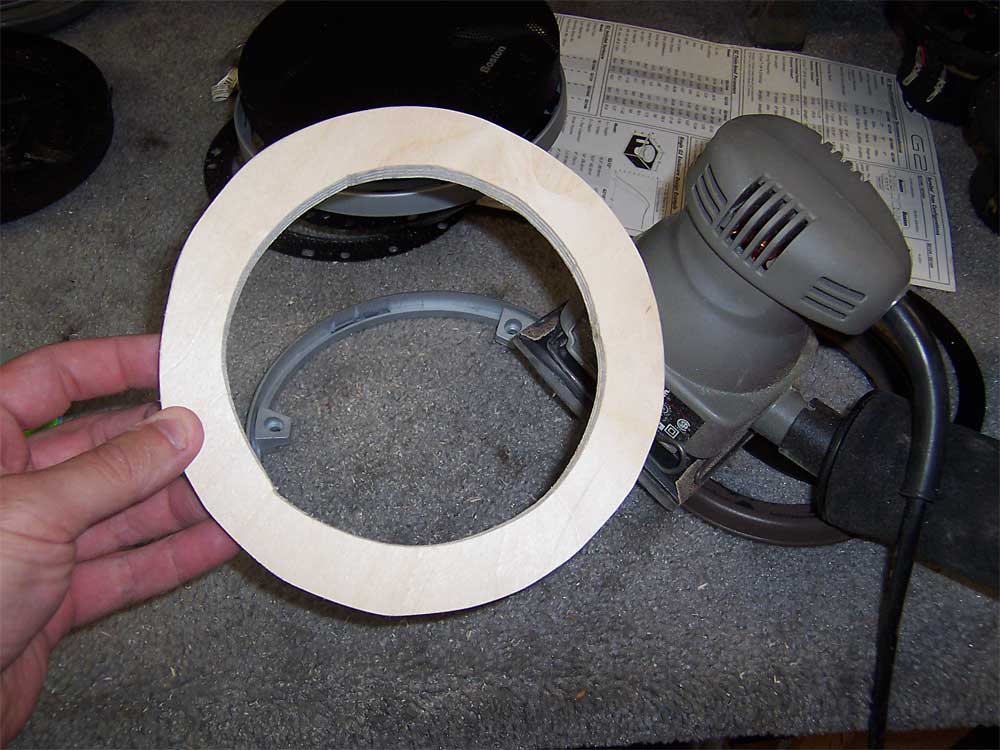
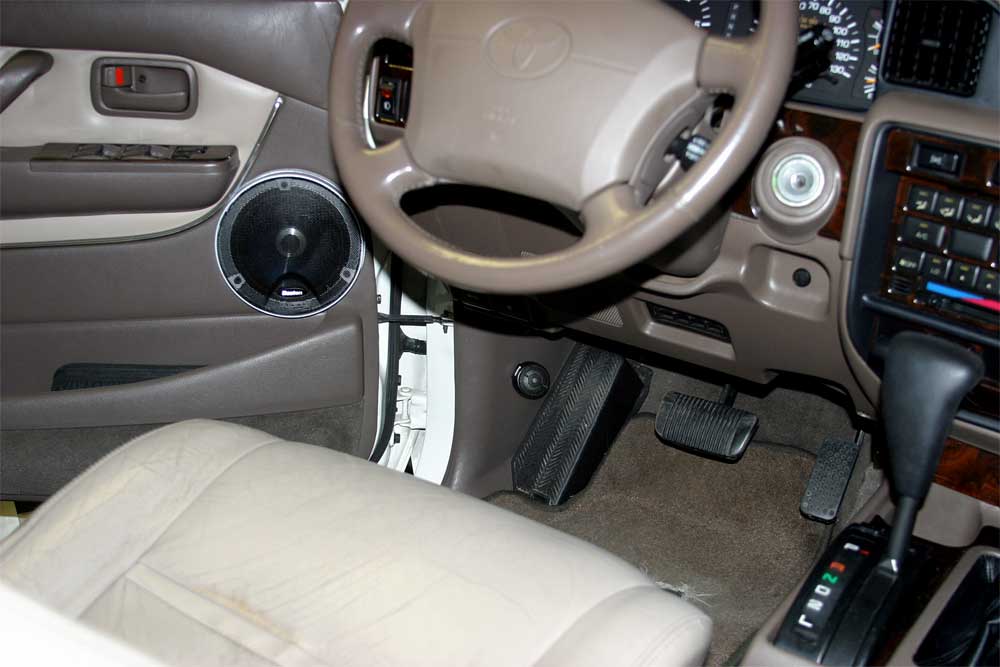
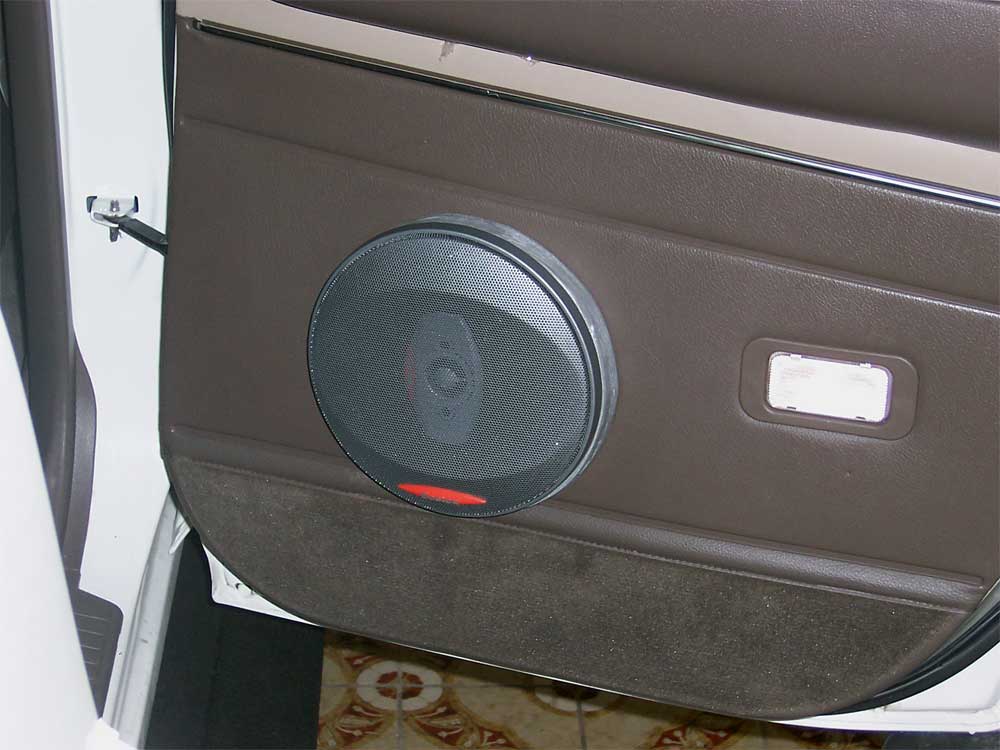
Moving on to the front speakers. To be able to fit 6.5” speakers in the doors, I build one inch spacer rings out of birch wood, and used grey paint to match the speakers.
I then attached the speakers to the door panels using the metal ring that the speakers came with. Just a bit of door metal had to be trimmed so the speakers would fit. Once the door panel was attached, with the speaker in place – I added one screws thru all the way thru the speaker rings to the metal in the door.
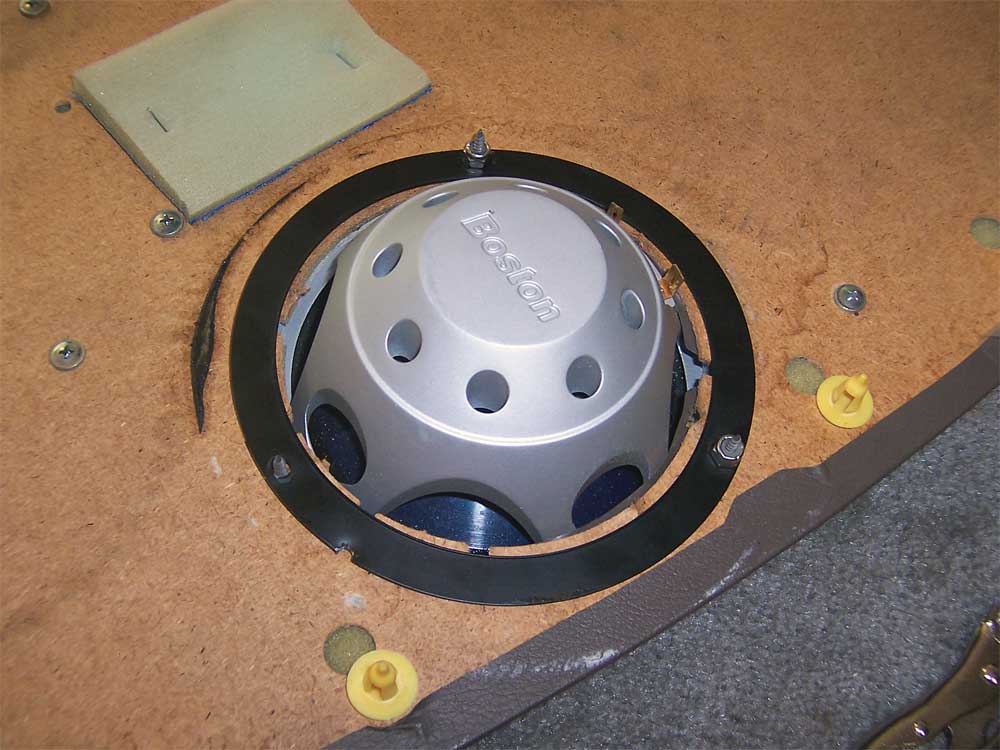

The crossovers are very large for the Pro60’s so I stuffed one crossover in the space used for the factory speaker, and the other is under the middle console.
I then trimmed down the speaker grills and glued them on using silicone to the to the plastic trim rings. – three beers
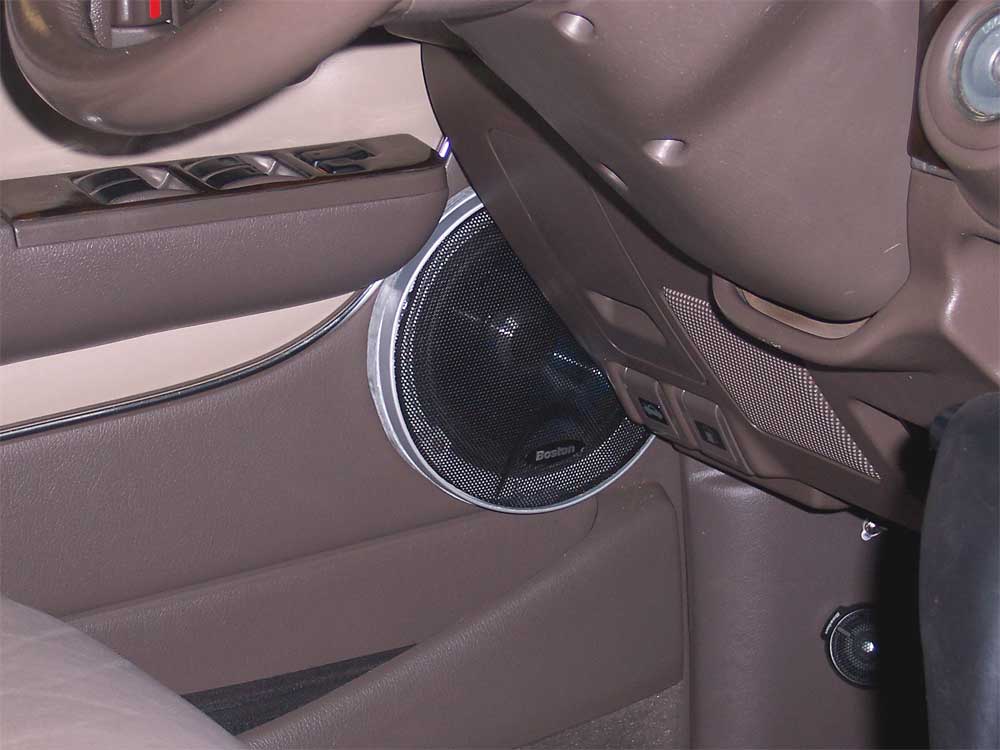
I then mounted the tweeters in the front kick panels. I like the placement of the tweeters there because it gives a incredible front staging and great imaging. I have done this in the last four cars, and have yet to have anyone, or myself kick a tweeter with there foot.
As for the back speakers – same process, but no trimming of the speaker grill was needed. – half a beer.
Then it was time for the subwoofer. I placed the box in the back, and hooked up the wires. ☺ Iam just using the old box from my FJ62, when I tackle the rear of the truck to install my Norcold and power inverter, I ‘ll build a new sub box. That will be “Part II”.

Once everything was installed, I tuned they system with a Real Time Analyzer and SPL Meter. This was done at my friend’s car stereo shop. To tune a car using a RTA, you set up microphones in the car, then play a CD of white noise that the RTA use to analyze the system.What is a RTA?
Then use your equalizer to tune the system so it is flat, and also sounds to your ear.
My goal was not going for a loud system, but just a nice sounding accurate one. I listen to a very wide variety of music, and wanted a system that could perform for all types of music.
So there you have it! Hope someone find this information useful.
So… – after a week of having the truck apart, and several beers..here is a short write-up of the install.
Equipment list:
Alpine CDA-9857 Head unit with Sat radio and Ipod control
A/D/S – PH15 Six channel Amp 6 x 50 watts
A/D/S 642CSi – Active Cross with Remote Bass control
EQL Equalizer/Pre Amp
Boston Acoustic Pro60 6.5”2-way component system
Boston Acoustic SL65 6.5” - 2 way car coaxial speaker
Boston Acoustic G2 12” Sub woofer
The Alpine Unit went in where the old radio was, not much to say here, removed the dash trim and the radio bolted write up to the existing brackets. – one beer job.
I routed the ipod cable to the glove box – one beer job.
The next step was to wire up the truck. I ran one large power wire to a spot under the center console. I used that fancy car audio wire 2 gauge. From that main power wire , I ran smaller gauge wire to the other components under the two front seats. Of course it all fused and grounded to one main ground. – another beer.
In car audio – everything must be grounded to one point. Even the Head unit has a ground wire running back to the same point as the amps and crossover. This eliminates ground loops in your system, if you have ground loops – you might get the annoying buzz – or whine, thru your speakers. You might never get this noise, but why risk it? So..everything gets a common ground.
Then I ran all the speaker cables, and control cables for the remote Bass control that in the center console. The knob on the drivers side is the Bass control, and the button on the passenger side is the garage door opener, that is hidden in the dash.
Under the drivers seat I installed the EQL and the A/D/S 642 CSI.
Under the passenger seat I installed the A/D/S PH15. Iam running this amp in 5-channel mode. This way the Subwoofer receives a mono 100watt signal for rear view mirror shaking bass.
I sacrificed the read heater for this. Living in Austin, Texas – our winters our mild and I won’t miss the rear heat. (Sorry, no pictures, I forgot to take one.) Pulling the rear heater was easy, I just cut the hoses and unbolted the unit. I then connected the two hard heater lines to each other with a couple of clamps and a piece of flexible heater hose. Then I made a plate to cover the hole in the floor, screwed it to the floor board, and sealed it up with silicone. – two more beers.
Why did I not place the amp in the rear area where the factory sub is? I have plans to use that for cargo area as well as my powerinverter.
Moving on to the front speakers. To be able to fit 6.5” speakers in the doors, I build one inch spacer rings out of birch wood, and used grey paint to match the speakers.
I then attached the speakers to the door panels using the metal ring that the speakers came with. Just a bit of door metal had to be trimmed so the speakers would fit. Once the door panel was attached, with the speaker in place – I added one screws thru all the way thru the speaker rings to the metal in the door.
The crossovers are very large for the Pro60’s so I stuffed one crossover in the space used for the factory speaker, and the other is under the middle console.
I then trimmed down the speaker grills and glued them on using silicone to the to the plastic trim rings. – three beers
I then mounted the tweeters in the front kick panels. I like the placement of the tweeters there because it gives a incredible front staging and great imaging. I have done this in the last four cars, and have yet to have anyone, or myself kick a tweeter with there foot.
As for the back speakers – same process, but no trimming of the speaker grill was needed. – half a beer.
Then it was time for the subwoofer. I placed the box in the back, and hooked up the wires. ☺ Iam just using the old box from my FJ62, when I tackle the rear of the truck to install my Norcold and power inverter, I ‘ll build a new sub box. That will be “Part II”.
Once everything was installed, I tuned they system with a Real Time Analyzer and SPL Meter. This was done at my friend’s car stereo shop. To tune a car using a RTA, you set up microphones in the car, then play a CD of white noise that the RTA use to analyze the system.What is a RTA?
Then use your equalizer to tune the system so it is flat, and also sounds to your ear.
My goal was not going for a loud system, but just a nice sounding accurate one. I listen to a very wide variety of music, and wanted a system that could perform for all types of music.
So there you have it! Hope someone find this information useful.


")
 Looks great Mark - got me thinking about that amp upgrade now ... can't wait to hear yours!
