Navigation
Install the app
How to install the app on iOS
Follow along with the video below to see how to install our site as a web app on your home screen.
Note: This feature may not be available in some browsers.
More options
Style variation
You are using an out of date browser. It may not display this or other websites correctly.
You should upgrade or use an alternative browser.
You should upgrade or use an alternative browser.
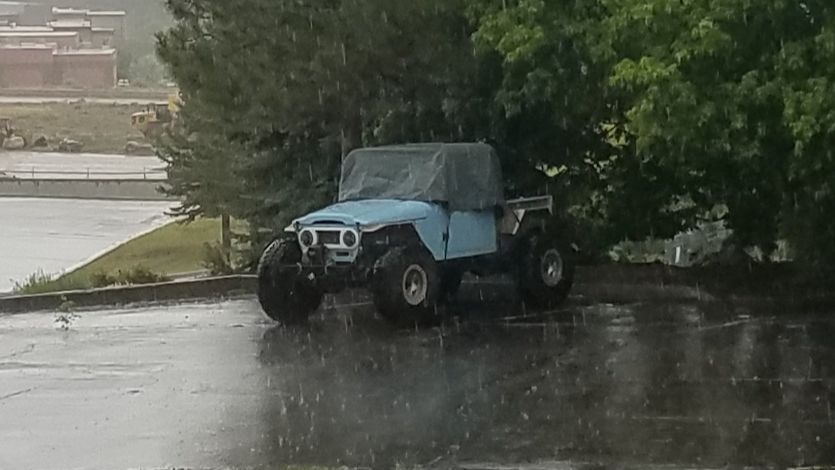
Builds Blender, My LX450/FZJ80 + FJ45esk + GM + Land Rover crazy concoction (1 Viewer)
- Thread starter Mieser
- Start date
This site may earn a commission from merchant affiliate
links, including eBay, Amazon, Skimlinks, and others.
More options
Who Replied?This was a great build thread. There's a good sprinkling of tips and tricks and the rig turned out really cool. Thanks for taking the time to put this on mud!
2fpower
SILVER Star
I've almost got 5000 miles on it now. All systems normal. I have been using it for my winter DD.
As soon as it warms up I will be tinkering on it again.
I am new to the LS conversions, currently planning to put a 4L80 in my current project but after looking at your Facebook post wondering if I should do a 6L 80. Lengths are very similar, which was my issue. Any thoughts for someone that doesn’t have tuner ability...
Awesome build and fantastic commentary in this thread. My question relates to the hydro assist set up. It seems like the ram would put an undesirable side load on the drag link since the two are not parallel to each other. How has this worked out? I’m considering hydro assist on my stock 80 series steering configuration.
2fpower
SILVER Star
Awesome build and fantastic commentary in this thread. My question relates to the hydro assist set up. It seems like the ram would put an undesirable side load on the drag link since the two are not parallel to each other. How has this worked out? I’m considering hydro assist on my stock 80 series steering configuration.
I will add my .02 as @Mieser is not on MUD oftern.
I added hydro assist, but installed it on the rear side of the axle, on the tie rod. However, to do that there is no room for the antiroll bar. I do feel like it is more protected as well where it is. Many have put on the front side, attaching to drag link, and I have not heard of failure of steering arms or other issues.
I would not recommend putting it on a mainly street rig. It feels like driving a tractor, no road feel or self centering.
Decent thread.....

Hydro assist ram
 forum.ih8mud.com
- Thread starter
- #746
A quick rundown of some updates I made to the #LX45 in the last few months.
I have had issues with the 80-series steering arms loosening up under hard use. I tried most of the normal things, but decided to try some of my own ideas to help fix the issues for good.
I started with another set of factory steering arms and knuckles so I wouldn't have to have the vehicle torn down for a long time. As a note, most of these factory studs/nuts where loose already.
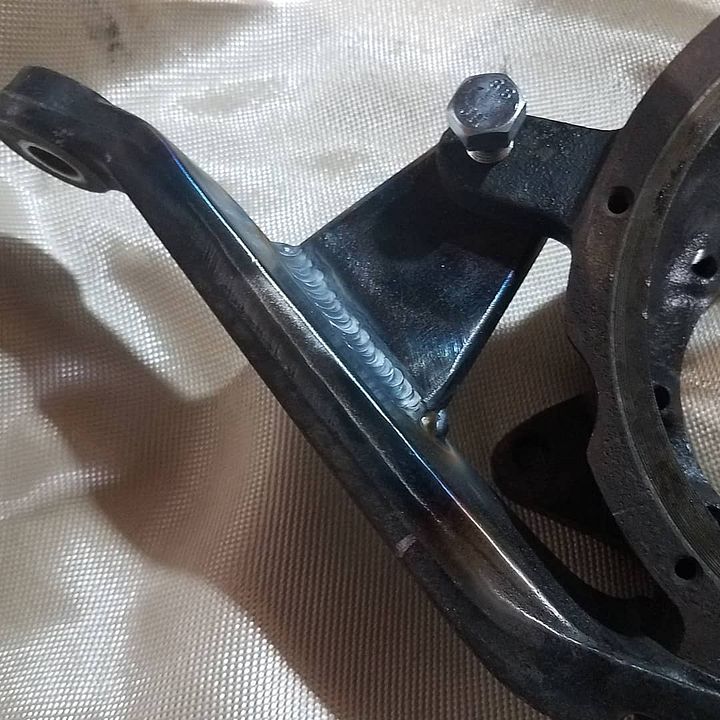
The factory design, from an engineering standpoint, really has never made much sense to me. It just isn't a great mechanism for transmitting high steering loads through a small bolt circle with the fasteners all in shear. I decided to add a large tab on each steering arm location that would brace the arm to the factory steering stop boss on the outer knuckle. This seemed to to be the best ( furthest out ) location on the knuckle with a decent amount of structure to it that would require minimum mods to the knuckle itself, and no effect on other systems. I also wanted to be able to take everything apart and use a factory replacement part if needed.
I was able to sneak a 1/2" thick tab in each location that was positioned so that the arm could still be removed. The angle of the kingpin bearing axis makes only configuration possible so the tab isn't trapped by the steering stop boss itself. The clearances between the caliper and tab is pretty tight. I ended up having to tap those tabs and drill out the threads in the steering stop boss in the tie rod location to sandwich everything together. The tabs where also sized to maintain access to the lower caliper bolt. Everything was TIG welded together and allowed to cool nice and slow wrapped in welding blankets and carpet. The stock steering arms actually welded quite well. I think these are forged steel parts.
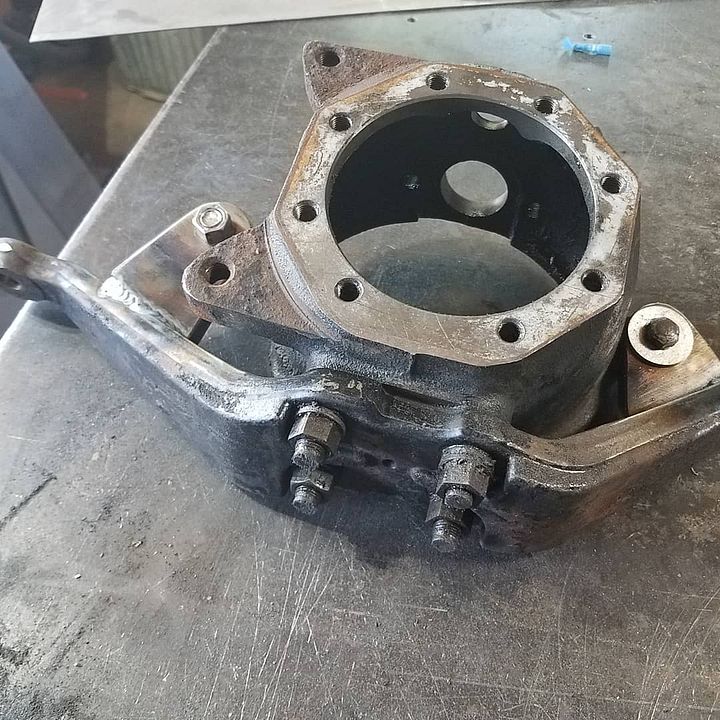
Since everything was already going to be apart, I also replaced all the steering arm studs with the new toyota steering arm studs. These where torque seated into the knuckle itself with red loctite. The knuckles where fully rebuilt when I had everything apart to keep leaks to a minimum.
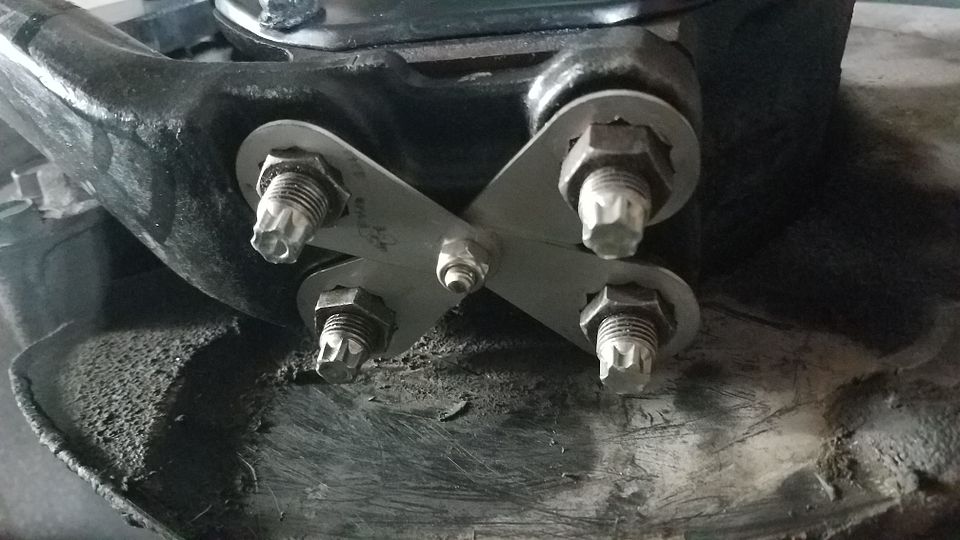
The final tweak on the knuckles was to make some lock-plates for the nuts to help keep them tight long term. While I think the steering arm tabs made the most difference, these plates can't hurt anything. They are stainless steel and key into a small threaded pin that was drilled and tapped into the center of the steering arm when I had everything apart. This pin is bottomed with blue loctite and uses a nylock nut to hold all 4 tabs in place.
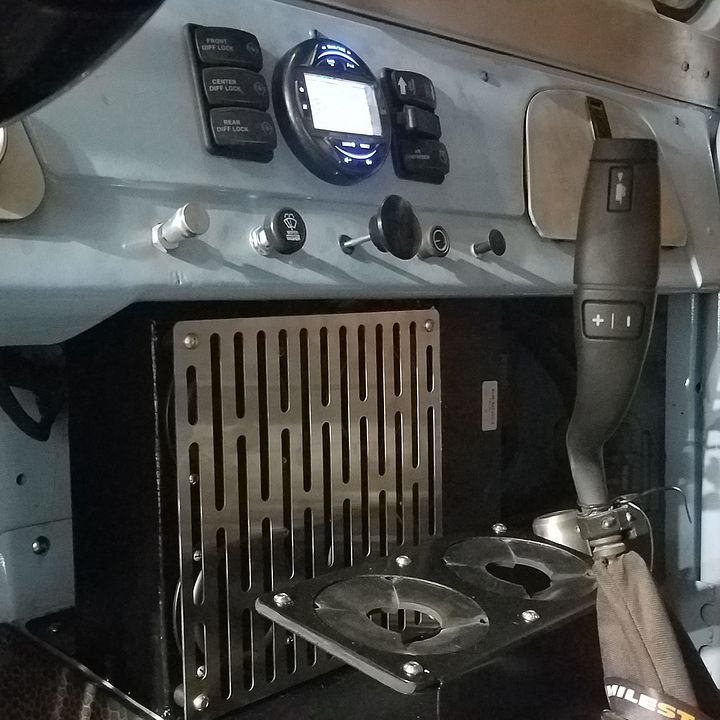
I also finally built a small (4) speaker box and cup holder combo that fits on top of the tunnel. This has sound deadening material on the inside and is poly filled with a laser cut stainless grill that is suppose to look reminiscent of some of the stock 40-series heater boxes. This little box sounds quite good with the Dual audio marine stereo and allows me to manage quite a few audio sources. I now have am/fm radio with weather bands, an mp3 player from a flash drive, bluetooth for my phone for nav, and was also able to feed the audio from the ham radio into the bigger speakers.
The cup holders also worked out really well, the only bummer is that the rubber sheet I used was just a LITTLE bit too thick to allow a 1L Naglene bottle as planned, but large insulated tumblers seem to work just fine. They actually work out better as drinking water stays cooler in them longer even without ice.
A cheap Jeep YJ cab cover fits well enough for when you want to leave the top panels at home while getting caught in a monsoon.
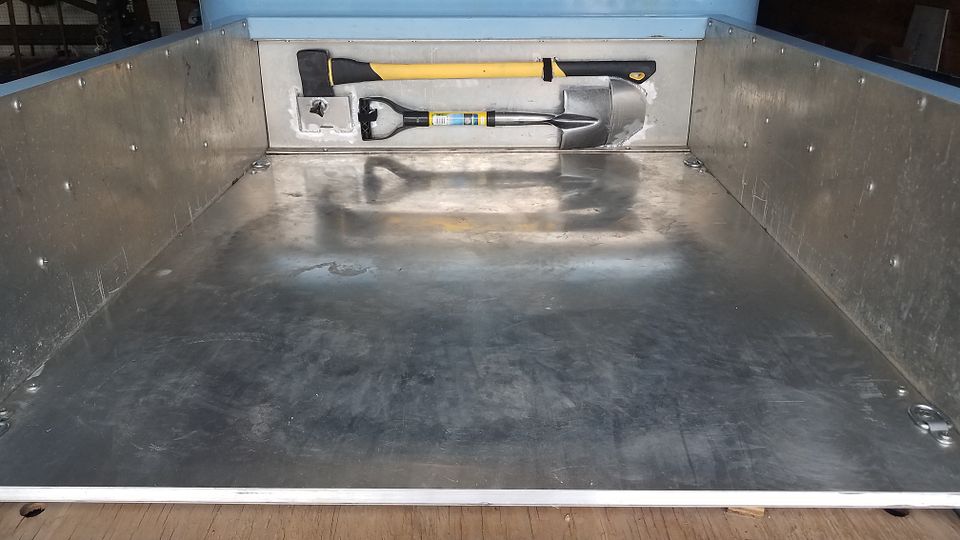
I also ended up adding a small pioneer tool rack, with a (small) shovel and axe, onto the front bed wall panel. The original 'temporary' plywood bed floor was also replaced with an aluminum unit. The aluminum version was built with thin sheets and 5/8 x 1.5 solid stringers/edges that was completely held together with 3M panel bond adhesive.
The list of small details never really ends, but I have been very impressed with this project over the last few years.
I have had issues with the 80-series steering arms loosening up under hard use. I tried most of the normal things, but decided to try some of my own ideas to help fix the issues for good.
I started with another set of factory steering arms and knuckles so I wouldn't have to have the vehicle torn down for a long time. As a note, most of these factory studs/nuts where loose already.
The factory design, from an engineering standpoint, really has never made much sense to me. It just isn't a great mechanism for transmitting high steering loads through a small bolt circle with the fasteners all in shear. I decided to add a large tab on each steering arm location that would brace the arm to the factory steering stop boss on the outer knuckle. This seemed to to be the best ( furthest out ) location on the knuckle with a decent amount of structure to it that would require minimum mods to the knuckle itself, and no effect on other systems. I also wanted to be able to take everything apart and use a factory replacement part if needed.
I was able to sneak a 1/2" thick tab in each location that was positioned so that the arm could still be removed. The angle of the kingpin bearing axis makes only configuration possible so the tab isn't trapped by the steering stop boss itself. The clearances between the caliper and tab is pretty tight. I ended up having to tap those tabs and drill out the threads in the steering stop boss in the tie rod location to sandwich everything together. The tabs where also sized to maintain access to the lower caliper bolt. Everything was TIG welded together and allowed to cool nice and slow wrapped in welding blankets and carpet. The stock steering arms actually welded quite well. I think these are forged steel parts.
Since everything was already going to be apart, I also replaced all the steering arm studs with the new toyota steering arm studs. These where torque seated into the knuckle itself with red loctite. The knuckles where fully rebuilt when I had everything apart to keep leaks to a minimum.
The final tweak on the knuckles was to make some lock-plates for the nuts to help keep them tight long term. While I think the steering arm tabs made the most difference, these plates can't hurt anything. They are stainless steel and key into a small threaded pin that was drilled and tapped into the center of the steering arm when I had everything apart. This pin is bottomed with blue loctite and uses a nylock nut to hold all 4 tabs in place.
I also finally built a small (4) speaker box and cup holder combo that fits on top of the tunnel. This has sound deadening material on the inside and is poly filled with a laser cut stainless grill that is suppose to look reminiscent of some of the stock 40-series heater boxes. This little box sounds quite good with the Dual audio marine stereo and allows me to manage quite a few audio sources. I now have am/fm radio with weather bands, an mp3 player from a flash drive, bluetooth for my phone for nav, and was also able to feed the audio from the ham radio into the bigger speakers.
The cup holders also worked out really well, the only bummer is that the rubber sheet I used was just a LITTLE bit too thick to allow a 1L Naglene bottle as planned, but large insulated tumblers seem to work just fine. They actually work out better as drinking water stays cooler in them longer even without ice.
A cheap Jeep YJ cab cover fits well enough for when you want to leave the top panels at home while getting caught in a monsoon.
I also ended up adding a small pioneer tool rack, with a (small) shovel and axe, onto the front bed wall panel. The original 'temporary' plywood bed floor was also replaced with an aluminum unit. The aluminum version was built with thin sheets and 5/8 x 1.5 solid stringers/edges that was completely held together with 3M panel bond adhesive.
The list of small details never really ends, but I have been very impressed with this project over the last few years.
- Thread starter
- #747
Awesome build and fantastic commentary in this thread. My question relates to the hydro assist set up. It seems like the ram would put an undesirable side load on the drag link since the two are not parallel to each other. How has this worked out? I’m considering hydro assist on my stock 80 series steering configuration.
overall the assist steering has worked out well. I haven't broken any joints or bent any steering arms. It might have loosened the arms up a bit more than normal, but that seems like a pretty common issue with the 80 series anyways. I did use a pretty mild assist ram to help ( and protect ) the factory steering box.
- Thread starter
- #748
I will add my .02 as @Mieser is not on MUD oftern.
I added hydro assist, but installed it on the rear side of the axle, on the tie rod. However, to do that there is no room for the antiroll bar. I do feel like it is more protected as well where it is. Many have put on the front side, attaching to drag link, and I have not heard of failure of steering arms or other issues.
I would not recommend putting it on a mainly street rig. It feels like driving a tractor, no road feel or self centering.
Decent thread.....
Hydro assist ram
Something sounds off if you're not getting any return to center or road feel, mine has both with the assist system. I might have a touch less than a stock steering system, but I am using a stock GM truck pump for flow. I think an increase in pump speed ( smaller pulley ) or maybe drilling out the flow orrifice in the output, would help tune it in a little bit at low engine speeds. I've driven mine a ton on road, no real issues.
- Thread starter
- #749
did you ever get the tune the way you wanted it, the bcm wired?? and who is doing your tuning, have a 5.3/6l80e working on the swap..
The tune is about as good as it gets for a single D/M position program.
I think to do it better, it needs to know it is in low range, have factory tap shift messages, and the tow/haul mode active. To do this, you need some kind of BCM module. I have given up on the factory BCM, but I did finally find someone making an aftermarket module and will be testing that soon.
Thanks for the updates! I was just read the Motortrend article this morning. I am still thinking of swapping my stretched40 project to a FJ80 frame and axles. I love how my 80 drives compared to my 40 on leaves.
I can not believe I have not seen the steering arm tabs before, great idea. I do not like how they have opposed forces on them with the steering in front and back.
Rob
I can not believe I have not seen the steering arm tabs before, great idea. I do not like how they have opposed forces on them with the steering in front and back.
Rob
I installed hydro assist last spring and man oh man what difference.overall the assist steering has worked out well. I haven't broken any joints or bent any steering arms. It might have loosened the arms up a bit more than normal, but that seems like a pretty common issue with the 80 series anyways. I did use a pretty mild assist ram to help ( and protect ) the factory steering box.
- Thread starter
- #752
I'm not much of a video guy, but I was able to pull most all of the pictures from the build and made a slideshow of the entire process.
Even at 1FPS is is over 30 minutes long! It is crazy to watch 3 years of work go by that fast.
Even at 1FPS is is over 30 minutes long! It is crazy to watch 3 years of work go by that fast.
How does articulation do in the rocks? Does it have enough travel?
- Thread starter
- #754
Plenty for me.How does articulation do in the rocks? Does it have enough travel?
I was able to package just over a 10" travel front and rear shock ( Fox 2.0 Resi bolt-in) in it with stock soft LX450 coils and about 5" of uptravel from ride height.
I removed the front swaybar but retained the rear unit. It will eat up all the shock travel it has....but also maintains some spring preload at full droop.
Most importantly, it feels stable and predicable for the driver without any quirky behavior. It is stable enough you can drive through the odd lifted tire. I
I don't really like huge amounts of sloppy wheel travel, especially droop that goes into zero or negative spring rate.
With the custom valving in the shocks by Accutune, and the more modern GM foam bumpstops. front and rear it is also a ton of fun in the bumpy stuff. It isn't a racecar or anything, but it will outpace most other vehicles on the trail without beating up the driver.
Cheers
Do you have any pics of it flexed out? I also don't like too much travel. I'm just curious what it looks like flex wise. It gives me a better idea than numbers. Does the front end unload much on steep climbs?Plenty for me.
I was able to package just over a 10" travel front and rear shock ( Fox 2.0 Resi bolt-in) in it with stock soft LX450 coils and about 5" of uptravel from ride height.
I removed the front swaybar but retained the rear unit. It will eat up all the shock travel it has....but also maintains some spring preload at full droop.
Most importantly, it feels stable and predicable for the driver without any quirky behavior. It is stable enough you can drive through the odd lifted tire. I
I don't really like huge amounts of sloppy wheel travel, especially droop that goes into zero or negative spring rate.
With the custom valving in the shocks by Accutune, and the more modern GM foam bumpstops. front and rear it is also a ton of fun in the bumpy stuff. It isn't a racecar or anything, but it will outpace most other vehicles on the trail without beating up the driver.
Cheers
- Thread starter
- #756
Time to take another pass through the project for the next few months in my spare time. These won't be major mods generally, but more details that I didn't get to do when it was first built....or stuff I have added to the wishlist over the last few years. Are they ever done?
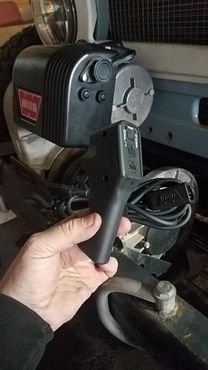
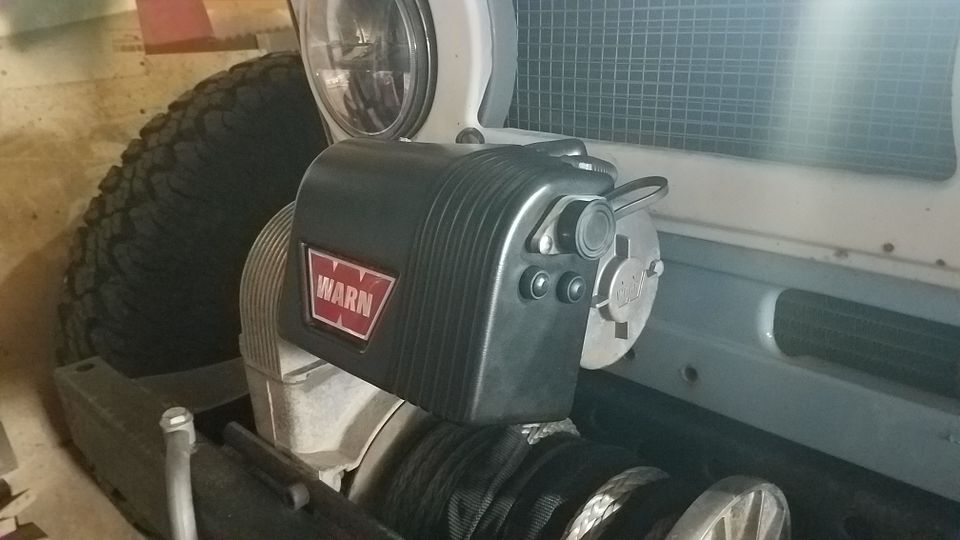
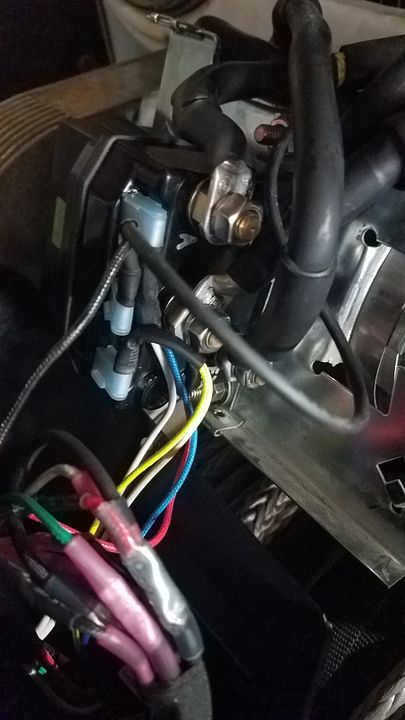
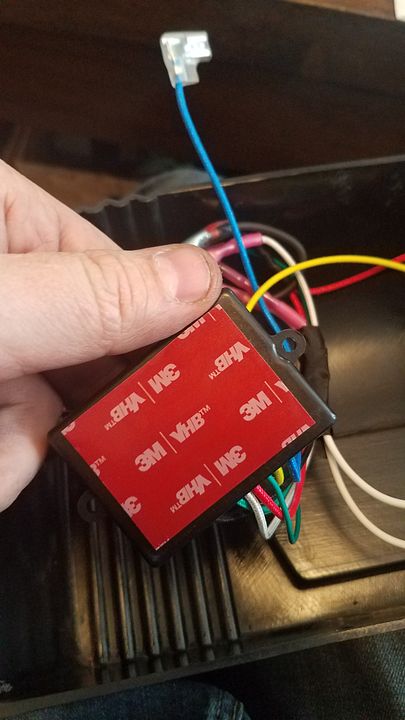
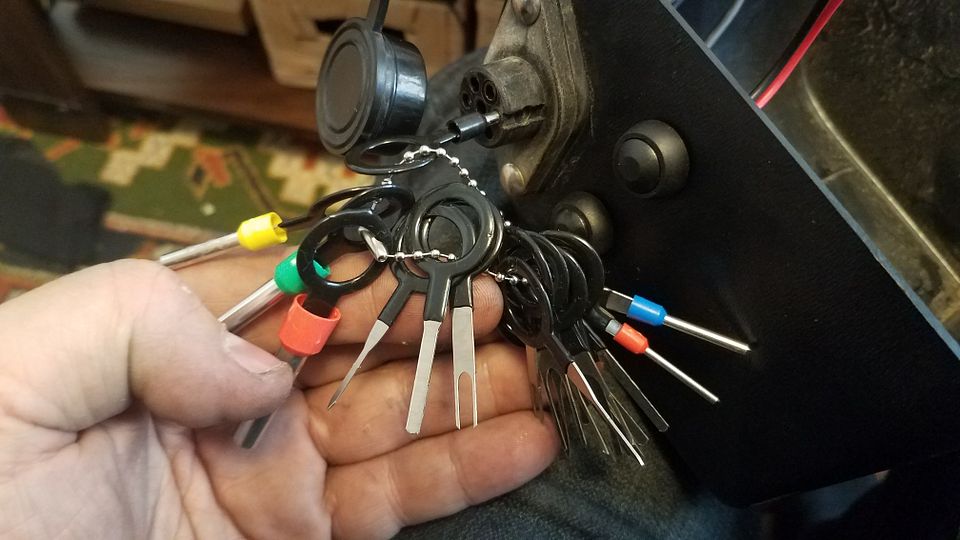
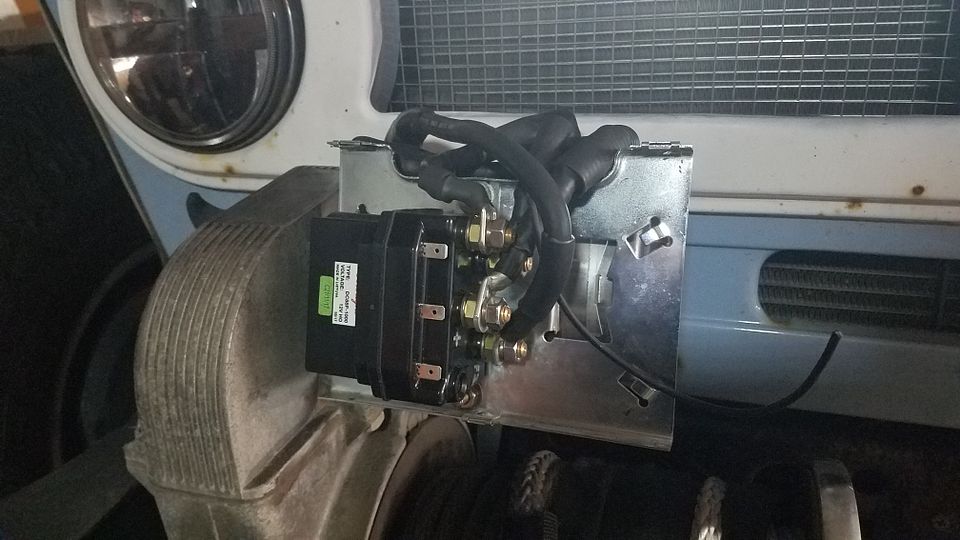
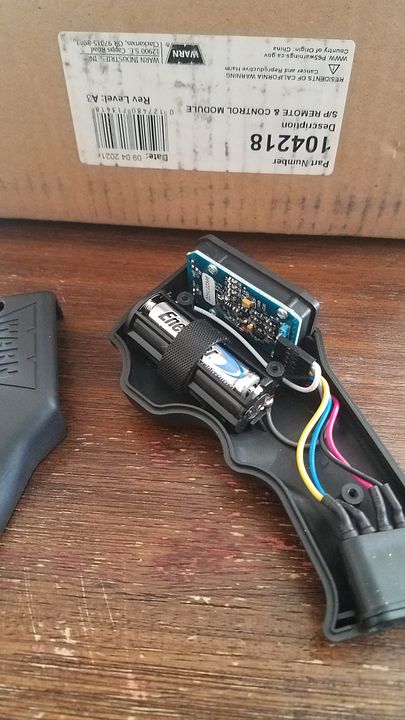
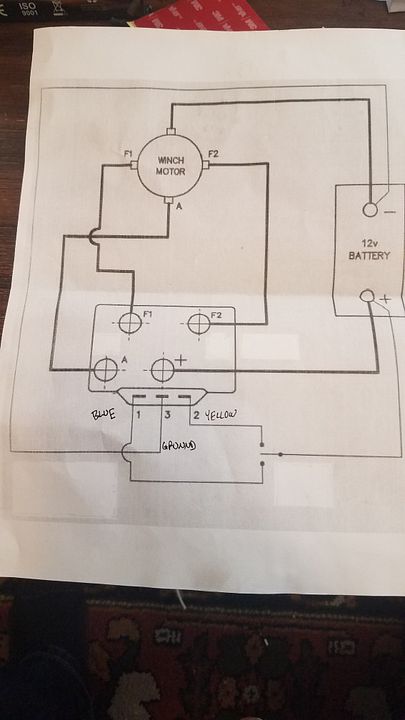
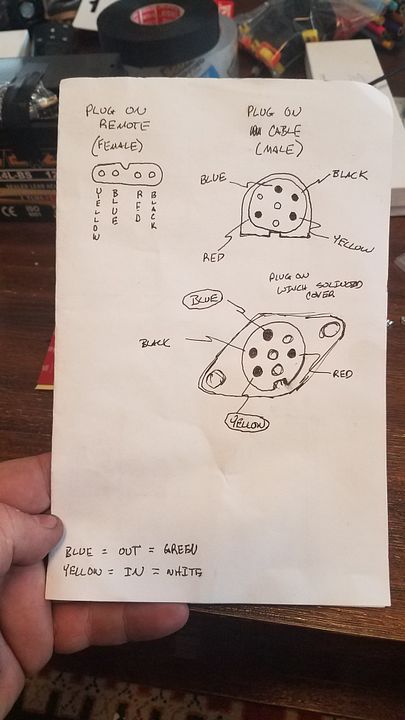
I decided I wanted a wireless winch controller to the Warn 8274 winch. I thought about the universal add-on unit, but I noticed that the new Warn Evo winches had a nice integrated wireless controller now. This is available from Warn for a very fair price, part number #104218. I believe this unit is designed to be used with the more modern sealed Albright Solenoid pack. I was able to pick up an Albright DC88P-1000 12v unit off Amazon which happens to fit just perfect in my stock housing AND has enough room for all the wireless stuff.
The Warn Evo controller is a slick little unit that has a fully redundant cable connection that plugs into the handheld unit and the winch. This means the winch still works if the batteries in the wireless controller are dead.
The newer version of this controller uses 3x AAA batteries vs a 3.7v lithium cell like the early versions. This means that the batteries can be easily replaced in a few minutes. I did take the extra few minutes to swap out the cheap stock batteries for some lithium units. This should make the controller last a long long time. I will throw another set in the glove box for spares. I also used a little strip of velcro tape around the battery holder to make sure they couldn't pop out if the remote was dropped.
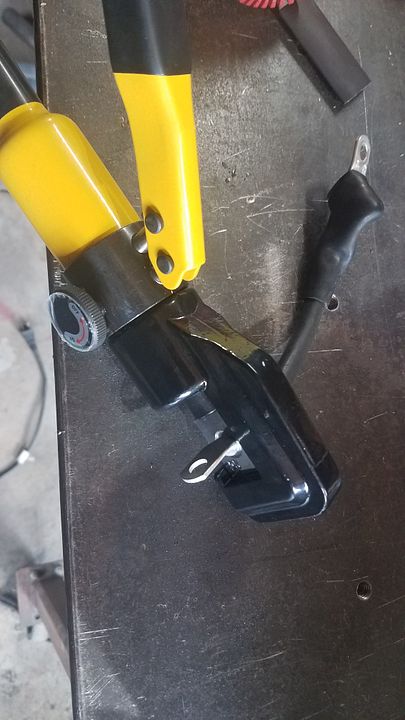
Another thing on the list was a pair of 'bump' buttons for the winch. I have had a few situations in the last couple years where I wanted access to the winch NOW to help quickly stabilize a vehicle. I found some small waterproof momentary switches that could be mounted right in the side of the factory cover. These are wired independently of the wireless winch controller and act as a completely separate and redundant way to activate the winch. I find these really handy for stuff like snugging up the hook or taking tension off the motor disconnect.
Overall this was a pretty easy mod once I dug into it. I had to crimp on two new ends on the factory feed cables, but they where long enough to start with. I didn't have to buy new battery cable. It took a bit to wrap my head around all the interface wiring. My factory remove was a 5 pin unit, and I only needed 4 pins. I was able to remove the extra pin easy enough with my wiring harness plug/pin set. There was enough room inside the stock cover for everything, but it did get a little tight towards the end. I did try and pin out everything and took some decent notes I will share below. It isn't THAT bad once you get into it, bu there are some color changes across the various plugs.
Pictures below. Please let me know if you have any questions.

I decided I wanted a wireless winch controller to the Warn 8274 winch. I thought about the universal add-on unit, but I noticed that the new Warn Evo winches had a nice integrated wireless controller now. This is available from Warn for a very fair price, part number #104218. I believe this unit is designed to be used with the more modern sealed Albright Solenoid pack. I was able to pick up an Albright DC88P-1000 12v unit off Amazon which happens to fit just perfect in my stock housing AND has enough room for all the wireless stuff.
The Warn Evo controller is a slick little unit that has a fully redundant cable connection that plugs into the handheld unit and the winch. This means the winch still works if the batteries in the wireless controller are dead.
The newer version of this controller uses 3x AAA batteries vs a 3.7v lithium cell like the early versions. This means that the batteries can be easily replaced in a few minutes. I did take the extra few minutes to swap out the cheap stock batteries for some lithium units. This should make the controller last a long long time. I will throw another set in the glove box for spares. I also used a little strip of velcro tape around the battery holder to make sure they couldn't pop out if the remote was dropped.
Another thing on the list was a pair of 'bump' buttons for the winch. I have had a few situations in the last couple years where I wanted access to the winch NOW to help quickly stabilize a vehicle. I found some small waterproof momentary switches that could be mounted right in the side of the factory cover. These are wired independently of the wireless winch controller and act as a completely separate and redundant way to activate the winch. I find these really handy for stuff like snugging up the hook or taking tension off the motor disconnect.
Overall this was a pretty easy mod once I dug into it. I had to crimp on two new ends on the factory feed cables, but they where long enough to start with. I didn't have to buy new battery cable. It took a bit to wrap my head around all the interface wiring. My factory remove was a 5 pin unit, and I only needed 4 pins. I was able to remove the extra pin easy enough with my wiring harness plug/pin set. There was enough room inside the stock cover for everything, but it did get a little tight towards the end. I did try and pin out everything and took some decent notes I will share below. It isn't THAT bad once you get into it, bu there are some color changes across the various plugs.
Pictures below. Please let me know if you have any questions.
- Thread starter
- #757
Do you have any pics of it flexed out? I also don't like too much travel. I'm just curious what it looks like flex wise. It gives me a better idea than numbers. Does the front end unload much on steep climbs?
I've never thought it needed more articulation.
I was a little worried that it might unload, I even built in a suck down winch for the front, but never finished it. With the suspension near stock height ( radius arm mount slightly below axle center ), it doesn't have any bad habits like unloading.
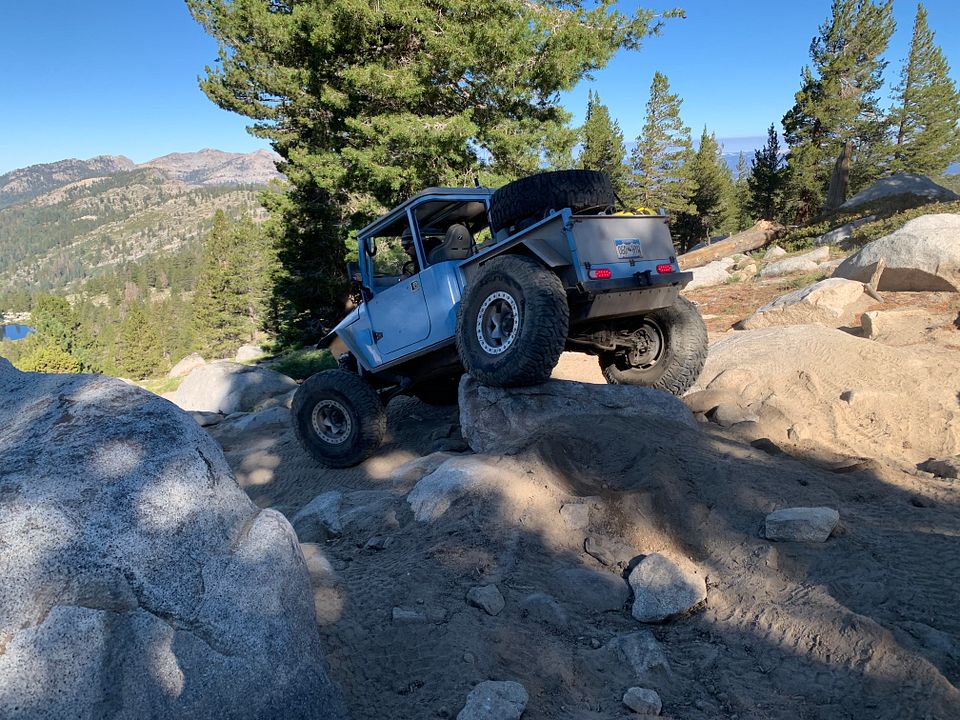
Here are some example vids on some well known steep climbs in Sand Hollow.
Wall of Doom
You Gotta Be Nuts
I've never thought it needed more articulation.
I was a little worried that it might unload, I even built in a suck down winch for the front, but never finished it. With the suspension near stock height ( radius arm mount slightly below axle center ), it doesn't have any bad habits like unloading.
Here are some example vids on some well known steep climbs in Sand Hollow.
Wall of Doom
You Gotta Be Nuts
That looks really good. Impressive climbs
Vossie
#thecrazycruiserman
Wow, what a build. Took me 3 days to read it all but when I started taking notes for things to keep in mind for my build I think its worth it!
Thanks for all your shop tips, lots in there that helps out a guy like me.
Thanks for all your shop tips, lots in there that helps out a guy like me.
Users who are viewing this thread
Total: 2 (members: 0, guests: 2)