Where did you find those M9X1 tube nuts?
Navigation
Install the app
How to install the app on iOS
Follow along with the video below to see how to install our site as a web app on your home screen.
Note: This feature may not be available in some browsers.
More options
Style variation
You are using an out of date browser. It may not display this or other websites correctly.
You should upgrade or use an alternative browser.
You should upgrade or use an alternative browser.
Barn Rebuild: The family heirloom
- Thread starter Heirloom
- Start date
This site may earn a commission from merchant affiliate
links, including eBay, Amazon, Skimlinks, and others.
More options
Who Replied?- Thread starter
- #102
Where did you find those M9X1 tube nuts?
They are supplied by Brake Quip. I went to a nearby hydraulic specialty shop called Pirtek (a distributor for brake quip) to place a special order. Good service. I'll go back to them when I figure out the soft lines I need to have made.
Last edited:
- Thread starter
- #103
Project "spring brakes" update:
Wheel cylinders are being refinished and rebuilt. I mounted the front right cylinders, and wanted to check with MUD to make sure I have things oriented correctly. Cylinders marked "R" are on the right side, and bleeders are outward. Pics to verify; one new aftermarket and one rebuilt with Aisin rubber.


Wheel cylinders are being refinished and rebuilt. I mounted the front right cylinders, and wanted to check with MUD to make sure I have things oriented correctly. Cylinders marked "R" are on the right side, and bleeders are outward. Pics to verify; one new aftermarket and one rebuilt with Aisin rubber.
- Thread starter
- #104
More assembly pics for right side. I guess I need to get the drums machined!
I used to work as a tech for a mom and pop repair place. The "mom" is one of the best bosses I have had in my life. I also learned my wrenching skills largely from "pop". Maybe I should go visit them and get the drums turned on their old manual lathe.
Question: I don't remember shoe retainer pins being on the front. The new spring kit has pins. Do I worry about them?
- Thread starter
- #105
Drums are too warped and/or pitted for resurfacing. I priced them at $38 each for new drums at Rock Auto. Shipping was high, though. Before I order anything, who has a lead on cheap drums? I will install the old ones as place holders for now... It isn't like I'm driving anywhere soon.
considering they will last for decades Id go Toyota. 2 cents. Mike
- Thread starter
- #107
considering they will last for decades Id go Toyota. 2 cents. Mike
I didn't think to check if Toyota still sold them. I may check that out. Do you have a part number?
Chamba
Too short. Too long. Just right: the 43
If not, PBR makes decent after market ones. I put a set on my bj40 and there was no pulsing our pull.
FishTacos
Full Globetard
Drums are too warped and/or pitted for resurfacing. I priced them at $38 each for new drums at Rock Auto. Shipping was high, though. Before I order anything, who has a lead on cheap drums? I will install the old ones as place holders for now... It isn't like I'm driving anywhere soon.
Try posting in wanted section of classified. Search there too. So many people have swapped out to discs that a good pair (or four) should be sitting on a shelf in someone's garage somewhere.
- Thread starter
- #110
This week I am still tinkering with brakes. Fronts are assembled. Rear cylinders are cleaned and painted, I'm going to reassemble them next time I get out to the barn.
I also started cleaning and painting the little brackets and hard line junctions. I'm going slow, so I remember where everything goes when it is time to start bending lines.


I also started cleaning and painting the little brackets and hard line junctions. I'm going slow, so I remember where everything goes when it is time to start bending lines.
- Thread starter
- #111
Speaking of remembering where stuff goes, I took the hard lines off assembled and hung them on the wall. That made life easier when I was trying to figure out where these parts go. I took pictures, too. Any experts out there that can catch anything before I bend the lines wrong?
Foresight tells me that if I bend the section flying over the passenger shock tower wrong, mounting fenders is going to be challenging. Any tips?


Foresight tells me that if I bend the section flying over the passenger shock tower wrong, mounting fenders is going to be challenging. Any tips?
Great work on the truck!! I hate it when family drama keeps someone from taking care of something. The whole "If I can't have it, no one can" mentality just blows my mind
- Thread starter
- #113
Project spring brakes continues:
It has been a few weeks since I have given any real time to the Toyota. I rented the double flare tool from O'ReilleyZone (looks lightly used, a good sign) and watched a YouTube tutorial. Here's what I did:
Insert the line and use a file to de-burr and square up the end.

Bevel the outer rim of the line with a file just a bit. Bevel the inside edge with a 5/16 drill bit (only slightly). No pics.
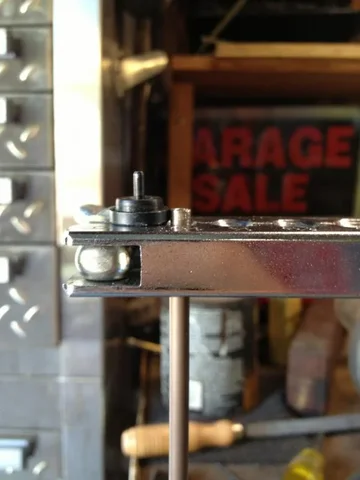
Insert the line with the beveled side of the clamp facing up at a depth equal to the height of the shoulder on the double-flare bit.

Insert the bit and make the first press. Should have a bubble shape to it.


It has been a few weeks since I have given any real time to the Toyota. I rented the double flare tool from O'ReilleyZone (looks lightly used, a good sign) and watched a YouTube tutorial. Here's what I did:
Insert the line and use a file to de-burr and square up the end.

Bevel the outer rim of the line with a file just a bit. Bevel the inside edge with a 5/16 drill bit (only slightly). No pics.
Insert the line with the beveled side of the clamp facing up at a depth equal to the height of the shoulder on the double-flare bit.

Insert the bit and make the first press. Should have a bubble shape to it.

Last edited:
- Thread starter
- #114
Here's the bubble I made on my first attempt. It looked ok to me. The tutorial I watched said to run the first flare (with the bit) down until the bit was flush on the clamp.

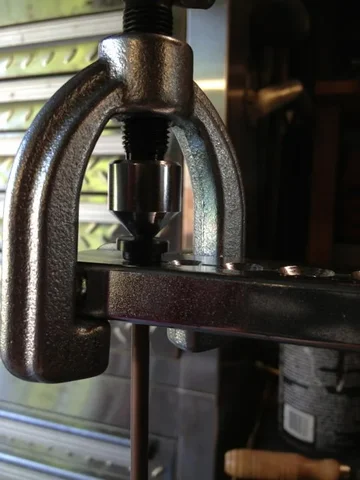
The second flare requires you to take the bit out. Use the cone and a drop of oil. The pressing motion should get the bubble to invert a little bit as the final flare takes shape. The tutorial I watched said that over tightening on this step would cause my line to crack, so I turned the bolt until I felt a natural jump in effort to continue.

Here's what my flares look like:


The second flare requires you to take the bit out. Use the cone and a drop of oil. The pressing motion should get the bubble to invert a little bit as the final flare takes shape. The tutorial I watched said that over tightening on this step would cause my line to crack, so I turned the bolt until I felt a natural jump in effort to continue.

Here's what my flares look like:

- Thread starter
- #115
After the first flare seemed good to me (I hope it turns out to seal well), I started making the little jumpers for the front wheels. I had to to something while the spray paint dried on the rear slave cylinders.
What do you guys think?


What do you guys think?
PixelWrangler
SILVER Star
After the first flare seemed good to me (I hope it turns out to seal well), I started making the little jumpers for the front wheels. I had to to something while the spray paint dried on the rear slave cylinders.
What do you guys think?
Looks F'n perfect to me!

Lookin good
Project "spring brakes" update:
Wheel cylinders are being refinished and rebuilt. I mounted the front right cylinders, and wanted to check with MUD to make sure I have things oriented correctly. Cylinders marked "R" are on the right side, and bleeders are outward. Pics to verify; one new aftermarket and one rebuilt with Aisin rubber.
Its hard for me to tell from the pic and a VERY long time since I've worked on toyota drums (all mine are 4wheel disc) but in the second picture it looks like the adjuster is on the wrong end. It should be at the end with the hole so you can adjust the brake contact.

Last edited:
- Thread starter
- #119
Backing plates have two holes, because that particular part is "ambidextrous"
Take a look at the Matco tube flaring kit or Eastwood's unit , both are excellent and provide perfect flares every time with no guesswork . I've used the Matco for 15yrs now and no other kit including Blue Point comes close due to Matco's indexing design on the u-press frame .
Sarge
Sarge
Similar threads
Users who are viewing this thread
Total: 1 (members: 0, guests: 1)
